Making s’mores bars means dealing with sticky marshmallow and melting chocolate that may drip everywhere if you’re not careful. Expect to get your fingers gooey and the counter a little smudged, especially during the marshmallow layer spread.
The process involves crushing graham crackers into fine crumbs, melting butter into a buttery, fragrant mixture, and watching the marshmallow puff up and brown under the broiler. It’s messy but satisfying—the kind of baking that leaves a trail of crumbs and melted chocolate.
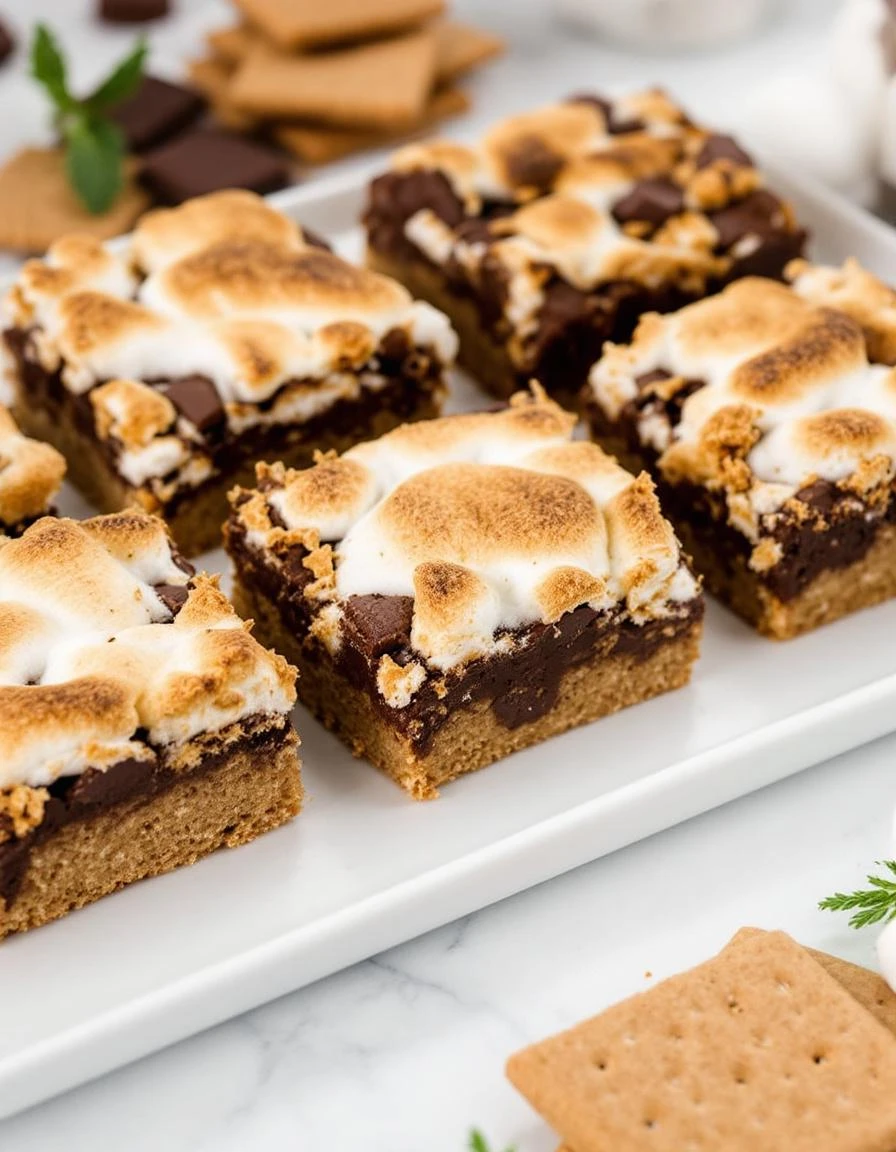
The satisfying crunch of the graham cracker crust giving way to gooey, melty chocolate and toasted marshmallow, with each bite offering a mix of crispy edges and soft, sticky centers.
What goes into this dish
- Graham crackers: I crush them into fine crumbs, which form a sturdy, buttery crust that’s crunchy yet melts in your mouth; if you prefer gluten-free, try digestive biscuits—they work similarly but with a different aroma.
- Butter: I melt it into the graham crumbs until it’s fragrant and binds everything together; you can swap with coconut oil for a dairy-free version that adds a subtle tropical note.
- Chocolate chips: I use semi-sweet, but dark or milk chocolate works too; if you only have chocolate bars, chop them into chunks—melts smoothly and coats the marshmallow layer nicely.
- Marshmallows: I prefer large, fluffy marshmallows for that gooey, melty top; mini marshmallows are quicker to melt but give a less dramatic puff—toast them lightly for a deeper caramel flavor.
- Vanilla extract: Just a splash in the chocolate layer brightens everything up; skip if you want a more traditional, plain s’mores flavor, but it’s worth the aroma boost.
- Optional toppings: Crushed graham, chocolate drizzle, or even a sprinkle of sea salt can elevate these bars; I like a pinch of sea salt for that sweet-salty contrast that makes each bite pop.
S'mores Bars
Ingredients
Equipment
Method
- Crush the graham crackers into fine crumbs using a food processor or by sealing them in a zip-top bag and rolling with a rolling pin. Pour the crumbs into a mixing bowl, then add the melted butter and stir until the mixture resembles damp sand.
- Press the graham cracker mixture evenly into the bottom of a greased 9x13 inch baking pan, creating a firm crust. Use the back of a spatula or your fingers to press it down firmly, then refrigerate for 10 minutes to set.
- Place the chocolate chips in a small saucepan over low heat or melt them in short bursts in the microwave, stirring until smooth. Mix in the vanilla extract to enhance the flavor, then pour the melted chocolate evenly over the chilled crust.
- Spread the chocolate layer carefully with a spatula to smooth out the surface. Allow it to cool slightly so it thickens and sets a bit while you prepare the marshmallows.
- Arrange the marshmallows evenly over the chocolate layer, covering the surface completely. Use your fingers or a spoon to distribute them so they are packed closely together.
- Preheat your broiler or oven with the broil setting. Place the pan on the top rack and toast the marshmallows for 1-2 minutes, watching carefully so they don’t burn. You want them to turn golden brown and puff up beautifully.
- Once the marshmallows are toasted to your liking, remove the pan from the oven and let it cool for a few minutes. The marshmallow topping will be sticky and glossy, with a toasted aroma filling the kitchen.
- Cut the bars into squares using a sharp knife, warming the blade with hot water and wiping dry between cuts for cleaner slices. Serve immediately for the best gooey texture or let set for a few minutes for firmer bars.
Common mistakes and how to fix them
- FORGOT to butter the pan: Greasing helps prevent sticking but can be easily overlooked.
- DUMPED the marshmallows directly on heat: Toast marshmallows carefully to avoid burning and bitterness.
- OVER-TORCHED the graham crust: Keep an eye on the edges to prevent burning and a bitter taste.
- MISSED the chill time: Let the bars set properly to avoid gooey mess when slicing.
Make-Ahead and Storage Tips
- You can prepare the crust and layer of marshmallows a day ahead; just cover tightly and store at room temperature.
- Bars can be refrigerated for up to 3 days, but the marshmallow might firm up slightly, losing some of that gooey texture.
- Freeze the assembled bars for up to a month; wrap well to prevent freezer burn and preserve the marshmallow’s fluff.
- Reheat in a low oven (around 300°F) for 10-15 minutes or until warmed through, checking for melty, sticky goodness.
- Flavors deepen overnight, making the chocolate richer and the marshmallow a tad more caramelized—best enjoyed after a rest.
- For best texture, reheat until marshmallow is soft and starts to puff slightly—touch it gently to judge softness.
FAQs
1. How do I cut neat bars?
Use a sharp knife and a gentle sawing motion. The bars are sticky, so work slowly to avoid squishing them. Feel the crust give way under the blade for clean slices.
2. How can I prevent sticking when cutting?
Warm the knife with hot water and wipe it dry before slicing. The heat melts through the marshmallow, making cuts smoother and less sticky.
3. How do I reheat without ruining texture?
Reheat in a low oven or microwave until the marshmallow puffs and melts slightly. The smell of toasted marshmallow will fill your kitchen, and you’ll see a glossy sheen return.
4. How long do S’mores Bars stay fresh?
Store in an airtight container at room temperature for up to 2 days. The marshmallow may lose some fluff but stay sticky and gooey, with a slightly softer texture.
5. Can I freeze these bars?
Yes, freezing is fine. Wrap bars tightly in plastic, then foil, and freeze for up to a month. Thaw at room temp, waiting for the marshmallow to soften again and regain its stretch.

Hi, I’m Lucas Foster, the cook, writer, and everyday food enthusiast behind Totally in the Zone. This space is where my love for cooking meets my belief that food should fit into real life. Not rushed. Not overcomplicated. Just thoughtful, satisfying, and made with intention.