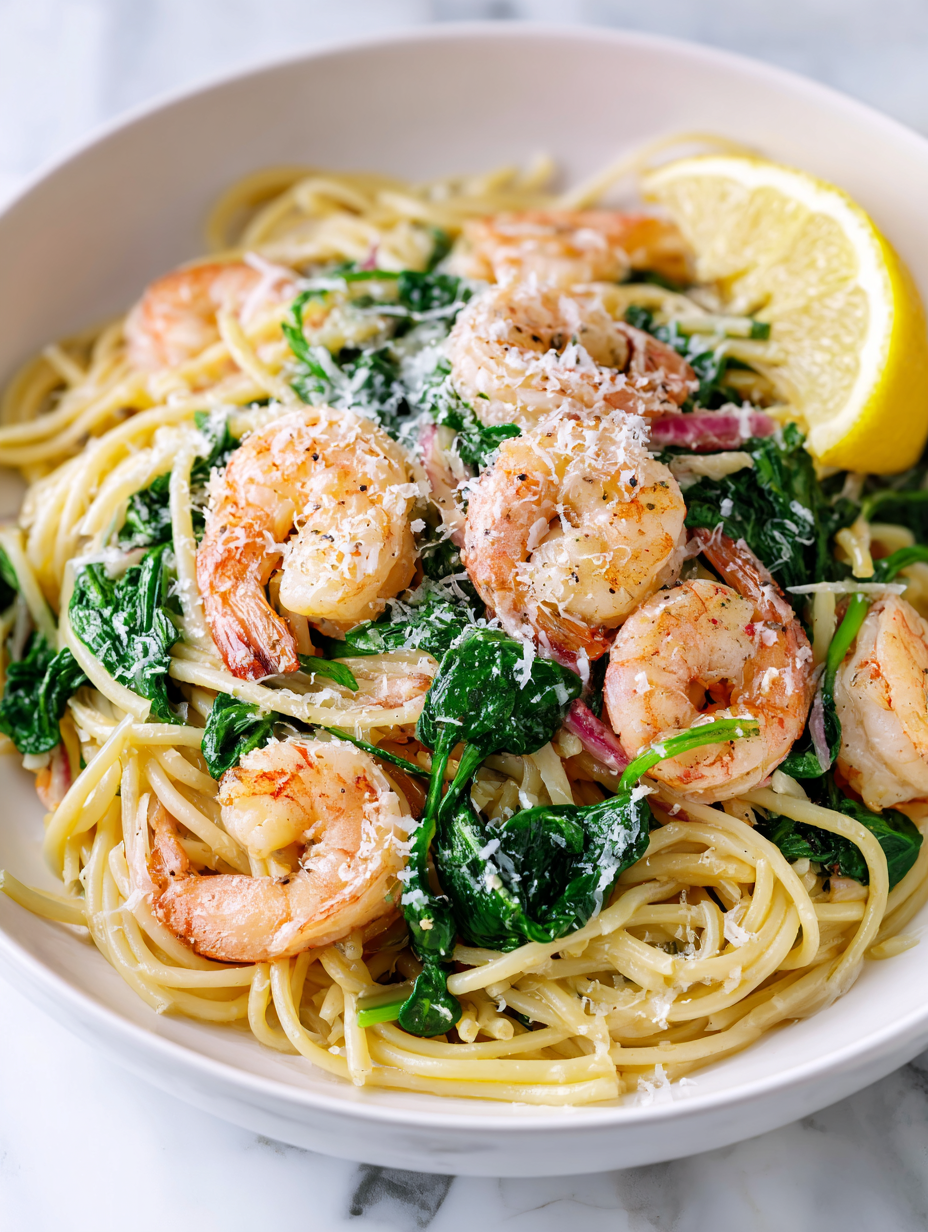
Author: LucasFoster

  • Wake Up to the Cozy Charm of Pumpkin Spice Overnight Oats

    Wake Up to the Cozy Charm of Pumpkin Spice Overnight Oats

    As the air turns crisper and pumpkin spice begins to scent the mornings, I find myself craving a breakfast that’s both comforting and prepared with minimal fuss. Enter Pumpkin Spice Overnight Oats—an unpretentious jar of goodness that transforms the mundane into something festive and satisfying. It’s like a warm hug in a bowl, ready to energize your day before the sun even rises.

    What sets this recipe apart is the unexpected depth of flavor you get from soaking oats in aromatic pumpkin puree, cinnamon, and a splash of maple syrup. The texture is velvety yet hearty, perfect for those mornings when time is tight but flavor is non-negotiable. Plus, it’s a smart way to indulge in seasonal spices without turning on the stove.

    Pumpkin Spice Overnight Oats

    Pumpkin Spice Overnight Oats is a no-cook breakfast dish where rolled oats are soaked overnight in a mixture of pumpkin puree, cinnamon, and sweetener, resulting in a creamy and hearty texture. The final product features a velvety consistency with flecks of spices and pumpkin, ready to enjoy straight from the fridge.
    Prep Time 5 minutes
    Total Time 5 minutes
    Servings: 2
    Course: Main Course
    Cuisine: American
    Calories: 250

    Ingredients
      

    • 1 cup rolled oats
    • 1/2 cup pumpkin puree canned or fresh
    • 1 cup milk of choice dairy or plant-based
    • 2 tablespoons maple syrup or honey
    • 1 teaspoon cinnamon ground
    • 1/4 teaspoon nutmeg optional

    Equipment

    • Measuring cups and spoons
    • Large mixing bowl
    • Jar or airtight container

    Method
     

    1. Measure out the rolled oats and transfer them into a large mixing bowl.
    2. Add pumpkin puree, milk, maple syrup, ground cinnamon, and nutmeg to the oats.
    3. Whisk everything together until you achieve a smooth, uniform mixture with the oats fully coated and spices evenly distributed.
    4. Spoon the mixture into a jar or airtight container, spreading it out evenly.
    5. Seal the container tightly and place in the refrigerator overnight or for at least 4 hours to let the oats soak up the flavors and become tender.
    6. The next morning, give the oats a gentle stir or fold to combine any separated liquids.
    7. Optional: top with fresh fruit, nuts, or a drizzle of additional maple syrup for added flavor and texture.
    8. Enjoy the creamy, spiced pumpkin oats straight from the jar for a wholesome, satisfying breakfast.

    Notes

    For added texture, include chopped pecans or a dollop of yogurt. Use dairy-free milk for vegan options.
    This recipe is a tribute to the cozy, sleepy mornings of fall, brought into the busy rhythm of everyday life. It makes me nostalgic for pumpkin patches and autumn walks, all while keeping things effortlessly delicious. As the seasons shift, this dish reminds me that simplicity can be a profound act of self-care.

  • Spooky, Cheesy Eyeball Pasta That Will Haunt Your Dinner

    Spooky, Cheesy Eyeball Pasta That Will Haunt Your Dinner

    Imagine a dish that transforms your kitchen into a Halloween haunted house with just a few simple ingredients. These creepy eyeball pasta and meatball ‘eyeballs’ are part art, part comfort food, and all fun. The sight of meaty orbs peeking out of a vibrant, spooky sauce makes every bite a delightful surprise.

    This recipe isn’t just about the scare factor; it’s about nostalgia and chaos in the best way. It’s perfect for a childhood throwback or a quick, playful meal to impress a crowd of little monsters. Plus, the messy, gooey textures and vivid colors are exactly what makes Halloween cooking so spirited.

    Halloween Eyeball Pasta and Meatball ‘Eyeballs’

    This dish features cooked pasta coated in a vibrant, spooky sauce, topped with meatballs that resemble creepy eyeballs. The meatballs are cooked until tender, then assembled with an eerie red sauce to create a playful, visually striking Halloween-themed meal. The final presentation combines gooey textures with vivid colors for a fun and spooky effect.
    Prep Time 20 minutes
    Cook Time 30 minutes
    Total Time 50 minutes
    Servings: 4
    Course: Main Course
    Cuisine: Halloween
    Calories: 520

    Ingredients
      

    • 12 oz spaghetti pasta uncooked
    • 1 1/2 cups meatball mixture prepared from ground meat, breadcrumbs, egg, seasonings
    • 2 cups tomato sauce preferably vibrant red or with red food coloring
    • 1 cup water
    • 1 tbsp olive oil
    • 1 tsp garlic powder
    • to taste salt and pepper
    • 12 small meatballs formed from mixture
    • 1 cup mozzarella cheese shredded, for eyeballs
    • 2 tbsp red food coloring optional for extra spooky color

    Equipment

    • Large pot
    • Skillet or frying pan
    • Mixing bowl
    • Baking sheet
    • Cooking spoon
    • Kitchen knife

    Method
     

    1. Cook the spaghetti in a large pot of boiling salted water until al dente according to package instructions. Drain and set aside.
      12 oz spaghetti pasta
    2. Heat olive oil in a skillet over medium heat. Add garlic powder, salt, and pepper, then pour in the tomato sauce and water. Stir until combined and simmer until slightly thickened, about 10 minutes.
      12 oz spaghetti pasta
    3. While the sauce simmers, form small meatballs from the prepared mixture, about the size of a walnut. Place them on a baking sheet lined with parchment.
      12 oz spaghetti pasta
    4. Bake the meatballs in a preheated oven at 400°F (200°C) until cooked through and browned, about 15 minutes. Remove from oven and let cool slightly.
      12 oz spaghetti pasta
    5. Slice each meatball in half horizontally to create a cross-section that resembles an eyeball. Place each half into a small mound of mozzarella cheese on a serving plate, pressing gently to adhere.
      12 oz spaghetti pasta
    6. Add a small dab of tomato sauce to the center of each mozzarella
      12 oz spaghetti pasta
    7. Serve the spooky eyeball pasta with the meatball eyeballs arranged on top, drizzled with extra sauce if desired. Enjoy while warm for a gooey, fun Halloween meal.

    Notes

    For added creepiness, add a few drops of red food coloring to the sauce or use black olives for extra eerie accents.
    As you plate up these eyeball pasta monsters, take a moment to enjoy the chaos of the kitchen. This dish is all about fun and creativity, a break from the usual routine. It’s a reminder that sometimes, the best recipes are the ones that make everyone smile and giggle.

    Whether you’re celebrating with kids or just craving some seasonal whimsy, these eyeballs will be a hit. They pair perfectly with a bubbling cauldron of green or blood-red sauce, adding that extra touch of Halloween magic to your table.

  • Blood Moon Bliss: Haunted Halloween Vampire Punch

    Blood Moon Bliss: Haunted Halloween Vampire Punch

    Every October, I find myself craving a spooky drink that’s both fun to make and even more exciting to sip. This Vampire Punch is not your average Halloween beverage; it’s a dark, luscious red that practically screams chaos and celebration. The best part? It’s surprisingly simple, yet looks like a potion straight out of a vampire’s lair.

    As someone who loves the thrill of Halloween decorations and creepy costumes, I also adore the little details—like a bubbling punch that smells faintly of cherries and pomegranate. Pouring this crimson concoction feels like unleashing a sweet, cursed magic onto your party table. It’s perfect for making your haunted gathering unforgettable, with just a splash of spooky sophistication.

    Vampire Punch

    Vampire Punch is a vibrant, deep-red beverage made from cherry and pomegranate juices combined with soda and a splash of spirits. It has a smooth, slightly effervescent texture with a striking, dark crimson appearance, perfect for spooky gatherings. The drink is served chilled, often garnished with fruit for an evocative presentation.
    Prep Time 10 minutes
    Cook Time 5 minutes
    Total Time 15 minutes
    Servings: 8
    Course: Main Course
    Cuisine: Halloween/Party Drink
    Calories: 150

    Ingredients
      

    • 2 cups cherry juice preferably unsweetened or lightly sweetened
    • 2 cups pomegranate juice fresh or bottled
    • 1 cup soda water for fizz
    • 1/2 cup vodka or light rum optional for an alcoholic version
    • 1 tablespoon simple syrup adjust to taste
    • ice ice cubes to chill the punch
    • fruit slices for garnish such as cherries, lemon or lime slices, or pomegranate seeds

    Equipment

    • Large pitcher or bowl
    • Mixing spoon
    • Measuring cups and spoons
    • Serving glasses

    Method
     

    1. Pour the cherry juice and pomegranate juice into a large pitcher, creating a dark, rich red base.
    2. Add the simple syrup and stir gently with a mixing spoon until well combined, ensuring the color deepens slightly.
    3. Pour in the vodka or light rum if using, and give the punch a gentle stir to incorporate the spirits evenly.
    4. Fill the pitcher with plenty of ice cubes to chill the mixture and add a frosty shimmer to the drink.
    5. Just before serving, slowly pour the soda water into the pitcher to add fizzy bubbles that will rise and shimmer through the deep crimson liquid.
    6. Garnish the punch with slices of lemon, lime, cherries, or scatter pomegranate seeds on top for a spooky, vibrant presentation.

    Notes

    Serve immediately with additional garnishes if desired. Adjust sweetness with more simple syrup or add extra spirits for a stronger punch.

    This Vampire Punch isn’t just a drink; it’s a centerpiece that sparks conversation and sealed memories. Its vivid color and rich flavor send a delicious shiver down your spine, fitting perfectly with the season’s mood. With just a few ingredients and a dash of chaos, you have a potion that transforms any Halloween into a true night of fright and delight.

    Whether you’re hosting a spooky soirée or just craving a themed treat for yourself, this punch is your new go-to. Keep a pitcher ready—because once you taste its haunting sweetness, you’ll want to sip on it all October long. Cheers to a hauntingly good holiday, filled with ghouls, goblins, and a splash of red magic.

  • Enchanting Black Magic Margarita for Halloween

    Enchanting Black Magic Margarita for Halloween

    The Black Magic Margarita isn’t just a cocktail; it’s a portal to a mysterious, spellbinding realm of flavor. As Halloween approaches, this eerie black drink becomes the spotlight, captivating guests with its dark allure and silky texture. The first sip whispers tales of enchanted nights and ghostly gatherings, making every moment feel a little more mystical.

    This recipe dares to challenge the mundane, using a simple yet striking ingredient to turn a classic into something spellbinding. Its deep, coal-black hue is perfect for setting a spooky mood and sparking conversation. Plus, the subtle citrus notes balance the dark mystique with a refreshing zing, creating a drink that’s as exciting to look at as it is to sip.

    Black Magic Margarita

    The Black Magic Margarita is a vibrant cocktail made with tequila, orange liqueur, citrus juice, and activated charcoal to achieve its striking black color. The ingredients are shaken with ice until chilled and smooth, resulting in a glossy, dark drink with a refreshing citrus flavor. Its silky texture and deep hue make it ideal for spooky celebrations or elegant gatherings.
    Prep Time 5 minutes
    Total Time 5 minutes
    Servings: 2
    Course: Main Course
    Cuisine: cocktail
    Calories: 180

    Ingredients
      

    • 2 oz tequila preferably blanco or silver
    • 1 oz orange liqueur such as Cointreau or triple sec
    • 1 oz fresh lime juice about one lime
    • 1/2 teaspoon activated charcoal powder food grade, use sparingly
    • 0.5 oz simple syrup optional for sweetness
    • ice ice cubes for shaking

    Equipment

    • Cocktail shaker
    • Measuring jigger
    • Strainer

    Method
     

    1. Fill a cocktail shaker with ice cubes, about halfway full.
    2. Pour in the tequila, orange liqueur, and fresh lime juice.
    3. Add the activated charcoal powder and simple syrup if using, for a rich black color and balanced sweetness.
    4. Secure the lid on the shaker and shake vigorously for about 15 seconds until well chilled and the mixture turns a deep black.
    5. Remove the shaker lid and place a strainer over it. Pour the cocktail into chilled glasses, ensuring a smooth, even flow.
    6. Garnish with a lime wedge or a black salt rim for extra visual impact and flavor.

    Notes

    Activated charcoal can stain surfaces, so handle with care. Adjust sweetness to taste with more or less simple syrup.
    Crafting this Black Magic Margarita is a playful nod to Halloween’s love for a little darkness with a hint of charm. It’s a striking addition to any spooky soirée or an unexpected treat for a ghostly gathering. Whether you’re celebrating with friends or enjoying a quiet night in, this cocktail adds a whisper of enchantment to the season.

    Enjoy the mysterious allure of this drink and let it inspire your Halloween festivities. Its vivid appearance and layered flavors make it stand out from the usual. Cheers to a night filled with magic, mystery, and a splash of the unusual.

  • Spooktacular Creativity: Halloween Stuffed Bell Pepper Jack-o’-Lanterns

    Spooktacular Creativity: Halloween Stuffed Bell Pepper Jack-o’-Lanterns

    Imagine a kitchen filled with the warm, earthy scents of roasted peppers, mingled with the savory aroma of melted cheese. These Halloween Stuffed Bell Pepper Jack-o’-Lanterns turn a simple veggie into a playful, spooky centerpiece that sparks childhood nostalgia and culinary curiosity alike. Each pepper carved with a mischievous grin feels like a tiny, edible sculpture with a deliciously satisfying fill.

    Crafting these requires a dash of artistic spirit and a mischievous eye — but the process keeps the chaos charming, especially when you realize you’ve carved an extra nose during a frantic carving session. The mildly sweet bell peppers contrast beautifully with zesty seasonings and gooey cheese, making the perfect spooky snack for October nights. Plus, they can be customized endlessly, from spicy chorizo to veggie-packed fillings.

    WHY I LOVE THIS RECIPE?

    • It transforms everyday bell peppers into edible Jack-o’-Lantern art with just a knife and imagination.
    • The aroma of roasting peppers and melting cheese makes my kitchen instantly festive.
    • I get to indulge my inner kid while sneaking in nutritious veggies.
    • It’s chaos-friendly; even messy carving looks adorable on the plate.
    • Perfect for last-minute Halloween parties or a fun family dinner.

    AVOID MY DISASTER (You’re Welcome)

    • FORGOT to remove the seeds? They stuck to the filling. Remember to gut the peppers thoroughly.
    • DUMPED cheese onto the tray instead of into peppers? Use a spoon to fill evenly, not a handful.
    • OVER-TORCHED the pepper edges? Keep a close eye on baking time; peppers can char quickly.
    • MISSED carving a smile? It’s okay — a toothpick can fix or redo details instantly.

    QUICK FIXES THAT SAVE YOUR DAY

    • IF the filling is too dry, splash in a little broth to loosen it up.
    • WHEN the peppers won’t stand upright, slice a tiny bit off the bottom for stability.
    • SHIELD your carving board with foil for easy cleanup of tiny pepper bits.
    • IF cheese starts to burn, tent with foil and extend baking time slightly.
    • PATCH flavor by sprinkling extra seasoning or fresh herbs after baking.


    These Jack-o’-Lantern peppers do more than scream Halloween—they celebrate it with flavor and fun. Their playful appearance makes every bite a little more magical. Whenever I see a glowing pumpkin, I remember the joy of simple, creative food that brings people together.
    In this season, when everything feels a bit more playful and a little spooky, these stuffed peppers fit right in. They bridge the gap between festive decor and a tasty treat, making your gathering both memorable and flavorful. Making these might just become your new fun Halloween tradition.

    Halloween Stuffed Bell Pepper Jack-o’-Lanterns

    These stuffed bell peppers are carved to resemble Jack-o’-Lanterns, with mischievous grins and features, then filled with a savory cheese and seasonings mixture. They are baked until tender and bubbly, with roasted edges and melted cheese creating a festive, edible decoration that combines fun presentation with flavorful bites.
    Prep Time 20 minutes
    Cook Time 30 minutes
    Total Time 50 minutes
    Servings: 4
    Course: Main Course
    Cuisine: American
    Calories: 250

    Ingredients
      

    • 4 bell peppers bell peppers preferably orange or yellow for vibrant Jack-o’-Lanterns
    • 1 cup shredded cheese cheddar or a blend
    • 1/2 cup cooked rice optional for added texture
    • 1 teaspoon seasoning paprika, garlic powder, salt, and pepper mixed
    • 1 tablespoon olive oil for roasting and carving

    Equipment

    • Chef’s knife
    • Baking sheet
    • Spoon
    • Mixing bowl
    • Small carving tools or paring knife

    Method
     

    1. Preheat your oven to 375°F (190°C). Cut the tops off each bell pepper and scoop out the seeds and membranes with a small spoon or knife, creating a hollow space and setting aside the tops for later.
    2. Use a small carving tool or paring knife to carefully carve a spooky face or simple jack-o’-lantern features into each pepper, making sure to leave enough thickness for stability and filling.
    3. Mix the shredded cheese, cooked rice (if using), and seasoning together in a bowl until well combined. This mixture will be your filling.
    4. Spoon the cheese mixture into each carved pepper, pressing gently to pack the filling in and ensure it stays in place during baking.
    5. Place the filled peppers on a baking sheet lined with foil or parchment paper. Drizzle the outside with olive oil to help with roasting and create a nice toasted edge.
    6. Bake in the preheated oven for about 25-30 minutes, until the peppers become tender and the cheese is bubbly and golden around the edges. Keep an eye to prevent charring.
    7. Once baked, carefully remove the peppers from the oven and let them cool slightly. Use a spoon to gently adjust or fix any carved features if needed, and place the tops back on if desired for presentation.
    8. Serve the Jack-o’-Lantern peppers warm, letting the melted cheese and roasted aroma fill the air. Enjoy these playful, savory treats that look as fun as they taste!

    Notes

    For extra spookiness, add small edible accessories like mini olives or cherry tomatoes for eyes and nose. Be cautious with carving to avoid puncturing the peppers too thin. Customize fillings with spicy chorizo, cooked ground meat, or veggies for variety.

    Crafting these stuffed pepper Jack-o’-Lanterns is a delightful way to add a splash of whimsy to any spooky celebration. Their visual charm and flavorful filling turn ordinary ingredients into an extraordinary experience. Plus, everyone loves a good edible decoration that doubles as a delicious snack.

    Whether you’re carving with children or just seeking a playful dish for your Halloween table, these peppers are a win. They add a burst of color, creativity, and comfort to the season’s festivities. So, gather your ingredients, embrace the chaos, and enjoy a little kitchen magic this October.

  • Tropical Chill: The Everything-You-Never-Knew Pineapple Slushie

    Tropical Chill: The Everything-You-Never-Knew Pineapple Slushie

    Most pineapple drinks whisper summer. But this slushie? It screams adventure. It’s the unexpected twist that transforms a simple fruit into a frozen fiesta. What makes it stand out? It’s not just the sweet tang — it’s the icy texture that melts away any lingering worries.

    Imagine crunching through a layer of frosty pineapple to find a burst of juicy, tropical flavor. This isn’t just a drink; it’s a mini escape to a sunny beach, right in your kitchen. Plus, it’s insanely easy to whip up, even in chaos. The secret? A clever use of pantry staples and a splash of imagination.

    Pineapple Slushie

    This pineapple slushie combines fresh pineapple, fruit juice, and ice to create a frozen, icy beverage with a vibrant tropical flavor. The mixture is blended until smooth and slushy, resulting in a refreshing, textured drink with a frosty appearance. It’s perfect for hot days or when you crave a quick, cool treat.
    Prep Time 5 minutes
    Total Time 5 minutes
    Servings: 2
    Course: Main Course
    Cuisine: tropical
    Calories: 120

    Ingredients
      

    • 2 cups fresh pineapple chunks preferably frozen for best slushie texture
    • 1 cup pineapple juice cold
    • 1 cup ice cubes adjust for desired consistency

    Equipment

    • Blender
    • Measuring cups and spoons

    Method
     

    1. Measure out the pineapple chunks and place them in your blender jar.
    2. Add the pineapple juice to the blender, covering the fruit evenly to help with blending.
    3. Add the ice cubes to the blender, ensuring there’s enough to achieve a thick, slushy texture.
    4. Secure the lid and blend on high speed until the mixture is smooth, icy, and vibrant in color, about 30-40 seconds.
    5. Stop the blender and check the consistency; if too thick, add a splash of juice and blend briefly. If too watery, add a few more ice cubes and blend again until desired texture is reached.
    6. Pour the slushie into glasses, allowing some of the frosty, textured mixture to flow over the rim.
    7. Serve immediately with a straw or a slice of fresh pineapple for a tropical touch.
    This pineapple slushie is more than a cooling treat. It’s a reminder that a little creativity can turn everyday ingredients into something memorable. As the seasons shift, having this recipe on hand means you can summon sunshine anytime, no matter the weather.

    So, next time the heat hits hard or you crave a taste of the tropics, reach for this slushie. It’s quick, refreshing, and so satisfying. Honestly, it might just be your new go-to summer fix.

  • Hidden Gem: Spiced Butternut Squash and Ginger Soup

    Hidden Gem: Spiced Butternut Squash and Ginger Soup

    As the leaves turn and a crisp chill fills the air, I find myself craving something warm yet unexpectedly vibrant. This butternut squash soup with a zing of fresh ginger isn’t just comforting; it’s an adventure in a bowl, revealing a layered depth I didn’t know I needed. The sweet earthiness of the squash perfectly balances the fiery punch of ginger, creating a symphony of flavors that dance on the tongue.

    What makes this recipe particularly special is the way it combines simple ingredients with a twist of spice, elevating a classic into something truly memorable. It’s a soup that invites curiosity with every spoonful, perfect for cozy evenings or a surprise guest. Its bright, spicy aroma makes the house smell like autumn’s best kept secret.

    Butternut Squash Soup with Fresh Ginger

    This butternut squash soup is made by roasting or simmering cubed squash until tender, then blending it into a smooth, velvety purée. Fresh ginger is added to provide a spicy kick, resulting in a bright, vibrant soup with a creamy texture and a hint of warmth and spice.
    Prep Time 10 minutes
    Cook Time 30 minutes
    Total Time 40 minutes
    Servings: 4
    Course: Main Course
    Cuisine: Autumn, Comfort Food
    Calories: 180

    Ingredients
      

    • 1 pound butternut squash peeled, seeded, and cubed
    • 1 inch fresh ginger peeled and minced
    • 1 medium onion diced
    • 2 tablespoons olive oil
    • 4 cups vegetable broth preferably low-sodium
    • to taste salt and pepper

    Equipment

    • Large pot or saucepan
    • Blender or immersion blender
    • Chef’s knife
    • Cutting board

    Method
     

    1. Heat a large pot over medium heat and add the olive oil. Once shimmering, add the diced onion and cook, stirring occasionally, until translucent and fragrant, about 5 minutes.
    2. Add the minced ginger to the pot and cook for another minute until it becomes aromatic.
    3. Stir in the cubed butternut squash and cook for a few minutes, allowing the edges to slightly soften and develop a light color.
    4. Pour in the vegetable broth, ensuring that the squash is covered. Increase the heat to bring the mixture to a gentle boil.
    5. Reduce the heat to low, cover the pot, and let it simmer for about 20 minutes or until the squash is tender when pierced with a fork.
    6. Remove the pot from heat and use an immersion blender to blend the soup directly in the pot until it becomes smooth and velvety. Alternatively, transfer in batches to a blender and puree until smooth.
    7. Taste the soup and season with salt and pepper as needed, blending again briefly to incorporate the seasonings.
    8. Ladle the hot soup into bowls and serve immediately, garnished with a small drizzle of olive oil or a sprinkle of fresh herbs if desired.

    In a world where comfort food often leans into the heavy side, this light, spiced soup offers a refreshing change of pace. It’s a dish that feels both nostalgic and novel, sparking a grin with each spoonful. Whether served as a starter or a main, it’s sure to warm you from the inside out.

    As the season shifts, this soup provides a wonderful reminder to embrace warmth in new ways. The combination of roasted squash and zesty ginger makes every bowl a small celebration of fall’s bounty. Sometimes, the simplest ingredients can create the most memorable moments around the table.

  • Chill Out and Chillax: The Unusual Charm of Iced Tea Slushie

    Chill Out and Chillax: The Unusual Charm of Iced Tea Slushie

    Imagine turning a simple iced tea into a frosty, whimsically textured treat that dances on your tongue. This isn’t just about cooling down on a hot day; it’s about transforming a familiar favorite into an unexpected sensory adventure. The secret lies in the freezing process that turns everyday tea into a slushie that’s both soothing and slightly chaotic in texture.

    What makes this recipe stand apart is its ability to be tailored wildly—think infused with herbs, or even a splash of something bubbly for a sparkling twist. It’s perfect for lazy afternoons, spontaneous gatherings, or when you need a little nostalgic reinvention. This icy delight is just waiting to color your kitchen with its icy shimmer and floral or citrus hints.

    **WHY I LOVE THIS RECIPE?**

    • It captures the essence of childhood summers with a grown-up twist.
    • The unpredictable texture adds a joyful chaos to simple sipping.
    • It’s a palate-cleansing reprieve from summer’s heat and complexity.
    • I love how easy it is to customize with my favorite flavors.

    **AVOID MY DISASTER (You’re Welcome)**

    • FORGOT the sugar? Ended up with a bitter ice block, so I added syrup post-freeze.
    • DUMPED entire lemon in? Puckered face—next time I add zest instead for balance.
    • OVER-TORCHED the tea? Bitter unexpected punch—quick rinse saved it from utter ruin.
    • FROZEN the tea too hot? Crystalized into a mess—let it cool first, then slushify.

    **QUICK FIXES THAT SAVE YOUR DAY**

    • When ice melts too fast, add a splash of cold brewed tea to thicken.
    • SPLASH of citrus juice brightens dull flavors in a flash.
    • PATCH blandness with a drizzle of honey or agave while blending.
    • SHIELD the mixture from freezer burns with a quick wrap — it preserves freshness.
    • When in doubt, stir in a handful of berries for instant flavor boost and color.

    Frosty Iced Tea Slushie

    This frozen treat transforms brewed iced tea into a textured, slushy dessert with a refreshing and vibrant appearance. The preparation involves brewing, sweetening, and freezing the tea, then blending it into a semi-frozen, icy texture that’s both cooling and playful in consistency.
    Prep Time 10 minutes
    Cook Time 15 minutes
    Total Time 25 minutes
    Servings: 2
    Course: Main Course
    Cuisine: Global
    Calories: 80

    Ingredients
      

    • 2 cups brewed iced tea cooled
    • 2 tablespoons sugar adjust to taste
    • ½ cup water hot or warm, for dissolving sugar
    • 1 cup ice cubes

    Equipment

    • Tea kettle or pot
    • Blender

    Method
     

    1. Brew your favorite tea and let it cool completely to room temperature, or chill in the fridge for faster cooling.
    2. Heat a small amount of water and dissolve the sugar until the syrup is clear and smooth, then let it cool slightly.
    3. Pour the cooled tea into a mixing bowl and stir in the simple syrup, tasting and adjusting sweetness if desired.
    4. Transfer the sweetened tea into a shallow dish or freeze-safe container, then place in the freezer.
    5. After about 2 hours, check the tea and scrape with a fork to break up ice crystals. Repeat this process every 30 minutes to develop a slushy texture.
    6. Once the tea has a firm, icy, but scoopable texture (about 4-5 hours total), spoon or scoop the mixture into a blender along with ice cubes.
    7. Blend everything until smooth and creamy, with a fluffy, sorbet-like consistency that looks inviting and vibrant.
    8. Pour the frosty slushie into glasses, and garnish with a lemon wedge or fresh herbs if desired for extra flavor and visual appeal.
    9. Serve immediately with a straw or spoon to enjoy the icy, textured treat right away.

    Notes

    Feel free to infuse the tea with herbs like mint or basil or add a splash of sparkling water after blending for a fizzy twist.

    This icy treat is more than just a refreshment; it’s a gateway to rediscovering the simple pleasure of chilled tea. In the heart of summer, it offers a cool reprieve that’s surprisingly adaptable, whether you stick to classic flavors or experiment with wild infusions.

    As the warm days stretch on, this slushie recipe becomes a small daily ritual—easy, quick, and endlessly customizable. It’s perfect for those moments when you need a splash of cool to keep going. Sometimes, a frozen glass of tea is just what you need to remind you of slow summer afternoons and lazy moments.

  • Spooky Trick: Halloween Deviled Egg Eyeballs

    Spooky Trick: Halloween Deviled Egg Eyeballs

    As a food blogger always on the lookout for eerie yet edible art, I stumbled upon a way to turn classic deviled eggs into creepy eyeballs. This approach lets me channel my inner mad scientist while still serving up something everyone will love (or be grossed out by, in the best way).

    The trick is in the details: a splash of red, a squirt of mustard, and a quick slice to mimic the bloodshot iris. It’s perfect for Halloween parties where your appetizer could cause squeals and giggles in equal measure. Plus, these eyeballs are deceptively simple, requiring only a handful of pantry staples and a dash of creative chaos.

    Creepy Eyeball Deviled Eggs

    This dish transforms classic deviled eggs into spooky eyeballs using natural ingredients and simple assembly. The eggs are hard-boiled and halved, then filled with a creamy yolk mixture, topped with a sliced olive to resemble an iris, and finished with a dash of red food coloring to mimic bloodshot detail. The final appearance is a set of eerie, realistic-looking eyeballs perfect for Halloween parties.
    Prep Time 15 minutes
    Cook Time 10 minutes
    Total Time 25 minutes
    Servings: 12
    Course: Main Course
    Cuisine: Halloween
    Calories: 70

    Ingredients
      

    • 6 large eggs fresh preferred
    • 3 tablespoons mayonnaise
    • 1 teaspoon yellow mustard
    • to taste red food coloring optional, for bloodshot effect
    • 12 small green or black olives pitted, sliced to mimic irises
    • 1 pinch paprika or smoked paprika optional, for added effect

    Equipment

    • Saucepan
    • Mixing bowl
    • Fork or whisk
    • Piping bag or small spoon
    • Knife
    • Cutting board

    Method
     

    1. Place the eggs in a saucepan and cover with cold water. Bring the water to a boil over medium-high heat, then once boiling, turn off the heat and let the eggs sit for 10 minutes for perfect hard-boiled eggs.
    2. Drain the hot water and rinse the eggs under cold running water until cooled completely. Gently tap each egg to crack the shell, then peel them carefully and set aside to dry.
    3. Slice each peeled egg in half lengthwise, revealing the bright yellow yolk inside. Carefully remove the yolks and place them in a mixing bowl.
    4. Mash the yolks with a fork until smooth, then add mayonnaise and a teaspoon of mustard, mixing until creamy and well combined. If desired, add a few drops of red food coloring to create bloodshot effect, mixing to distribute evenly.
    5. Spoon or pipe the yolk mixture back into the hollowed egg whites, filling each cavity generously to mimic eyeballs.
    6. Slice the olives thinly into rounds to create irises. Gently place one olive slice on top of each filled egg, pressing down lightly to embed it slightly into the yolk filling.
    7. Use a tiny dab of red food coloring or a swipe of red sauce on the egg whites around the olives to mimic blood vessels and bloodshot details. Optionally, sprinkle a pinch of paprika for added realism.
    8. Arrange the completed eyeballs on a serving platter. Chill in the refrigerator for 15 minutes for the best presentation and flavor.
    9. Serve cold, and enjoy these spooky and fun creepy eyeball deviled eggs at your Halloween gathering.

    Notes

    For extra bloodshot effect, use a fine brush to flick small red food coloring dots around the olives. Prepare the eggs ahead of time for easier assembly during the party. Be creative with the blood vessel details to make your eyeballs more realistic.

    These creepy eyeballs turn any Halloween table into a haunted scene. The mildly unsettling appearance can be fun to watch as guests try to figure them out before taking a bite. Plus, it’s the kind of dish that fuels a little party chaos and giggles.

    Beyond Halloween, they remind us of childhood kitchen experiments — just with a ghoulish twist. I find that a little creativity goes a long way when everyone’s craving something neither too sweet nor too savory. Sometimes, the only thing scarier than the look is how quickly they disappear.

  • Autumn Harvest Frittata: A Cozy Twist

    Autumn Harvest Frittata: A Cozy Twist

    As the leaves turn vibrant shades of orange and crimson, I find myself craving more than just pumpkin spice. This fall, I’ve been obsessed with transforming traditional ingredients into something unexpected — like using roasted butternut squash and sage in a fluffy frittata. It’s not just breakfast; it’s a celebration of autumn’s bounty wrapped into one hearty dish.

    Cooking during this season feels like capturing the essence of cozy mornings and chilly evenings. The scent of caramelized onions mingling with sweet squash makes my kitchen smell like a fall forest. Each bite brings a mix of textures and flavors that remind me why fall is the best time to get creative with simple ingredients.

    Butternut Squash and Sage Frittata

    This frittata combines roasted sweet butternut squash and fragrant sage into a fluffy egg mixture baked until set. The dish features a tender interior with a lightly browned top, showcasing vibrant fall flavors and textures. It’s a hearty, colorful breakfast or brunch option perfect for cozy mornings.
    Prep Time 15 minutes
    Cook Time 25 minutes
    Total Time 40 minutes
    Servings: 4
    Course: Main Course
    Cuisine: Fall
    Calories: 210

    Ingredients
      

    • 1 medium butternut squash peeled, seeded, and cubed
    • 2 tablespoons olive oil divided
    • 1 small onion finely chopped
    • 2 cloves garlic minced
    • 4 large eggs beaten
    • 1/4 cup milk optional, for fluffiness
    • 1 teaspoon fresh sage chopped
    • to taste salt and pepper
    • 1/4 cup shredded cheese optional, such as Parmesan or Gruyère

    Equipment

    • Baking sheet
    • Mixing bowl
    • Whisk
    • Oven-safe skillet or baking dish
    • Cutting board
    • Chef’s knife

    Method
     

    1. Preheat your oven to 400°F (200°C). Spread the cubed butternut squash on a baking sheet, drizzle with one tablespoon of olive oil, and roast for about 20-25 minutes until tender and lightly caramelized. This brings out the natural sweetness and softens the squash for the frittata.
      2 tablespoons olive oil
    2. While the squash roasts, heat the remaining tablespoon of olive oil in a skillet over medium heat. Add the chopped onion and cook for 3-4 minutes until it turns translucent and fragrant.
      2 tablespoons olive oil
    3. Add the minced garlic and chopped sage to the onions, cooking for another 30 seconds until the garlic is aromatic and the sage is slightly crispy.
      2 tablespoons olive oil
    4. In a mixing bowl, whisk together the eggs, milk, salt, and pepper until well combined. This creates a light, airy base for the frittata.
      2 tablespoons olive oil
    5. Add the roasted butternut squash to the skillet with the onion, garlic, and sage. Stir gently to combine and let the flavors meld for a minute or two over low heat.
      2 tablespoons olive oil
    6. Pour the beaten egg mixture over the squash and onions in the skillet. Tilt the pan to evenly distribute the eggs and ingredients.
      2 tablespoons olive oil
    7. Sprinkle shredded cheese over the top if using, and cook without stirring for about 2-3 minutes until the edges start to set and the bottom turns golden.
      2 tablespoons olive oil
    8. Transfer the skillet to the preheated oven and bake for 12-15 minutes until the frittata is puffed, golden, and fully set in the center.
    9. Remove the skillet from the oven and let the frittata cool for a few minutes. Slice into wedges and serve warm for a savory, visually appealing dish.
    This recipe is perfect for lazy weekend mornings or for impressing guests with minimal effort. The flavors of baked squash and fresh herbs make every forkful feel like a warm hug. As the season wanes, it’s a reminder to appreciate the fleeting beauty of fall, one bite at a time.