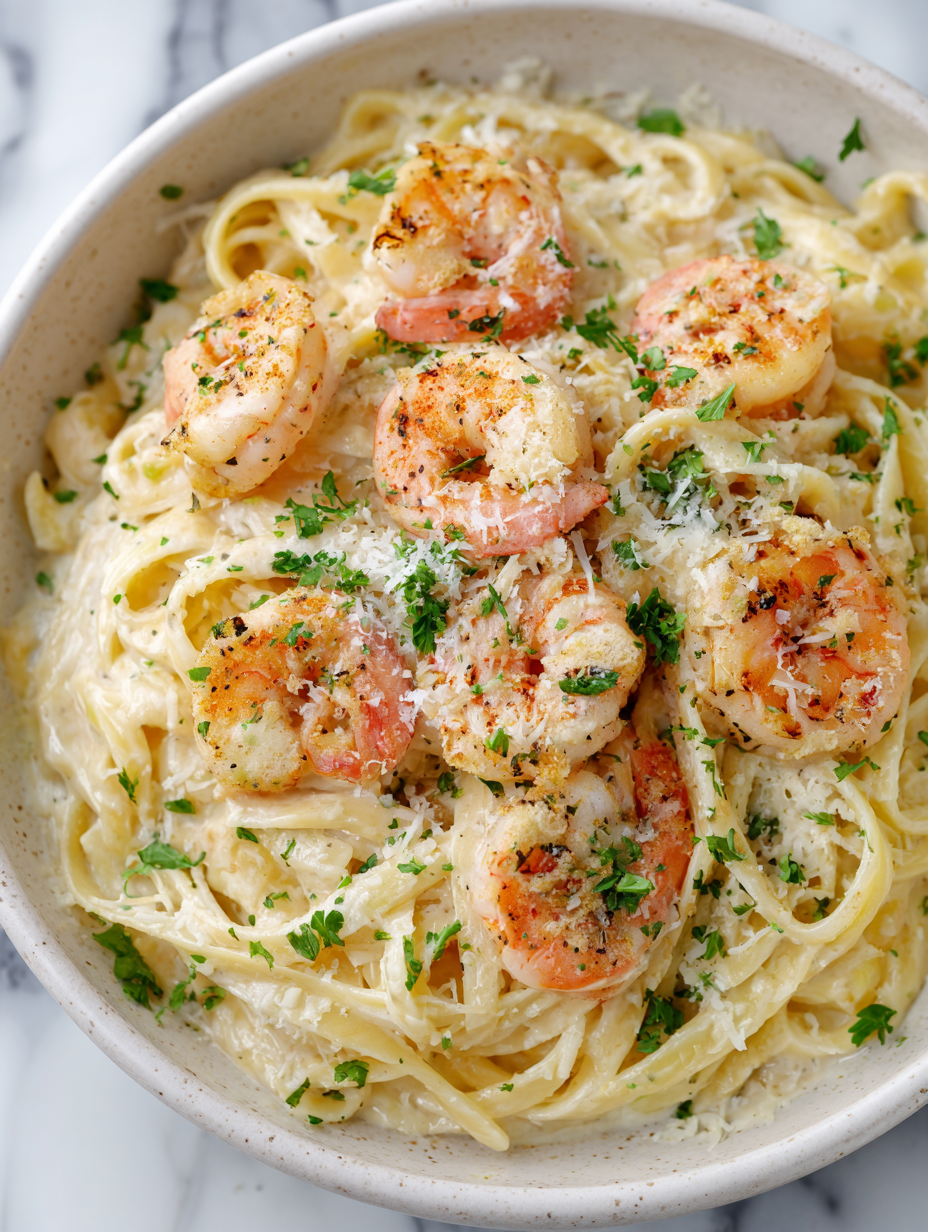
Author: LucasFoster

  • The Cherry Slushie Secret: A Cool Twist on Classic Summer Sips

    The Cherry Slushie Secret: A Cool Twist on Classic Summer Sips

    During those scorching summer days, I crave more than just ice water; I need something that feels like a refreshment revolution. The cherry slushie is my unexpected hero, bringing a burst of bright, tart flavor with every icy sip. Its vibrant red hue and frosty texture make it impossible to resist, especially when fresh cherries are at their peak.

    This recipe isn just about beating the heat; its about rediscovering the childhood thrill of a simple frozen treat. Made with ripe cherries and a splash of lemon, it offers a punch of tanginess balanced by a delicate sweetness. Its fast to blend up and even faster to devour, making it my go-to for spontaneous summer gatherings.

    Cherry Lemon Slushie

    The cherry lemon slushie is a frozen beverage made by blending ripe cherries, lemon juice, and sweetener until smooth and icy. It has a vibrant red color, a frosty texture, and a tangy-sweet flavor profile, perfect for hot summer days. The result is a refreshingly cold drink with a slushy consistency that melts in the mouth.
    Prep Time 10 minutes
    Total Time 10 minutes
    Servings: 2
    Course: Main Course
    Cuisine: American
    Calories: 120

    Ingredients
      

    • 2 cups fresh cherries, pitted preferably ripe and sweet
    • 1/4 cup fresh lemon juice about 2 lemons
    • 2 tablespoons honey or simple syrup adjust sweetness to taste
    • 1/2 cup water or ice to help blend and chill

    Equipment

    • Blender
    • Measuring cups and spoons

    Method
     

    1. Add the pitted cherries, lemon juice, honey, and water or ice to the blender.
    2. Secure the lid and blend on high until the mixture is smooth, vibrant red, and frosty, about 30-45 seconds. You should see a slushy, icy texture.
    3. Stop the blender and check the consistency; if it’s too thick, add a splash more water and blend briefly again.
    4. Pour the cherry lemon slushie into glasses, allowing the icy clouds to settle slightly for a visually appealing layer.
    5. Garnish with a fresh cherry or a twist of lemon for extra color and aroma.
    6. Serve immediately with a straw or spoon, enjoying the bright, tart, and icy refreshment.

    Notes

    For an extra frosty slushie, freeze the cherries beforehand or add a handful of ice during blending.

    Reinventing icy drinks with a handful of cherries reminds me why I love the summer season. The sharp, sweet aroma of fresh fruit and the icy crunch is a sensory dance in every glass. Sometimes, the simplest ingredients create the boldest memories, and this cherry slushie is no exception.

    As temperatures climb higher, this slushie feels like a cool symphony on a warm day. Its perfect for those lazy, sun-drenched afternoons when only a refreshingly icy treat will do. Savor each sip and let the vibrant flavor transport you to a sunny, carefree state of mind.

  • Hauntedly Delicious: The Art of Crafting Halloween Graveyard Pudding Cups

    Hauntedly Delicious: The Art of Crafting Halloween Graveyard Pudding Cups

    Every October, I find myself mysteriously drawn to the eerie glow of jack-o’-lanterns and the whispered secrets of spooky tales. This year, I decided to channel that thrill into something unexpectedly delightful: Halloween Graveyard Pudding Cups. These little cups of chaos are not just treats, but edible scenes that spark nostalgic chills and sweet satisfaction.

    Crafting this dessert feels like setting the scene for a ghostly gathering—dirt, tombstones, and creeping creepers made from simple pantry items. It’s a wonderful way to turn a basic pudding into a spooky spectacle that mesmerizes both kids and adults. Plus, assembling these tiny graveyards sparks a mischievous fun I can’t resist sharing.

    Halloween Graveyard Pudding Cups

    Halloween Graveyard Pudding Cups are layered desserts featuring creamy chocolate pudding topped with crumbled cookies to resemble dirt, along with edible tombstones and creeping greenery for spooky effect. The main ingredients include pudding, crushed cookies, and candy decorations, creating a textured and visually eerie treat with a smooth and crunchy combination. These miniature scenes are assembled in cups, making them a fun and spooky presentation for Halloween parties.
    Prep Time 20 minutes
    Cook Time 10 minutes
    Total Time 30 minutes
    Servings: 6
    Course: Main Course
    Cuisine: Halloween
    Calories: 250

    Ingredients
      

    • 1 package chocolate pudding mix instant variety
    • 2 cups cold milk
    • 1 cup crushed chocolate cookies for dirt topping
    • 6 small graham cracker tombstones pre-made or homemade
    • small handful green jelly or gummy creepers for creeping vines
    • optional candy gravestones or Halloween-themed decorations

    Equipment

    • Mixing bowls
    • Whisk
    • Measuring cups and spoons
    • Small cups or jars
    • Plastic sandwich bags or piping bags
    • Cookie sheet

    Method
     

    1. In a mixing bowl, whisk together the instant chocolate pudding mix with cold milk for about 2 minutes until the mixture thickens and becomes smooth.
    2. Divide the pudding evenly among small cups or jars, filling each about three-quarters full to create a base layer.
    3. Sprinkle crushed cookies over the pudding to mimic dirt, covering the surface evenly with a crumbly texture.
    4. Place pre-made graham cracker tombstones into each cup, pressing them slightly into the crumb layer for stability.
    5. Add green gummies or jelly creepers around the tombstones and along the edges to resemble creeping vines and foliage.
    6. Optionally, add candy gravestones or Halloween-themed decorations on top to enhance the spooky scene.
    7. Allow the assembled pudding cups to set in the refrigerator for at least 1 hour before serving, so the layers firm up and the decorations stay in place.
    8. Once chilled, serve the Halloween Graveyard Pudding Cups with a spooky straw or spoon for a delightfully eerie treat.
    As the evening winds down and the candles flicker low, these pudding cups serve as a reminder of how playful and inventive Halloween can be. Each spoonful carries the echoes of laughter, scare stories, and the thrill of a well-loved holiday tradition.

    This project is more than just dessert; it’s a nostalgic toast to childhood fears and the magic of dressing up. Whether you’re hosting a party or just sneaking fun into a quiet night, these graveyard cups bring a bit of mischief and a lot of sweetness to the celebration.

  • Spooktacular Halloween Mummy Meatballs That Will Amaze Your Ghouls

    Spooktacular Halloween Mummy Meatballs That Will Amaze Your Ghouls

    Every Halloween, I love transforming simple ingredients into something delightful and spooky. This year, I went all out with mummy-themed meatballs that look as if they’ve just stepped out of a burial site. The aroma of seasoned beef mingling with garlic and herbs makes my kitchen smell like a haunted mansion’s pantry.

    What’s more fun than wrapping savory meatballs in strips of dough, resembling tiny mummies? It’s a chaotic kitchen dance—filling, wrapping, baking—and totally worth every giggle. These little monsters are perfect for parties, kids’ lunches, or just a wicked good snack to get into the spooky spirit.

    Mummy Meatballs

    Mummy meatballs are baked or cooked meatballs made from seasoned ground beef, shaped into small balls, and wrapped with strips of dough or pastry to resemble mummies. When finished, they have a tender interior with a golden-brown exterior and a whimsical, bandaged appearance. The dish is often served as a fun, spooky appetizer or party snack around Halloween.
    Prep Time 20 minutes
    Cook Time 25 minutes
    Total Time 45 minutes
    Servings: 4
    Course: Main Course
    Cuisine: Halloween
    Calories: 220

    Ingredients
      

    • 1 pound ground beef lean or regular
    • 1/2 cup bread crumbs panko preferred
    • 1 large egg beaten
    • 2 cloves garlic minced
    • 1 tablespoon fresh parsley chopped (optional)
    • to taste salt and pepper
    • 1 roll puff pastry or refrigerated dough cut into strips
    • 1 egg egg wash beaten, for brushing
    • optional black sesame seeds or olives for ‘eyes’

    Equipment

    • Baking sheet
    • Mixing bowl

    Method
     

    1. Preheat your oven to 400°F (200°C) and line a baking sheet with parchment paper.
    2. In a mixing bowl, combine the ground beef with bread crumbs, minced garlic, chopped parsley, beaten egg, and a pinch of salt and pepper. Mix everything together until just combined, being careful not to overmix to keep the meatballs tender.
    3. Using your hands, roll the mixture into small, uniform meatballs, about one inch in diameter. Place them spaced apart on the prepared baking sheet.
    4. Bake the meatballs in the preheated oven for about 15-20 minutes, or until they are cooked through and lightly browned on the outside. You should see a nice crust forming as they bake.
    5. While the meatballs are baking, roll out the puff pastry or dough and cut into thin strips, about 1/4 inch wide. These will resemble mummy wrapping strips.
    6. Once the meatballs are out of the oven and slightly cooled, carefully wrap each one with strips of dough, overlapping as you go to mimic bandages. Leave a small space at one end to create the ‘head’ appearance.
    7. Place the wrapped meatballs back onto the baking sheet. Brush the dough with beaten egg wash to give it a shiny, golden finish.
    8. Bake the wrapped meatballs for an additional 10-12 minutes, or until the dough strips are crisp and golden brown. Watch for a bubbly aroma and crispy edges.
    9. If desired, add small dots of black sesame seeds or tiny slices of olives as ‘eyes’ near the head of each mummy for a spooky effect.
    10. Remove the mummy meatballs from the oven and allow them to cool slightly before serving. They should be crispy on the outside with juicy, flavorful meat on the inside.

    Notes

    You can customize the ‘eyes’ by using small pieces of black olives or edible markers for added spooky flair.

    Wrapping up these creepy creatures was a blast, and the crunch of crispy dough with juicy meat inside feels just right. The best part? They vanish from the platter faster than you can say “boo!”. This recipe is your secret weapon for a festive, no-stress Halloween spread.

    As the season shifts, these mummy meatballs remind us that fun meals can be whimsical and worry-free. Pair them with a bright marinara dip or a cheesy dip for extra laughs and flavor. Happy haunting and happy eating!

  • Tropical Chill: The Pi

    Tropical Chill: The Pi

    Imagine finding a beachside stand that offers a frozen delight with a twist. The pi

    Frozen Mango-Coconut Treats

    This dessert features smooth blended mango and coconut milk poured into molds and frozen until firm, creating a refreshing and icy snack. The mixture combines sweet, tropical flavors with a creamy texture, resulting in a vibrant and cool treat with a firm but tender bite.
    Prep Time 10 minutes
    Total Time 10 minutes
    Servings: 8
    Course: Main Course
    Cuisine: tropical
    Calories: 120

    Ingredients
      

    • 3 cups frozen mango chunks preferably peeled and pitted
    • 1 cup coconut milk full-fat for creaminess
    • 2 tbsp honey or agave syrup adjust sweetness to taste

    Equipment

    • Blender
    • Molds or silicone cupcake liners
    • Freezer

    Method
     

    1. Place the frozen mango chunks into a blender.
    2. Add the coconut milk to the blender with the mango.
    3. Sweeten the mixture with honey or agave syrup for added flavor.
    4. Secure the lid and blend on high until the mixture is smooth, thick, and creamy, about 1-2 minutes. You should see no chunks remaining and the color should be vibrant.
    5. Pour the blended mixture evenly into molds or silicone liners, filling each about three-quarters full.
    6. Insert sticks if using molds with handles or simply cover the molds with plastic wrap.
    7. Place the molds in the freezer and freeze for at least 4 hours or until completely firm.
    8. Once frozen, remove the treats from the molds by gently warming the outside for a few seconds or running them briefly under warm water.
    9. Serve immediately for a refreshing, icy snack with a bright, tropical flavor and smooth, firm bite.
    In a season that feels more chaotic than ever, simple pleasures like a frozen pi

  • Hidden Veggie Pumpkin Pancakes That Will Convince You to Eat More Vegetables

    Hidden Veggie Pumpkin Pancakes That Will Convince You to Eat More Vegetables

    Every fall, I find myself craving cozy mornings with a plate of warm, fluffy pancakes. Usually, these are indulgent and loaded with butter and syrup, but this year I decided to introduce a secret ingredient that surprised even me: shredded zucchini. It’s sneaky, it adds moisture, and it makes these pumpkin pancakes even more nutritious.

    What sets these pancakes apart is the way the pumpkin creates a tender crumb, while the zucchini keeps them from drying out. The aroma of cinnamon and nutmeg mingles with the roasted pumpkin smell, filling my kitchen with autumn nostalgia. This recipe is my ode to making comfort food sneaky healthy and totally crave-worthy.

    Pumpkin Zucchini Pancakes

    These pumpkin zucchini pancakes are tender, fluffy griddled cakes made by mixing pumpkin puree and shredded zucchini into a pancake batter. The key ingredients provide moisture and nutrition, resulting in golden-brown pancakes with a soft interior and slightly crisp edges. The aroma of cinnamon and nutmeg complements the pumpkin flavor, creating an autumn-inspired breakfast treat.
    Prep Time 10 minutes
    Cook Time 15 minutes
    Total Time 25 minutes
    Servings: 4
    Course: Main Course
    Cuisine: American
    Calories: 250

    Ingredients
      

    • 1 1/2 cups all-purpose flour
    • 2 tablespoons brown sugar
    • 1 teaspoon ground cinnamon
    • 1/2 teaspoon ground nutmeg
    • 1 teaspoon baking powder
    • 1/2 teaspoon salt
    • 2 large eggs beaten
    • 1 cup pumpkin puree
    • 1/2 cup shredded zucchini squeezed to remove excess moisture
    • 2 tablespoons unsalted butter melted, for cooking

    Equipment

    • Griddle or large skillet
    • Mixing bowls
    • Whisk
    • Grater
    • Measuring cups and spoons
    • Spatula

    Method
     

    1. In a large mixing bowl, whisk together the flour, brown sugar, cinnamon, nutmeg, baking powder, and salt until evenly combined. This forms the dry base for your pancake batter.
    2. In a separate bowl, beat the eggs and then stir in the pumpkin puree until smooth and well mixed.
    3. Add the wet mixture to the dry ingredients, stirring gently until just combined. Do not overmix; some lumps are okay.
    4. Fold in the shredded zucchini gently, distributing it evenly throughout the batter. The batter will be slightly thick but pourable.
    5. Preheat a griddle or large skillet over medium heat and brush with melted butter until shimmering.
    6. Spoon about 1/4 cup of batter onto the hot griddle for each pancake, leaving space between them. Cook until bubbles form on the surface and the edges look set, about 2-3 minutes.
    7. Carefully flip each pancake with a spatula and cook for another 2-3 minutes, until golden brown and cooked through.
    8. Transfer the cooked pancakes to a plate and keep warm while you cook the remaining batter, adding more butter to the skillet as needed.
    9. Serve the pumpkin zucchini pancakes warm with your favorite toppings, like maple syrup or fresh fruit.

    These pumpkin pancakes aren’t just a seasonal treat; they’ve become a weekend staple. The hidden zucchini adds a bit of chaos, but in the best way—more veggies, more flavor, more joy. I love how they turn a simple breakfast into a moment of accidental nutrition.

    As the weather cools and cozy mornings become essential, this recipe offers a warm reminder that healthy doesn’t have to mean boring. It’s a perfect balance of flavor and fun, making breakfast feel like an exciting discovery every time.

  • Vibrant Summer Fresh Salsa That Will Brighten Any Meal

    Vibrant Summer Fresh Salsa That Will Brighten Any Meal

    Imagine a salsa that captures the essence of sun-ripened tomatoes and fragrant herbs, bursting with flavor and fresh in every bite. This recipe turns simple produce into a vibrant, mouthwatering topping that transforms any dish from ordinary to extraordinary. It’s perfect for summer gatherings or a quick, healthy snack that also evokes nostalgic backyard barbecues.

    The beauty of this salsa lies in its simplicity—it’s all about balancing acidity, sweetness, and a kick of spice, crafted with ingredients you probably already have at home. The act of chopping fresh tomatoes, onions, and herbs releases a symphony of aromas that make your kitchen smell like a bustling farmer’s market. Once mixed, it’s a colorful, crunchy medley that’s as beautiful as it is delicious.

    **WHY I LOVE THIS RECIPE?**

    Fresh Tomato Salsa

    This salsa features chopped sun-ripened tomatoes, finely diced onions, and fragrant herbs mixed together to create a vibrant, chunky topping. It combines acidity, sweetness, and spice, resulting in a colorful, crunchy medley with a fresh flavor and bright appearance. The texture is crisp and juicy, perfect for serving as a dip or topping.
    Prep Time 15 minutes
    Total Time 15 minutes
    Servings: 4
    Course: Main Course
    Cuisine: Mexican
    Calories: 20

    Ingredients
      

    • 4 cups ripe tomatoes chopped
    • 1 small red onion finely diced
    • 1/2 cup fresh cilantro chopped
    • 1 clove garlic minced
    • 1 tablespoon lime juice freshly squeezed
    • 1/2 teaspoon salt to taste
    • 1/4 teaspoon black pepper freshly ground
    • 1 small jalapeño pepper finely diced, optional for heat

    Equipment

    • Chef’s knife
    • Cutting board
    • Mixing bowl
    • Spoon

    Method
     

    1. Begin by rinsing the ripe tomatoes and then chopping them into small, uniform pieces to release their juices and vibrant color.
    2. Finely dice the red onion and add it to the tomatoes, giving the salsa a crunchy texture and a sweet, sharp flavor.
    3. Chop the fresh cilantro leaves and stir them into the mixture for a fragrant, herbal note.
    4. Mince a clove of garlic and sprinkle it into the salsa for a subtle, savory kick.
    5. Pour in fresh lime juice, which brightens the flavors and helps meld the ingredients together.
    6. Add salt and freshly ground black pepper to taste, enhancing the overall flavor balance.
    7. If you prefer more heat, finely dice a jalapeño pepper and stir it into the salsa for a spicy kick.
    8. Gently mix everything together with a spoon until well combined, ensuring the flavors meld evenly.
    9. Let the salsa sit for 10 minutes to allow the flavors to develop fully, then give it a quick stir before serving.
    10. Serve the salsa with chips, atop grilled meats, or as a fresh topping for tacos for a vibrant, flavorful addition.

    Notes

    For a mellower flavor, remove the seeds from the jalapeño. Adjust salt and lime to taste, depending on the acidity of your tomatoes.
    This fresh salsa is a simple celebration of seasonal produce, perfect for brightening up any meal with minimal effort. It’s ideal forlazy weekends, quick dinners, or anytime you crave a burst of freshness. Letting the ingredients sit together for a bit enhances their flavors, making each bite better than the last.

    No matter how many times I make this dish, it always feels like a little victory—a quick fix that delivers bright, lively flavor straight from the garden to the plate. Plus, it’s versatile enough to pair with chips, grilled meats, or atop a bowl of crispy tacos. A true testament to how fresh ingredients can turn an everyday meal into something memorable.

  • Spiced Pumpkin Oatmeal: A Cozy Morning Hack

    Spiced Pumpkin Oatmeal: A Cozy Morning Hack

    As the mornings grow crisp and hints of autumn fill the air, I find myself craving more than just the usual breakfast routine. Instead, I turn to a bowl of pumpkin oatmeal, but not the typical kind. I add a dash of cinnamon, a sprinkle of nutmeg, and a handful of toasted pecans for that perfect crunch.

    This recipe takes a simple staple and transforms it into a heartwarming experience. The aroma alone — caramelized pumpkin, warm spices, and oats simmering — makes my kitchen smell like the holidays in full swing. It’s a breakfast that comforts and energizes, all in one bowl.

    Pumpkin Cinnamon Oatmeal with Toasted Pecans

    This pumpkin oatmeal combines creamy cooked oats with pureed pumpkin and warm spices, creating a hearty, smooth breakfast. Topped with toasted pecans, it offers a contrasting crunch and aromatic flavor, with a visually inviting orange hue and a thick, cozy texture.
    Prep Time 5 minutes
    Cook Time 15 minutes
    Total Time 20 minutes
    Servings: 2
    Course: Main Course
    Cuisine: American
    Calories: 290

    Ingredients
      

    • 1 1/2 cups rolled oats
    • 2 cups water or milk
    • 1/2 cup pureed pumpkin can use canned or homemade
    • 1 teaspoon ground cinnamon
    • 1/4 teaspoon ground nutmeg
    • 2 tablespoons maple syrup or honey
    • 1/4 cup toasted pecans chopped

    Equipment

    • Medium saucepan
    • Wooden spoon or spatula
    • Toaster or oven for toasting pecans

    Method
     

    1. Begin by measuring out the oats and pouring water or milk into a medium saucepan, then bring it to a gentle simmer over medium heat.
    2. Add the rolled oats to the simmering liquid, stirring occasionally to prevent sticking. Cook until the oats become tender and start to absorb the liquid, about 5 minutes.
    3. Stir in the pureed pumpkin, ensuring it fully integrates into the oats, creating an orange-hued mixture.
    4. Sprinkle in the cinnamon and nutmeg, then drizzle in the maple syrup or honey, stirring well to evenly coat the oats with the spices and sweetness.
    5. Continue to cook the mixture, gently simmering and stirring for another 3–4 minutes until it’s thick, creamy, and fragrant.
    6. While the oats finish cooking, toast the pecans in a dry skillet or oven until lightly golden and fragrant, about 3–5 minutes. Chop them coarsely once cooled.
    7. Remove the oatmeal from heat and scoop into bowls, then sprinkle the toasted pecans generously over the top for added crunch and flavor.
    8. Serve the pumpkin oatmeal warm, enjoying the creamy texture combined with the crunchy pecan topping.

    Notes

    You can substitute other nuts or add a dollop of yogurt for extra creaminess.

    This pumpkin oatmeal is more than just a seasonal delight; it’s a reminder that mornings can be both nourishing and festive. Whether you need a quick weekday boost or a cozy weekend treat, it fits seamlessly into your routine.

    As the leaves turn and the air cools, this dish captures the essence of fall’s richness. It’s an invitation to slow down, savor every bite, and enjoy the simple magic of a homemade, seasonal breakfast. Happy mornings.

  • Spooky Delight: Halloween Monster Eyeball Cake Pops

    Spooky Delight: Halloween Monster Eyeball Cake Pops

    Imagine biting into a cake pop that looks eerily like a monster’s eyeball, complete with veins and a glossy iris. The vibrant red, green, or even purple colors create a chilling effect, perfect for any haunted gathering. These creepy treats turn simple cake pops into a conversational centerpiece that’s as fun to make as they are to eat.

    Using unconventional food dyes and a splash of spooky imagination, you can transform ordinary ingredients into creepy masterpieces. I love how these little monsters bring a mix of chaos and charm to my Halloween celebrations. Plus, the process of assembling their tiny, squishy eyes sparks a creative frenzy I eagerly embrace each year.

    Monster’s Eyeball Cake Pops

    These cake pops are decorated to resemble creepy eyeballs, featuring a smooth, rounded shape with colorful or eerie-colored coating. The glossy finish is achieved through a candy shell, while the detailed veins and iris are added with food coloring and edible accents for a striking final appearance. They combine a moist cake interior with a firm, shiny exterior, making them both fun and spooky treats perfect for Halloween and themed parties.
    Prep Time 30 minutes
    Cook Time 20 minutes
    Total Time 50 minutes
    Servings: 10
    Course: Main Course
    Cuisine: American
    Calories: 150

    Ingredients
      

    • 1 box store-bought cake (or homemade) preferably vanilla or chocolate
    • 1/4 cup butter or shortening for richness
    • 1 cup cream cheese softened
    • 2 cups powdered sugar for sweetness and structure
    • 16 oz white chocolate or candy melts for coating
    • food coloring various colors for irises and veins
    • 1 cup vanilla frosting or gluing mixture for attaching decorations

    Equipment

    • Mixing bowl
    • Baking Pan
    • food processor or crumb cutter
    • melting pot or microwave-safe bowl
    • lollipop sticks
    • Saucepan
    • Baking sheet
    • piping bags or toothpicks

    Method
     

    1. Crumble the cake into a large mixing bowl until fine, then add softened cream cheese and mix thoroughly to create a dough-like consistency.
    2. Using your hands, form the mixture into small, round balls about one inch in diameter. Place them on a baking sheet lined with parchment paper.
    3. Insert a lollipop stick into each cake ball about halfway, then freeze the balls for at least 30 minutes until firm.
    4. While the cake balls chill, melt the white chocolate or candy melts in a microwave or double boiler until smooth and glossy.
    5. Dip each frozen cake pop into the melted chocolate, rotating to cover completely, then gently tap to remove excess coating. Place on a parchment-lined sheet to set.
    6. Once the coating is set, use food coloring mixed with a small amount of frosting or edible glue to create detailed veins, irises, and sclera around each eye for a creepy, realistic look.
    7. Add a small dot of contrasting colored icing or candy to simulate the pupil and give the eyeball a spooky glare.
    8. Allow all decorations to dry briefly, then serve these creepy eyeball cake pops to add a fun, chilling feature to your Halloween spread.

    Notes

    You can customize the colors and details to match different monster or zombie themes. For extra creepiness, use edible glitter or dust to add a spooky shimmer.

    Halloween is the perfect time to indulge in playful, spooky desserts that make everyone smile. These monster eyeball cake pops combine creativity with a deliciously sweet taste that fits the season perfectly. They’re a fun project to share with friends or carve out a few moments of chaotic kitchen joy alone.

    Despite the spooky appearance, these treats are surprisingly simple to make with just a few ingredients and a dash of imagination. As you craft each eyeball, you’ll feel a childlike thrill—knowing you’ve turned ordinary cake into something delightfully horrifying.

  • Chill with a Twist: The Unconventional Oreo Slushie Experience

    Chill with a Twist: The Unconventional Oreo Slushie Experience

    This recipe is perfect for those unexpectedly hot days when only something icy and indulgent will do. It’s a whirlwind of textures and flavors that wakes up your taste buds and stirs up memories of sitting cross-legged with a cookie in hand. And the best part? It’s quick, forgiving, and endlessly customizable.

    Ice Cream Cookie Sandwiches

    This dessert features two cookies filled with a layer of creamy ice cream, creating a cool and indulgent treat. The cookies are baked until golden and crisp, then sandwiched around softened ice cream for a delightful combination of crunchy and creamy textures with a visually appealing final appearance.
    Prep Time 15 minutes
    Cook Time 12 minutes
    Total Time 27 minutes
    Servings: 8
    Course: Main Course
    Cuisine: Dessert
    Calories: 220

    Ingredients
      

    • 1 cup unsalted butter softened
    • 1 cup brown sugar
    • 1 egg large egg
    • 2 tsp vanilla extract
    • 2 cups all-purpose flour
    • 1/2 tsp baking soda
    • 1/4 tsp salt
    • 2 cups vanilla ice cream softened but still firm

    Equipment

    • Mixing bowls
    • Baking sheet
    • Parchment paper
    • Ice cream scoop
    • Cooling rack

    Method
     

    1. Preheat the oven to 350°F (175°C) and line a baking sheet with parchment paper to prevent sticking.
    2. Cream together the softened butter and brown sugar in a mixing bowl until the mixture is light and fluffy, and you can see the sugar dissolving.
    3. Beat in the egg and vanilla extract until fully incorporated, resulting in a smooth, cohesive batter.
    4. In a separate bowl, whisk together the flour, baking soda, and salt to evenly distribute the leavening agents.
    5. Gradually add the dry ingredients to the wet mixture, stirring gently until a thick dough forms.
    6. Using a cookie scoop or spoon, portion out the dough onto the prepared baking sheet, spacing the cookies about 2 inches apart.
    7. Bake the cookies for about 10-12 minutes, or until they turn golden around the edges but are still soft in the center.
    8. Remove the cookies from the oven and let them cool on the baking sheet for 5 minutes before transferring them to a wire rack to cool completely.
    9. Once cooled, take one cookie and spread a generous scoop of softened ice cream onto its flat side.
    10. Top with a second cookie, pressing gently to sandwich the ice cream evenly between the two cookies.
    11. Repeat this process with the remaining cookies and ice cream, then serve immediately or freeze for later enjoyment.

    Notes

    For easier handling, refrigerate the assembled sandwiches for about 10 minutes before serving. This helps the ice cream firm up slightly and prevents melting quickly.
    As the summer sun dips lower, this Oreo slushie becomes the unexpected hero of your cooling lineup. It’s an easy, fun way to bring friends together or enjoy solo as a satisfying treat after a long day. Keep the blender handy, because once you start, you’ll find yourself craving this frozen delight again and again.

  • A Rustic Twist on Peach Crisp That Will Transform Your Summer Desserts

    A Rustic Twist on Peach Crisp That Will Transform Your Summer Desserts

    Imagine walking into a kitchen filled with the sweet, summery aroma of ripe peaches and cinnamon. This Peach Crisp recipe isn’t just about satisfying your sweet tooth; it’s about capturing the carefree spirit of peaches in season, with a crunchy topping that adds the perfect texture. The magic lies in how simple ingredients become a nostalgic, comforting dish with minimal fuss.

    What’s special about this recipe is its versatility. You can personalize it with your favorite nuts or a splash of vanilla. It’s equally delicious warm straight from the oven or cooled with a dollop of whipped cream. Gathering around this peach crisp feels like a celebration of summer’s fleeting bounty.

    Peach Crisp

    Peach Crisp is a baked dessert featuring ripe, sweet peaches topped with a crunchy dating mixture of oats, flour, butter, and cinnamon. The dish results in a bubbling, golden-brown topping with tender, juicy fruit inside, offering a balance of soft and crispy textures.
    Prep Time 15 minutes
    Cook Time 40 minutes
    Total Time 55 minutes
    Servings: 6
    Course: Main Course
    Cuisine: American
    Calories: 250

    Ingredients
      

    • 4 cups ripe peaches, sliced peeling optional
    • 1 cup granulated sugar
    • 1 tablespoon lemon juice to enhance flavor and prevent browning
    • 1 cup old-fashioned rolled oats
    • 1 cup all-purpose flour
    • 1/2 cup brown sugar
    • 1/2 cup cold unsalted butter, cubed cold helps create a crumbly topping
    • 1 teaspoon ground cinnamon

    Equipment

    • Mixing bowls
    • Baking dish
    • pastry cutter or two forks
    • Measuring cups and spoons
    • Knife
    • peeler

    Method
     

    1. Slice the peaches and peel them if desired. Toss the slices with sugar and lemon juice in a large mixing bowl until coated evenly.
    2. Transfer the peach mixture to a greased baking dish, spreading it out into an even layer. This forms the juicy base for your crisp.
    3. In a separate bowl, combine oats, flour, brown sugar, and cinnamon. Stir to blend the dry ingredients thoroughly.
    4. Add the cold, cubed butter to the dry mixture. Use a pastry cutter or two forks to cut in the butter until the mixture resembles coarse crumbs with some pea-sized pieces.
    5. Sprinkle the crumbly topping evenly over the peaches, covering the surface completely to ensure a crunchy top.
    6. Bake in a preheated oven at 350°F (175°C) for about 40 minutes, until the topping is golden brown and the filling is bubbling at the edges.
    7. Remove from the oven and let cool slightly. Serve warm with whipped cream or vanilla ice cream if desired.

    Notes

    Peach Crisp can be customized with chopped nuts or a splash of vanilla in the topping. Properly cooled leftovers can be stored in the refrigerator for up to two days.
    This Peach Crisp is a wonderful way to honor the fleeting sweetness of summer fruits. It’s a dish that brings people together, whether at a family gathering or a quiet evening alone with a good book. The irresistible aroma and the burst of juicy peaches make every spoonful a small escape.

    As the seasons shift, this recipe becomes a nostalgic reminder to cherish the simple joys of fresh, ripe fruit. It’s easy to prepare, comforting, and full of sunshine—perfect for those lingering summer days or bright autumn mornings. Sometimes, the best dessert is the one that makes you feel right at home.