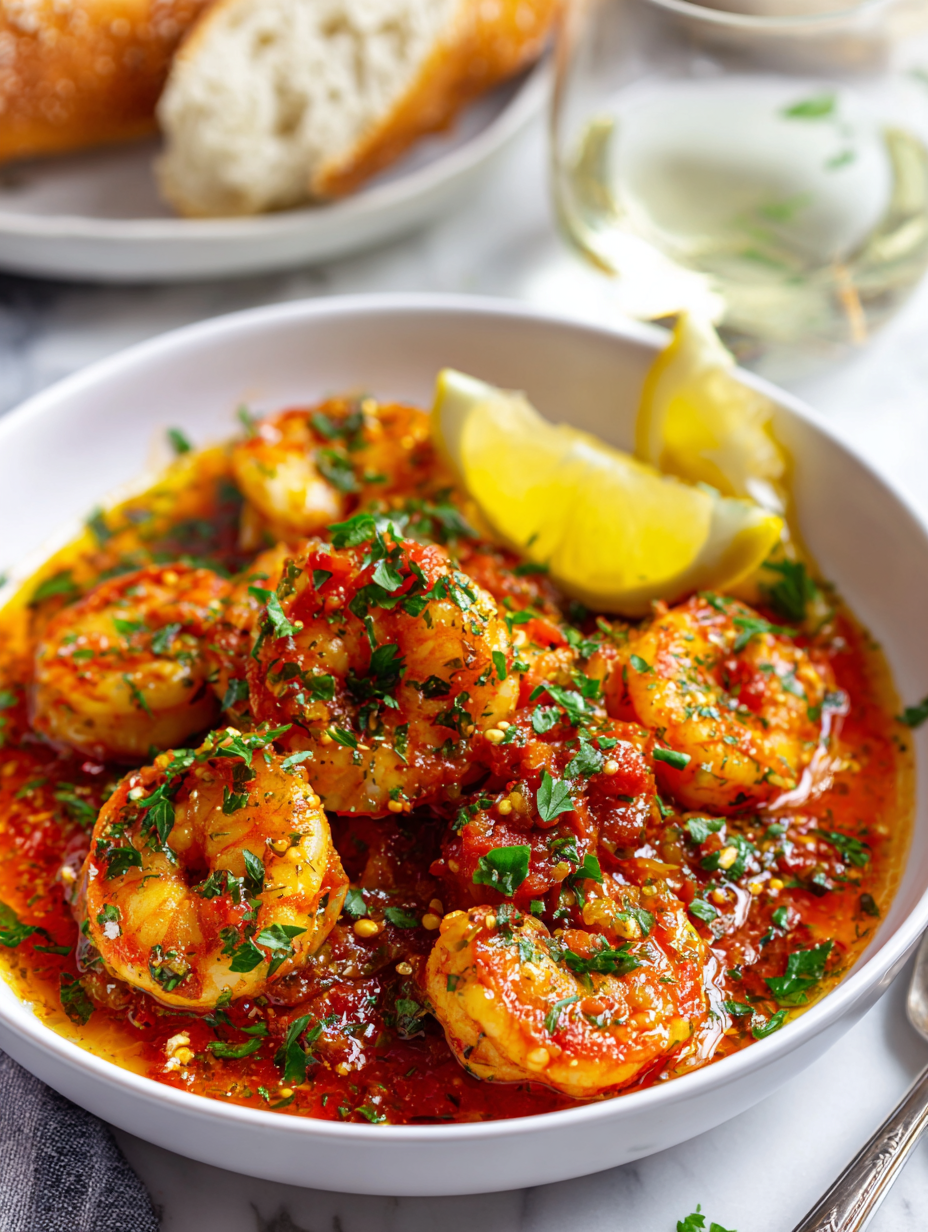
Author: LucasFoster

  • Spooktacular Ghost Brownies: An Unforgettable Halloween Treat

    Spooktacular Ghost Brownies: An Unforgettable Halloween Treat

    Halloween is the perfect excuse to break out the spooky baking tools we rarely use the rest of the year. This year, I decided to create something that’s just as whimsical as it is delicious—Ghost Brownies that seem to float off the plate. The smell of rich chocolate mingling with vanilla and a hint of vanilla extract is enough to make anyone’s spirits lift.

    What makes these brownies stand out isn’t just their ghostly appearance, but how surprisingly easy they are to whip up. Whether you’re a seasoned baker or just looking for a quick Halloween project, these treats transform your ordinary brownie into a haunted delight. Plus, the little marshmallow ghosts add a playful crunch and adorable vibe for every age.

    They’re perfect for last-minute parties or when you want a little pumpkin spice magic mixed with gooey chocolate. Nothing beats the joy of seeing kids’ faces light up when they spot these floating phantoms on the dessert table.

    Ghost Brownies

    Ghost Brownies are rich, fudgy chocolate brownies topped with fluffy marshmallow ghosts that appear to float on the surface. The recipe involves baking a chocolate batter until set and then decorating with marshmallow figures to create a whimsical Halloween treat with a soft, chewy interior and a slightly crisp crust.
    Prep Time 15 minutes
    Cook Time 35 minutes
    Total Time 50 minutes
    Servings: 12
    Course: Main Course
    Cuisine: American
    Calories: 250

    Ingredients
      

    • 1 cup unsalted butter melted
    • 2 cups granulated sugar
    • 4 large eggs beaten
    • 1 teaspoon vanilla extract
    • 1 cup all-purpose flour
    • 0.5 cup unsweetened cocoa powder preferably Dutch-processed
    • 0.25 teaspoon salt
    • 1 cup semi-sweet chocolate chips
    • 36 marshmallows for ghost decorations

    Equipment

    • Mixing bowl
    • Whisk
    • Baking Pan
    • Parchment paper
    • Cooling rack
    • Small Microwave-safe Bowl
    • Spoon or Spatula

    Method
     

    1. Preheat your oven to 350°F (175°C) and line a 9×13-inch baking pan with parchment paper for easy removal.
    2. In a large mixing bowl, whisk together melted butter and sugar until smooth and slightly shiny.
    3. Add the beaten eggs and vanilla extract to the wet mixture, whisking until fully combined and silky.
    4. Sift together the cocoa powder, flour, and salt in a separate bowl to aerate and remove lumps.
    5. Gradually fold the dry ingredients into the wet mixture using a spatula, just until no streaks remain.
    6. Stir in the chocolate chips, ensuring they are evenly distributed throughout the batter.
    7. Pour the batter into the prepared pan, spreading it evenly with a spatula to smooth the top.
    8. Bake in the preheated oven for about 35 minutes, or until a toothpick inserted in the center comes out with a few moist crumbs.
    9. Once baked, let the brownies cool completely in the pan on a wire rack for about 15-20 minutes.
    10. Meanwhile, cut the marshmallows in half diagonally to create ghost shapes; set aside.
    11. Arrange the marshmallow ghosts on top of the cooled brownies, pressing gently to adhere.
    12. Optionally, use chocolate or icing to add small eyes to the marshmallow ghosts for extra detail.
    13. Slice into squares and serve these spooky, chocolaty treats, perfect for Halloween parties or haunted movie nights!
    As the evening winds down, these Ghost Brownies will linger in your mind long after the last crumb is gone. Their playful look and nostalgic chocolate aroma make them a true crowd-pleaser, perfect for celebrating the spooky season to its fullest.

    Baking these adds a dash of chaos and fun to your Halloween preparations. They remind us that sometimes, the simplest ingredients can turn into the most memorable treats, especially when dressed up as ghosts. Enjoy the magic of Halloween with these charming, hauntingly delicious brownies.

  • Bell Pepper Bliss: A Cozy Twist on Stuffed Peppers

    Bell Pepper Bliss: A Cozy Twist on Stuffed Peppers

    Imagine biting into a bell pepper filled with a symphony of seasoned grains, melting cheese, and herbs. This recipe transforms a simple vegetable into a comforting pocket of warmth and flavor, perfect for a chilly evening. The aroma of roasted peppers mingling with garlic and spices will instantly pull you into a cozy kitchen moment.

    What’s special about this stuffed pepper recipe? It’s adaptable—gluten-free, vegetarian, or with a protein boost. Plus, each pepper is like a little edible vessel, making serving and presentation feel playful and inviting. It’s a nourishing, straightforward dish you can prep ahead and customize to your heart’s content.

    Stuffed Bell Peppers

    This dish features bell peppers filled with a seasoned mixture of grains, cheese, and herbs, then baked until tender and bubbling. The peppers are roasted until their skins are slightly charred and the filling is heated through, creating a colorful and hearty presentation with a melty, textured interior.
    Prep Time 20 minutes
    Cook Time 40 minutes
    Total Time 1 hour
    Servings: 4
    Course: Main Course
    Cuisine: International
    Calories: 250

    Ingredients
      

    • 4 large bell peppers preferably red, yellow, or orange
    • 1 cup cooked grains (rice, quinoa, or bulgur) cooled
    • 1 cup shredded cheese cheddar, mozzarella, or your favorite melting cheese
    • 1/4 cup chopped fresh herbs parsley, cilantro, or basil
    • 2 cloves garlic minced
    • 2 tablespoons olive oil
    • to taste salt and pepper

    Equipment

    • Oven
    • Baking dish
    • Skillet or saucepan
    • Mixing bowl
    • Knife
    • Cutting board

    Method
     

    1. Preheat the oven to 400°F (200°C). Slice the tops off the bell peppers and remove the seeds and membranes. Place them upright in a baking dish.
    2. In a skillet, heat olive oil over medium heat. Add minced garlic and sauté until fragrant, about 30 seconds, releasing a warm aroma.
    3. Add cooked grains to the skillet with garlic, stirring to combine; cook for 2 minutes so the flavors meld and grains warm through.
    4. Remove the skillet from heat and stir in shredded cheese, chopped herbs, salt, and pepper until the cheese begins to melt and everything is evenly mixed.
    5. Spoon the filling mixture into each hollowed-out pepper, pressing gently to fill completely and mound slightly on top.
    6. Bake the peppers in the preheated oven for about 30-40 minutes, until the peppers are tender and slightly charred on the edges, and the filling is bubbling and golden.
    7. Remove from oven and let cool slightly before serving. The peppers will be soft with a charred skin and a warm, cheesy filling.

    In a world of quick bites, this dish offers a slower, savoring experience. The crisp-tender peppers and hearty stuffing create a delightful contrast with every bite. It’s an easy way to bring some joy and comfort to your dinner table, especially during busy, chilly nights.

    Revisiting the tradition of stuffed peppers feels like reconnecting with a childhood memory, but with a modern twist. Whether paired with a fresh salad or enjoyed solo, it’s a reminder that simple ingredients can deliver big, satisfying flavors. That first bite is always a little revelation, even on the busiest days.

  • Autumn’s Hidden Gem: Roasted Pumpkin Soup with a Twist

    Autumn’s Hidden Gem: Roasted Pumpkin Soup with a Twist

    As the leaves turn fiery shades of red and gold, I find myself craving more than just pumpkin pie. This roasted pumpkin soup takes a different angle—embracing the smoky caramel notes from charred pumpkin skins. It’s a cozy potion that transforms ordinary ingredients into something unexpectedly complex.

    Imagine the warm aroma filling your kitchen—smoky, sweet, with an earthiness that makes you pause. Each spoonful is an ode to fall’s fleeting beauty—dark pumpkin flesh softened to golden velvet, touched by a hint of spices. This recipe turns simple roasted pumpkin into a comforting, layered broth that’s perfect for chilly days or mellow evenings.

    Smoky Roasted Pumpkin Soup

    This roasted pumpkin soup features charred pumpkin skins that add a smoky caramel flavor, resulting in a velvety, golden-orange broth. Key cooking methods include roasting and blending to develop a rich, layered taste and smooth texture, perfect for cozy fall days.
    Prep Time 15 minutes
    Cook Time 45 minutes
    Total Time 1 hour
    Servings: 4
    Course: Main Course
    Cuisine: Fall
    Calories: 180

    Ingredients
      

    • 1 kg pumpkin preferably sugar or carving pumpkin
    • 2 tablespoons olive oil for roasting
    • 1 medium onion chopped
    • 3 cloves garlic minced
    • 4 cups vegetable broth
    • 1 teaspoon ground cumin
    • 1/2 teaspoon smoked paprika
    • Salt and freshly ground black pepper to taste
    • 2 tablespoons cream or coconut milk optional for serving

    Equipment

    • Baking sheet
    • Blender
    • Chef’s knife
    • Cutting board
    • Large pot
    • Soup spoon

    Method
     

    1. Preheat your oven to 400°F (200°C). Slice the pumpkin in half, remove seeds, and brush the flesh with olive oil. Place the pumpkin halves cut side down on a baking sheet lined with parchment paper and roast until the flesh is tender and the skin is darkened and charred, about 45 minutes.
    2. Remove the pumpkin from the oven and let it cool slightly. Scoop out the soft flesh, discarding the skin and charred bits, and transfer it to a large pot.
    3. While the pumpkin is roasting, heat a drizzle of olive oil in a large pot over medium heat. Add the chopped onion and cook, stirring occasionally, until translucent and fragrant—about 5 minutes. Add the minced garlic and cook for another minute until aromatic.
    4. Pour in the vegetable broth and bring it to a gentle simmer. Add the cooked pumpkin flesh to the pot, along with ground cumin and smoked paprika. Stir to combine all the flavors.
    5. Let the mixture simmer for 10-15 minutes to meld the flavors and allow the pumpkin to soften further. Use an immersion blender or transfer to a blender to blend until smooth and creamy. Return to the pot if blended separately.
    6. Taste the soup and season with salt and black pepper as needed. Reheat gently if necessary until steaming hot.
    7. Optional: Swirl in a tablespoon of cream or coconut milk just before serving for added richness. Serve the soup hot, garnished with fresh herbs or a drizzle of cream if desired.
    This soup isn’t just about comforting flavors; it’s about celebrating the seasonal bounty in a new way. It’s a reminder that roasting vegetables can unlock unexpected depths of flavor, even when you’re pressed for time. A bowl of this pumpkin soup can make you feel grounded yet adventurous, all at once.

    Plus, it’s versatile enough to serve as a starter or a main for a casual dinner. Its rich, smoky undertone pairs beautifully with crusty bread or a crisp green salad. Just a warm bowl of this vibrant autumn harvest can brighten any day, no matter how busy or gray outside.

  • The Fizzy Magic: Uncovering the Charm of Sprite Slushies

    The Fizzy Magic: Uncovering the Charm of Sprite Slushies

    WHY I LOVE THIS RECIPE?

    • It’s an unexpected twist on a classic soda, turning simplicity into spectacle.
    • I enjoy the chaos of crushed ice mingling with bubbly citrus—so refreshing and playful.
    • It brings back childhood summers filled with sticky fingers and sweating glasses.
    • The quick assembly means instant cool relief during scorching afternoons.
    • Sharing it makes me nostalgic about unplanned summer adventures.

    Citrus Bubble Surprise

    This beverage features chilled soda mixed with crushed ice and fresh citrus slices, creating a fizzy, icy drink with a playful and refreshing appearance. The recipe involves simple assembly and quick mixing, resulting in a bubbly, slightly slushy texture with vibrant fruit visuals.
    Prep Time 5 minutes
    Total Time 5 minutes
    Servings: 2
    Course: Main Course
    Cuisine: fusion
    Calories: 80

    Ingredients
      

    • 1 cup crushed ice preferably finely crushed
    • 1 cup club soda or lemon-lime soda chilled
    • 2 slices orange thin slices, for garnish
    • 2 slices lime thin slices, for garnish
    • 2 slices lemon thin slices, for garnish

    Equipment

    • Cocktail glasses or tall drinking glasses
    • Ice crusher or sturdy cloth and rolling pin
    • Measuring cups and spoons
    • Spoon or stirrer

    Method
     

    1. Begin by preparing your crushed ice—use an ice crusher or place ice in a sturdy cloth and gently crush with a rolling pin until it reaches a coarse, snow-like consistency. This will give the drink a nice icy texture and visual appeal.
    2. Pour the chilled soda into a tall glass, filling it about halfway. This effervescent base sets the stage for the bubbly display.
    3. Add a generous layer of crushed ice on top of the soda, filling the glass almost to the brim. The ice should mound slightly, creating a frosty, textured surface.
    4. Gently stir the mixture with a spoon or stirrer to combine the bubbles with the icy layer, creating a frothy, fizzy appearance.
    5. Slice the citrus fruits into thin rounds and float a slice of orange, lime, and lemon on top of the crushed ice, arranging them for color and visual appeal.
    6. Serve immediately with a straw or a stirrer, so the drink remains bubbly and visually vibrant, ready to enjoy the playful combination of fizz and icy crunch.

    Notes

    Best enjoyed immediately while the bubbles are lively and the ice remains crushed and frosty.

    As the season shifts, these icy concoctions become more than a treat—they’re a reminder to embrace spontaneous fun. Keep a bag of crushed ice ready, and you’ll always have a quick escape from the heat. Sometimes, the simplest drinks create the most vivid memories, all in a sparkling splash.

  • Summer’s Sweetest Secret: The Peach Slushie You Can’t Resist

    Summer’s Sweetest Secret: The Peach Slushie You Can’t Resist

    Imagine biting into a perfectly ripe peach, the juice bursting with every chew, and then blending that magic into a frozen, icy delight. That’s what makes this peach slushie so special — it captures the essence of summer in every sip. Fresh peaches, a splash of lemon, and just the right chill turn ordinary fruit into a life-affirming treat.

    For those who love a beverage that cools the chaos of chaotic days, this recipe is a game-changer. It’s straightforward, yet feels indulgent and nostalgic. Plus, it’s a fun way to enjoy a seasonal fruit when the market is overflowing.

    Peach Slushie

    This peach slushie is a frozen beverage that combines ripe peaches with lemon juice to create a smooth, icy texture. Blended until silky and thick, it captures the sweet, juicy flavor of summer fruit in a refreshing cold drink. The final result is a vibrant, frosty beverage with a slightly chunky, yet smooth consistency.
    Prep Time 10 minutes
    Total Time 10 minutes
    Servings: 2
    Course: Main Course
    Cuisine: American
    Calories: 80

    Ingredients
      

    • 4 cups ripe peaches, peeled and sliced preferably frozen for best texture
    • 1 tablespoon lemon juice freshly squeezed for bright flavor
    • 2 teaspoons honey or simple syrup optional, for added sweetness
    • 1/2 cup water or ice to help blend and chill

    Equipment

    • Blender
    • Knife

    Method
     

    1. Place the sliced peaches into your blender, ensuring they’re evenly distributed for smooth blending.
    2. Add the lemon juice and honey or simple syrup to the blender, balancing the natural sweetness of the fruit.
    3. Pour in the water or add the ice to help cool and thin the mixture.
    4. Secure the lid and blend everything on high until the mixture is completely smooth and frosty, about 30-45 seconds. It should have a thick, icy consistency that’s easy to sip.
    5. Stop the blender and check the texture—if it’s too thick, add a little more water; if it’s too thin, blend in some more frozen peaches or ice until it reaches your desired consistency.
    6. Pour the peach slushie into glasses, and optionally garnish with a slice of peach or a sprig of mint for a pretty presentation.

    Notes

    For a creamier texture, add a dollop of Greek yogurt or a splash of coconut milk before blending.

    As the heat presses down, there’s something about a slushie that refreshes the spirit as well as the palate. This peach concoction is not just a drink; it’s a reminder to pause and savor summer’s bounty.

    Enjoy making it whenever the peaches are at their peak. It’s a simple way to bring a bright, cool burst to any day, whether at an outdoor gathering or a quiet afternoon at home.

  • Autumnal Spice & Cream: Roasted Butternut Squash & Carrot Soup

    Autumnal Spice & Cream: Roasted Butternut Squash & Carrot Soup

    As the leaves turn shades of amber and gold, I find myself craving the comforting embrace of warm soups. This roasted butternut squash and carrot soup offers a perfect blend of earthiness and sweetness, amplified by caramelized edges and smoky undertones. It’s a dish that invites slow, mindful eating amid the sounds of crackling leaves outside.

    Roasting transforms everyday vegetables into something truly special—a symphony of flavors that bloom in every spoonful. This recipe is my go-to when I want to celebrate the season or cozy up on chilly evenings. The rich, velvety texture and natural sweetness make it a versatile meal for any occasion, whether for family dinners or a small gathering with friends.

    Roasted Butternut Squash and Carrot Soup

    This roasted butternut squash and carrot soup is made by roasting the vegetables until caramelized and tender, then blending them into a smooth, velvety purée. The final dish has a rich, slightly sweet flavor with a creamy texture and a warm, inviting appearance.
    Prep Time 15 minutes
    Cook Time 40 minutes
    Total Time 55 minutes
    Servings: 4
    Course: Main Course
    Cuisine: Seasonal
    Calories: 150

    Ingredients
      

    • 1 lb butternut squash peeled and cubed
    • 2 large carrots peeled and sliced
    • 2 tablespoons olive oil for roasting
    • 1 small onion diced
    • 2 cloves garlic minced
    • 4 cups vegetable broth
    • to taste salt and pepper for seasoning

    Equipment

    • Baking sheet
    • Blender
    • Saucepan

    Method
     

    1. Preheat the oven to 400°F (200°C). Spread the cubed butternut squash and sliced carrots evenly on a baking sheet. Drizzle with olive oil, then toss to coat thoroughly. Roast until the vegetables are deeply browned and caramelized around the edges, about 25-30 minutes.
    2. While the vegetables roast, sauté the diced onion in a large saucepan over medium heat with a splash of olive oil. Cook until translucent and fragrant, about 5 minutes, stirring occasionally.
    3. Add the minced garlic to the onions and cook for another minute until fragrant. Be careful not to burn the garlic.
    4. Transfer the roasted vegetables into the saucepan with the sautéed onions and garlic. Pour in the vegetable broth and bring to a gentle simmer.
    5. Use an immersion blender or carefully transfer the mixture to a blender. Blend until completely smooth and velvety, with no chunks remaining.
    6. Return the blended soup to the saucepan if needed. Warm over low heat, seasoning with salt and pepper to taste. Stir gently to combine.
    7. Once heated through, ladle the soup into bowls, and serve hot. Optionally, garnish with fresh herbs or a swirl of cream.

    Notes

    Roasting the vegetables enhances their natural sweetness and depth of flavor. Adjust seasoning to your preference for salt and pepper.

    Whenever I make this soup, I feel a sense of accomplishment. It’s simple but feels indulgent, especially with a swirl of cream or a sprinkle of toasted seeds on top. The warm aroma alone signals comfort and autumn’s arrival, which is exactly what I need right now.

    This recipe reminds me of childhood falls and long conversations over mugs of hot soup. It’s a dish that grounds me, offering both nourishment and nostalgia. As the season shifts, I’ll be turning to this comforting bowl, knowing it’s a taste of seasonal magic in every bite.

  • Spooky Cool: The Halloween Brain Jello Mold That Warms the Ghoulish Heart

    Spooky Cool: The Halloween Brain Jello Mold That Warms the Ghoulish Heart

    Halloween is the one night when chaos reigns and every mealtime becomes a playful experiment. This year, I dared to craft a Brain Jello Mold that’s more creepy than cute but totally edible and delicious. The squishy, translucent texture feels like real brain tissue, except it’s sweet, fruity, and no one will mind if you slice into its grotesque shape.

    What makes this project irresistible is how it combines nostalgic childhood science projects with spooky season flair. Plus, the act of transforming plain Jello into something eerily brain-like sparks a happy chaos in my kitchen. It’s perfect for impressing party guests—or just satisfying a bizarre craving for gory goodies.

    Brain Jello Mold

    This dish is a spooky, gelatin-based dessert molded into a brain-like shape that features a translucent, squishy texture. Made with fruit-flavored gelatin and layered to resemble brain tissue, it is both eerie in appearance and sweet in flavor, with a soft, jiggle-inducing final texture.
    Prep Time 20 minutes
    Cook Time 10 minutes
    Total Time 30 minutes
    Servings: 8
    Course: Main Course
    Cuisine: Seasonal / Halloween
    Calories: 120

    Ingredients
      

    • 1 box fruit-flavored gelatin (e.g., cherry or berry) preferably unflavored gelatin powder for clearer effect
    • 2 cups boiling water
    • 1 cup cold water
    • 1 can sweetened condensed milk optional, for a creamier texture

    Equipment

    • Heatproof mixing bowl
    • Whisk
    • Brain-shaped mold or silicone mold
    • Measuring cups and spoons
    • Saucepan
    • Spray bottle or non-stick spray

    Method
     

    1. Spray your brain-shaped mold with non-stick spray to ensure easy removal later.
    2. Pour the dry gelatin powder into a heatproof mixing bowl.
    3. Add boiling water to the gelatin and whisk thoroughly until completely dissolved, about 2-3 minutes. The mixture should be smooth and glossy.
    4. Add cold water and stir to combine. If using sweetened condensed milk for a creamier effect, mix it in now for a richer, opaque appearance.
    5. Pour the gelatin mixture carefully into the prepared mold, filling it all the way to the top for full brain shape.
    6. Place the mold on a tray and transfer it to the refrigerator. Chill for at least 4 hours or until fully set and firm to the touch.
    7. Once set, gently loosen the edges of the gelatin with a small spatula or knife, then invert the mold onto a serving plate to reveal the brain-like shape.
    8. If desired, use a spoon or small knife to add details or texture to the surface for a more realistic or grotesque effect.
    9. Slice into portions and serve, showcasing its squishy, translucent, brain-like appearance with a fruity aroma.

    Notes

    For extra creepiness, add red-colored syrup or fruit coulis around the mold before serving to mimic blood vessels.
    This Brain Jello Mold isn’t just a conversation starter; it’s a reminder that food can be fun and spooky at the same time. As the season chills into fall, embracing these playful recipes helps make moments memorable, whether for friends or fun solo experiments.

    When the last piece is sliced and served, the giggles and shudders make all the prep worth it. Plus, it’s a fantastic way to get creative with upcycling leftover jello or experimenting with vibrant, eerie colors. Halloween tables just got a lot more interesting—and so will your kitchen adventures.

  • Spooky Seasonal Delight: Halloween Pumpkin Cheesecake Bars

    Spooky Seasonal Delight: Halloween Pumpkin Cheesecake Bars

    Every October, I find myself craving something that captures the essence of fall’s mystery and sweetness. This year, I decided to craft a dessert that marries the creamy richness of cheesecake with the warm, spicy notes of pumpkin and autumnal spices. The process transforms simple ingredients into a layered masterpiece that’s as fun to make as it is to eat.

    What makes these Halloween Pumpkin Cheesecake Bars truly special is their unexpected flavor twist. They’re a bit nostalgic, a little chaotic, and perfectly suited for the season’s festivities. Plus, they sneak in a healthy dose of pumpkin, giving you that cozy, festive feeling in every bite.

    Halloween Pumpkin Cheesecake Bars

    Pumpkin cheesecake bars are a layered dessert combining a buttery crust, a creamy pumpkin-flavored cheesecake layer, and a spiced topping. The dish is baked until set, resulting in a smooth, dense texture with a vibrant orange hue and warming autumnal spices throughout.
    Prep Time 20 minutes
    Cook Time 45 minutes
    Total Time 1 hour 5 minutes
    Servings: 12
    Course: Main Course
    Cuisine: American
    Calories: 350

    Ingredients
      

    • 1 ½ cups graham cracker crumbs
    • ¼ cup granulated sugar
    • ½ cup unsalted butter, melted
    • 16 oz cream cheese, softened
    • 1 cup pumpkin purée
    • ¾ cup granulated sugar
    • 3 large eggs
    • 1 ½ tsps cinnamon
    • ½ tsp ground ginger
    • ¼ tsp ground nutmeg
    • ¼ tsp clove
    • 1 cup sour cream
    • ¼ cup brown sugar
    • ½ tsp vanilla extract

    Equipment

    • 8×8 inch baking pan
    • Mixing bowls
    • Rubber spatula
    • electric mixer or whisk
    • Measuring cups and spoons
    • Oven

    Method
     

    1. Preheat your oven to 350°F (175°C). Combine graham cracker crumbs and sugar in a bowl, then stir in melted butter until the mixture resembles wet sand. Press this mixture firmly into the bottom of your baking pan to form an even crust. Bake for 10 minutes to set, then set aside to cool slightly.
    2. In a large mixing bowl, beat the softened cream cheese until smooth and creamy, about 2 minutes. Add pumpkin purée, sugar, eggs, cinnamon, ginger, nutmeg, and clove, mixing until fully combined and the batter is smooth.
    3. Pour the pumpkin cheesecake filling over the cooled crust, spreading it evenly with a spatula. Smooth the top for a flat surface.
    4. Bake for 40–45 minutes, or until the edges are set and the center slightly jiggles when shaken. The surface may crack slightly, which is normal. Remove from oven and let cool completely to room temperature.
    5. In a small bowl, mix sour cream, brown sugar, and vanilla until smooth and slightly thickened. Spread this topping gently over the cooled cheesecake layer, smoothing with a spatula to cover evenly.
    6. Refrigerate the bars for at least 2 hours, or until fully chilled and set. Slice into squares and serve, enjoying the creamy pumpkin flavor with a hint of spice.

    Notes

    For a festive touch, decorate the top with whipped cream or candy eyes before serving.
    These bars are not just a treat; they’re a conversation starter at any seasonal gathering. They bring a sense of joy and chaos, and maybe a little nostalgia, to your Halloween table. As the cool air settles in, they serve as a reminder that some of the sweetest moments come from simple, homemade delights. So, embrace the mess, the spice, and the pumpkin magic—happy haunting!

  • Spooky Charm: Halloween Pumpkin Rice Krispie Treats You Can’t Miss

    Spooky Charm: Halloween Pumpkin Rice Krispie Treats You Can’t Miss

    As October darkens the days and the air turns crisp, I find myself craving more than just the usual sweets for Halloween. This year, I decided to combine the nostalgic crunch of Rice Krispie treats with a festive pumpkin twist that surprises both the eyes and the taste buds. The smell of melting butter mingled with cinnamon and pumpkin spice instantly creates a cozy, autumnal atmosphere in my kitchen.

    There’s something irresistible about these treats—they’re easy to make, and they spark joy on a busy, candy-filled night. Plus, the vibrant orange color and adorable pumpkin faces make them perfect for sharing at parties or handing out to trick-or-treaters. This recipe is my way of embracing the chaos of Halloween while still keeping it sweet and simple.

    Pumpkin-Spiced Rice Krispie Treats

    These treats combine the classic crispy texture of Rice Krispie squares with a seasonal pumpkin flavor and warm spices. Made by melting butter and marshmallows, then mixing in pumpkin puree, cinnamon, and cereal, they form a vibrant orange, slightly sticky treat that can be shaped into fun pumpkins or bars.
    Prep Time 10 minutes
    Cook Time 15 minutes
    Total Time 25 minutes
    Servings: 12
    Course: Main Course
    Cuisine: American
    Calories: 150

    Ingredients
      

    • 4 cups mini marshmallows
    • 3 tablespoons unsalted butter
    • 1 cup canned pumpkin puree
    • 1 teaspoon ground cinnamon
    • 1/2 teaspoon pumpkin pie spice
    • 6 cups Rice Krispies cereal
    • optional orange food coloring for vibrant color

    Equipment

    • Large saucepan
    • Mixing spoon
    • 9×13 inch baking dish
    • Parchment paper
    • Cookie cutter or knife for shaping

    Method
     

    1. Grease a 9×13 inch baking dish with butter or line it with parchment paper to prevent sticking.
    2. In a large saucepan, melt the butter over medium heat while stirring occasionally until it’s melted and starts to bubble gently.
    3. Add the marshmallows to the melted butter and stir continuously until completely melted and smooth, creating a glossy mixture with a faint aroma of toasted marshmallows.
    4. Stir in the pumpkin puree, cinnamon, and pumpkin pie spice until well combined and the mixture turns a warm orange hue, releasing a fragrant, autumnal scent.
    5. If you wish to intensify the color, stir in a few drops of orange food coloring until evenly blended.
    6. Remove the saucepan from heat and immediately pour the Rice Krispies cereal into the mixture, folding gently with a spatula to coat all the cereal evenly and avoid crushing the flakes.
    7. Transfer the mixture into the prepared baking dish and press it down firmly with a spatula or greased hands to create an even layer. Let it cool for about 15 minutes to set.
    8. Once cooled and firm, use a cookie cutter or a sharp knife to cut into pumpkin shapes or bars, creating neat, festive pieces.
    9. Arrange the treats on a serving platter and enjoy their crispy, chewy texture with bursts of pumpkin spice flavor.

    Notes

    For added fun, decorate the pumpkin faces with chocolate chips or orange icing.

    Crafting these pumpkin Rice Krispie treats is a small act of seasonal celebration. They’re quick to assemble, and the kids love helping decorate the faces with chocolates and sprinkles. Every bite offers a comforting crunch, layered with a whisper of pumpkin spice that feels just right for fall.

    Whether you’re hosting a spooky gathering or want a charming treat for the school party, these are bound to delight. They embody the playful spirit of Halloween, with a flavor that’s as joyful as the costumes and decorations around you. Enjoy the magic of the season with this easy, festive sweet option.

  • Unconventional Comfort: Taco Soup with a Twist

    Unconventional Comfort: Taco Soup with a Twist

    Imagine a winter evening when the house is filled with the irresistible aroma of melting cheese and seasoned beef. Instead of the usual casserole or stew, this taco soup offers a lively, chip-and-dip-inspired flavor that surprises the taste buds. It’s a perfect blend of chaos and comfort, with ingredients that might already be hiding in your pantry.

    This recipe isn’t just about filling bellies; it’s about sparking nostalgic memories of childhood taco nights, but with a hearty, warming twist. Each spoonful delivers a spicy, tangy kick paired with the coziness of melted cheese and crunchy tortilla chips. It’s the kind of comfort that turns a regular night into an event.

    WHY I LOVE THIS RECIPE?

    • I adore how every bite echoes lazy, joyful taco nights with a much-needed adult twist.
    • My chaotic kitchen is no match for the simplicity of just tossing everything in one pot.
    • It fills my home with a smoky, spicy aroma and makes the coldest days feel warmer.
    • Seeing everyone’s surprised faces when they realize it’s more than just taco filling turned soup.
    • It’s a messy, satisfying reminder that comfort food doesn’t have to be complicated.

    AVOID MY DISASTER (You’re Welcome)

    • FORGOT to read the recipe? Over-cooked beans turn mushy—add a splash of broth to salvage texture.
    • DUMPED the cheese early? It cooled and clumped—stir in hot soup to revive that gooey goodness.
    • OVER-TORCHED the corn tortillas? They’ll taste burnt—toast new ones quickly for that crunch.
    • INTOXICALLY seasoned? Rinse and start fresh—quick, fresh lime juice helps mask excess spice.

    QUICK FIXES THAT SAVE YOUR DAY

    • When soup is too thick, splash in a little chicken broth to shimmer your sauce back to life.
    • Patch blandness by adding a dash of hot sauce or a squeeze of lime for brightness.
    • Shield bitterness with a generous sprinkle of fresh cilantro or green onions.
    • If beans are undercooked, cook for five minutes longer to soften perfectly.
    • When cheese isn’t melting right, add it slowly and stir continuously—leaves a creamy, cheesy shimmer.

    This taco soup isn’t just a meal; it’s a way to celebrate the chaos of cooking and the comfort of familiar flavors. It’s perfect for quick weeknight dinners or lazy weekends, when you want something hearty without fuss. The combination of spices, cheese, and crunchy chips creates a dish that warms not just the stomach but the soul.

    Whatever the season, this soup’s lively flavors remind us that a little bit of chaos in the kitchen can lead to something unexpectedly delightful. It’s fast, forgiving, and full of personality—a true testament to the joy of home-cooked comfort food.

    Taco Soup

    Taco soup is a hearty, flavorful dish that combines seasoned ground beef, beans, tomatoes, and spices simmered together to create a chunky, comforting soup. It is finished with melted cheese and crunchy tortilla chips, resulting in a thick, textured bowl of vibrant flavors and satisfying warmth. The dish features a thick, stew-like consistency with a colorful, inviting appearance.
    Prep Time 10 minutes
    Cook Time 30 minutes
    Total Time 40 minutes
    Servings: 6
    Course: Main Course
    Cuisine: American
    Calories: 350

    Ingredients
      

    • 1 lb ground beef or turkey or chicken
    • 1 can diced tomatoes with juices
    • 1 can black beans drained and rinsed
    • 1 cup corn kernels fresh or frozen
    • 2 tablespoons taco seasoning or chili powder and cumin
    • 2 cups chicken broth or beef broth
    • 1 cup shredded cheddar cheese for topping
    • to taste tortilla chips crushed for topping
    • 1 fresh lime lime wedge for garnish

    Equipment

    • Large pot or Dutch oven
    • Wooden spoon or spatula

    Method
     

    1. Heat the large pot over medium heat and add the ground beef. Cook, breaking it apart with a spoon, until browned and cooked through, about 5-7 minutes, until you hear a gentle sizzling and see the meat turn a rich brown.
    2. Add the diced tomatoes, draining some juices if necessary, and stir well to combine with the beef. Let the mixture simmer briefly until fragrant, about 2 minutes, as the tomatoes release their aroma.
    3. Stir in the black beans, corn, and taco seasoning, ensuring everything is evenly coated and distributed. Cook for another 2-3 minutes until heated through and aromatic.
    4. Pour in the chicken broth, then increase the heat slightly to bring the mixture to a gentle boil. Once bubbling, reduce the heat to low, cover, and let it simmer for 15-20 minutes, allowing the flavors to meld and the soup to thicken slightly.
    5. Uncover the soup and stir well to loosen anything sticking to the bottom. Check the seasoning and adjust with salt or more spices if needed. Once the soup is flavorful and heated evenly, ladle it into bowls.
    6. Sprinkle shredded cheddar cheese on top of each bowl, allowing it to melt slightly from the hot soup. Crush a handful of tortilla chips and sprinkle over the cheese for added crunch and flavor.
    7. Squeeze fresh lime juice over the bowls for a bright, tangy kick. Serve immediately, garnished with additional chips or chopped cilantro if desired, and enjoy the warm, vibrant flavors of this comforting taco soup.

    Now that you’ve got the scoop on this unexpected taco soup, you can make it your own with your favorite toppings and spices. Its versatility lets you play with heat levels and add-ins, turning it into a personalized masterpiece.

    Cooking this soup feels like a small rebellion against the stress of everyday life. It’s a quick, satisfying meal that keeps the chill out and the smiles in. Plus, it’s a reminder that even simple ingredients can create something wonderfully memorable.