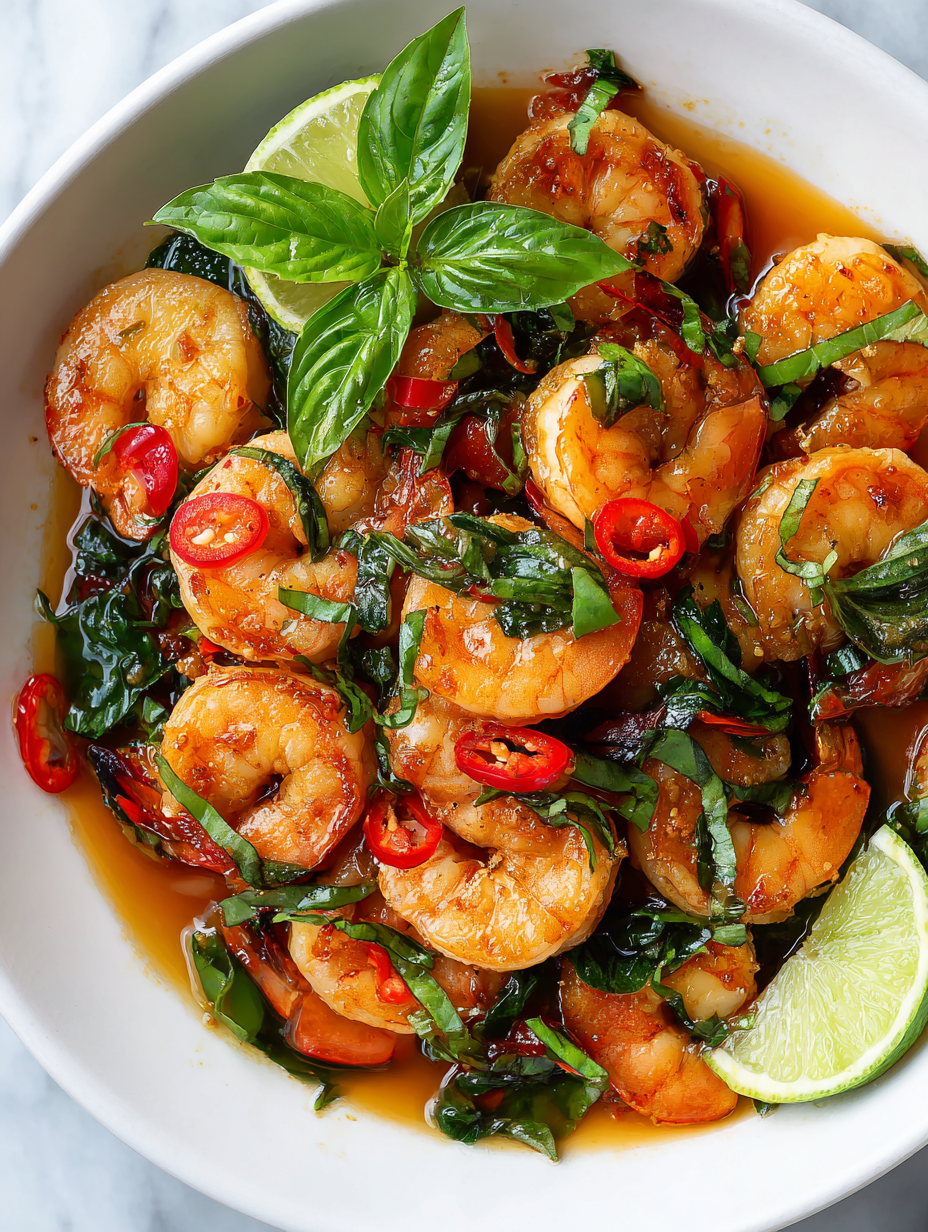
Author: LucasFoster

  • The Secret Garden of Tomato Sauce: An Unexpected Twist

    The Secret Garden of Tomato Sauce: An Unexpected Twist

    Cooking tomato sauce from scratch often feels like a straightforward task. But what if you approached it as a nostalgic journey into childhood memories of afternoons in grandma’s kitchen? Using rare heirloom tomatoes and a splash of something curious like roasted red pepper adds depth and surprise.

    Today, I want to share a recipe that transforms simple ingredients into a vibrant, multi-layered sauce. It’s perfect for those cozy evenings or when you crave something rich yet fresh, bursting with flavor and history.

    Heirloom Tomato Sauce with Roasted Red Pepper

    This homemade tomato sauce combines ripe heirloom tomatoes and roasted red pepper for a vibrant flavor. The sauce is simmered until thickened, resulting in a smooth, colorful, and multi-layered final texture that captures fresh and smoky notes.
    Prep Time 20 minutes
    Cook Time 40 minutes
    Total Time 1 hour
    Servings: 4
    Course: Main Course
    Cuisine: Homemade
    Calories: 120

    Ingredients
      

    • 6 cups heirloom tomatoes preferably ripe and fragrant
    • 1 red red bell pepper roasted and peeled
    • 2 cloves garlic minced
    • 2 tablespoons olive oil divided
    • 1/2 teaspoon salt
    • 1/4 teaspoon black pepper
    • 1 pinch sugar to balance acidity

    Equipment

    • Chef’s knife
    • Cutting board
    • Blender or immersion blender
    • Medium saucepan
    • Baking sheet

    Method
     

    1. Preheat your oven and place the whole red bell pepper on a baking sheet, roasting until the skin chars and blisters, about 20 minutes. Once cool enough to handle, peel off the charred skin and discard seeds, then set aside.
    2. While the pepper roasts, core the heirloom tomatoes and chop them roughly. Place them in a large bowl to prepare for cooking.
    3. Heat a tablespoon of olive oil in a medium saucepan over medium heat. Add the minced garlic and sauté until fragrant, about 30 seconds, until you smell a warm aroma and the garlic is just beginning to turn golden.
      6 cups heirloom tomatoes
    4. Add the chopped tomatoes to the pan and stir to coat with the garlic and oil. Cook, stirring occasionally, until the tomatoes start breaking down and releasing juices, about 10 minutes.
      6 cups heirloom tomatoes
    5. Chop the roasted red pepper into smaller pieces and add it to the tomato mixture. Stir well to combine all flavors evenly.
      6 cups heirloom tomatoes
    6. Pour in the remaining tablespoon of olive oil, then add salt, black pepper, and a pinch of sugar to balance the acidity. Simmer the sauce gently on low heat for about 20 minutes, allowing flavors to meld and the sauce to thicken.
      6 cups heirloom tomatoes
    7. Once the sauce has thickened and deepened in color, remove the pan from heat. Use an immersion blender or transfer to a regular blender to puree the mixture until smooth, adjusting thickness as desired.
    8. Return the blended sauce to low heat for a few more minutes to ensure it’s heated through. Taste and adjust seasoning if needed.
    9. Serve the vibrant red sauce hot over pasta, grilled vegetables, or your favorite dish, showing off its rich color and smooth texture.
    This tomato sauce recipe is more than just a condiment; it’s a story in every spoonful. Whether you’re simmering it slowly on the stove or quickly blending for a fresh twist, it captures no-fuss comfort with a punch of personality.

    So next time you hunt for dinner inspiration, remember this sauce’s humble beginnings and bold character. It’s a reminder that even classic recipes can surprise us with their subtle complexity and a hint of nostalgia.

  • Chilled Vodka Slushies with a Twist of Lemon and Basil

    Chilled Vodka Slushies with a Twist of Lemon and Basil

    As summer heat hits its peak, I find myself craving something icy and unexpectedly sophisticated. Vodka slushies are my go-to refreshment, but I love giving them a twist that surprises the palate. Imagine bright lemon, fresh basil, and a hint of mint swirling in a glass of icy vodka — irresistible and utterly simple to prepare.

    Adding herbal notes to a frozen cocktail isn’t just about flavor; it’s about creating a sensory experience. The chill of the slushie combined with the aroma of fresh herbs makes each sip feel like a mini escape. This recipe proves that even the most casual drink can feel a little special.

    Herbal Vodka Slushie

    This vodka slushie combines bright lemon juice with fresh basil and mint, blended with ice to create a icy, smooth texture. The herbal aromas and tangy citrus flavor make for a refreshingly sophisticated frozen cocktail. The final appearance is a frosty, vibrant drink with small ice crystals and visible herb leaves stirred in.
    Prep Time 10 minutes
    Total Time 10 minutes
    Servings: 2
    Course: Main Course
    Cuisine: fusion
    Calories: 210

    Ingredients
      

    • 1 cup fresh lemon juice about 2-3 lemons
    • 8 fresh basil leaves fresh basil
    • 8 fresh mint leaves fresh mint
    • 1 cup vodka
    • 2 cups ice cubes

    Equipment

    • Measuring cups and spoons
    • Blender
    • Citrus juicer or reamer
    • Herb knife or scissors

    Method
     

    1. Juice the lemons using a citrus reamer or juicer until you have about one cup of fresh lemon juice. Set aside.
    2. Roughly chop the basil and mint leaves to help release their aromatic oils, then set aside.
    3. Add the lemon juice, vodka, and the chopped herbs into your blender jar.
    4. Pulse a few times to slightly crush the herbs and combine the liquid ingredients evenly.
    5. Add the ice cubes to the blender and secure the lid firmly.
    6. Blend on high speed until the mixture is smooth, frosty, and with a slushy texture, about 30-60 seconds.
    7. Open the lid and check the consistency; it should be thick, icy, and well combined with visible herb flecks.
    8. Pour the slushie into chilled glasses and garnish with a small sprig of basil or mint if desired.

    Notes

    For an extra refreshing twist, rim glasses with sugar or salt before pouring. Adjust the sweetness by adding a touch of simple syrup if desired.

    This recipe is perfect for those lazy weekends or spontaneous gatherings when a cold, flavorful drink hits the spot. The simplicity and freshness make it an instant crowd-pleaser and a great way to impress without fuss. Plus, it’s endlessly customizable—swap basil for mint, or lemon for lime.

    Enjoy the crisp, invigorating burst of this vodka slushie whenever you need a moment of cool relief. It’s a reminder that the best drinks are often the simplest, with just a few fresh ingredients and a good chill. Cheers to making your summer moments cooler and more memorable.

  • Spooktacularly Creepy: The Halloween Mummy Pizza

    Spooktacularly Creepy: The Halloween Mummy Pizza

    Every October, I find myself craving something both playful and savory to celebrate Halloween. This year, I decided to craft a dish that merges childhood nostalgia with spooky fun: the Halloween Mummy Pizza. It’s a mischievous twist on classic pizza that looks like a wandering mummy, wrapped in gooey cheese and bandages of pepperoni.

    The best part? It’s incredibly easy to make, perfect for a quick themed dinner or a kid-friendly party. Watching friends’ and family’s reactions as they see it for the first time is priceless. Plus, the aroma of melting cheese and seasoned crust instantly transports me back to haunted house visits and pumpkin patch strolls.

    Halloween Mummy Pizza

    This dish features a baked pizza topped with melted cheese and arranged to resemble a spooky mummy. The crust provides a crispy base, while the cheese and pepperoni create a gooey, bandaged appearance that is both playful and savory. It is assembled and baked until golden and bubbly, resulting in a visually fun and tasty treat.
    Prep Time 15 minutes
    Cook Time 15 minutes
    Total Time 30 minutes
    Servings: 4
    Course: Main Course
    Cuisine: American
    Calories: 350

    Ingredients
      

    • 1 roll pizza dough store-bought or homemade
    • 1 cup shredded mozzarella cheese preferably fresh
    • 20 slices pepperoni slices for bandage wrapping
    • 1 tablespoon olive oil for brushing crust
    • 1 teaspoon dried Italian herbs optional, for added flavor

    Equipment

    • Baking sheet
    • Rolling pin

    Method
     

    1. Preheat your oven to 400°F (200°C). Lightly flour a clean surface and roll out the pizza dough into a large circle or oval shape, about 12 inches in diameter.
    2. Transfer the rolled dough onto a baking sheet lined with parchment paper. Brush the edges of the crust with olive oil to help it crisp and develop a golden color during baking.
    3. Evenly sprinkle the shredded mozzarella cheese over the entire surface of the dough, leaving a small border around the edges for the crust.
    4. Arrange slices of pepperoni on top of the cheese to mimic the look of bandages winding around the mummy. Overlap and scatter slices to cover the cheese surface.
    5. Sprinkle dried Italian herbs over the top for extra flavor and visual appeal, if using.
    6. Bake the pizza in the preheated oven for about 12-15 minutes, or until the crust is golden brown and the cheese is bubbling and slightly browned.
    7. Remove the pizza from the oven and let it cool for a couple of minutes. Use extra pepperoni slices to create additional bandages or detailing if desired to enhance the mummy look.
    8. Slice the mummy pizza into wedges, revealing the cheesy, bandaged appearance, and serve immediately for a fun and spooky meal.

    Notes

    For an even more festive touch, add olive eyes or tiny edible decoration for added spooky detail.

    This mummy pizza is more than just a fun food project; it’s a cheerful way to bring everyone together. During a season filled with spooky stories and ghostly decorations, this dish adds a deliciously silly touch to the celebration. It’s perfect for making memories and delighting curious little eaters.

    Whenever I serve this, I’m reminded that food can be both creative and comforting. It captures the whimsical spirit of Halloween while satisfying those lingering pizza cravings. No matter how chaotic the kitchen gets, a plateful of this can turn any night into a joyful, goofy Halloween feast.

  • Caramel Slushie Magic: A Sweet Chill You Didn’t Know You Needed

    Caramel Slushie Magic: A Sweet Chill You Didn’t Know You Needed

    Imagine the warm days of summer mixed with the cozy aroma of caramel. That’s the magic behind this unusual twist on a classic cold treat. When I first stumbled upon this idea, I was skeptical about how well caramel would freeze but oh, what a surprise it was. Each sip delivers a burst of rich sweetness with that satisfying icy crunch.

    This recipe is a dance of textures and flavors—smooth caramel blended into a frosty slush that tingles your taste buds. It’s perfect for moments when you crave something indulgently sweet but still refreshingly cold. Plus, it’s so easy to whip up that it becomes my go-to for last-minute cravings.

    Caramel Ice Slush

    This dessert features a smooth caramel-flavored syrup blended into icy crushed ice, creating a frosty treat with rich sweetness and a satisfying crunch. The preparation involves cooking caramel to develop depth of flavor, then combining it with ice and blending until smooth and textured. The final appearance is a pale gold, icy slush with a glossy surface and inviting aroma.
    Prep Time 10 minutes
    Cook Time 15 minutes
    Total Time 25 minutes
    Servings: 4
    Course: Main Course
    Cuisine: Contemporary
    Calories: 180

    Ingredients
      

    • 1 cup granulated sugar for caramel
    • 1/2 cup water for caramel
    • 1 cup heavy cream to enrich the caramel
    • 2 cups crushed ice for blending

    Equipment

    • Saucepan
    • Blender

    Method
     

    1. Combine the sugar and water in a saucepan over medium heat. Stir gently until the sugar dissolves completely, then stop stirring and let the mixture boil until it turns a deep amber color, about 5-7 minutes.
    2. Remove the caramel from heat and carefully whisk in the heavy cream. Continue whisking until the mixture is smooth and glossy, then set aside to cool slightly.
    3. Pour the warm caramel sauce into a bowl and let it cool to room temperature. This helps prevent melting the ice when blending.
    4. Place the crushed ice into a blender. Add the cooled caramel sauce over the ice.
    5. Blend on high speed until the mixture becomes slushy and smooth, about 30-45 seconds. You should see a glossy, pale gold texture with small ice crystals.
    6. Pour the caramel ice slush into glasses, ensuring a generous scoop in each.
    7. Serve immediately for the best icy texture, with a caramel drizzle or a sprinkle of sea salt if desired.
    This caramel slushie is a reminder that simple ingredients can create something wonderfully unexpected. It fits right into the hot weather or whenever you need a quick mood lift. There’s no complicated equipment—just pure, satisfying cold sweetness that melts slooowly in your mouth.

    Whether sharing with friends or drinking alone while listening to summer sounds, this treat adds a luxurious twist to any day. It’s such a small thing, but the smell of caramel as the ice blends is enough to make anyone smile. Sometimes, joy comes in the form of a simple cold glass of caramel magic.

  • Unexpectedly Delicious: The Cozy Pumpkin Muffin That Turns Heads

    Unexpectedly Delicious: The Cozy Pumpkin Muffin That Turns Heads

    Imagine a pumpkin muffin that combines the comforting aroma of cinnamon and nutmeg with a surprising twist of zesty orange zest. This recipe was born from my quest to elevate the humble pumpkin muffin into something that sparks joy at first bite. As the season shifts, I find myself craving these warm, spiced bites that remind me of autumn mornings with a hint of citrus freshness.

    Each muffin is a mini celebration of fall, with a moist crumb and a fragrant top that crackles slightly. The secret ingredient? A splash of vanilla bean extract that amplifies the cozy, nostalgic flavors. It’s perfect for lazy Sunday mornings or when you want to bring a little sunshine to your afternoon snack.

    Spiced Pumpkin Orange Muffins

    These pumpkin muffins are infused with warm spices like cinnamon and nutmeg, complemented by a hint of fresh orange zest. The batter is mixed until just combined, then baked until moist and golden with a slightly crackled top. The addition of vanilla bean extract enhances the cozy, aromatic flavor profile, resulting in a tender muffin with a moist crumb and a fragrant crust.
    Prep Time 15 minutes
    Cook Time 20 minutes
    Total Time 35 minutes
    Servings: 12
    Course: Main Course
    Cuisine: American
    Calories: 200

    Ingredients
      

    • 1 1/2 cups all-purpose flour
    • 1/2 cup granulated sugar
    • 1 cup canned pumpkin puree
    • 1/3 cup vegetable oil
    • 2 large eggs
    • 1 teaspoon ground cinnamon
    • 1/2 teaspoon ground nutmeg
    • 1 teaspoon vanilla bean extract
    • Zest of 1 orange orange zest
    • 1 teaspoon baking powder
    • 1/2 teaspoon salt

    Equipment

    • Mixing bowls
    • Whisk
    • Muffin tin
    • Paper muffin liners or cooking spray
    • Grater or zester
    • Measuring cups and spoons
    • Spatula

    Method
     

    1. Preheat your oven to 350°F (175°C). Line a muffin tin with paper liners or lightly grease it to prevent sticking.
    2. In a large mixing bowl, whisk together the flour, sugar, baking powder, salt, cinnamon, and nutmeg until evenly combined. This creates a flavorful dry mixture.
    3. In another bowl, whisk the pumpkin puree, eggs, vegetable oil, vanilla extract, and orange zest until smooth and slightly frothy.
    4. Pour the wet mixture into the dry ingredients. Gently fold with a spatula until just combined; avoid overmixing to keep the muffins tender.
    5. Using a scoop or spoon, divide the batter evenly among the muffin cups, filling each about two-thirds full.
    6. Bake in the preheated oven for 20-22 minutes or until the tops are golden and a toothpick inserted in the center comes out clean.
    7. Remove the muffins from the oven and let them cool slightly in the tin for about 5 minutes, then transfer them to a wire rack to cool completely.
    8. Once cooled, the muffins should be moist inside with a fragrant aroma and slightly crackled tops, ready to serve.
    There’s something irresistibly comforting about a pumpkin muffin, especially one that’s subtly spiked with citrus. As the days grow shorter and cooler, baking these fills my kitchen with a welcoming atmosphere and an aroma that lingers long after the muffins are gone.

    No matter if you’re baking for friends or just for yourself, these muffins turn simple ingredients into a small, joyful ritual. The next time the craving strikes, I’ll be reaching for this recipe, knowing it never fails to bring a smile—and a full belly.

  • Lazy Saturday? Turn It Into a Cozy Lasagna Soup Adventure

    Lazy Saturday? Turn It Into a Cozy Lasagna Soup Adventure

    Imagine coming home after a long week and craving something hearty without the marathon effort of layered lasagna. Lasagna soup offers that perfect intersection of comfort and simplicity, melding all the luscious flavors in one bowl. The scent alone—rich tomato, melting cheese, and fragrant Italian herbs—can turn a dull afternoon into a celebration.

    This recipe is my secret weapon for busy days when heartwarming food feels out of reach. It’s like a hug in a bowl, where pasta and cheese meet a vibrant, savory broth that mimics every bite of classic lasagna. Plus, it’s surprisingly fast to put together considering how indulgent it tastes.

    Lasagna Soup

    Lasagna soup combines the flavors of classic lasagna in a single bowl, featuring a rich tomato-based broth, tender pasta, and melted cheese. The dish is prepared by simmering savory broth with herbs and adding pasta until al dente, topped with cheese for a comforting, hearty texture.
    Prep Time 10 minutes
    Cook Time 30 minutes
    Total Time 40 minutes
    Servings: 4
    Course: Main Course
    Cuisine: Italian
    Calories: 320

    Ingredients
      

    • 1 tablespoon olive oil for sautéing
    • 1 medium onion finely chopped
    • 3 cloves garlic minced
    • 28 ounces canned crushed tomatoes use high-quality for best flavor
    • 4 cups chicken broth or vegetable broth
    • 1 teaspoon dried basil optional, add more for extra flavor
    • 0.5 teaspoon dried oregano optional
    • 8 ounces small pasta shells or elbow macaroni uncooked
    • 1 cup mozzarella cheese shredded
    • 0.5 cup parmesan cheese grated
    • Salt and pepper to taste

    Equipment

    • Large pot
    • Wooden spoon

    Method
     

    1. Heat a large pot over medium heat and add olive oil. Once shimmering, add the chopped onion and cook until translucent and fragrant, about 5 minutes.
    2. Add the minced garlic to the pot and cook for about 1 minute, stirring constantly until fragrant, avoiding burning.
    3. Stir in the crushed tomatoes, chicken broth, dried basil, and oregano. Bring the mixture to a gentle simmer, allowing the flavors to meld for 10 minutes.
    4. Once the broth is flavorful, add the uncooked pasta and cook until al dente, following pasta package instructions, about 8-10 minutes.
    5. Stir in the shredded mozzarella and grated parmesan cheese until melted and creamy, about 2 minutes. Taste and season with salt and pepper as needed.
    6. Serve the hot lasagna soup garnished with additional parmesan or fresh herbs if desired.

    There’s something about a bubbling bowl of lasagna soup that feels both nostalgic and excitingly new. It’s perfect for cozy weekends or when friends crash unexpectedly, promising a warm, filling meal in minutes. The best part? It’s a dish that makes everyone feel cared for without hours in the kitchen.

    As the seasons shift, this recipe reminds me that comfort food doesn’t need to be complicated. Sometimes, the simplest ingredients, simmered just right, create the most memorable moments. Keep this recipe on hand—you’ll find it’s a true crowd-pleaser and a weekly staple.

  • Spook-tacular Ghost Veggie Platter for Halloween

    Spook-tacular Ghost Veggie Platter for Halloween

    Halloween is the perfect time to get playful with your snacks, and nothing does the trick like a whimsical veggie platter. But instead of common vegetables on a boring tray, I decided to craft a spooky ghost scene that sparks joy and chaos at the same time. Bright white cauliflower and ghostly white cheese combine to form adorable, munchable spirits that turn any table into a festive spectacle.

    This recipe took a fun, chaotic turn when I realized just how much kids and adults alike love food that makes them smile. In a world obsessed with Instagram-worthy, bite-sized treats, a ghost veggie platter hits all the right notes—colorful, cute, and super easy to assemble. Plus, it’s a sneaky way to make veggies exciting for those fussy eaters in your haunted house.

    Spooky Ghost Veggie Platter

    This veggie platter features cauliflower florets and cheese shaped into adorable ghost figures, creating a fun and festive Halloween appetizer. The dish involves assembling cauliflower and cheese to resemble floating ghosts, resulting in a whimsical and colorful presentation suitable for parties. The final appearance is playful, with ghostly white shapes contrasting vibrant vegetables on the platter.
    Prep Time 20 minutes
    Total Time 20 minutes
    Servings: 8
    Course: Main Course
    Cuisine: Halloween
    Calories: 150

    Ingredients
      

    • 1 head cauliflower separated into florets
    • 8 oz white cheese or pre-sliced mozzarella cut into ghost shapes
    • cup mixed vegetables carrots, cucumber, bell peppers for colorful background
    • to taste dipping sauce optional, for serving

    Equipment

    • Knife
    • Cutting board
    • Small Cookie Cutter or Cookie Stencil
    • Serving Platter

    Method
     

    1. Arrange cauliflower florets on a serving platter, creating a spooky scene with some florets positioned to resemble floating ghosts.
    2. Use a small cookie cutter or knife to cut ghost shapes out of the cheese slices, ensuring they are slightly smaller than the cauliflower florets for easy assembly.
    3. Gently place the cheese ghost shapes onto individual cauliflower florets, pressing slightly to help them adhere and mimic floating spirits.
    4. Add sliced vegetables around the cauliflower for a colorful background, arranging them to frame the ghost figures and add visual appeal.
    5. If desired, serve the spooky veggie ghosts with a side dipping sauce for extra flavor and fun.

    Notes

    Use a sharp knife for clean cuts into the cheese and vegetables. Get creative with the shapes and arrangement for a more festive look.
    Creating a Halloween ghost veggie platter is more than just a fun activity; it’s a way to bring smiles and a sprinkle of silliness to your celebration. As the shadows lengthen and the moon rises, this tray becomes the star of spooky vibes and healthy bites.

    Whether you’re hosting a party or simply craving a festive snack, this platter’s charming ghosts will charm everyone. Plus, the simple assembly means you can focus more on ghost stories and less on complicated prep. Here’s to a hauntingly delightful snack that checks all the fun boxes.

  • Spooky Bats & Green Goodness: Halloween Guacamole with Tortilla Chips

    Spooky Bats & Green Goodness: Halloween Guacamole with Tortilla Chips

    Halloween is the perfect reason to unleash your creativity in the kitchen. This year, I decided to ditch traditional dips and go for something more whimsical and fun: Bat-Shaped Tortilla Chips paired with a vibrant, eerie green guacamole. The combination is a visual treat and a flavor explosion that’s easy enough for kids and impressively spooky for adults.

    What really makes this recipe stand out is the playful design of the chips, perfectly mimicking fluttering bats in flight. The rich, creamy guacamole with a hint of lime and garlic gets a youthful glow of zesty green — much like a cauldron of magic potion. It’s a guaranteed crowd-pleaser at any Halloween gathering or eerie movie marathon.

    WHY I LOVE THIS RECIPE?

    • CRAFTING the bat shapes feels like a little baking adventure, transporting me back to childhood craft days.
    • The rich aroma of fresh cilantro and lime makes everyone gather around, sniffing in anticipation.
    • Mixing the green guacamole awakens my nostalgic memories of every Halloween costume party I’ve thrown over the years.
    • Seeing the delight on kids’ faces when they spot the bat chips is utterly priceless.
    • It’s a guaranteed way to bring a dash of chaos and a lot of smiles to the party table.

    AVOID MY DISASTER (You’re Welcome)

    • FORGOT to pre-cut the chips? Dull scissors can help with bat shapes, keeping the faces crisp and spooky.
    • DUMPED too much lemon in the guac? Stir in more avocado and a pinch of salt to balance the acid.
    • OVER-TORCHED the tortilla chips? Lower the oven temperature and keep a close eye.
    • IGNORED the avocado! It turns brown quickly—use lime juice liberally and serve immediately.

    QUICK FIXES THAT SAVE YOUR DAY

    • IF the guacamole is too thick, splash in a teaspoon of olive oil and stir.
    • WHEN chips are flimsy, re-bake a few minutes at 350°F for crispness.
    • PATCH over burnt chips with a paper towel and save the batch.
    • SHIELD your guac from browning by pressing cling wrap directly on its surface.
    • SPLASH salsa around the chips for extra flavor if they lose crunch.

    In the end, this playful Halloween snack isn’t just about the spooky look — it’s about savoring moments with loved ones, surrounded by fun and flavor. It’s a simple recipe that sparks joy and adds a dash of whimsy to the spooky season.

    Enjoy crafting this eerie, delicious surprise and watch your guests marvel at your creativity. The vibrant green, the cute bat shapes, and the irresistible aroma will make your Halloween table unforgettable.

    Bat-Shaped Tortilla Chips with Green Guacamole

    This dish features crispy tortilla chips cut into playful bat shapes, paired with a vibrant, creamy guacamole colored with lime and garlic. The chips provide a crunchy texture, while the smooth guacamole offers a zesty, green appearance perfect for Halloween festivities.
    Prep Time 15 minutes
    Cook Time 10 minutes
    Total Time 25 minutes
    Servings: 4
    Course: Main Course
    Cuisine: American
    Calories: 180

    Ingredients
      

    • 8 slices corn tortillas preferably fresh
    • 2 tbsp olive oil for brushing
    • 2 avocados ripe avocados pitted and peeled
    • 1 lime lime juiced
    • 1 clove garlic minced
    • 1/4 cup cilantro chopped
    • to taste salt for seasoning

    Equipment

    • Baking sheet
    • Cookie cutter or scissors

    Method
     

    1. Preheat your oven to 350°F (175°C). Lightly brush both sides of the corn tortillas with olive oil to help them crisp up nicely.
    2. Stack the tortillas and use a bat-shaped cookie cutter or scissors to cut out bat silhouettes from each slice. Keep the scraps aside for additional chips or re-shaping.
    3. Arrange the bat-shaped tortilla pieces on a baking sheet in a single layer, ensuring they aren’t overlapping.
    4. Bake the chips in the oven for about 8-10 minutes, or until they turn golden brown and crisp, watching carefully to prevent burning.
    5. While the chips are baking, halve and pit the avocados, then scoop them into a mixing bowl.
    6. Add the minced garlic, chopped cilantro, lime juice, and a pinch of salt to the avocados. Mash everything together with a fork until smooth and creamy, and it turns a vibrant green.
    7. Once the chips are out of the oven and cooled slightly, transfer the guacamole to a serving bowl. Serve the crispy bat-shaped chips immediately alongside the vibrant green guacamole for a fun Halloween snack.

    Notes

    For extra fun, use a small knife to refine the bat shapes before baking. Serve immediately to enjoy maximum crunch. Leftover guacamole can turn brown quickly—press cling wrap directly onto its surface if not eaten right away.

    This Halloween, let your creativity run wild with playful treats like these bat-shaped chips and the irresistibly bright guacamole. It’s a chance to turn simple ingredients into smiles, chaos, and a few giggles around the table.

    Whether you’re hosting friends or just making a fun snack for family night, this recipe is a quick, cheerful way to celebrate the season. No matter the outcome, the joy and chaos you bring to the kitchen will make it all worthwhile. Happy haunting and happy snacking!

  • White Chicken Chili: A Cozy Twist for Chilly Nights

    White Chicken Chili: A Cozy Twist for Chilly Nights

    When the air turns crisp and evenings grow a touch colder, I find myself craving something warm and comforting that also surprises the palate. Last winter, I stumbled upon a white chicken chili recipe that became my go-to cozy meal, and I cant get enough of it. Its rich aroma, creamy texture, and bright zest have become my signature twist on chili season.

    This dish isn’t just about warmth; its about nostalgia and reinventing comfort food with a fresh, zesty lift. The blend of tender chicken, silky beans, and a hint of lime sparks joy and makes every spoonful feel like a little celebration. Its simply impossible to stay indifferent once the flavors hit your senses.

    White Chicken Chili

    White chicken chili is a creamy, flavorful stew that combines tender chicken, silky beans, and spices, cooked using simmering and sautéing methods. The dish has a hearty yet silky texture with a bright, zesty finish, often garnished with lime and herbs. Its appearance is inviting, with a thick broth and tender meat contrasting with colorful garnishes.
    Prep Time 15 minutes
    Cook Time 30 minutes
    Total Time 45 minutes
    Servings: 4
    Course: Main Course
    Cuisine: American
    Calories: 280

    Ingredients
      

    • 1 lb boneless, skinless chicken breasts cut into bite-sized pieces
    • 1 tablespoon olive oil
    • 1 medium yellow onion diced
    • 3 cloves garlic minced
    • 2 cups chicken broth
    • 2 cups white beans drained and rinsed, such as cannellini or great northern beans
    • 1 cup corn kernels fresh or frozen
    • 1 teaspoon ground cumin
    • 1/2 teaspoon chili powder
    • 1/4 teaspoon ground oregano
    • to taste salt and pepper
    • 1 lime lime cut into wedges for serving
    • fresh cilantro cilantro chopped, for garnish

    Equipment

    • Large pot or Dutch oven
    • Chef’s knife

    Method
     

    1. Heat a large pot over medium heat and add the olive oil. Once shimmering, add the diced onion and cook until translucent and fragrant, about 5 minutes.
    2. Add the minced garlic to the pot and cook for another minute until it becomes fragrant, stirring occasionally to prevent burning.
    3. Stir in the bite-sized chicken pieces and cook until they are no longer pink on the outside, about 4-5 minutes, while breaking them apart with a spoon.
    4. Pour in the chicken broth and bring the mixture to a gentle boil, scraping up any browned bits from the bottom of the pot for added flavor.
    5. Add the drained and rinsed white beans, corn kernels, cumin, chili powder, and oregano to the pot. Stir well to combine all ingredients evenly.
    6. Reduce the heat to low, cover the pot, and let the chili simmer gently for about 20 minutes, stirring occasionally to prevent sticking.
    7. Taste the chili and season with salt and pepper as needed, then squeeze in fresh lime juice to brighten the flavors.
    8. Ladle the hot chili into bowls, garnish with chopped cilantro, and serve with lime wedges on the side for an extra zesty touch.

    Notes

    For an extra layer of flavor, consider adding a dash of hot sauce or a sprinkle of shredded cheese before serving.

    This white chicken chili has earned a special place in my fall and winter menus, especially when I want something hearty but not too heavy. Its blend of spices and fresh herbs feels like a warm hug that awakens the senses after a busy day. I love how it pairs with crusty bread or a sprinkle of cheese for an added touch of indulgence.

    As the seasons change and comfort food takes center stage, this recipe reminds me that a bowl can be both satisfying and bright. Its a reminder that simple ingredients—chicken, beans, and a few spices—can come together to craft something truly memorable. Plus, it’s quick enough to whip up on a weeknight, yet special enough for weekend gatherings.

  • Fizzing Nostalgia: The Art of Perfect Coke Slushie

    Fizzing Nostalgia: The Art of Perfect Coke Slushie

    There’s something magical about turning a simple soda into a chilly treat. This Coke slushie isn’t just a cold beverage; it’s a flashback to carefree summer days, the kind where the simplest pleasures reign supreme. Using just a few ingredients, you can capture that fizzy, sweet crunch in every spoonful.

    But beyond nostalgia, this recipe is a canvas for playful experimentation. Swap out cola for cherry or vanilla varieties for a twist that surprises your taste buds. It’s a quick fix for a spontaneous gathering or a solo moment of refreshment.

    WHY I LOVE THIS RECIPE?

    • It’s a fun way to remix childhood memories into adult chill time.
    • The texture is a satisfying balance of icy grit and bubbly surprise.
    • It’s almost impossible to mess up—trust me, I’ve tried with varying outcomes.
    • Neglecting your blender during a heatwave wasn’t this delightful before.
    • Perfect for those who crave sweetness with a crisp, icy crunch.

    AVOID MY DISASTER (You’re Welcome)

    • FORGOT to freeze the soda early? It turned into a watery mess – thaw and refreeze before blending.
    • DUMPED too much sugar? It overpowered the cola flavor—use less for a balanced sip.
    • OVER‑TORCHED the syrup mix? It caramelized and clumped – keep the heat gentle and stir often.
    • FORGOT to add lemon? The flavor lacked zing—add a splash to brighten up your slushie.

    QUICK FIXES THAT SAVE YOUR DAY

    • When the mixture isn’t icy enough, splash some cold water and stir vigorously.
    • Patch sweetness by adding a dash of fruit juice—strawberry or lime work wonders.
    • Shield your blender from overheating by pulsing instead of constant blending.
    • If the soda is too flat, add a splash of fresh sparkling water for extra fizz.
    • When aroma fades, a quick squeeze of lemon refreshes the scent and flavor.

    This Coke slushie brings a refreshing, frosty twist to hot days with a nostalgic kick. It’s a testament to how simple ingredients can create moments of joy. The bright, bubbly joy is perfect for summer or any time you need a sweet, chilly escape.

    As the season shifts, this easy treat fits right into spontaneous plans or lazy afternoons. It’s a reminder that sometimes, the best pleasures are the simplest. A cold Coke slushie is more than a drink; it’s a little celebration of summer’s fleeting magic.

    Cola Slushie

    A cola slushie is a frozen beverage made by blending ice with carbonated cola soda until smooth and icy. The result is a crunchy, bubbly treat with a bright appearance and a refreshing balance of sweetness and coldness, perfect for hot days. Its texture combines a snowy slush with fizzy hints lingering in every spoonful.
    Prep Time 10 minutes
    Total Time 10 minutes
    Servings: 2
    Course: Main Course
    Cuisine: American
    Calories: 150

    Ingredients
      

    • 2 cups cola soda chilled and well-frozen
    • 1 cup ice cubes
    • to taste sugar syrup or sweetener optional, add if extra sweetness desired

    Equipment

    • Freezer
    • Blender

    Method
     

    1. Place the chilled cola soda in the freezer for at least 2 hours until thoroughly frozen—it should be solid and slushy when you check.
    2. Add the frozen cola and ice cubes to the blender bowl. If you like it sweeter, include a splash of sugar syrup or a sweetener now.
    3. Blend everything on high speed until the mixture is slushy, smooth, and icy with a bubbly appearance. You should hear a whirling sound and see a frosty texture form.
    4. Stop blending once the mixture is creamy and has a fine, icy texture—avoid over-blending to keep some crunch in the slushie.
    5. Pour the slushie into glasses, watching the icy, bubbly mixture swirl into a frosty mound.
    6. If desired, garnish with a straw or a slice of lemon to add a zingy aroma and bright flavor.
    7. Serve immediately for the best icy crunch and fizzy refreshment. Enjoy your homemade cola slushie!

    Notes

    Make sure to freeze the cola thoroughly beforehand to achieve the best slushie texture. Adjust sweetness by adding syrup if needed. For extra flavor, experiment with different soda varieties like cherry or vanilla.

    Whether you’re cooling off after a long day or throwing a quick get-together, this Coke slushie is your go-to. It’s quick to make, endlessly customizable, and always a hit. Plus, it taps into that childhood nostalgia that never really goes out of style.

    Remember, the key is patience with the freezing and a little playful experimentation. Don’t be afraid to tweak the flavors or textures until it feels just right. In the end, it’s these little tweaks that turn a simple recipe into a cherished moment.