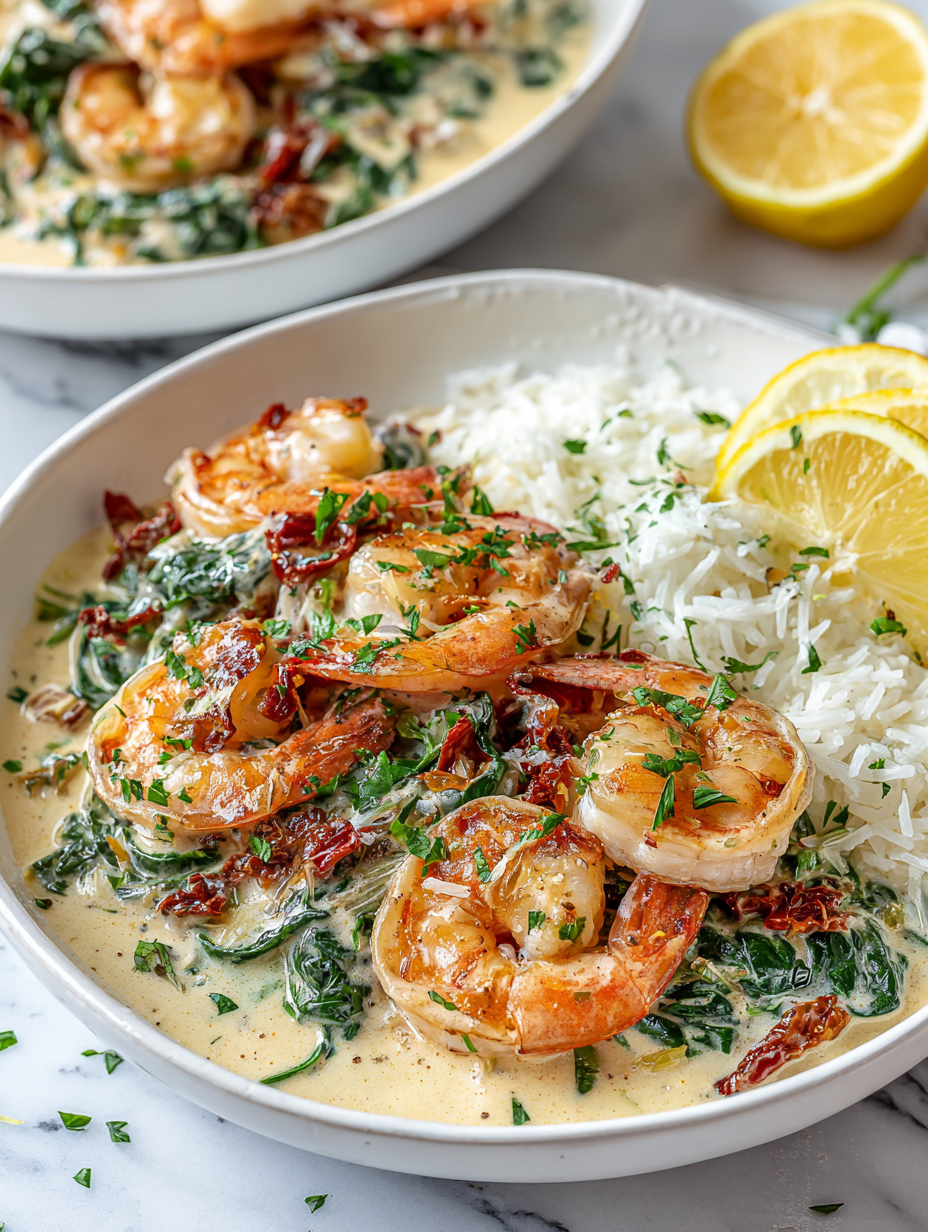
Author: LucasFoster

  • The Secret to an Unforgettably Refreshing Champagne Slushie

    The Secret to an Unforgettably Refreshing Champagne Slushie

    When summer heat hits, I turn to an unlikely hero: the champagne slushie. It’s my go-to escape, a bubbling, icy miracle that transforms a simple drink into a celebration in every sip. There’s something about the fizz and cold that instantly lifts my mood, makes everything feel a little more festive.

    This recipe isn’t just about mixing drinks; it’s about recreating a memory. A forgotten picnic, an impromptu toast, or a spontaneous dance in the kitchen—all frozen alive in a glass. And trust me, the unexpected chill paired with sparkling bubbles is a sensation you don’t want to miss.

    ## WHY I LOVE THIS RECIPE?
    – It’s a playful twist on a classic, perfect for summer gatherings.
    – The icy texture makes every sip unexpectedly cooling and delightful.
    – It’s surprisingly easy, with a quick blend that screams instant gratification.
    – The bubbles add a lively, sparkling surprise that’s hard to resist.
    – I love how it makes every moment feel a little more special, even at home.

    Champagne Slushie

    A champagne slushie is a refreshing frozen beverage made by blending champagne with ice and sweeteners to create a bubbly, icy drink. The mixture results in a fizzy, slushy texture that’s cold, sparkling, and visually appealing, perfect for summer gatherings or celebratory moments.
    Prep Time 5 minutes
    Total Time 5 minutes
    Servings: 2
    Course: Main Course
    Cuisine: International
    Calories: 150

    Ingredients
      

    • 1 bottle champagne chilled
    • 2 cups ice cubes
    • 2 tablespoons simple syrup adjust to taste

    Equipment

    • Blender
    • Measuring cups and spoons

    Method
     

    1. Pour the chilled champagne into the blender jar.
    2. Add the ice cubes to the blender, distributing evenly over the liquid.
    3. Drizzle in the simple syrup for sweetness, adjusting based on your preference.
    4. Pulse the blender a few times to start crushing the ice and mixing the ingredients gently.
    5. Blend on high until the mixture is smooth, icy, and slightly slushy, about 30-45 seconds.
    6. Turn off the blender and check the texture—the drink should be bubbly, cold, and fluffy.
    7. Scoop the champagne slushie into chilled glasses and garnish with a twist of lemon or a small sprig of mint if desired.
    As the ice melts into a mist of bubbly sweetness, I find myself craving another sip. This champagne slushie isn’t just a treat—it’s a small, sparkling escape from everyday life.

    Whether it’s a lazy afternoon or a spontaneous celebration, this recipe keeps my spirits high and my glasses frosty. The fact that it’s so simple makes it a perfect go-to, no matter the occasion. Cheers to cool, sparkling bliss whenever you need it.

  • Hidden Gem: The Ultimate Strawberry Slushie with a Twist

    Hidden Gem: The Ultimate Strawberry Slushie with a Twist

    Most strawberry slushies are just sweet, icy drinks that cool you down on hot days. But I stumbled upon a secret ingredient that adds a surprising depth of flavor and a luscious texture you never expected from a simple frozen treat. It’s a little unexpected, yet elevates the classic to something special.

    This recipe is perfect for anyone craving a delightful escape from the ordinary. The subtle hint of citrus and touch of vanilla make each sip a refreshing adventure, especially when berries are at their peak. It’s almost like the summer itself decided to get a little more fancy in my glass.

    Strawberry Citrus Vanilla Slushie

    A chilled frozen beverage blending fresh strawberries, citrus juice, and a splash of vanilla with icy elements for a smooth, scoopable texture. The recipe combines ingredients through blending to create a vibrant, slushy drink with a silky consistency and bright flavor profile. Final appearance is a colorful, frosty glass of thick, invitingly textured slushie.
    Prep Time 10 minutes
    Total Time 10 minutes
    Servings: 2
    Course: Main Course
    Cuisine: American
    Calories: 120

    Ingredients
      

    • 1 cup fresh strawberries hulled and halved
    • 1/2 cup fresh orange juice preferably freshly squeezed
    • 1 teaspoon vanilla extract
    • 1 cup ice cubes adjust for desired thickness
    • 1 tablespoon honey optional, for sweetness

    Equipment

    • Blender
    • Measuring cups and spoons

    Method
     

    1. Add the halved strawberries, fresh orange juice, vanilla extract, and honey to the blender.
    2. Pour in the ice cubes and secure the lid of the blender.
    3. Blend on high speed until the mixture is smooth and frosty, about 30-40 seconds. The ice should be fully broken down, and the slushie will have a thick, creamy texture.
    4. Pause briefly to check the consistency; if it’s too thick, add a splash more orange juice and blend again for a few seconds.
    5. Once well blended, pour the slushie into chilled glasses.
    6. Serve immediately, garnished with a small strawberry or a twist of citrus if desired.

    Notes

    For a more tart flavor, add a splash of lemon juice. Adjust the sweetness to taste with honey or agave syrup. For a creamier texture, blend in a dollop of Greek yogurt or coconut milk.

    This strawberry slushie isn’t just a pretty pink drink — it’s a diary entry in cold beverage form. Every sip brings back memories of sunlit afternoons and fruity messes in the kitchen. Sometimes, it’s the simplest things that remind us why we love making and sharing food.

    As the seasons turn and berries become an unavoidable temptation, this recipe feels like a small celebration of summer’s bounty. I’ll keep tinkering with it, but for now, it’s my go-to for cooling down and sweetening up any day.

  • Vegan Pumpkin Soup: A Cozy Fall Sensation with a Surprise Twist

    Vegan Pumpkin Soup: A Cozy Fall Sensation with a Surprise Twist

    Imagine a bowl of pumpkin soup that doesn’t just warm your hands but also ignites your senses. I stumbled upon this recipe during a foggy autumn morning, when the sweet aroma of pumpkin mixed with spices felt like a warm hug from the inside out. It’s a surprisingly vibrant take on the classic, blending unexpected ingredients that add depth and a little chaos to your usual fall routine.

    There’s something undeniably comforting about pureed pumpkin enveloped in spices, but this version introduces a secret ingredient that elevates it beyond ordinary. The texture is velvety and smooth, yet it carries a lively zing that surprises every spoonful. That twist makes it a perfect meal to elevate your seasonal menu and spark joy in the kitchen.

    Spiced Pumpkin Soup with a Citrus Twist

    This pumpkin soup is made by blending roasted pumpkin with aromatic spices and a secret ingredient that adds brightness. It has a velvety, smooth texture with a lively zing, finished with a splash of citrus for a fresh finish. The soup is served hot, showcasing a rich orange hue and a cozy, inviting aroma.
    Prep Time 15 minutes
    Cook Time 30 minutes
    Total Time 45 minutes
    Servings: 4
    Course: Main Course
    Cuisine: Autumn
    Calories: 150

    Ingredients
      

    • 1 kg pumpkin preferably sugar pumpkin or butternut squash
    • 2 tbsp olive oil
    • 1 tsp cinnamon ground
    • 0.5 tsp nutmeg ground
    • 1 pinch clove ground or whole, crushed
    • 1 tsp sugar
    • 750 ml vegetable broth
    • 2 tbsp citrus juice fresh lemon or orange juice
    • 2 cloves garlic about 2 cloves, minced
    • 1 small onion roughly chopped
    • Salt to taste
    • Black pepper to taste

    Equipment

    • Roasting pan
    • Blender
    • Soup pot
    • Wooden spoon

    Method
     

    1. Preheat your oven to 400°F (200°C). Cut the pumpkin in half, scoop out the seeds, and place it cut side down on a baking sheet brushed with olive oil. Roast until the flesh is soft and caramelized around the edges, about 40 minutes.
    2. Once cooled slightly, scoop out the roasted pumpkin flesh into a bowl, discarding the skin. Set aside.
    3. Heat a large soup pot over medium heat and add a tablespoon of olive oil. Sauté the chopped onion and minced garlic until fragrant and translucent, about 5 minutes.
      1 kg pumpkin
    4. Add the roasted pumpkin flesh to the pot along with cinnamon, nutmeg, clove, and sugar. Stir well to coat the pumpkin with spices and cook for another 2 minutes until aromatic.
      1 kg pumpkin
    5. Pour in the vegetable broth and bring the mixture to a gentle simmer. Let it cook uncovered for about 10 minutes, allowing flavors to meld and the soup to thicken slightly.
      1 kg pumpkin
    6. Use an immersion blender or transfer the soup carefully to a blender and puree until smooth and velvety. Return the pureed soup to the pot and heat through.
    7. Stir in the fresh citrus juice, adjusting the amount to taste for brightness. Season with salt and black pepper as desired.
      1 kg pumpkin
    8. Simmer for another 2-3 minutes to allow the flavors to meld, then ladle the hot soup into bowls.
    9. Garnish with a swirl of cream, a sprinkle of cinnamon, or a few fresh herbs if desired. Serve immediately while steaming and inviting.

    Notes

    For an extra layer of flavor, roast the pumpkin with a few sprigs of thyme or rosemary. Adjust citrus to your preference for brightness.

    This vegan pumpkin soup is not just a meal; it’s a little adventure in every bite. It captures the essence of fall—warm, spicy, and a touch unexpected—making it versatile for cozy nights or quick lunch fixes. I love how it brings a bit of nostalgia while inviting bold new flavors into your culinary world.

    As the weather cools down, this soup feels essential yet exciting. It’s the kind of dish that makes you look forward to leftovers and adds a spark of creativity to any autumn dinner table. Sometimes, simple ingredients and a daring twist can turn a humble meal into a memorable experience.

  • Fall in a Bowl: The Ultimate Turkey & Sweet Potato Chili

    Fall in a Bowl: The Ultimate Turkey & Sweet Potato Chili

    As autumn leaves crunch beneath your boots, this chili captures the season’s cozy essence in every bite. I love how the sweet potatoes lend a natural sweetness that balances the hearty turkey, creating a comforting dish that warms not just your stomach but your soul. The aroma of cumin, cinnamon, and roasted veggies is an inviting call to gather around the table as the cooler weather settles in.

    This recipe is my secret weapon for busy weeknights or last-minute guests. It’s a throw-it-all-in kind of dish that turns simple ingredients into something truly memorable. Plus, the vibrant orange hue and spicy smell make the kitchen smell like a fall harvest festival—no fancy ingredients required.

    Sweet Potato Turkey Chili

    This chili combines hearty ground turkey and tender sweet potatoes simmered together with aromatic spices and vegetables. It develops a thick, chunky consistency with a vibrant orange hue, showcasing a comforting and savory dish with bold flavors.
    Prep Time 15 minutes
    Cook Time 45 minutes
    Total Time 1 hour
    Servings: 4
    Course: Main Course
    Cuisine: American
    Calories: 350

    Ingredients
      

    • 1 lb ground turkey lean preferably
    • 2 medium sweet potatoes peeled and diced
    • 1 medium onion diced
    • 3 cloves garlic minced
    • 1 can (14 oz) diced tomatoes undrained
    • 1 cup chicken or vegetable broth
    • 1 tablespoon cumin
    • 1 teaspoon cinnamon
    • 1 teaspoon chili powder
    • 0.5 teaspoon black pepper
    • Salt to taste
    • 2 tablespoons olive oil

    Equipment

    • Large Soup Pot or Dutch Oven
    • Sharp knife

    Method
     

    1. Heat the olive oil in a large soup pot over medium heat until shimmering. Add diced onion and cook, stirring occasionally, until softened and translucent, about 5 minutes.
    2. Add the minced garlic and cook for another 30 seconds until fragrant, making the kitchen smell savory and warm.
    3. Stir in the ground turkey, breaking it apart with a spoon, and cook until browned and no longer pink, about 7-8 minutes. The meat should develop some golden spots.
    4. Add the diced sweet potatoes to the pot, stirring to coat with the spices and cooking for 2-3 minutes until they start to soften slightly.
    5. Stir in the diced tomatoes (with juice), cumin, cinnamon, chili powder, black pepper, and a pinch of salt, blending the spices evenly into the mixture.
    6. Pour in the broth, stirring everything together and scraping up any brown bits from the bottom of the pot for flavor.
    7. Bring the mixture to a gentle boil, then reduce the heat to low and simmer uncovered for about 30 minutes, stirring occasionally, until the sweet potatoes are tender and the chili has thickened to your liking.
    8. Taste and adjust the seasoning with salt or more spices if desired. The chili should be hearty, with a thick, chunky texture and vibrant orange hue from the sweet potatoes.
    9. Serve hot, garnished with your favorite toppings such as chopped cilantro, sour cream, or shredded cheese if desired.

    Cooking this chili is like wrapping yourself in a warm blanket on a crisp autumn day. It’s satisfying, hearty, and perfect for settling in as the leaves turn and the air grows colder. Once you taste those tender sweet potatoes and savory turkey, you’ll wonder how you ever made chili any other way.

    In the end, this dish isn’t just about the flavors—it’s about embracing the season’s spirit of comfort and simplicity. A bowl of this chili feels like a small celebration of everything fall brings. Enjoy every spoonful, knowing you’ve created something nourishing and full of autumn’s best tastes.

  • Spook-tacular Witch Finger Cookies That Will Bewitch Your Halloween

    Spook-tacular Witch Finger Cookies That Will Bewitch Your Halloween

    Halloween is my favorite time to get a little creative in the kitchen, and these Witch Finger Cookies are my secret weapon for a creepy, fun treat. The moment I shape the dough into tiny, gnarled fingers, I feel a mischievous thrill—it’s like casting a sweet spell on everyone who sees them. Plus, the scent of melting butter and almond extract fills the kitchen with a hauntingly good aroma.

    What makes these cookies stand out is their perfect combo of crunch and chew, with that creepy little almond nail on top. They’re surprisingly easy to make, even at the last minute, and they turn a simple baking session into a hilarious zombie-haunt. Kids and adults alike love the unsettling look and delicious taste, making them the highlight of any Halloween party.

    Witch Finger Cookies

    Witch Finger Cookies are shaped into small, bony-looking fingers and baked until crisp, featuring a delicate almond nail on each. The dough is made with buttery, almond-flavored ingredients, which give them a crunchy exterior with a slight chew. They have a spooky, gnarled appearance perfect for Halloween celebrations.
    Prep Time 20 minutes
    Cook Time 15 minutes
    Total Time 35 minutes
    Servings: 24
    Course: Main Course
    Cuisine: Halloween
    Calories: 120

    Ingredients
      

    • 1 cup unsalted butter softened
    • 1 cup granulated sugar
    • 1 large egg
    • 1/2 teaspoon almond extract
    • 2 1/2 cups all-purpose flour
    • 1/2 teaspoon baking powder
    • 1/4 teaspoon salt
    • small quantity almond slice for the nail

    Equipment

    • Mixing bowls
    • Baking sheet
    • Parchment paper
    • Small knife or toothpick

    Method
     

    1. Cream together the softened butter and sugar in a mixing bowl until the mixture is light and fluffy, with a pale color and a slightly velvety texture.
    2. Beat in the egg and almond extract until fully incorporated, giving the mixture a fragrant aroma and a smooth consistency.
    3. In a separate bowl, whisk together the flour, baking powder, and salt to evenly distribute the dry ingredients.
    4. Gradually add the dry mixture to the wet ingredients, mixing gently until a cohesive dough forms that’s soft but manageable.
    5. Preheat your oven to 350°F (175°C) and line a baking sheet with parchment paper.
    6. Divide the dough into small portions and roll each into a thin, finger-length shape, tapering the ends slightly to resemble fingers.
    7. Place the shaped fingers on the prepared baking sheet, spacing them slightly apart.
    8. Use a small knife or toothpick to create knuckle marks along each finger, giving them a gnarled, creepy appearance.
    9. Press an almond slice onto the top of each finger to create a spooky nail, embedding it slightly into the dough.
    10. Bake the cookies for about 15 minutes, until they are lightly golden around the edges and feel firm to the touch.
    11. Remove the cookies from the oven and allow them to cool completely on a wire rack, which helps them set and crisp up.
    12. Once cooled, enjoy these spooky, crunchy witch finger cookies that are perfect for Halloween treats.

    Adorning my haunted dessert table wouldn’t be complete without these ghoulish little fingers. Each bite offers a crisp snap, followed by a buttery, almondy sweetness that’s impossible to resist. They’re not just treats—they’re tiny pieces of spooky art that bring my Halloween décor to life.

    This recipe is a reminder that sometimes, the simplest ingredients can create the most theatrically spooky results. As the shadows stretch and the night grows cold, these cookies carve out a special, slightly chaotic, but wholly fun spot in my holiday tradition.

  • The Secret Ingredient That Turns Pumpkin Cheesecake into Autumn’s Best-kept Secret

    The Secret Ingredient That Turns Pumpkin Cheesecake into Autumn’s Best-kept Secret

    As the air turns crisp and the leaves crunch underfoot, my obsession with pumpkin desserts grows deeper. This year, I decided to elevate a classic pumpkin cheesecake by infusing it with a hint of unexpected spice—cardamom. The aroma alone transforms your kitchen into a cozy autumn retreat, promising warmth in every bite.

    This recipe isn’t just about capturing fall flavors; it’s about creating a moment of nostalgia mixed with a dash of chaos in the kitchen. I’ve tweaked the usual ingredients to include a secret swirl of dulce de leche that makes each slice irresistibly rich and caramelized. It’s a dessert that balances tradition and a touch of daring, perfect for showcasing at your next gathering.

    Spiced Pumpkin Cheesecake with Dulce de Leche Swirl

    This pumpkin cheesecake is baked with warm spices like cardamom, resulting in a creamy, dense texture with a smooth appearance. A swirl of dulce de leche is incorporated into the cheesecake batter, creating ribbons of caramel flavor throughout the dessert.
    Prep Time 30 minutes
    Cook Time 1 hour
    Total Time 1 hour 30 minutes
    Servings: 8
    Course: Main Course
    Cuisine: American
    Calories: 480

    Ingredients
      

    • 1 1/2 cups graham cracker crumbs for crust
    • 1/4 cup granulated sugar for crust
    • 1/2 cup unsalted butter melted, for crust
    • 16 oz cream cheese softened
    • 1 cup granulated sugar for filling
    • 1 cup unsweetened pumpkin puree canned
    • 3 large eggs
    • 1 1/2 teaspoons ground cinnamon
    • 1/2 teaspoon ground cardamom adds warm spice
    • 1/2 teaspoon salt
    • 1/2 cup dulce de leche for swirl

    Equipment

    • Springform pan
    • Mixing bowls
    • Electric mixer
    • Rubber spatula
    • Baking sheet
    • Oven

    Method
     

    1. Combine graham cracker crumbs and sugar in a bowl, then stir in melted butter until the mixture resembles wet sand. Press this mixture evenly into the bottom of a springform pan to form a crust. Bake in a preheated oven at 350°F (175°C) for 10 minutes to set the crust, then cool slightly.
    2. In a large mixing bowl, beat softened cream cheese with an electric mixer until smooth and fluffy, about 2-3 minutes.
    3. Gradually add sugar and continue beating until well combined and creamy. Mix in pumpkin puree, ensuring an even color and consistency.
    4. Add eggs one at a time, beating on low speed after each addition to incorporate fully. Mix in cinnamon, cardamom, and salt until fragrant and evenly distributed.
    5. Pour the pumpkin cheesecake batter over the crust in the springform pan. Use a spatula to smooth the top for an even surface.
    6. Spoon dollops of dulce de leche over the surface of the batter in random spots. Use a toothpick or skewer to gently swirl the dulce de leche into the batter, creating beautiful ribbons.
    7. Place the springform pan on a baking sheet and bake in the preheated oven at 350°F (175°C) for 60 minutes, or until the edges are set and the center is slightly jiggly.
    8. Remove the cheesecake from the oven and let it cool in the pan for about 30 minutes, then refrigerate for at least 4 hours or overnight to set fully.
    9. Once chilled, carefully run a knife around the edges of the springform to loosen, then unlock the sides and remove the pan.
    10. Slice the cheesecake with a heated knife for clean, smooth cuts, and serve chilled to enjoy its rich, creamy texture with swirls of dulce de leche visible throughout.
    As you cut through the smooth, spiced pumpkin filling, the scent of cinnamon and cardamom fills the air, sealing the deal on this cozy indulgence. It’s a dessert that makes every holiday table feel just a little more special.

    This cheesecake not only celebrates the bounty of fall but also offers a comforting escape from the busy season’s hustle. With its creamy texture and festive spices, it’s sure to be a conversation starter. A slice of this pumpkin cheesecake will forever be your new seasonal tradition.

  • Monster Burgers: Transform Your Halloween Feast

    Monster Burgers: Transform Your Halloween Feast

    Halloween is my favorite time to get creative in the kitchen, especially with dishes that invite a little chaos and a lot of fun. These Monster Burgers turn an ordinary meal into a spooky spectacle, perfect for kids and adults alike. Picture a plate of beefy monsters with googly eyes and jagged cheese teeth—who wouldn’t want to dig in?

    What makes these burgers stand out is how easily you can customize them with spooky toppings and playful presentations. I love the way the smell of sizzling patties mingles with the scent of roasted peppers and melty cheese, creating a feast for both the eyes and nose. They’re simple enough to whip up in a flash but packed with enough personality to be your Halloween highlight.

    Monster Burgers

    Monster Burgers are playful sandwiches made with beef patties topped with melted cheese, roasted peppers, and decorative features like googly eyes to create a spooky, monster-like appearance. The burgers are assembled with sizzling patties, melty cheese, and colorful toppings to achieve a fun and eye-catching presentation, with a crispy exterior and juicy interior.
    Prep Time 15 minutes
    Cook Time 15 minutes
    Total Time 30 minutes
    Servings: 4
    Course: Main Course
    Cuisine: American
    Calories: 550

    Ingredients
      

    • 1 lb ground beef 80/20 blend for juiciness
    • 4 slices cheddar cheese sliced for melting
    • 1 red bell pepper roasted and sliced
    • 4 small mini mozzarella balls for googly eyes
    • 4 teaspoons mustard or ketchup for decoration
    • 4 burger buns burger buns preferably sesame or plain
    • to taste salt and pepper

    Equipment

    • Grill or stovetop skillet
    • Cooking spatula
    • Baking sheet
    • Oven or toaster oven
    • Knife
    • Cutting board

    Method
     

    1. Preheat your grill or skillet over medium-high heat and lightly oil the surface to prevent sticking.
    2. Divide the ground beef into four equal portions and gently shape each into a round patty, making them slightly wider than the buns to allow for shrinkage.
    3. Season the patties generously with salt and pepper on both sides to enhance flavor.
    4. Place the patties on the hot grill or skillet and cook for about 4-5 minutes per side, until they develop a nice sear and are cooked to your desired doneness.
    5. During the last minute of cooking, lay a slice of cheese on each patty to melt and become gooey.
    6. Meanwhile, roast the red bell peppers either under a broiler or on the grill until the skins are charred and blistered, about 5-7 minutes. Then, transfer them to a bowl and cover for a few minutes to steam, making peeling easier.
    7. Peel the roasted peppers, remove seeds, and slice into thin strips to resemble jagged spikes for the monsters.
    8. Remove the cooked patties from the grill and place each on the bottom half of a burger bun.
    9. Top each beef patty with slices of roasted peppers, creating a jagged, spiky look for the monster’s hair or spikes.
    10. Use small mozzarella balls to create eyes by placing two on each burger, and add dots of mustard or ketchup to form pupils.
    11. Cap each burger with the top bun and serve immediately, allowing the cheese to stay gooey and the toppings to be vibrant.

    Notes

    You can get creative with additional toppings like sliced olives, pepperoni, or shredded lettuce to customize your monsters.

    As the night winds down, these Monster Burgers leave behind more than just crumbs—they bring a burst of joy and silliness to the table. No matter how many costumes or candy, a good burger never fails to bring everyone together. This recipe is my secret weapon for making Halloween memorable and delicious.

    So, brave the chaos, embrace the ghoulish details, and enjoy every bite of your spooky creation. Halloween is all about celebrating the weird and wonderful—these burgers do just that in the tastiest way possible. Now it’s time to scare up some fun and make this Halloween a feast to remember.

  • Chill out with this Unusual Lemonade Slushie Hack!

    Chill out with this Unusual Lemonade Slushie Hack!

    On a scorching summer day, I found myself craving something more than just regular lemonade. I stumbled upon an unexpected ingredient that transformed my icy drink into a frosty marvel. It’s a little chaotically delicious, and it promises a moment of cool bliss that’s unexpectedly nostalgic.

    What makes this lemonade slushie stand out is the secret twist—surprising yet simple—using a splash of vanilla or a dash of berry juice. The icy texture, combined with the zesty citric punch, cracks beautifully with every sip. It’s perfect for spontaneous gatherings or a quiet moment of solo refreshment.

    WHY I LOVE THIS RECIPE?

    • It combines childhood memories with adult sophistication—think ice cubes clinking and a hint of vanilla sweetness.
    • Feel the thrill of discovering a new way to beat the heat—without needing fancy equipment.
    • The chaotic splash of flavors makes each sip a mini adventure—wildly refreshing and oddly comforting.
    • It’s my go-to for surprising guests, offering a burst of cool chaos in every glass.
    • This recipe demands no fuss—just simple ingredients and quick blending for instant joy.

    AVOID MY DISASTER (You’re Welcome)

    • FORGOT to chill the lemonade? Microwave it for 30 seconds—ice melts faster, and the slushie thickens quickly.
    • DUMPED too much sugar? Add splash of lemon juice or a pinch of salt to balance the sweetness and enhance flavor.
    • OVER‑TORCHED the ice? Use crushed instead of large cubes for faster freezing and smoother texture.
    • FORGOT to blend properly? Run the blender longer for a fluffy, even consistency that crackles on contact.

    QUICK FIXES THAT SAVE YOUR DAY

    • When the slushie’s too watery, ADD more crushed ice and blend again for instant thickness.
    • Splash in a little more lemon juice when it’s dull—sharpen that vibrant flavor.
    • Shield against melting—serve immediately or cover with a damp towel for a quick cool-down.
    • When the flavor’s flat, MIX in a splash of fruit syrup from pantry or freezer.
    • Crack open a lemon peel and SHOOT a quick whiff—sometimes a fresh citrus burst does the trick.

    The season’s heat calls for something beyond basic refreshment. This lemonade slushie mixes familiar citrus brightness with a playful icy texture, making it special on the hottest days or spontaneous parties. The simplicity and unexpected twists push it past ordinary summer drinks.

    Its quick assembly and forgiving nature mean it’s perfect for those who crave instant gratification. Plus, the nostalgic touch of a chilled, tangy sip makes every moment feel a little brighter. It’s ready before you even realize how much you needed it.

    Lemonade Slushie with a Twist

    This lemonade slushie is a frozen beverage made by blending chilled lemonade with ice, creating a thick, icy texture. A splash of vanilla or berry juice is added to introduce a secret flavor twist, resulting in a vibrant, slushy drink with a sparkling citric punch and a smooth, icy appearance.
    Prep Time 10 minutes
    Total Time 10 minutes
    Servings: 2
    Course: Main Course
    Cuisine: Summer
    Calories: 80

    Ingredients
      

    • 2 cups lemonade chilled
    • 1 cup crushed ice or ice cubes crushed in a blender
    • 1 tablespoon vanilla extract optional, for a flavor twist
    • 2 tablespoons berry juice optional, for a fruity flavor

    Equipment

    • Blender
    • Measuring cups and spoons

    Method
     

    1. Measure the chilled lemonade and pour it into the blender.
    2. Add the crushed ice to the blender, creating a mixture that looks frosty and slightly slushy.
    3. Drop in the vanilla extract if using, which will add a subtle sweetness and aroma to the slushie.
    4. If you want a fruity twist, pour in the berry juice for a vibrant color and flavor boost.
    5. Secure the lid tightly on the blender and blend on high speed until the mixture becomes thick, smooth, and has a fluffy, icy consistency, about 30-45 seconds.
    6. Stop the blender and check the texture; it should be scoopable and crackly when you insert a spoon.
    7. Pour the slushie into glasses, allowing the icy, colorful mixture to overflow slightly for a tempting presentation.
    8. If desired, garnish with a slice of lemon or a sprig of mint for a fresh touch.
    9. Serve immediately with a straw or spoon, enjoying the refreshing, icy treat.

    This recipe captures the essence of summer—bright, bold, and refreshingly chaotic. The way it crackles in your mouth and cools your skin makes it a perfect companion for lazy sunny afternoons. Plus, it’s a reminder that sometimes, the best ideas come from happy accidents in the kitchen.

    Enjoy making this lemonade slushie your go-to summer treat. Whether it’s for a quick escape from the heat or a crowd-pleaser at gatherings, it’s sure to bring a splash of joy. Keep experimenting with different fruits or add a splash of soda—there’s no wrong way to enjoy this frostbitten delight.

  • Spooky Sweet: Halloween Candy Corn Parfaits That Charm and Surprise

    Spooky Sweet: Halloween Candy Corn Parfaits That Charm and Surprise

    As the leaves turn and the air gets crisper, I find myself craving something playful yet nostalgic. These Halloween Candy Corn Parfaits offer a delightful twist on traditional treats, blending creamy textures with the vibrant colors of fall. They’re perfect for when you want to impress guests or simply indulge in a bit of seasonal fun.

    What makes these parfaits stand out is their unexpected elegance—layered visuals combined with familiar flavors. They’re easy to assemble but feel special enough for a Halloween party centerpiece or a cozy night by the fireplace. Bright, sweet, and slightly mischievous, this dessert captures the spirit of October’s festivities.

    Halloween Candy Corn Parfaits

    These layered parfaits feature creamy vanilla pudding interleaved with vibrant orange and yellow fruit or jelly layers, mimicking the iconic candy corn colors. They are assembled in clear glasses to showcase the colorful strata, resulting in a sweet, smooth, and visually playful dessert.
    Prep Time 15 minutes
    Cook Time 10 minutes
    Total Time 25 minutes
    Servings: 4
    Course: Main Course
    Cuisine: seasonal/holiday
    Calories: 250

    Ingredients
      

    • 1 box vanilla instant pudding mix or prepared pudding
    • 2 cups milk for the pudding
    • 1 cup orange jelly or fruit puree for the orange layer
    • 1 cup yellow jelly or fruit puree for the yellow layer
    • 1 cup whipped cream optional, for topping

    Equipment

    • Mixing bowls
    • Whisk
    • Measuring cups and spoons
    • Parfait glasses or small jars
    • Spatula

    Method
     

    1. Start by whisking the vanilla pudding mix with the cold milk in a mixing bowl until thoroughly combined and the mixture has thickened, about 2-3 minutes. This creates a smooth, creamy base.
    2. Pour the orange jelly or fruit puree into a separate bowl and stir well to break up any lumps, ensuring a bright, smooth layer.
    3. Pour the yellow jelly or fruit puree into another bowl and mix until it’s smooth and uniform in color.
    4. Begin assembling the parfaits by spooning a layer of the prepared vanilla pudding into each glass or jar, filling about one-third of the way up.
    5. Follow with a spoonful of the orange jelly or fruit puree, adding a vibrant, opaque layer on top of the pudding.
    6. Add another layer of vanilla pudding over the orange, smoothing gently with the back of a spoon.
    7. Next, layer the yellow jelly or fruit puree, spreading it carefully over the cream layer for a bright contrast.
    8. Finish with a final dollop of vanilla pudding on the top, creating a smooth surface to showcase the colorful layers.
    9. If desired, top each parfait with a swirl of whipped cream for a festive finish.
    10. Chill the parfaits in the refrigerator for at least 1 hour to allow the flavors to set and the layers to firm up before serving.

    Notes

    You can customize the layers with different fruits or colors to suit your taste or theme. Ensure each layer is set before adding the next for clean, distinct visuals.

    These candy corn parfaits are a reminder that even the simplest ingredients can be transformed into something enchanting. The combination of silky custard, crunchy candy, and fluffy whipped cream makes every spoonful a tiny celebration of fall. Plus, they’re a charming way to use up leftover candy or prep for a last-minute gathering.

    Seasons come and go, but the joy of crafting a playful dessert like this remains constant. With their cheerful colors and nostalgic taste, they’re sure to bring smiles and a few giggles. Nothing beats a treat that’s as fun to look at as it is to eat.

  • The Secret Art of Vanilla Slushies: A Summer Revival

    The Secret Art of Vanilla Slushies: A Summer Revival

    Imagine discovering a vanilla slushie that doesn’t just cool you down but takes you on a nostalgic journey through childhood summers. This isn’t your average frozen treat; it’s a canvas for seasonal twists and unexpected flavor pairings. When the sun beats down relentlessly, a thick, creamy vanilla slushie brings relief and joy in one frosty sip.

    What makes this recipe stand out is its simplicity and versatility. You can whip one up in minutes with just a few ingredients, yet it feels like a luxurious escape. Perfect for afternoons when all you want is a cold, comforting hug in a glass. Plus, it’s an ideal way to use up those forgotten vanilla beans lingering in your pantry.

    Vanilla Slushie

    A creamy frozen treat made primarily with vanilla, blended into a thick, icy consistency that offers a nostalgic summer refreshment. The recipe uses simple ingredients like vanilla beans, milk, and sweetener, resulting in a smooth, frosty beverage perfect for hot days or as a versatile base for seasonal flavors.
    Prep Time 5 minutes
    Total Time 5 minutes
    Servings: 2
    Course: Main Course
    Cuisine: American
    Calories: 150

    Ingredients
      

    • 1 cup milk preferably whole milk for creaminess
    • 2 tablespoons honey or sugar, to taste
    • 1 vanilla bean vanilla bean split and scraped
    • 1 cup ice cubes crushed or whole

    Equipment

    • Blender
    • Measuring cups and spoons

    Method
     

    1. Slice open the vanilla bean lengthwise and scrape out the tiny seeds, then add both the seeds and pod to the blender.
    2. Pour in the milk and add honey, then give everything a quick swirl to distribute the vanilla flavor.
    3. Add the ice cubes to the blender, ensuring they surround the liquid ingredients for easy blending.
    4. Secure the lid on the blender and blend on high until the mixture becomes thick, smooth, and ice crystals are finely broken down, about 30-45 seconds.
    5. Stop the blender and taste the slushie; adjust sweetness if needed by adding more honey and blend again briefly.
    6. Pour the creamy vanilla slushie into glasses, allowing it to mound slightly with a frosty texture on top.
    7. Serve immediately with a straw or spoon, enjoying the thick, icy texture and rich vanilla aroma.
    This vanilla slushie isn’t just a quick refresh—it’s a celebration of simple ingredients in their most delightful form. Its smooth texture and blissful vanilla aroma make it a perfect summer companion, whether you’re lounging poolside or seeking a cool pick-me-up after a long day.

    Enjoying this treat now feels particularly meaningful as the season turns warmer, reminding us how a small, chilly indulgence can brighten even the busiest days. No matter how hectic life gets, a vanilla slushie offers a moment of pure, icy comfort.