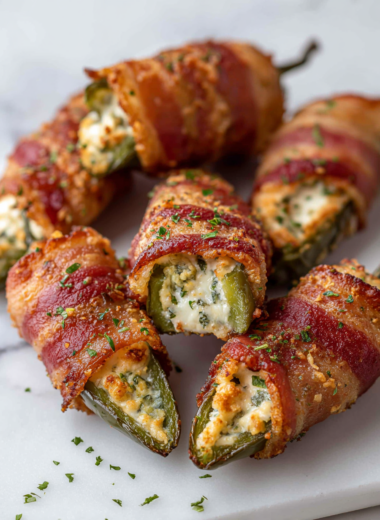
Author: LucasFoster

  • Blood-Red Beet Gnocchi: A Rustic, Vibrant Twist on a Classic

    Blood-Red Beet Gnocchi: A Rustic, Vibrant Twist on a Classic

    Gnocchi made with beets feels like a splash of color in the kitchen, a way to elevate a simple dish with natural beauty. The process of roasting and pureeing the beets adds a smoky, earthy sweetness that pairs beautifully with the soft, pillowy gnocchi. It’s a dish that demands patience but rewards with an irresistible, vivid plate.

    Why I keep returning to this recipe

    The vivid color, the earthy sweetness, and the comforting chew make every batch feel like a small celebration. It’s imperfect, often messy, but always satisfying. Plus, it’s a reminder that humble ingredients can create something truly memorable.

    Breaking down the beet and beyond

    • Beets: Deeply earthy, sweet, and vibrant—key for that stunning color and flavor.
    • Egg: Helps bind the dough, adds richness. Substitute with a flax egg for vegan.
    • Ricotta: Creamy and mild, it keeps gnocchi tender. Yogurt works in a pinch.
    • Parmesan: Salty and nutty, enhances flavor. Pecorino can replace for a sharper bite.
    • Flour: Provides structure, but too much makes gnocchi dense. Use just enough to bring it together.
    • Olive oil: Optional for a light drizzle or sauce base. Smells bright and fresh.

    Tools of the trade for vibrant gnocchi preparation

    • Oven: Roasts the beets evenly for deep flavor.
    • Blender or Food Processor: Purees the beets into a smooth, vivid paste.
    • Large Pot: Boils the gnocchi until tender.
    • Slotted Spoon: Removes gnocchi from boiling water gently.
    • Mixing Bowls and Dough Scraper: Helps combine ingredients and handle dough.

    Step-by-step for perfect bloody beet gnocchi

    Step 1: Preheat your oven to 200°C (390°F). Wrap the whole beets in foil and roast for about 50 minutes, or until tender when pierced with a fork.

    Step 2: Peel the beets once cool enough to handle. Puree them in a blender until smooth, the color should be a deep, rich crimson.

    Step 3: In a large bowl, combine the beet puree with 1 egg, 1 cup of ricotta, and 1/2 cup grated Parmesan. Mix well.

    Step 4: Add 2 cups of all-purpose flour gradually, kneading gently until a soft dough forms. If the dough feels sticky, sprinkle in a little more flour.

    Step 5: Divide the dough into four portions. Roll each into a long rope about 1 inch thick. Cut into 1-inch pieces.

    Step 6: Bring a large pot of salted water to a boil. Drop the gnocchi in and cook until they float to the surface, about 2-3 minutes.

    Step 7: Remove with a slotted spoon. They should be firm but tender with a slight bounce.

    Step 8: Optional: Toss with browned butter and sage, or your favorite sauce.

    Step 9: Serve hot, with a sprinkle of extra Parmesan and a drizzle of olive oil.

    Cooking checkpoints that save your gnocchi

    • Beet puree should be smooth and vibrant, not watery or lumpy.
    • Gnocchi dough should hold together without sticking excessively to your hands.
    • Gnocchi float when done, but they should also be tender when you bite into one.
    • Sauce should cling lightly without drowning the gnocchi or making them soggy.

    Common pitfalls and how to fix them

    • Dough feels overly wet or sticky.? Add a bit more flour if dough is too sticky.
    • Gnocchi sink or stay dense.? Cook gnocchi slightly longer if they don’t float.
    • Overcooking leads to a gluey texture.? Reduce heat immediately if gnocchi turn mushy.
    • Gnocchi stick together after cooking.? Toss gnocchi in sauce quickly to prevent sticking.

    Beet Gnocchi

    Beet gnocchi are vibrant, tender dumplings made with roasted beets blended into a smooth puree, combined with ricotta and Parmesan to create a soft, pillowy texture. The dough is gently shaped into small pieces and boiled until they float, resulting in colorful, delicate bites. Served with your favorite sauce, they offer a beautiful and earthy addition to any meal.
    Prep Time 15 minutes
    Cook Time 10 minutes
    Total Time 25 minutes
    Servings: 4
    Course: Main Course
    Cuisine: Italian
    Calories: 250

    Ingredients
      

    • 4 large beets whole, scrubbed
    • 1 cup ricotta cheese or yogurt as a substitute
    • 1/2 cup Parmesan cheese freshly grated
    • 1 large egg or flax egg for vegan
    • 2 cups all-purpose flour plus extra if needed
    • 2 tablespoons olive oil optional, for serving

    Equipment

    • Oven
    • Blender or Food Processor
    • Large pot
    • Slotted spoon
    • Mixing bowls
    • Dough Scraper

    Method
     

    1. Preheat your oven to 200°C (390°F). Wrap each beet in foil and roast for about 50 minutes until tender when pierced with a fork.
    2. Once cooled slightly, peel the beets using your hands or a paper towel to remove the skin, revealing the deep red flesh.
    3. Puree the peeled beets in a blender or food processor until smooth and vibrant in color, ensuring there are no lumps.
    4. In a large mixing bowl, combine the beet puree with the egg, ricotta, and grated Parmesan. Mix gently until well incorporated.
    5. Gradually add the flour to the mixture, folding and kneading gently until a soft dough forms. If it feels sticky, sprinkle in a little more flour.
    6. Divide the dough into four equal portions. Roll each portion into a long rope approximately 1 inch in diameter on a lightly floured surface.
    7. Cut each rope into 1-inch pieces, creating the gnocchi shape, and place them on a floured tray to prevent sticking.
    8. Bring a large pot of salted water to a boil. Drop the gnocchi in batches, cooking until they float to the surface, about 2-3 minutes.
    9. Use a slotted spoon to remove the cooked gnocchi, and transfer them to a serving dish. They should be tender with a slight bounce when pressed.
    10. Optional: Toss the warm gnocchi with a drizzle of olive oil or your preferred sauce, and garnish with extra Parmesan if desired.
    11. Serve immediately, enjoying the vibrant color and earthy sweetness of these beautiful beet gnocchi.

    Notes

    Ensure the beet puree is smooth and not watery. Handle the dough gently to keep gnocchi light and tender. Adjust flour as needed for perfect consistency.
    This dish is a riot of color and flavor, a reminder that even humble ingredients like beets can shine. Gnocchi like this make me feel connected to the earth and the seasons, a simple pleasure that’s full of surprises. Enjoy customizing with your favorite herbs, nuts, or a splash of vinegar for brightness. It’s a messy, joyful process, but the result is worth every bit of effort.

  • Jack O’ Lantern Burgers: A Playful Twist for Fall Gatherings

    Jack O’ Lantern Burgers: A Playful Twist for Fall Gatherings

    Jack O’ Lantern Burgers are more than just a Halloween joke; they’re a celebration of autumn’s bounty and playful spirit. I love how a simple burger can be turned into a visual treat that sparks conversations and giggles. It’s a chance to get creative with textures and colors, turning everyday ingredients into something memorable.

    Why I keep coming back to this recipe

    The playful spirit and burst of flavors make every fall gathering special. It’s a simple way to surprise friends and family, sparking joy and nostalgia at the same time. Plus, it’s forgiving—perfect for casual cooks who want to impress without fuss.

    Breaking down the ingredients

    • Ground beef: Juicy, flavorful, and ideal for quick searing. Opt for 80/20 for tenderness.
    • Carrots: Sweet and crunchy, these mimic pumpkin ridges. Use heirloom or standard carrots.
    • Burger buns: Soft but sturdy, toasted lightly for contrast. Brioche or potato buns work well.
    • Cheese slices: Mild cheddar or American melt nicely, adding gooeyness.
    • Lemon or smoked paprika: Lemon brightens the flavors, paprika adds smoky depth.
    • Ketchup or spicy mustard: A tangy finish that balances the savory richness.
    • Vegetable toppings (lettuce, tomato): Fresh and crisp, to contrast the cooked components.

    Tools & equipment you’ll need

    • Grill or skillet: To cook the burger patties evenly with a good sear.
    • Sharp knife: For slicing vegetables and shaping the pumpkin-like toppings.
    • Toaster or oven: To lightly toast the buns for extra crunch.
    • Spatula: To flip the burgers safely and evenly.
    • Meat thermometer: To check that the patties reach safe internal temperature.

    Step-by-step to craft the perfect Jack O’ Lantern Burgers

    Step 1: Start by preparing your veggie toppings. Slice bright orange carrots into thin rounds to mimic pumpkin ridges.

    Step 2: Heat a grill or skillet to medium-high (about 190°C/375°F).

    Step 3: Form your burger patties—don’t overwork the meat, keep it tender.

    Step 4: Cook the patties for 4-5 minutes per side, until nicely browned and slightly charred.

    Step 5: While they cook, toast burger buns lightly, about 1-2 minutes, until golden.

    Step 6: Assemble your burgers: place the patty on the bun, add cheese, then stack with your pumpkin-inspired toppings.

    Step 7: Use a squeeze of lemon or a dash of smoky paprika for extra punch.

    Step 8: Finish with a playful squirt of ketchup or a smear of spicy mustard.

    Cooking checkpoints & tips for best results

    • Meat should be cooked to an internal temperature of 71°C/160°F for safety.
    • Patty edges should be crisp and caramelized, with a juicy center.
    • Buns should be toasted lightly, not burnt, for a perfect crunch and warmth.

    Common mistakes & how to fix them

    • Not enough oil, causing sticking and tearing.? If the burger sticks to the pan, add a little oil or butter to the surface.
    • Cheese not melting fast enough.? If the cheese isn’t melting, cover the pan briefly or increase heat slightly.
    • Overtoasted buns.? If buns burn before toasting, lower the heat or toast for less time.
    • Thick, undercooked center.? If the patties are too thick, gently press down to flatten slightly.

    Jack O’ Lantern Burgers

    Jack O’ Lantern Burgers transform classic beef patties into playful, pumpkin-inspired treats perfect for autumn gatherings. Juicy burgers topped with melty cheese and vibrant carrot ridges are assembled on toasted buns to create a fun and flavorful dish with a festive appearance. The final result is a crunchy, cheesy burger with colorful toppings that sparks joy and conversation.
    Prep Time 15 minutes
    Cook Time 10 minutes
    Total Time 25 minutes
    Servings: 4
    Course: Main Course
    Cuisine: American
    Calories: 450

    Ingredients
      

    • 1 lb ground beef 80/20 for tenderness
    • 4 burger buns brioche or potato buns recommended
    • 4 slice cheese slices cheddar or American
    • 2 large carrots orange, for pumpkin ridges
    • to taste lemon or smoked paprika for flavor enhancement
    • to taste ketchup or spicy mustard for finishing touch
    • as needed vegetable toppings (lettuce, tomato) optional, for added freshness

    Equipment

    • Grill or skillet
    • Sharp knife
    • Toaster or oven
    • Spatula
    • Meat thermometer

    Method
     

    1. Slice the carrots into thin rounds, then cut some into smaller ridges to mimic pumpkin textures; set aside.
    2. Preheat your grill or skillet to a medium-high heat until it’s hot and slightly smoky.
    3. Gently divide the ground beef into four equal portions and shape each into a patty, being careful not to overwork the meat for tenderness.
    4. Place the patties on the hot grill or skillet, cooking for about 4-5 minutes per side until they develop a deep brown sear and reach an internal temperature of 71°C/160°F.
    5. While the patties cook, lightly toast the burger buns in a toaster or oven until golden, about 1-2 minutes.
    6. Place a slice of cheese on each hot burger patty, allowing it to melt slightly as you prepare to assemble.
    7. Arrange the carrot slices and ridges on each toasted bun to resemble pumpkin features, creating a fun, festive look.
    8. Set the cooked patties with melted cheese onto the prepared bun bottoms, atop the carrot decorations.
    9. Squeeze a dash of lemon or sprinkle smoked paprika over the toppings to add brightness and smoky depth.
    10. Finish by adding fresh vegetable toppings like lettuce and tomato if desired, then cap with the top bun.
    11. Serve immediately with a dollop of ketchup or spicy mustard for a flavorful finishing touch.

    Notes

    Ensure the carrots are sliced thin enough to mimic pumpkin ridges and can be easily shaped for decoration. Keep a close eye on the buns while toasting to prevent burning. Use a meat thermometer for perfect doneness of the patties.
    This recipe turns ordinary burgers into a festive spectacle. It’s a fun, imperfect process—don’t worry if your pumpkin slices aren’t perfect or the cheese melts a little unevenly. The joy is in the chaos, the smell of sizzling meat, and the look on everyone’s face when they see your spooky, tasty creation. Keep it casual, and let the fall vibes do the rest.

  • Spooky Stuffed Peppers: A Halloween-Inspired Snack with a Twist

    Spooky Stuffed Peppers: A Halloween-Inspired Snack with a Twist

    Halloween is creeping closer, and I find myself craving something playful yet satisfying. These spooky stuffed peppers hit that sweet spot — a little eerie, a little cozy, all about bold flavors and fun presentation. They’re perfect for a casual gathering or a solo dinner when you want something festive.

    Why I Keep Coming Back to This Recipe

    It’s endlessly customizable and always a conversation starter, especially around Halloween. The combination of smoky, cheesy, and slightly spicy flavors keeps me intrigued. Plus, the playful presentation makes it feel like a treat for both kids and adults. I love how simple ingredients turn into something unexpectedly fun and satisfying.

    Breaking Down the Key Ingredients

    • Bell Peppers:: Sweet, crunchy, and vibrant, they form the spooky vessel. Swap for zucchini boats if peppers aren’t your thing.
    • Ground Meat or Plant Mince:: Adds savory richness and substance. Use lentils or tofu for a vegetarian twist.
    • Cooked Rice:: Gives bulk and helps everything stick together. Cauliflower rice works if you want less carbs.
    • Cheese:: Melty, gooey, with a smoky edge if you choose smoked varieties. Cheddar or mozzarella are classics.
    • Smoked Paprika:: Adds a deep smoky flavor that screams fall. Substitute with chipotle powder for extra heat.
    • Onion & Garlic:: Fundamental aromatics that build flavor. Shallots can be a milder alternative.

    Tools & Equipment for Spooky Stuffed Peppers

    • Oven: Bakes the peppers evenly and crisps up the cheese.
    • Skillet: Sautés the aromatics and cooks the filling.
    • Knife: Preps the peppers and ingredients.
    • Spoon: Fills the peppers neatly.
    • Baking dish: Holds the peppers during baking.

    How to Make Spooky Stuffed Peppers: Step-by-Step

    Step 1: Preheat your oven to 200°C (390°F).

    Step 2: Slice the tops off 4 large bell peppers, scoop out seeds and membranes.

    Step 3: In a skillet, heat a splash of oil over medium heat. Sauté 1 chopped onion until translucent, about 5 minutes.

    Step 4: Add 200g ground beef or plant-based mince, cook until browned, about 7 minutes.

    Step 5: Stir in 1 cup cooked rice, ½ cup shredded cheese, and a dash of smoked paprika. Mix well.

    Step 6: Stuff the peppers generously with the filling, pressing down slightly.

    Step 7: Place peppers in a baking dish, cover with foil.

    Step 8: Bake for 25-30 minutes, until peppers are tender and filling is bubbling.

    Step 9: Remove foil, sprinkle extra cheese on top, bake uncovered for 5 more minutes.

    Step 10: Let rest 5 minutes before serving. Garnish with chopped parsley or jalapeños.

    Cooking Checkpoints & Tips for Perfect Spooky Stuffed Peppers

    • Peppers should be tender but not mushy after baking.
    • Filling should be hot and bubbling when you take them out.
    • Cheese on top should be golden and crispy, not burnt.

    Common Mistakes & How to Fix Them

    • Peppers tear when slicing.? USE A sharper knife for easier cutting.
    • Cheese over-browns too quickly.? Cover with foil to prevent burning.
    • Filling is undercooked or dry.? Lower oven temperature slightly.
    • Onions stay raw and harsh.? Sauté onions longer if they smell raw.

    Spooky Stuffed Peppers

    These vibrant bell peppers are filled with a savory mixture of ground meat, rice, cheese, and smoky spices, then baked until tender and bubbling. The final dish features a crispy cheese topping and a colorful, playful presentation perfect for Halloween gatherings or festive dinners. The process involves stuffing the peppers and baking to achieve a cheesy, slightly crispy exterior with a flavorful, tender interior.
    Prep Time 15 minutes
    Cook Time 35 minutes
    Total Time 50 minutes
    Servings: 4
    Course: Main Course
    Cuisine: American
    Calories: 350

    Ingredients
      

    • 4 large bell peppers preferably colorful for visual flair
    • 1 whole onion chopped
    • 200 g ground meat beef, chicken, or plant-based
    • 1 cup cooked rice white, brown, or cauliflower rice for low carb
    • 0.5 cup shredded cheese cheddar or mozzarella, plus extra for topping
    • 1 tsp smoked paprika for smoky flavor
    • 2 cloves garlic minced
    • 1 tbsp oil for sautéing

    Equipment

    • Oven
    • Skillet
    • Knife
    • Spoon
    • Baking dish

    Method
     

    1. Preheat your oven to 200°C (390°F). Slice the tops off each bell pepper and carefully scoop out the seeds and membranes, creating a hollow cavity for the filling.
    2. Heat a splash of oil in a skillet over medium heat. Add the chopped onion and sauté for about 5 minutes until it becomes translucent and fragrant.
    3. Add the ground meat to the skillet. Cook, breaking it apart with a spoon, until browned and cooked through, about 7 minutes.
    4. Stir in the minced garlic and smoked paprika, cooking for another minute until fragrant. Then, fold in the cooked rice and half of the shredded cheese, mixing well to combine.
    5. Use a spoon to generously stuff each hollowed-out pepper with the filling, pressing down slightly to pack it in.
    6. Arrange the stuffed peppers upright in a baking dish. Cover the dish with foil to trap heat and moisture.
    7. Bake the peppers for 25 to 30 minutes until they are tender and the filling is bubbling and hot.
    8. Remove the foil, sprinkle the remaining cheese over the tops of the peppers, and bake uncovered for an additional 5 minutes until the cheese is golden and crispy.
    9. Take the peppers out of the oven and let them rest for a few minutes. Garnish with chopped parsley or jalapeños for extra flair and heat.

    Notes

    For an extra spooky touch, cut out small shapes like bats or ghosts from cheese and place them on top during the final baking step. Feel free to customize the filling with your favorite ingredients or spice levels.
    These peppers are a fun way to elevate your usual snack game, especially if you’re into playful, slightly eerie food. They look impressive but are straightforward to prep, with a cozy, smoky aroma filling the kitchen. Feel free to swap ingredients to suit your taste or what’s in the fridge. Enjoy making these with a little bit of chaos and a lot of flavor.

  • Spiderweb Donuts: An Unexpected Delight for the Curious Baker

    Spiderweb Donuts: An Unexpected Delight for the Curious Baker

    Spiderweb donuts aren’t your everyday treat. They’re a playful, slightly chaotic twist on classic fried dough, inspired by those late-night craving moments. The web pattern adds a quirky visual that makes even the simplest donut a conversation piece.

    Why these donuts keep calling me back

    The playful web pattern and crispy texture make every bite a little surprise. They’re imperfect, a little wild, which feels honest and satisfying. Plus, they remind me of childhood experiments—messy, fun, and totally worth the cleanup.

    Inside the web: ingredients and their stories

    • All-purpose flour: The backbone of the dough—gives structure and chewiness.
    • Active dry yeast: Leavens the dough, making the donuts light and airy.
    • Sugar: Sweetens and helps with browning; opt for brown sugar for a richer flavor.
    • Milk: Provides moisture; warm milk activates the yeast.
    • Eggs: Bind the dough; add richness and tender crumb.
    • Butter: Adds flavor and softness; unsalted is best for control.
    • Powdered sugar: Creates a glossy, sweet glaze; can be swapped with honey or maple syrup for a different vibe.

    Tools of the trade for webby perfection

    • Deep-fry thermometer: Ensures the oil stays at the perfect frying temp.
    • Piping bag or squeeze bottle: For creating the web patterns with glaze.
    • Slotted spoon: To lift donuts from hot oil without breaking them.
    • Wire rack: For draining excess oil and cooling.
    • Mixing bowls: To prep dough, glaze, and other components.

    Step-by-step to a crispy, webbed delight

    Step 1: Mix the flour, sugar, and a pinch of salt in a large bowl. Warm milk to about 37°C (98.6°F), then sprinkle yeast over it. Let it sit for 5 minutes until foamy.

    Step 2: Add the eggs and melted butter to the yeast mixture. Combine wet and dry ingredients until a sticky dough forms.

    Step 3: Knead the dough on a floured surface for about 8 minutes until smooth. Cover with a damp cloth and let rise for 1 hour, until doubled in size.

    Step 4: Heat oil in a deep fryer or large pot to 180°C (356°F).

    Step 5: Divide dough into small balls, then stretch and shape into donut forms. Fry in batches for 2-3 minutes each, until golden and crisp.

    Step 6: Remove with a slotted spoon, drain on paper towels, then let cool slightly.

    Step 7: Prepare your glaze: mix powdered sugar with a splash of milk and vanilla extract.

    Step 8: Dip the donuts into the glaze, then use a piping bag to draw web-like patterns on each donut.

    Step 9: Let the glaze set for about 15 minutes before serving.

    Cooking checkpoints and tips to keep in mind

    • Dough should be sticky but manageable; if too wet, add a little more flour.
    • Oil must be hot enough before frying; test with a small piece—if it sizzles immediately, you’re good.
    • Donuts should turn a deep golden brown; undercooked ones will be pale and greasy.
    • Glaze should be smooth and shiny; if thick, add a splash of milk to loosen it up.

    Common pitfalls and how to dodge them

    • Oil temperature too high or too low.? Use a thermometer to keep oil at 180°C (356°F). If too cool, donuts soak up oil; if too hot, burn.
    • Dough too sticky to shape.? Knead the dough until smooth and elastic. If sticky, dust with a bit more flour.
    • Overcrowding the fryer.? Fry in small batches to prevent oil temperature drop. If overcrowded, donuts become greasy.
    • Glaze too thin or thick.? Set glaze with a pinch of lemon juice if too thick. If runny, add more powdered sugar.

    Spiderweb Donuts

    Spiderweb donuts are a playful fried treat with a crispy exterior and soft, chewy interior, topped with a glossy glaze and intricate web patterns. Using basic ingredients like flour, yeast, and eggs, the dough is fried until golden, then decorated with a sweet glaze to create a fun, chaotic web design. Their imperfect, wild appearance makes them both a visual delight and a satisfying snack.
    Prep Time 20 minutes
    Cook Time 10 minutes
    Total Time 30 minutes
    Servings: 8
    Course: Main Course
    Cuisine: American
    Calories: 250

    Ingredients
      

    • 2 ½ cups all-purpose flour
    • 2 ¼ teaspoons active dry yeast
    • 1/4 cup brown sugar
    • ¾ cup warm milk (about 37°C or 98.6°F) for activating yeast
    • 2 eggs
    • ¼ cup unsalted butter melted
    • 1 cup powdered sugar for glaze

    Equipment

    • Deep-fry thermometer
    • Piping bag or squeeze bottle
    • Slotted spoon
    • Wire rack
    • Mixing bowls

    Method
     

    1. In a large mixing bowl, combine the flour, brown sugar, and a pinch of salt. In a separate small bowl, warm the milk until just steaming, then sprinkle the yeast over it. Let sit for 5 minutes until frothy and bubbling—this activates the yeast.
    2. Add the eggs and melted butter to the yeast mixture, then pour this wet mixture into the dry ingredients. Stir until a sticky dough forms, pulling ingredients together.
    3. Turn the dough out onto a floured surface and knead for about 8 minutes until smooth, elastic, and slightly tacky. Cover with a damp cloth and let rise in a warm spot for 1 hour, until doubled in size.
    4. Heat oil in a deep fryer or large pot to 180°C (356°F). Use a thermometer to keep the temperature steady for perfect frying.
    5. Punch down the risen dough and divide into small, golf-ball-sized pieces. Gently stretch and shape each piece into a round donut shape with a hole in the center.
    6. Carefully lower the shaped donuts into the hot oil in batches, frying for 2-3 minutes until they turn a deep golden brown and sound crispy when tapped. Use a slotted spoon to turn and remove them.
    7. Transfer the fried donuts to a wire rack to drain excess oil and cool slightly. The donuts should be crispy on the outside and soft inside.
    8. In a small bowl, whisk together the powdered sugar with a splash of milk and a few drops of vanilla extract until smooth and glossy. This will be your glaze.
    9. Dip each donut into the glaze, letting excess drip off. Place the glazed donuts on a clean wire rack or parchment paper.
    10. Using a piping bag or squeeze bottle filled with remaining glaze, draw web-like patterns on each donut. Be playful—chaotic lines create the web effect.
    11. Allow the glaze to set for about 15 minutes until shiny and firm. Serve your spiderweb donuts fresh and enjoy their playful, crispy texture with a sweet, glossy finish.

    Notes

    Ensure oil temperature stays consistent for even frying. Feel free to experiment with different glaze flavors or add food coloring for more visual fun.
    These donuts are a bit chaotic to make but totally worth it. The web pattern adds a playful twist that makes them perfect for sharing, especially when friends are craving something sweet and a little different. Feel free to experiment with different glazes or toppings—think sprinkles, colored sugars, or even a drizzle of dark chocolate. Every bite offers a satisfying crunch and a soft, sweet center that keeps you coming back for more.

  • Ghost Meringues: A Whisper of Sweet Nostalgia with a Touch of Mystery

    Ghost Meringues: A Whisper of Sweet Nostalgia with a Touch of Mystery

    There’s a quiet thrill in making meringues that hover between crisp and delicate, almost like they might vanish. Ghost meringues, with their whisper-thin shells and ethereal shapes, feel like a secret kept in the kitchen. They’re not just a treat; they’re a mini ritual of patience and a dash of whimsy. Sometimes, I think of them as tiny, edible apparitions, floating through the air.

    Why I Keep Coming Back to Ghost Meringues

    Their fleeting, fragile beauty makes each batch a small act of patience. The scent of vanilla filling the kitchen, the crisp snap when you bite into one—these memories stick. Plus, they’re endlessly customizable, a quiet canvas for your mood or season. I keep returning to them, drawn by their whispering charm and the peace that comes with perfecting a delicate craft.

    Ghostly Ingredients and Their Secrets

    • Egg whites: The bare bones of the ghost—whip until stiff for that airy structure.
    • Sugar: Sweet whispers that stabilize the meringue—granulated or caster works.
    • Vanilla extract: A splash of warmth—adds depth and a hint of ghostly aroma.
    • Lemon juice or cream of tartar: A tiny squeeze or pinch—helps whip up faster and keeps the whites stable.
    • Dark chocolate or cocoa powder: Optional but fun—drizzle or dust for a spooky effect.
    • Food coloring (white, black, or gray): To add ghostly shades—use sparingly for a misty look.

    Tools of the Ghostly Trade

    • Electric whisk or stand mixer: To whip the egg whites to stiff peaks—fast and efficient.
    • Piping bag or plastic sandwich bag: For shaping the meringues with precision.
    • Baking sheet lined with parchment: A smooth surface for even drying.
    • Cooling rack: To let the meringues breathe and crisp up fully.

    Crafting the Ghostly Whisper: Meringue-Making Steps

    Step 1: Preheat your oven to 90°C (200°F).

    Step 2: Line a baking sheet with parchment paper—make sure it’s smooth and free of wrinkles.

    Step 3: Whisk 2 egg whites in a clean bowl until soft peaks form, about 3 minutes.

    Step 4: Gradually add 100g (1/2 cup) sugar, a tablespoon at a time, while whisking. Keep whisking until glossy and stiff.

    Step 5: Pipe small, irregular shapes onto your prepared sheet—think tiny ghostly blobs with a flick of the wrist.

    Step 6: Bake for 1 hour, then turn off the oven and leave the meringues inside for another 30 minutes to dry out.

    Step 7: Cool completely on a wire rack. They should be crisp and fragile, like whispers.

    Step 8: Serve with a drizzle of dark chocolate or a dusting of cocoa—whatever feels right.

    Ghostly Details to Watch for During Baking

    • Meringue should hold stiff peaks without collapsing.
    • The edges should be crisp, with a slight shimmer when done.
    • The smell will be sweet with a hint of vanilla—no wet egg whites.
    • They should crackle gently when cooled—indicating proper dryness.

    Spooky Mistakes and How to Vanish Them

    • Oven cold when baking started.? FORGOT to preheat oven—rescue by quick reheating before baking.
    • Sugar clumping or meringue collapsing.? DUMPED in sugar too fast—try adding gradually, whisking constantly.
    • Dark spots or burnt tips.? OVER-TORCHED edges—reduce baking time or lower temp.
    • Flat, sticky meringue.? MERINGUE too wet—ensure no yolk sneaks in, and whisk until glossy.

    Ghost Meringues

    Ghost meringues are delicate, ethereal treats with whisper-thin shells that crackle softly when bitten. Made by whipping egg whites with sugar and vanilla until glossy, then piping into ghostly shapes and baking at a low temperature until crisp, they resemble tiny floating apparitions. Their fragile, airy texture makes them a charming and whimsical dessert or decoration.
    Prep Time 15 minutes
    Cook Time 1 minute
    Total Time 1 minute
    Servings: 8
    Course: Main Course
    Cuisine: French
    Calories: 50

    Ingredients
      

    • 2 egg whites egg whites preferably at room temperature
    • 100 g sugar granulated or caster
    • 1 teaspoon vanilla extract adds depth and aroma
    • 1/4 teaspoon lemon juice or cream of tartar stabilizes the egg whites
    • optional dark chocolate or cocoa powder for drizzling or dusting
    • optional food coloring white, black, or gray for ghostly shades

    Equipment

    • Electric whisk or stand mixer
    • Piping bag or plastic sandwich bag
    • Baking sheet lined with parchment
    • Cooling rack

    Method
     

    1. Preheat your oven to 90°C (200°F) and line a baking sheet with parchment paper, smoothing it out to avoid wrinkles.
    2. Whisk the egg whites in a clean bowl with an electric mixer until soft peaks form, which takes about 3 minutes and results in a fluffy, pale-white mixture.
    3. Gradually add the sugar, a tablespoon at a time, while continuing to whisk. Keep going until the mixture turns glossy and forms stiff peaks that stand tall when you lift the whisk.
    4. Stir in the vanilla extract and lemon juice or cream of tartar to stabilize the meringue, mixing gently just to combine.
    5. If desired, fold in a tiny amount of food coloring to create ghostly shades or leave the meringue pure white. Carefully mix until the color is evenly distributed.
    6. Transfer the meringue mixture into a piping bag fitted with a round tip or use a plastic sandwich bag with the tip cut off. Pipe small, irregular blobs onto the prepared parchment, aiming for ghost-like shapes.
    7. Bake in the oven for about 1 hour, then turn off the heat and leave the meringues inside for another 30 minutes to dry out completely. They should crackle gently when touched and feel crisp.
    8. Remove the meringues from the oven, carefully transfer them to a cooling rack, and let them cool completely until they are fragile and airy.
    9. If you like, drizzle melted dark chocolate or dust with cocoa powder to add a spooky touch. Serve on their own or as a whimsical decoration.

    Notes

    Ensure no yolk contaminates the egg whites for perfect stiff peaks. Patience is key—baking slowly ensures crisp, delicate meringues that resemble tiny ghosts floating in the air.
    Making ghost meringues is like capturing a fleeting memory—fragile, sweet, and just a little haunting. They’re perfect for a quiet moment with a cup of tea or as a mysterious treat at a gathering. Play with flavors or shapes, and let each batch carry a bit of your own ghostly charm. Enjoy the process—sometimes, the most fleeting things are the most memorable.

  • Mummy Brownies: A Nostalgic Twist on Classic Comforts

    Mummy Brownies: A Nostalgic Twist on Classic Comforts

    Mummy brownies are a little more than just a chocolate fix. They’re a nostalgic nod to childhood afternoons spent baking with my grandma, who always added a splash of coffee to her batter. That tweak gave her brownies a smoky, deep richness that I still chase in every batch.

    Why I keep coming back to this recipe

    These brownies remind me of lazy Sunday afternoons and messy kitchens. They’re forgiving, with a rustic charm that doesn’t demand perfection. Plus, the way the chocolate melts just right, that’s pure comfort in each bite.

    Unpacking the ingredients of a good mummy brownie

    • Dark chocolate: Provides that intense, oozy richness. Use good quality for depth, or a blend of semi-sweet and bittersweet.
    • Butter: Makes the batter velvety. Swap in coconut oil for a dairy-free version.
    • Eggs: Bind the batter and add moisture. Room temperature eggs mix better.
    • Sugar: Sweetens and aerates. Brown sugar adds a hint of caramel.
    • Cocoa powder: Deepens the chocolate flavor. Use natural for a richer, more bitter punch.
    • Vanilla extract: Brightens everything. Skip if you prefer a more intense chocolate focus.
    • Salt: Balancing agent. A pinch enhances the overall flavor.

    Tools of the trade for brownie mastery

    • Mixing bowls: To blend wet and dry ingredients comfortably.
    • Double boiler or microwave: Gentle melting of chocolate and butter.
    • 20cm (8-inch) square pan: Baking the brownies evenly.
    • Parchment paper: Prevent sticking and ease removal.
    • Spatula: Folding ingredients smoothly.

    Step-by-step on how to bring these brownies to life

    Step 1: Preheat your oven to 175°C (350°F). Line a 20cm (8-inch) square pan with parchment paper, leaving some overhang.

    Step 2: Melt 200g (7 oz) of dark chocolate with 100g (1/2 cup) of butter in a double boiler or microwave in short bursts, stirring until smooth.

    Step 3: In a mixing bowl, beat 3 eggs with 150g (3/4 cup) of sugar until light and slightly frothy.

    Step 4: Stir in 1 teaspoon of vanilla extract and a pinch of salt, then fold in the melted chocolate mixture.

    Step 5: Sift in 100g (3/4 cup) of cocoa powder and gently blend until just combined.

    Step 6: Pour the batter into your prepared pan, smoothing out the top with a spatula.

    Step 7: Bake for 20-25 minutes. The edges should be firm but the center still slightly jiggly.

    Key checkpoints to perfect your mummy brownies

    • Edges are firm and slightly pulling away from the pan.
    • Center jiggles just a little when gently shaken.
    • A toothpick inserted in the center comes out with moist crumbs, not wet batter.

    Common brownie slip-ups and how to fix them

    • Burnt edges or dry texture.? If brownies are over-torched and dry, cover with foil and serve with a drizzle of caramel.
    • Undercooked middle.? If the center is raw, cover with foil and bake for a few more minutes.
    • Too dense or dry batter.? If batter is too thick, fold in a splash of milk to loosen.
    • Cracking surface.? If brownies crack top, lower oven temperature slightly next time.

    Mummy Brownies

    Mummy brownies are rich, fudgy chocolate treats with a deep, smoky flavor from a splash of coffee added to the batter. They have a rustic, homemade appearance with a melt-in-your-mouth texture, perfect for nostalgic baking moments with a comforting chocolate punch.
    Prep Time 15 minutes
    Cook Time 25 minutes
    Total Time 40 minutes
    Servings: 8
    Course: Main Course
    Cuisine: American
    Calories: 250

    Ingredients
      

    • 200 g dark chocolate good quality, chopped
    • 100 g butter or coconut oil for dairy-free
    • 3 eggs room temperature
    • 150 g sugar granulated or brown sugar
    • 1 tsp vanilla extract
    • 100 g cocoa powder natural preferred
    • pinch salt

    Equipment

    • Mixing bowls
    • Double boiler or microwave
    • 20cm (8-inch) square pan
    • Parchment paper
    • Spatula

    Method
     

    1. Preheat your oven to 175°C (350°F). Line your square pan with parchment paper, leaving overhang for easy removal.
    2. Melt the dark chocolate and butter together using a double boiler or microwave in short bursts, stirring until smooth and glossy. The mixture will smell rich and chocolatey.
    3. In a mixing bowl, whisk the eggs and sugar together until the mixture becomes pale and slightly frothy, about 2-3 minutes. You’ll notice it thickening and becoming fluffy.
    4. Stir in the vanilla extract and a pinch of salt into the egg mixture, blending well to incorporate the flavors.
    5. Fold the melted chocolate mixture into the egg mixture gently, using a spatula, until well combined and shiny.
    6. Sift the cocoa powder into the batter and gently fold it in, just until you see no streaks, creating a rich, chocolatey batter.
    7. Pour the batter into your prepared pan, spreading it evenly with a spatula so it looks smooth and shiny on top.
    8. Bake the brownies in the preheated oven for 20-25 minutes. The edges will be firm and slightly pulling away from the pan, while the center remains a little jiggly.
    9. Remove the pan from the oven and let the brownies cool slightly in the pan, allowing the texture to set and develop a fudgy interior.
    10. Lift the brownies out using the parchment overhang, then cut into squares with a sharp knife. The surface will be slightly cracked, with a moist, dense crumb inside.
    11. Serve your rich, chocolatey mummy brownies warm or at room temperature, enjoying the deep cocoa flavor and fudgy texture with a nostalgic feel.
    Once out of the oven, let the brownies cool in the pan for at least 15 minutes. Transfer to a wire rack and let them set for another 20. Slice into squares, and enjoy that rich, fudgy texture. They’re best slightly warm, maybe with a scoop of vanilla ice cream or a drizzle of caramel if you’re feeling indulgent.

  • Haunted House Cookies: A Spooky Snack with a Twist

    Haunted House Cookies: A Spooky Snack with a Twist

    Baking these haunted house cookies feels like a small act of mischief. There’s something satisfying about shaping dough into crooked, quirky houses that look like they’ve seen better days. It’s a bit chaotic, a little imperfect—exactly what makes them charming. These cookies are a nod to childhood memories, but with a spooky, seasonal twist that’s perfect for Halloween or any dark, cozy night.

    Why These Cookies Keep Coming Back

    Their imperfect charm, the fun of shaping tiny haunted houses, and the nostalgic craving for a sweet, spooky treat. Plus, they’re forgiving for bakers of all skill levels, and each batch feels like a little adventure. I keep coming back because the joy is in the chaos—the cracked, crooked little houses remind me that imperfection is part of the charm.

    Key Ingredients and How They Shape Your Cookies

    • Butter: Gives richness and spreads slightly; softened butter makes mixing easier.
    • Granulated sugar: Sweetens and helps with browning; swap with coconut sugar for a caramel note.
    • Eggs: Bind the dough; use large eggs for consistency.
    • Flour: Builds structure; gluten-free flours work but change texture.
    • Vanilla extract: Adds warmth and depth; vanilla bean paste can intensify flavor.
    • Salt: Enhances sweetness and flavor contrast.
    • Decorative add-ins (candy, marshmallows): Create spooky details; use chocolate chips or colored icing.

    Tools of the Trade for Spooky Baking

    • Mixing bowls: To combine ingredients smoothly.
    • Electric mixer: To cream butter and sugar effortlessly.
    • Baking sheet: To hold the cookies while baking.
    • Parchment paper: To prevent sticking and easy cleanup.
    • Cooling rack: To cool cookies evenly and prevent sogginess.

    Step-by-Step Guide to Creating Haunted House Cookies

    Step 1: Preheat your oven to 180°C (350°F).

    Step 2: Line a baking sheet with parchment paper.

    Step 3: Cream butter and sugar until fluffy, about 3 minutes.

    Step 4: Mix in vanilla extract and a pinch of salt.

    Step 5: Add eggs one at a time, beating after each.

    Step 6: Gradually add flour, mix until just combined.

    Step 7: Scoop dough into eerie, uneven mounds on the baking sheet.

    Step 8: Bake for 12-15 minutes, until edges are golden and slightly cracked.

    Step 9: Let cookies cool on the sheet for 5 minutes, then transfer to a wire rack.

    Cooking Tips & Tricks for Perfect Haunted House Cookies

    • Ensure butter is softened for easier mixing and better texture.
    • Watch for edges turning golden—don’t overbake or they’ll lose their spooky crack.
    • Use a toothpick to test doneness; it should come out clean.
    • Cookies should be firm but still slightly soft when cooled—perfect for decorating.

    Common Haunted House Cookie Mishaps and How to Fix Them

    • Cookies are pale and soft after 15 minutes.? UNDERESTIMATED BAKING TIME?
    • Cookies are overbaked or too thin.? CRACKED, HARD EDGES?
    • Too much butter or not enough flour.? Dough is too sticky?
    • Too much butter or baking at too high a temperature.? Cookies spread too much?

    Haunted House Cookies

    These spooky, crooked cookies are made by shaping a simple buttery dough into quirky, uneven haunted houses. Baked until golden with cracked edges, they have a charmingly rustic appearance and a crisp yet tender texture, perfect for seasonal treats or Halloween festivities. Decorate with candies or icing to add extra spooky flair.
    Prep Time 20 minutes
    Cook Time 15 minutes
    Total Time 35 minutes
    Servings: 12
    Course: Main Course
    Cuisine: American
    Calories: 120

    Ingredients
      

    • 1 cup unsalted butter softened
    • 1 cup granulated sugar
    • 1 large egg
    • 2 teaspoons vanilla extract
    • 2 1/2 cups all-purpose flour
    • 1/2 teaspoon salt
    • candy, marshmallows, or icing decorative add-ins for spooky details

    Equipment

    • Mixing bowls
    • Electric mixer
    • Baking sheet
    • Parchment paper
    • Cooling rack

    Method
     

    1. Preheat your oven to 180°C (350°F) and line a baking sheet with parchment paper.
    2. In a large mixing bowl, beat softened butter and granulated sugar together using an electric mixer until the mixture is light, fluffy, and creamy, about 3 minutes. You’ll notice it turns a pale shade and feels smooth to the touch.
    3. Mix in the vanilla extract and a pinch of salt, blending until well combined and fragrant.
    4. One at a time, beat in the large egg until fully incorporated, which will make the mixture shiny and slightly thicker.
    5. Gradually add the flour, about half at a time, mixing on low speed until just combined. The dough will start to come together and feel firm but still pliable.
    6. Scoop portions of dough and shape them into uneven, crooked little houses using your hands. Place them spaced apart on the prepared baking sheet.
    7. Bake the cookies in the preheated oven for 12-15 minutes. Watch for golden edges and cracked surfaces, which give these cookies their spooky charm.
    8. Once baked, remove the sheet from the oven and let the cookies cool for about 5 minutes before transferring them to a wire rack to cool completely. They should feel firm yet still slightly soft in the center, perfect for decorating.
    9. Decorate your haunted houses with candies, marshmallows, or icing to add spooky details like windows, doors, or crooked rooftops.
    10. Enjoy your charming, crooked haunted house cookies, perfect for Halloween or any dark, cozy night!

    Notes

    Ensure butter is softened for easy mixing. Watch edges closely to prevent overbaking. Use decorative candies or icing to enhance the spooky effect.
    These cookies aren’t just treats—they’re tiny haunted houses you build with your hands. Each crack and uneven edge tells a story, a little spooky charm in every bite. Whether you’re baking with kids or crafting alone, they add a playful, slightly chaotic touch to any holiday table. Enjoy adding your own spooky details—think candy windows or marshmallow ghosts—to really bring them to life.

  • Mummy Hot Dogs: A Nostalgic Twist on a Childhood Classic

    Mummy Hot Dogs: A Nostalgic Twist on a Childhood Classic

    Mummy hot dogs are a childhood favorite with a fun, spooky makeover. I love how a simple dough wrap can turn into a creepy little creature, perfect for Halloween or a quick snack. It’s a recipe that’s almost too easy, but the results always get a giggle or two. Plus, they’re a guaranteed hit with kids and adults alike.

    Why I keep making these creepy snacks

    They’re quick, fun, and evoke childhood memories. Plus, the reaction from kids when they see the ‘mummies’ is priceless. It’s a simple recipe that still feels a bit special, especially during spooky season or last-minute gatherings. No matter how often I make them, they always bring a smile.

    What’s inside these spooky bites?

    • Hot dogs: The base, juicy and salty, needs a good snip to make it look like a wrapped mummy.
    • Crescent roll dough: Easy to work with, flaky, and golden when baked — the perfect mummy wrapping.
    • Ketchup and mustard: Classic condiments that double as ‘eyes’ and dipping sauces, adding brightness and zing.
    • Egg wash (optional): Gives that glossy, professional finish, but you can skip if you’re in a rush.
    • Black sesame seeds or peppercorns (for eyes): Small, dark, and perfect for tiny ‘eyes’ that pop against the dough.

    Tools of the mummy trade

    • Baking sheet: To hold the hot dogs while baking and ensure even heat.
    • Parchment paper: Prevents sticking and makes cleanup easier.
    • Knife: To cut slices into the hot dogs and dough.
    • Pastry brush (optional): To lightly brush dough with egg wash for extra shine.

    Step-by-step to mummy magic

    Step 1: Preheat your oven to 200°C (390°F).

    Step 2: Line a baking sheet with parchment paper for easy cleanup.

    Step 3: Cut slices into the hot dogs, about halfway down, to create a mummy bandage effect.

    Step 4: Wrap strips of crescent roll dough around the hot dogs, leaving gaps for ‘eyes.’

    Step 5: Place the wrapped hot dogs on the baking sheet, seam side down.

    Step 6: Bake for 12-15 minutes until golden and crispy.

    Step 7: While baking, mix ketchup and mustard for dipping.

    Step 8: Once out of the oven, add small dots of mustard or ketchup for ‘eyes.’

    Step 9: Serve warm with your favorite sides.

    Cooking checkpoints to keep in mind

    • Ensure the dough is golden and crispy, not pale.
    • Hot dogs should be steaming hot inside, check with a quick temp test.
    • Eyes should be visible and slightly raised for a spooky effect.

    Common mummy mishaps and how to fix them

    • Hot dough or undercooked hot dogs.? Use too much dough → Use less for a more authentic mummy look.
    • Dough not crispy enough.? Bake longer or at higher temp → Keep an eye on baking time and color.
    • Eyes fall off after baking.? Eyes not sticking → Use a tiny dab of mustard or ketchup as glue.
    • Appearance gets messy.? Dough tears or shrinks → Roll dough evenly and don’t overstuff.

    Mummy Hot Dogs

    Mummy hot dogs are a fun, spooky snack perfect for Halloween or kids’ parties. Juicy hot dogs are sliced and wrapped in flaky crescent roll dough, then baked until golden and crispy, with playful ‘eyes’ added for a creepy touch. The result is a crispy, flaky, and playful treat that looks like tiny mummies, sure to amuse both kids and adults.
    Prep Time 10 minutes
    Cook Time 15 minutes
    Total Time 25 minutes
    Servings: 4
    Course: Main Course
    Cuisine: American
    Calories: 250

    Ingredients
      

    • 4 pieces hot dogs Juicy and salty, the base for the mummies
    • 1 can crescent roll dough Pre-cut dough for easy wrapping
    • 2 tbsp ketchup For dipping and eyes
    • 2 tbsp mustard Optional for eyes and dipping
    • small black sesame seeds or peppercorns For tiny ‘eyes’
    • 1 egg egg Optional for egg wash to give a glossy finish

    Equipment

    • Baking sheet
    • Parchment paper
    • Knife
    • Pastry brush

    Method
     

    1. Preheat your oven to 200°C (390°F) and line a baking sheet with parchment paper.
    2. Lay the crescent roll dough on a clean surface and gently unroll it; cut the dough into strips about 1/4 inch wide.
    3. Using a knife, make shallow slices halfway down each hot dog, creating a wrapped effect that looks like bandages.
    4. Wrap strips of the crescent dough around each hot dog, leaving small gaps for the eyes to peek through.
    5. If desired, lightly brush the wrapped hot dogs with beaten egg using a pastry brush for a shiny finish.
    6. Place the wrapped hot dogs seam-side down on the prepared baking sheet, spacing them evenly.
    7. Bake in the preheated oven for 12-15 minutes, until the dough is golden brown and crispy.
    8. While baking, prepare the ‘eyes’ by placing small dots of ketchup or mustard on each hot dog for the pupils.
    9. Once out of the oven, carefully place tiny black sesame seeds or peppercorns on the ketchup or mustard dots to complete the spooky eyes.
    10. Serve the mummy hot dogs warm with your favorite dipping sauces and enjoy their playful, crispy texture.

    Notes

    For a shiny finish, brush with an egg wash before baking. Be sure to watch the baking time to prevent over-browning. Use a small dab of mustard or ketchup to attach the eyes securely.
    These mummy hot dogs are a perfect mix of fun and comfort, especially for a quick family snack or a spooky-themed party. They bring a playful twist to a simple ingredient and turn it into something memorable. Feel free to experiment with different fillings or toppings to make them your own. Don’t rush—enjoy the process and the smiles that come with them.

  • Witch Hat Cupcakes: A Spooky Sweet Trick for Your Halloween Table

    Witch Hat Cupcakes: A Spooky Sweet Trick for Your Halloween Table

    Every October, I find myself craving something that feels both festive and a little mischievous. These witch hat cupcakes hit that sweet spot perfectly, combining playful design with rich, chocolaty flavor. They’re not just for kids; they bring out the inner baker in anyone willing to get a little creative.

    Why these cupcakes keep my oven busy

    The playful shape and glossy finish make them a hit every year. They’re straightforward enough for a quick project, but the detailed decorating feeds my creative side. Plus, biting into that rich chocolate with a hint of vanilla always brings a quiet sense of satisfaction. They turn a simple gathering into something special, even if just for a moment.

    What makes these cupcakes spooky and tasty

    • Dark cocoa powder: Gives that deep, rich chocolate flavor and a velvety color.
    • Butter: Creamy and fragrant, it helps create a tender crumb.
    • Chocolate ganache: Glossy, smoky, and smooth, perfect for the hat’s brim.
    • Candy corn or mini candies: Add a pop of color and a bit of crunch, bringing visual fun.
    • Vanilla extract: A splash brightens the overall flavor with a subtle warmth.
    • Powdered sugar: For sweetness and to stiffen frosting or ganache.
    • Milk or cream: Adjusts consistency, adding richness and moisture.

    Tools and equipment for magic baking

    • Muffin tin: To hold the cupcake batter steady during baking.
    • Mixing bowls: To combine ingredients smoothly.
    • Electric mixer: To fluff butter and sugar easily.
    • Piping bag with star tip: To pipe the ganache or frosting neatly.
    • Cooling rack: To cool cupcakes evenly and prevent sogginess.

    Step-by-step guide to spooky, adorable witch hat cupcakes

    Step 1: Preheat your oven to 180°C (350°F).

    Step 2: Line a muffin tin with paper liners.

    Step 3: Mix the dry ingredients: flour, cocoa powder, baking powder, and salt.

    Step 4: Cream butter and sugar until fluffy, about 3 minutes.

    Step 5: Add eggs one at a time, then vanilla. Mix well.

    Step 6: Alternate adding milk and dry ingredients, starting and ending with dry.

    Step 7: Fill cupcake liners about 2/3 full.

    Step 8: Bake for 20-22 minutes, or until a toothpick comes out clean.

    Step 9: Cool cupcakes on a wire rack for 15 minutes.

    Step 10: Prepare chocolate ganache: heat cream, pour over chopped chocolate, stir until smooth.

    Step 11: Frost cooled cupcakes with ganache.

    Step 12: Let set for 30 minutes before decorating.

    Tips and tricks to perfect your witch hats

    • Ensure cupcakes are fully cooled before frosting to avoid melting.
    • Use a piping bag with a star tip for a smooth, professional look.
    • Watch the ganache closely to prevent burning the chocolate.
    • If the ganache is too thick, stir in a teaspoon of warm cream.
    • For a shinier finish, brush the hats with a little edible gold dust.

    Common pitfalls and how to fix them

    • Overbaking causes cracks.? If cupcakes crack on top → Slightly lower oven temperature or reduce baking time.
    • Chocolate and cream separate.? Ganache splits → Stir in a teaspoon of warm cream to reunite.
    • Poor adhesion of decorations.? Hats slide off cupcakes → Use a thicker frosting or attach with a dab of melted chocolate.
    • Center remains wet.? Undercooked centers → Bake a few minutes longer or check with a toothpick.

    Witch Hat Chocolate Cupcakes

    These festive witch hat cupcakes are made with rich chocolate batter baked into moist, tender cupcakes topped with glossy ganache. The hats are decorated with a crisp, shiny chocolate brim and colorful candies for a fun Halloween touch, resulting in a playful and indulgent treat with a velvety finish.
    Prep Time 30 minutes
    Cook Time 22 minutes
    Total Time 52 minutes
    Servings: 12
    Course: Main Course
    Cuisine: American
    Calories: 250

    Ingredients
      

    • 1 1/2 cups all-purpose flour
    • 1/2 cup unsweetened cocoa powder
    • 1 1/2 teaspoons baking powder
    • 1/2 teaspoon salt
    • 1/2 cup unsalted butter softened
    • 1 cup granulated sugar
    • 2 large eggs
    • 2 teaspoons vanilla extract
    • 3/4 cup milk
    • 1 cup chopped chocolate chopped dark chocolate for ganache
    • 1/2 cup heavy cream
    • Assorted candies candy corn or mini candies for decoration
    • Optional edible gold dust for finishing

    Equipment

    • Muffin tin
    • Mixing bowls
    • Electric mixer
    • Piping bag with star tip
    • Cooling rack

    Method
     

    1. Preheat your oven to 180°C (350°F) and line a muffin tin with paper liners.
    2. In a bowl, whisk together flour, cocoa powder, baking powder, and salt until evenly combined.
    3. In a large mixing bowl, cream softened butter and sugar with an electric mixer until the mixture is light, fluffy, and fragrant, about 3 minutes.
    4. Add eggs one at a time, mixing well after each addition. Stir in vanilla extract until combined.
    5. Gradually add the dry ingredients to the wet mixture, alternating with milk, starting and ending with dry ingredients. Mix until just combined and smooth.
    6. Fill each cupcake liner about two-thirds full with batter, then bake for 20-22 minutes, or until a toothpick inserted in the center comes out clean.
    7. Remove cupcakes from the oven and let them cool in the tin for 5 minutes before transferring to a wire rack to cool completely.
    8. Meanwhile, prepare the chocolate ganache by heating heavy cream until just bubbling, then pouring it over chopped dark chocolate. Let sit for a minute, then stir until smooth and glossy.
    9. Once cupcakes are cooled completely, pipe the ganache onto each cupcake using a star tip, creating a smooth, even layer that resembles a hat brim.
    10. Using a piping bag fitted with a star tip, pipe a small cone of ganache on top of each cupcake to resemble the hat’s point. Let the ganache set for 30 minutes.
    11. Decorate the hats by adding colorful candies like candy corn at the base or mini candies on top for a playful, spooky effect. Optionally, brush the decorations with edible gold dust for a magical shine.
    12. Serve these adorable witch hat cupcakes at your Halloween gathering and enjoy their rich chocolate flavor and festive appearance!

    Notes

    Ensure cupcakes are completely cooled before frosting to prevent melting. For extra shine, lightly brush the decorations with edible gold dust. Feel free to customize with different candies for a unique look each year.
    These witch hat cupcakes are more than just a treat; they’re a little magic trick for any Halloween gathering. The rich chocolate and glossy ganache create a perfect bite, and the hat shape adds a whimsical touch that kids and adults alike love. Feel free to personalize your hats with different candies or sprinkles for extra charm. Making them might get a little messy, but the smiles are worth it.

  • Spooky Fun with Halloween Pizza: A Playful Twist on Classic Comfort

    Spooky Fun with Halloween Pizza: A Playful Twist on Classic Comfort

    I’ve always loved turning food into a little story or a surprise, and Halloween offers the perfect excuse. This pizza is my way of blending comfort with a dash of chaos—no fancy tricks, just playful ingredients and a bit of messy fun. It’s about making something familiar feel a little wild, a little festive, and totally shareable.

    Why I Keep Coming Back to This Halloween Pizza

    It’s a perfect blend of simplicity and playful chaos. I love how a basic dough transforms into a spooky masterpiece, and it always makes my family smile. Plus, it’s quick enough to whip up last minute, yet fun enough to feel special. Every time I make it, I get a little nostalgic about childhood Halloweens, but with a grown-up twist.

    Ghoulish Goodies: Ingredients and Their Secrets

    • Pizza dough — I love a chewy, slightly sour base, but store-bought works fine if you’re in a pinch.: A good stretch is key, so let it sit at room temp before shaping.
    • Tomato sauce — Bright, tangy, with a hint of garlic. Swap in pesto for a green, herby twist.: Spread thinly to avoid sogginess.
    • Mozzarella — Melty, gooey, with a mild flavor that melts into the toppings.: Fresh or low-moisture works, just shred it well.
    • Black olives — Oozing with salty, smoky flavor, perfect for spooky eyes.: Slice thin for easy placement.
    • Orange bell pepper — Sweet, crisp, and vibrant, adds a cheerful pop of color.: Slice into tiny triangles or strips.
    • Pepperoni or salami — For that jagged, fiery grin, spicy and crispy when baked.: Cut into shapes or uneven pieces for a messy look.
    • Fresh herbs — Basil or parsley, chopped for finishing touches.: Adds fresh aroma and a burst of flavor.

    Tools of the Trick: What You Need for Halloween Pizza

    • Pizza stone or baking sheet: Provides a hot surface for a crisp crust.
    • Rolling pin or hands: Helps stretch the dough evenly.
    • Sharp knife or scissors: For cutting toppings and decorating.
    • Pastry brush (optional): For brushing the crust with oil or egg wash.
    • Cooling rack: To rest the pizza and prevent sogginess.

    Step-by-step: Crafting a Halloween-Themed Pizza

    Step 1: Preheat your oven to 220°C (430°F).

    Step 2: Stretch the pizza dough on a floured surface into a rough rectangle, about 30×20 cm.

    Step 3: Spread a thin layer of tomato sauce over the dough, leaving a 1-inch border.

    Step 4: Sprinkle shredded mozzarella evenly, then add sliced black olives for eyes and a small orange bell pepper for a nose.

    Step 5: Use pepperoni slices or salami for a jagged smile, arranging them like a crooked grin.

    Step 6: Bake on a preheated baking sheet or pizza stone for 12-15 minutes until the crust is golden and the cheese is bubbly.

    Step 7: Remove from oven and let sit for 5 minutes. Decorate with chopped herbs, if desired.

    Step 8: Slice and serve while warm, with extra toppings like chili flakes or fresh basil.

    Cooking Checks & Tips to Keep Your Halloween Pizza Perfect

    • Check that the crust is golden and crisp around the edges.
    • Ensure the cheese is bubbly and slightly browned on top.
    • The toppings should look vibrant, not dried out or burnt.
    • Use a probe thermometer to confirm the pizza’s internal temp reaches 75°C (165°F).

    Common Spook-ups & How to Fix Them

    • Burnt edges from too high heat or too long.? OVER-TORCHED CRUST — Lower oven temperature to 200°C (390°F) and bake for less time.
    • A soggy crust from inadequate preheating.? SOGGY BASE — Use a preheated pizza stone or ensure oven is very hot before baking.
    • Toppings falling off when slicing.? TOPPINGS SLIDING OFF — Use a light hand with toppings and press them into the cheese.
    • Cheese remaining unmelted or stringy.? CHEESE NOT MELTING — Cover with foil if cheese browns too quickly.

    Halloween Spooky Pizza

    This playful Halloween pizza features a chewy, slightly sour dough base topped with vibrant tomato sauce, melted mozzarella, and fun spooky toppings like black olives, orange bell peppers, and pepperoni arranged in a mischievous grin. The final appearance is a cheesy, golden crust with spooky face details, delivering a crispy texture with gooey, melty toppings that make for a festive, shareable dish.
    Prep Time 15 minutes
    Cook Time 15 minutes
    Total Time 30 minutes
    Servings: 4
    Course: Main Course
    Cuisine: American
    Calories: 350

    Ingredients
      

    • 1 roll store-bought pizza dough bring to room temperature for easier stretching
    • 1/2 cup tomato sauce spread thin to avoid sogginess
    • 1 cup shredded mozzarella preferably fresh or low-moisture
    • 6 pieces black olives sliced thin for spooky eyes
    • 1/2 cup orange bell pepper sliced into tiny triangles or strips
    • 8 slices pepperoni or salami cut into shapes or uneven pieces for a messy grin
    • a handful fresh herbs (basil or parsley) chopped for finishing touches

    Equipment

    • Oven
    • Baking sheet or pizza stone
    • Rolling pin or hands
    • Sharp knife or scissors
    • Pastry brush (optional)
    • Cooling rack

    Method
     

    1. Preheat your oven to 220°C (430°F). Place a baking sheet or pizza stone inside to heat up.
    2. Gently stretch the pizza dough on a floured surface into a rectangle about 30×20 cm, giving it a relaxed, rustic shape. Let it sit for a minute if it resists stretching.
    3. Transfer the stretched dough onto a piece of parchment or your hot baking surface if using a pizza stone. Spread a thin layer of tomato sauce over the surface, leaving about a 1-inch border around the edges.
    4. Sprinkle shredded mozzarella evenly across the sauce, making sure to cover the entire surface for a gooey, cheesy base.
    5. Use a sharp knife or scissors to cut thin slices of black olives, then arrange two for eyes near the top of the pizza.
    6. Place small pieces of orange bell pepper in the center to form a nose, adding a splash of bright color.
    7. Arrange pepperoni slices or salami in a crooked smile shape across the lower part of the pizza to mimic a spooky grin.
    8. Carefully slide the pizza onto your preheated baking surface and bake for 12-15 minutes, until the crust is golden and crispy, and the cheese is bubbly.
    9. Remove the pizza from the oven and let it rest for 5 minutes on a cooling rack, which helps prevent sogginess and makes slicing easier.
    10. Sprinkle chopped fresh herbs over the top for a burst of aroma and a final touch of freshness.
    11. Slice the pizza into pieces, revealing the cheesy, colorful, spooky face, then serve while warm for a fun Halloween feast.

    Notes

    For extra fun, you can add chili flakes for heat or extra herbs for more flavor. Using a pizza stone enhances crispiness, but a baking sheet works perfectly too.
    This pizza isn’t just about the spooky face; it’s about the joy of turning simple ingredients into something that sparks a little chaos and a lot of smiles. It’s perfect for a quick Halloween treat or a fun family project. Feel free to go wild with toppings—think edible eyes, green pesto, or even candy for a sweet surprise. Whatever you do, enjoy the messy, playful process and the cheesy, crispy results.