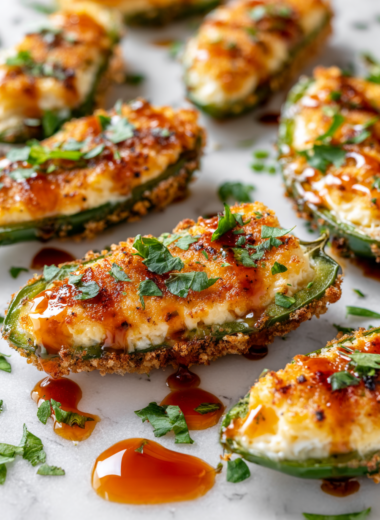
Category: Appetizers

  • Cheese Ball Recipe

    Cheese balls are such a cozy, retro snack, but I like to think of them as a blank canvas. The one I make is not just about cheese and nuts; it’s about layers of flavor, a little chaos, and a touch of nostalgia that hits all the right notes during a gathering.

    This recipe is my go-to for unexpected parties or quiet nights when I want something familiar but with a little spark. It’s simple, yes, but I love how small tweaks—like adding a splash of smoked paprika or a handful of chopped herbs—can transform it into something a bit special.

    It’s not just about impressing people; it’s about that moment when everyone digs in, faces lighting up, and you realize that something so humble can bring so much joy.

    The Unusual, Specific Angle for Cheese Ball: Nostalgic Comfort with a Twist of Global Flavors

    Why This Cheese Ball Means a Lot to Me

    • I love how a cheese ball can be both nostalgic and surprising.
    • Sometimes I get a little too ambitious with the coatings, but that’s part of the fun.
    • There’s a certain satisfaction in shaping that perfect round, even if I mess up the first few.
    • I’ve had moments where I added too much spice and had to start over, but it’s worth it.
    • Making this always reminds me of family gatherings and the chaos of hosting.

    A Personal Story of Cheese, Chaos, and Comfort

    • I first stumbled upon this recipe during a chaotic holiday gathering. It was a hit, despite my improvisations.
    • The joy of tweaking ingredients and watching everyone’s faces light up keeps me coming back.
    • It’s a reminder that simple ingredients, when treated with love, can create something memorable.

    Cheese Ball: A Brief History and Fun Facts

    • Cheese balls date back to the 1950s, originally served at cocktail parties.
    • The classic coating of nuts or herbs varies by region and personal taste.
    • They became popular during the post-war boom, symbolizing simple, hearty entertaining.
    • Modern twists include using vegan cheeses or international spices.

    Breaking Down the Key Ingredients

    • Cream cheese: I love its smooth, neutral base. For a richer flavor, try mascarpone—sooo creamy.
    • Sharp cheddar: Adds a punch. Swap for Monterey Jack for milder, meltier results.
    • Nuts (pecans, walnuts): The crunch is essential. Toast them first for added flavor.
    • Herbs (parsley, chives): Brighten up the richness. Fresh herbs work best for vibrant flavor.
    • Spices (paprika, cayenne): For a smoky or spicy kick. Use smoked paprika for depth.

    Spotlight on Cream Cheese and Cheddar

    Cream Cheese:

    • The silky base—warm it slightly to make mixing easier. It melts into the other flavors seamlessly.
    • Ensure it’s at room temp for a smooth, spreadable texture.

    Sharp Cheddar:

    • Its bold tang cuts through richness. Grate it finely for even melting and flavor distribution.
    • Use aged cheddar for a more complex bite.

    Ingredient Substitutions for Different Diets and Tastes

    • Dairy-Free: Use vegan cream cheese and shredded plant-based cheese for a similar creamy, cheesy result.
    • Flavor may be milder, but still satisfying.
    • Gluten-Free: Opt for gluten-free nuts or seeds for coating.
    • Spice-Free: Skip the cayenne or paprika if sensitive to heat.
    • Herb Variations: Use dried herbs if fresh aren’t available, but reduce quantity.
    • Cheese Types: Brie or goat cheese can add a different richness and tang.

    Equipment & Tools

    • Mixing bowl: Combine and blend cheeses and spices.
    • Spatula or wooden spoon: Mix ingredients smoothly.
    • Plastic wrap: Wrap and chill the cheese ball.
    • Serving plate: Present the finished cheese ball.
    • Sharp knife: Help shape the cheese mixture.

    Step-by-Step Guide to a Cozy, Flavorful Cheese Ball

    1. Gather your ingredients: cream cheese, sharp cheddar, spices, and your choice of coating.
    2. Soften the cream cheese at room temp, about 30 minutes. It should be soft but not melted.
    3. Mix the cheeses, spices, and a pinch of salt in a bowl until smooth. Use a spatula or your fingers.
    4. Shape the mixture into a tight ball with your hands. If sticky, chill for 15-20 minutes.
    5. Roll the ball in chopped nuts, herbs, or paprika. Press gently to coat.
    6. Wrap in plastic wrap and chill for at least 2 hours. Flavors meld and it firms up.
    7. Before serving, let sit at room temp for 15 minutes. Serve with crackers or bread.

    Chill in the fridge for at least 2 hours to let flavors meld. Bring to room temp before serving for best flavor and texture.

    How to Know It’s Done

    • Cheese ball should feel firm but not hard when pressed.
    • Outer coating should be evenly adhered, with no sticky patches.
    • A slight aroma of spices and cheese should be noticeable but not overpowering.

    Global Flavored Cheese Ball

    This cheese ball combines creamy cheeses with layers of flavor, shaped into a compact sphere and coated with nuts, herbs, or spices. It offers a nostalgic yet surprising appetizer with a rich, smooth interior and a crunchy, flavorful exterior, perfect for gatherings or quiet nights. Small tweaks in ingredients elevate its simple charm into a memorable treat.
    Prep Time 20 minutes
    Total Time 2 hours
    Servings: 8
    Course: Main Course
    Cuisine: Global
    Calories: 250

    Ingredients
      

    • 8 oz cream cheese softened at room temperature
    • 1 cup sharp cheddar cheese finely grated
    • 1/2 cup chopped nuts (pecans or walnuts) toast before using for extra flavor
    • 2 tbsp fresh herbs (parsley, chives) finely chopped
    • 1 tsp smoked paprika or regular paprika
    • 1/2 tsp cayenne pepper optional, for spice

    Equipment

    • Mixing bowl
    • Spatula or wooden spoon
    • Plastic wrap
    • Serving plate
    • Sharp knife

    Method
     

    1. Begin by softening the cream cheese at room temperature for about 30 minutes until it’s smooth and easy to mix. Place it in a large mixing bowl.
    2. Add the finely grated sharp cheddar cheese to the bowl with cream cheese. Mix with a spatula or wooden spoon until well combined and creamy.
    3. Stir in the smoked paprika and cayenne pepper, adjusting for spice preference. Mix until the spices are evenly distributed and fragrant.
    4. Chop your fresh herbs finely and fold them into the mixture, adding a bright, fresh flavor contrast to the richness.
    5. Shape the cheese mixture into a tight ball using your hands, pressing firmly to ensure it holds together. If the mixture is too sticky, refrigerate for 15-20 minutes to firm up.
    6. Pour the toasted chopped nuts onto a plate and gently roll the cheese ball in the nuts, pressing lightly to coat evenly with a crunchy layer.
    7. Wrap the coated cheese ball tightly in plastic wrap and refrigerate for at least 2 hours, allowing the flavors to meld and the shape to set firmly.
    8. Remove the cheese ball from the fridge about 15 minutes before serving. Let it sit at room temperature to enhance flavor and soften slightly.
    9. Transfer the cheese ball to a serving plate and present with crackers or sliced bread for a deliciously creamy, crunchy appetizer.

    Tips & Tricks for the Perfect Cheese Ball

    • MIX: Use room temp cheeses for easier blending and a smoother ball.
    • CHILL: Chill the mixture for at least 15 minutes for easier shaping.
    • ADD: Incorporate herbs or spices into the coating for flavor bursts.
    • PRESS: When coating, press gently to ensure adhesion.
    • SERVE: Let the cheese ball sit at room temperature for 15 minutes before slicing for optimal flavor.

    Common Mistakes and How to Fix Them

    • FORGOT to soften the cream cheese? Microwave it for 10 seconds in bursts.
    • DUMPED too much spice? Rinse with a little more cream cheese and mix again.
    • OVER-TORCHED the coating? Reduce heat or switch to a different nuts or herbs.
    • SPLASH of water in the mixture? Pat dry ingredients and start over if too watery.

    Quick Fixes for Common Cheese Ball Problems

    • When too sticky, refrigerate for 15 minutes. It firms up and handles better.
    • Splash a little cold water on your hands to shape sticky mixture.
    • Patch a cracked cheese ball with extra coating or herbs.
    • Shield from drying out by wrapping tightly in plastic.
    • If coating falls off, press again and chill briefly.

    Make-Ahead and Storage Tips

    • Prepare the cheese mixture and shape the ball ahead of time. Keep wrapped in plastic in the fridge.
    • Chill for up to 24 hours to deepen flavors. Flavors may become more pronounced.
    • Coatings can be applied right before serving to keep them crisp.
    • Leftovers can be stored in an airtight container for up to 3 days. Reheat briefly at room temp.

    10 Practical Q&As About Cheese Ball Recipe

    1. Can I substitute the cheeses?

    Use a mixture of sharp cheddar and cream cheese for a balanced tang and creaminess. The texture should be smooth and slightly sticky.

    2. Can I use different cheeses?

    Yes, you can swap cheddar for pepper jack for some spice, or Swiss for a milder flavor. Keep in mind the texture might change slightly.

    3. What are good coatings for the cheese ball?

    Yes, rolling the cheese mixture in chopped nuts, herbs, or paprika adds flavor and texture. Use fresh herbs for brightness.

    4. How long should I chill the cheese ball?

    Chill the cheese ball for at least 2 hours to firm up. It makes shaping easier and flavors meld.

    5. What should I serve the cheese ball with?

    Serve with sturdy crackers or sliced baguette. The crunch contrasts nicely with the creamy interior.

    6. My cheese mixture is too sticky, what do I do?

    If the cheese mixture is too sticky, refrigerate for 30 minutes before shaping. Coldness helps manage stickiness.

    7. How do I shape the cheese ball without it sticking?

    Use a small spatula or your hands dusted with cold water to shape the ball. Keeps it smooth and manageable.

    8. Can I prepare the cheese ball ahead of time?

    Make it a day ahead; it allows flavors to develop. Keep wrapped in plastic in the fridge.

    9. How long does the cheese ball last?

    Keep refrigerated, covered tightly, for up to 3 days. Let come to room temp before serving for maximum flavor.

    10. Can I reheat or serve leftovers?

    Reheat by letting it sit at room temp for 15 minutes. For leftovers, serve cold, with a bit of fresh herbs.

    There’s something about making a cheese ball that feels like a small act of care. It’s imperfect, a bit messy, but it always invites people in, makes them smile, and reminds me that sometimes, simple is best.

    Whether it’s a quick snack or part of a spread, this cheese ball is about connection—nostalgic, comforting, and just a little unexpected. It’s the kind of thing that sticks around in memory long after the last cracker is gone.

  • Stuffed Mushrooms Recipe

    Stuffed mushrooms are one of those dishes that sneak into your kitchen when you’re not looking. I love how humble ingredients—mushrooms, cheese, herbs—come together with a bit of heat and patience. But what really keeps me coming back is the smell—earthy, cheesy, with a hint of garlic—that fills the house.

    This recipe is a little different from the usual because I like to think of it as a canvas for experimenting. Sometimes I toss in a handful of toasted pine nuts, other times I add a splash of lemon juice to brighten everything up. It’s simple, honest cooking that’s easy to tweak and makes you feel like a pro in your own kitchen.

    A cook’s notes on the forgotten art of making stuffed mushrooms with a focus on flavor layering and texture contrast.

    Why Stuffed Mushrooms Matter to Me

    • I love how the smell of garlic and cheese in the oven turns the kitchen into a cozy space.
    • There’s a small thrill in filling each mushroom perfectly—like a tiny edible sculpture.
    • Every time I make these, I remember family dinners and lazy weekends.
    • It’s a dish I can’t help but tweak—more cheese, less salt, a dash of hot sauce—whatever feels right.

    A personal story behind the dish.

    • Growing up, my grandma’s kitchen always smelled like garlic and roasted herbs. She made these stuffed mushrooms for special occasions, and I’d watch her with wide eyes, trying to learn her secrets.
    • The simplicity of it, yet the depth of flavor, always amazed me. It’s one of those recipes that feels like a warm hug, no matter how many times I make it.

    A brief history and fun facts about stuffed mushrooms

    • Stuffed mushrooms have been around since the Roman times, where ancient cooks filled them with herbs and cheese.
    • The classic stuffing often includes breadcrumbs, but I prefer a cheese-based filling for richness.
    • Mushrooms are a natural umami bomb, making them perfect for stuffing and baking.
    • In some cultures, stuffed mushrooms are served during festivities, symbolizing prosperity.

    Ingredient insights: what makes each component special

    • Mushrooms: I prefer large, meaty caps like portobellos for sturdiness, but creminis work well too. They need to be firm and plump, with a rich aroma.
    • Cheese: Sharp cheddar adds a smoky, oozy quality, while Parmesan gives a nutty, salty punch. Swap in Monterey Jack for mellowness, or a splash of ricotta for creaminess.
    • Garlic: Fresh garlic is key for that pungent, aromatic punch. Use more if you love bold flavors or less for subtlety.
    • Herbs: Parsley and thyme brighten the dish. Fresh herbs give more vibrancy than dried, but dried can work in a pinch.
    • Breadcrumbs: Optional for a crunch, but if you skip, you’ll get a softer, more cheese-focused filling.

    Spotlight on Mushrooms and Cheese

    Mushrooms:

    • Their earthy aroma intensifies when baked, becoming tender and juicy. The caps hold the filling perfectly.
    • Cheese: Melts into a gooey, golden crust, filling the air with a rich, cheesy scent that’s irresistible.

    Cheese:

    • Mushrooms: Watch for dry or cracked caps, which can leak or break during baking.
    • Mushrooms: Their stems contain flavor but can be fibrous. Finely chop for a smoother filling.

    Ingredient substitutions to suit your diet and pantry

    • Dairy-Free: Use vegan cheese or mashed avocado for creaminess, though flavor may be milder.
    • Gluten-Free: Skip breadcrumbs or swap with crushed nuts for a crunchy texture.
    • Low-Sodium: Use low-sodium cheese and season cautiously to keep flavor bold.
    • Vegan: Substitute dairy cheese with plant-based cheese and add nutritional yeast.
    • Herbs: Fresh herbs are best, but dried can be used—double the amount for intensity.

    Equipment & Tools

    • Baking sheet: To hold the mushrooms in the oven.
    • Small spoon or melon baller: To stuff the mushrooms neatly.
    • Oven: To cook the mushrooms evenly.
    • Mixing bowl: To combine the filling ingredients.

    Step-by-step guide to perfect stuffed mushrooms

    1. Preheat your oven to 190°C (375°F).
    2. Clean the mushrooms gently with a damp cloth. Remove stems and chop finely.
    3. Mix chopped stems, garlic, herbs, and cheese in a bowl. Add a splash of olive oil and season.
    4. Fill each mushroom cap generously with the filling using a small spoon.
    5. Arrange filled mushrooms on a baking sheet lined with parchment. Bake for 20 minutes.
    6. If you want a crispy top, broil for 2 minutes until golden and bubbling.
    7. Remove from oven and let rest for 5 minutes before serving.

    Let the stuffed mushrooms rest for 5 minutes before serving to allow flavors to settle.

    How to Know It’s Done

    • Filling is golden and bubbly.
    • Mushrooms are tender but not soggy.
    • The tops are crispy and slightly browned.

    Stuffed Mushrooms

    Stuffed mushrooms are a savory appetizer featuring large mushroom caps filled with a flavorful mixture of cheese, herbs, and chopped stems. Baked until golden and bubbling, they develop a tender, juicy interior with a crispy top. The dish combines earthy mushroom aroma with cheesy richness and aromatic garlic, creating a cozy, irresistible bite.
    Prep Time 15 minutes
    Cook Time 20 minutes
    Total Time 35 minutes
    Servings: 4
    Course: Main Course
    Cuisine: American
    Calories: 150

    Ingredients
      

    • 8 large large mushroom caps (e.g., portobellos or creminis) preferably firm and plump
    • 1/2 cup cheddar cheese shredded
    • 1/4 cup Parmesan cheese grated
    • 2 cloves garlic minced
    • 1 tablespoon fresh parsley chopped
    • 1 teaspoon fresh thyme chopped
    • 2 tablespoons olive oil
    • 1/4 cup chopped mushroom stems finely chopped
    • 1 dash salt
    • 1 dash black pepper

    Equipment

    • Baking sheet
    • Small spoon or melon baller
    • Oven
    • Mixing bowl

    Method
     

    1. Preheat your oven to 190°C (375°F). Gently clean the mushroom caps with a damp cloth and remove the stems, setting them aside.
    2. Finely chop the mushroom stems and set aside. In a mixing bowl, combine the chopped stems, minced garlic, chopped parsley, chopped thyme, shredded cheddar, grated Parmesan, and a drizzle of olive oil. Season with a pinch of salt and black pepper.
    3. Use a small spoon or melon baller to carefully fill each mushroom cap with the cheese mixture, pressing it in so it stays snug.
    4. Arrange the stuffed mushrooms on a baking sheet lined with parchment paper, spacing them evenly. Drizzle a little olive oil over the tops for extra crispiness.
    5. Bake in the oven for about 20 minutes, until the filling is golden and bubbly, and the mushroom caps are tender.
    6. If you like a crispy top, switch to broil mode for 2 minutes, watching closely to prevent burning.
    7. Remove from the oven and let the mushrooms rest for about 5 minutes. Serve warm, perhaps with a sprinkle of extra herbs for color.

    Cooking tips and tricks

    • THE TOP: Broil for a crispy finish, watch closely to avoid burning.
    • THE MIX: Use finely chopped stems for an even filling.
    • THE FILL: Add a pinch of lemon zest to brighten flavors.
    • THE PREP: Pat mushrooms dry before filling to prevent sogginess.
    • THE BAKE: Bake until the filling is golden and mushrooms are tender.

    Common mistakes and how to fix them

    • FORGOT TO preheat the oven? Warm it up for at least 15 minutes before baking.
    • DUMPED too much filling? Use a smaller spoon next time for a neater look.
    • OVER-TORCHED the tops? Cover with foil and lower the oven temperature.
    • SOGGY mushrooms? Bake on a wire rack to help excess moisture escape.

    Quick kitchen fixes

    • When mushrooms are dry, brush them with a little olive oil before baking.
    • Splash a bit of white wine into the filling for extra depth.
    • Patch over cracked mushrooms with a little extra cheese.
    • Shield the tops with foil if they brown too quickly.
    • When in doubt, bake a few extra minutes—they’ll still be delicious.

    Make-ahead and storage tips

    • Prepare the stuffing a day ahead, keep refrigerated for up to 24 hours.
    • Fill the mushrooms shortly before baking to prevent sogginess.
    • Reheat leftovers in the oven at 180°C (350°F) until bubbly, about 10 minutes.
    • Frozen stuffed mushrooms can be baked directly from frozen, add 5-7 minutes to baking time.

    10 Practical Q&As About Stuffed Mushrooms

    1. What type of mushrooms work best?

    Use large, meaty mushroom caps like portobellos or large cremini so they hold the filling well.

    2. What about mushroom stems?

    Chop the stems finely to mix into the filling, avoiding waste and adding flavor.

    3. Can I swap the cheeses?

    Use sharp cheddar or Parmesan for a rich, savory flavor, but for a milder taste, try Monterey Jack.

    4. What’s the ideal baking temp?

    Bake at 190°C (375°F) for about 20 minutes until the tops are golden and bubbly.

    5. Should I use a convection oven?

    Preheat your oven; avoid opening it mid-way to keep the heat steady.

    6. When’s the best time to serve?

    Serve hot, right out of the oven, with a side of crusty bread or a fresh salad.

    7. How do I stuff the mushrooms smoothly?

    Use a small spoon or melon baller to fill the mushroom caps neatly.

    8. Can I make these ahead?

    Broil for 2 minutes if you want a extra crispy top.

    9. How long can I store leftovers?

    Yes, prepare and assemble a day before, then bake just before serving.

    10. Can I freeze stuffed mushrooms?

    Store in an airtight container in the fridge for up to 2 days; reheat at 180°C (350°F) until bubbly.

    There’s a quiet satisfaction in biting into a perfectly stuffed mushroom—warm, juicy, with a crispy topping. It’s a dish that’s rooted in tradition but flexible enough for your own twist.

    Next time you’re craving something savory and comforting, give this a shot. It’s a small, unpretentious plate that somehow feels special, especially when you’re sharing it with friends or just enjoying a quiet moment alone.

  • Spinach Artichoke Dip Recipe

    This dip is my go-to whenever I want comfort in a bowl. It’s not fancy, but it’s honest—melty, cheesy, with a hint of smoky artichoke goodness.

    I’ve made it a hundred ways, but I keep coming back to the simple combo of spinach and artichokes. It’s the kind of dish that tastes better with a little chaos in the kitchen, like when I forget the cheese and then remember to add a splash of lemon instead.

    The unpolished, honest cook’s notes angle—focusing on real-life kitchen quirks and sensory details.

    Why I Keep Coming Back to This Dip

    • I love how this dip smells when it’s baking—garlic, cheese, a little smoky.
    • Making this with fresh spinach feels more vibrant than using frozen.
    • Nothing beats the joy of pulling a golden, bubbling dish out of the oven.
    • I’ve had this at countless parties, always disappearing fast.

    My Inspiration Behind This Dish

    • This recipe came from a messy kitchen moment—trying to clear out the fridge and ending up with a delicious surprise.
    • It’s a dish that feels like a warm hug, perfect for sharing.
    • The ingredients are simple, but together they create something comforting and familiar.

    A Brief History of Spinach Artichoke Dip

    • This dish gained popularity in the 1980s, especially in American casual dining.
    • The name ‘artichoke’ hints at its Mediterranean roots, but it’s now a comfort food staple.
    • Cream cheese was an accidental invention in the 1870s, which led to countless creamy dips.
    • Spinach became associated with health foods in the 1950s, boosting this dip’s popularity.

    Ingredient Insights and Sensory Cues

    • Spinach: Fresh spinach wilts quickly, releasing a vibrant green color and earthy aroma. Squeeze out excess water for creamy texture.
    • Artichokes: Canned artichokes are tender and slightly briny, adding a tangy note. Rinse well to remove brine flavors.
    • Cheese: Cream cheese is creamy and mild, binding everything together. Use full-fat for best melt and flavor.
    • Garlic: Sautéed garlic releases a fragrant aroma, infusing the dish with warmth. Use fresh for punch.
    • Lemon: Brightens the dip with citrus notes. A squeeze before baking enhances flavors.

    Spotlight on Artichokes and Cheese

    Artichoke Hearts:

    • Artichokes: Their tender, slightly nutty flavor balances richness. They soften nicely during baking, becoming silky.
    • Artichokes tend to hold onto flavor even after cooking, adding a little tang and texture.

    Cheddar or Mozzarella:

    • Cheese: Melts into a gooey, stretchy consistency that’s irresistible. Freshly grated cheese melts more evenly.
    • Cheese’s aroma intensifies as it bakes, filling the kitchen with savory warmth.

    Ingredient Swap Tips

    • Dairy-Free: Use cashew or almond-based cheese for creaminess, but expect a different flavor profile.
    • Gluten-Free: Ensure chips or bread served alongside are gluten-free, as the dip itself is naturally gluten-free.
    • Vegan: Swap dairy cheese for vegan cheese, though texture and melt may vary.
    • Low-Sodium: Use less salt if your cheeses are salty, and rely on lemon for brightness.
    • Extra Veg: Add chopped sun-dried tomatoes or roasted red peppers for a flavor boost.

    Equipment & Tools

    • Ovenproof dish or skillet: Baking and serving
    • Mixing bowl: Combining ingredients
    • Spatula or spoon: Mixing and spreading
    • Oven or broiler: Baking and finishing

    Step-by-Step: Making Spinach Artichoke Dip

    1. Preheat your oven to 180°C (350°F). Find a 1.5-quart baking dish or an ovenproof skillet.
    2. In a skillet over medium heat, sauté 2 minced garlic cloves in a tablespoon of olive oil until fragrant, about 30 seconds.
    3. Add 4 cups of fresh spinach, cooking until wilted, about 2 minutes. Squeeze out excess moisture and set aside.
    4. Drain 1 can (14 oz) of artichoke hearts, chop roughly, and mix into the spinach. Set aside.
    5. In a mixing bowl, combine 8 oz cream cheese, 1 cup grated Parmesan, and 1 cup shredded mozzarella.
    6. Stir in the spinach and artichoke mixture. Season with salt, pepper, and a squeeze of lemon, if desired.
    7. Transfer the mixture to your prepared baking dish. Smooth the top with a spatula.
    8. Bake for 20-25 minutes, until bubbling around the edges and lightly golden on top.
    9. Check for doneness: the cheese should be melted and bubbling, and the top should be slightly crispy.
    10. If the top isn’t golden enough, broil on high for 2-3 minutes, watching carefully to prevent burning.

    Let the dip rest for 5 minutes after baking. Serve warm with chips or bread.

    How to Know It’s Done

    • The dip is bubbling around the edges and has a golden top.
    • The cheese is fully melted and slightly gooey.
    • The smell of garlic and cheese fills the kitchen, inviting and warm.

    Spinach Artichoke Dip

    This comforting dip combines fresh spinach and tender artichoke hearts mixed with melting cheeses to create a creamy, cheesy spread with smoky hints. Baked until bubbling and golden, it has a smooth texture with a fragrant aroma of garlic and lemon, perfect for sharing at parties or cozy nights in.
    Prep Time 10 minutes
    Cook Time 25 minutes
    Total Time 35 minutes
    Servings: 8
    Course: Main Course
    Cuisine: American
    Calories: 250

    Ingredients
      

    • 2 cloves garlic minced
    • 1 tablespoon olive oil for sautéing
    • 4 cups fresh spinach washed and roughly chopped
    • 1 can (14 oz) artichoke hearts drained and roughly chopped
    • 8 oz cream cheese softened
    • 1 cup grated Parmesan cheese
    • 1 cup shredded mozzarella cheese
    • 1 squeeze lemon for brightness
    • to taste salt and pepper

    Equipment

    • Ovenproof dish or skillet
    • Mixing bowl
    • Spatula or spoon
    • Oven or broiler

    Method
     

    1. Preheat your oven to 180°C (350°F). Find a baking dish or ovenproof skillet ready for baking.
    2. In a skillet over medium heat, warm the olive oil and sauté the minced garlic until fragrant, about 30 seconds. You’ll notice the aroma filling the kitchen and the garlic turning slightly golden.
    3. Add the fresh spinach to the skillet and cook, stirring, until wilted and vibrant green, about 2 minutes. Squeeze out excess moisture with a paper towel to keep the dip creamy and prevent it from becoming watery.
    4. Drain the artichoke hearts well and roughly chop them. Stir the chopped artichokes into the wilted spinach mixture, combining everything evenly.
    5. In a mixing bowl, combine the softened cream cheese, grated Parmesan, and shredded mozzarella. Mix until smooth and creamy—this creates the cheesy base that melts beautifully during baking.
    6. Fold the spinach and artichoke mixture into the cheese blend, stirring gently to combine. Squeeze a little fresh lemon juice over the mixture to add brightness and balance the richness. Season with salt and pepper to taste.
    7. Transfer the entire mixture into your prepared baking dish, spreading it out with a spatula to create an even top. Place it in the oven.
    8. Bake for 20-25 minutes, until the dip is bubbling around the edges and the top is lightly golden and melty. The aroma of garlic, cheese, and smoky artichoke fills the air.
    9. If the top isn’t golden enough, broil on high for 2-3 minutes, keeping a close eye so it doesn’t burn. You want a slightly crispy, bubbly surface.
    10. Remove from the oven and let the dip rest for 5 minutes to settle. Serve warm with chips, bread, or crunchy vegetables for dipping. Enjoy the creamy, cheesy goodness that’s perfect for sharing!

    Cooking Tips & Tricks for Perfect Dip

    • GARLIC: Toast garlic briefly in oil to unlock deeper flavor.
    • USE ROOM TEMP CHEESE: Ensures even melting and prevents clumping.
    • SALT THE SPINACH: Adds flavor and helps remove excess moisture.
    • BAKE IN A HOT OVEN: 180°C (350°F) to get that bubbly, golden top.
    • STIR MID-BAKE: To prevent cheese from sticking or burning on the edges.

    Common Mistakes and How to Fix Them

    • FORGOT TO DRAIN THE SPINACH? Squeeze out as much moisture as possible to avoid watery dip.
    • DUMPED TOO MUCH CHEESE? Add a splash of milk or cream to loosen it up.
    • OVER-TORCHED? Cover with foil and lower the oven temp to save it.
    • SEPARATION DURING REHEAT? Stir vigorously and reheat gently, adding a splash of broth if needed.

    Quick Fixes for Common Issues

    • If it’s too thick, stir in a splash of milk or cream.
    • When it’s too watery, bake longer or add more cheese.
    • Splash lemon juice if it’s bland or needs brightness.
    • Patch a burnt top with foil and finish baking.
    • Shield with foil if edges brown too quickly.

    Make-Ahead Tips and Storage

    • Prepare the mixture a day ahead, cover, and refrigerate. Flavors deepen overnight.
    • Bake straight from the fridge; add 5-10 minutes to the baking time.
    • Reheat in the oven at 180°C (350°F) until bubbling—about 10 minutes.
    • Stir before serving to reincorporate any separation or oil.
    • Best enjoyed warm, but leftovers can be stored in the fridge for 2-3 days.

    10 Practical Q&As About Spinach Artichoke Dip

    1. Can I use frozen spinach?

    Use fresh spinach and canned artichokes to keep it vibrant and easy. Drain artichokes well, and squeeze out excess moisture from spinach to prevent watery dip.

    2. What cheese works best?

    Yes, but thaw completely and squeeze out all excess water. Frozen spinach can make the dip watery if not drained properly.

    3. Can I substitute other cheeses?

    Cream cheese for creaminess, Parmesan for flavor, and mozzarella for gooey texture—combine for the perfect blend.

    4. How do I prevent it from becoming greasy?

    Absolutely, try gouda or fontina if you want a different melt and a richer flavor.

    5. Is it better baked or served cold?

    Use full-fat cream cheese and grate your cheese fresh. Bake until bubbling and lightly golden to avoid excess grease.

    6. How do I keep it hot at a party?

    Baked until bubbly makes it more comforting. Serve warm for a gooey, flavorful experience.

    7. What can I serve it with?

    Use a small slow cooker or a warming tray. Stir occasionally to keep it creamy and prevent skin from forming.

    8. Can I make it ahead?

    Pita chips, sliced baguette, crunchy vegetables, or even crispy baked fries work well.

    9. How long does it last in the fridge?

    Yes, prepare, assemble, and refrigerate up to a day before baking. Reheat gently to maintain texture.

    10. What if it separates during reheating?

    Up to 3 days. Keep covered, reheat in the oven or microwave, and stir well before serving.

    Sometimes, I think about how much I love that moment when the dip comes out of the oven, bubbling and golden. It’s messy, it’s imperfect, but it’s real, just like cooking should be.

    This dish is a small reminder that the best recipes are the ones you tweak and mess up. They carry stories, spills, and the smell of garlic that lingers long after the last bite.

  • Spicy Roasted Tofu Recipe

    When I first started roasting tofu, I was surprised how a simple spice rub could transform its blandness into something smoky and addictive.

    There’s something about the process—watching the edges turn crisp and golden—that makes this dish feel both casual and celebratory.

    It’s a reminder that even humble ingredients like tofu can surprise you when you give them a little heat and spice, no fancy tricks needed.

    Turning ordinary tofu into a smoky, crispy, spicy snack by roasting it with a special homemade marinade.

    Why This Recipe Matters to Me

    • I love how roasting transforms tofu into a crispy, smoky bite.
    • It’s my go-to for quick weeknight dinners that still feel special.
    • The spice mixture is a personal favorite—adjust the heat to match your mood.
    • I get excited watching the edges crisp up—almost like magic.

    The Spark That Started It All

    • I stumbled upon this method when I wanted a quick, flavorful way to spice up tofu for a weeknight dinner.
    • The first batch was a happy accident—spicy, smoky, and crispy—so I kept refining the marinade.
    • Now, it’s my trusty dish for when I need comfort and a little kick, no matter the season.

    A Little Tofu History and Fun Facts

    • Tofu has been a staple in Asian cuisines for over a thousand years.
    • Roasting tofu is a modern take inspired by the smoky flavors of charred vegetables.
    • The marinade combines traditional Asian ingredients with a spicy twist, common in street food stalls.

    Ingredient Insights for Flavour and Texture

    • Tofu: First-person, firm tofu is my go-to, but silken won’t work here. You want that firm bite and crisp.
    • Chili Powder: I love the smoky heat it adds—try chipotle for a different smoky punch, or skip if you prefer milder.
    • Soy Sauce: It’s my salty backbone; swap with coconut aminos for a soy-free version, but reduce salt.
    • Sesame Oil: Adds a toasty aroma that’s hard to beat—try olive oil for a lighter touch.
    • Lime Juice: Brightens everything—omit if you want less tang, but it’s a game-changer.

    Spotlight on Tofu and Chili Powder

    Chili Powder: It’s my secret for that smoky, spicy punch—use more for heat, less for flavor.:

    • Firm tofu: It’s dense and holds up well when roasted—look for water-packed blocks for best texture.
    • During roasting, it turns golden and crispy on the outside, while remaining tender inside.
    • Press it well to squeeze out water—moisture is the enemy of crispness.

    Cayenne: Adds fiery heat—be cautious, a pinch goes a long way.:

    • The chili’s smoky aroma intensifies as it roasts, filling the kitchen with warmth.
    • It can turn bitter if burned, so keep an eye on the edges and adjust oven rack.
    • Mix with paprika for a milder flavor or cayenne for extra heat.

    Substitutions to Suit Your Pantry and Preferences

    • Dairy-Free: Swap soy sauce for coconut aminos—less salty, still savory.
    • Low-Sodium: Use reduced-salt soy sauce—your taste buds will thank you.
    • Gluten-Free: Ensure your spices are gluten-free to keep it safe for celiacs.
    • Sweetener: Add a splash of honey or maple for a touch of sweetness, balancing the spice.
    • Oil: Use avocado oil for a neutral, high-smoke-point fat that crisps up well.

    Equipment & Tools

    • baking sheet: Roast the tofu evenly
    • parchment paper: Prevent sticking and easy cleanup
    • mixing bowls: Marinate the tofu
    • kitchen tongs: Turn tofu during roasting
    • sharp knife: Cut tofu into even cubes

    Step-by-Step Guide to Spicy Roasted Tofu

    1. Press the tofu for 15 minutes to remove excess moisture, then cut into 1-inch cubes.
    2. Mix your marinade: soy sauce, chili powder, garlic powder, smoked paprika, a splash of sesame oil, and a squeeze of lime.
    3. Toss the tofu cubes gently in the marinade, making sure every piece is coated. Marinate for at least 30 minutes.
    4. Preheat your oven to 200°C (390°F). Line a baking sheet with parchment paper.
    5. Spread the tofu cubes in a single layer on the baking sheet. Bake for 25-30 minutes, flipping halfway.
    6. Keep an eye on the edges—when they turn deep golden and crispy, they’re ready.
    7. Remove from oven and let rest for 5 minutes. Finish with a sprinkle of toasted sesame seeds.
    8. Serve hot, garnished with chopped scallions or a drizzle of sriracha for extra zing.

    Let the tofu rest for 5 minutes after roasting to allow flavors to settle. Serve immediately or let cool slightly for a more manageable bite.

    How to Know It’s Done

    • Edges are deep golden and crispy
    • Tofu feels firm and crackly when pressed
    • Marinade has absorbed well, with a fragrant spicy aroma

    Spicy Roasted Tofu

    This dish features firm tofu marinated in a smoky, spicy spice rub, then roasted until crispy and golden on the edges. The process highlights the transformation of bland tofu into a flavorful, crispy snack with a tender interior and a smoky, spicy aroma. Perfect for a quick, satisfying meal or snack, showcasing the magic of heat and spice.
    Prep Time 20 minutes
    Cook Time 30 minutes
    Total Time 50 minutes
    Servings: 4
    Course: Main Course
    Cuisine: Asian-inspired
    Calories: 180

    Ingredients
      

    • 1 block firm tofu water-packed, well-pressed
    • 2 tablespoons soy sauce or coconut aminos for soy-free
    • 1 teaspoon chili powder smoky preferred
    • 1/2 teaspoon garlic powder
    • 1/2 teaspoon smoked paprika
    • 1 teaspoon sesame oil toasted preferred
    • 1 tablespoon lime juice freshly squeezed

    Equipment

    • Baking sheet
    • Parchment paper
    • Mixing bowls
    • Kitchen tongs
    • Sharp knife

    Method
     

    1. Press the tofu for about 15 minutes to remove excess moisture, then cut it into evenly sized 1-inch cubes using a sharp knife.
    2. In a mixing bowl, whisk together soy sauce, chili powder, garlic powder, smoked paprika, sesame oil, and lime juice until well combined.
    3. Toss the tofu cubes gently in the marinade, making sure each piece is evenly coated. Let them marinate for at least 30 minutes to soak up all the spicy, smoky flavors.
    4. Preheat your oven to 200°C (390°F). Line a baking sheet with parchment paper to prevent sticking.
    5. Spread the marinated tofu cubes in a single layer on the prepared baking sheet, ensuring they aren’t crowded to allow for even crisping.
    6. Bake for 25 to 30 minutes, flipping the tofu halfway through with tongs, until the edges turn deep golden and crispy, and the kitchen fills with a smoky aroma.
    7. Once baked, remove the tofu from the oven and let it rest for 5 minutes. This helps the crispiness set and flavors to deepen.
    8. Sprinkle with toasted sesame seeds and, if desired, garnish with chopped scallions for extra freshness and color.
    9. Serve the crispy, smoky tofu hot, perhaps alongside rice or greens, or enjoy as a spicy snack on its own.

    Tips & Tricks for Perfect Spicy Roasted Tofu

    • Use a hot oven—200°C ensures crispy edges.
    • Marinate tofu in a shallow dish for even flavor.
    • Flip tofu halfway through roasting to crisp all sides.
    • Use parchment paper—no sticking or tearing.
    • For extra smoky flavor, broil for 2 minutes at the end.

    Common Mistakes and How to Fix Them

    • FORGOT TO PRESS THE TOFU? DRAIN AND PRESS FOR 15 MINUTES, THEN PAT DRY.
    • DUMPED TOO MUCH MARINADE? Wipe excess before roasting to prevent sogginess.
    • OVER-TORCHED THE EDGES? Reduce oven temp to 190°C and check earlier.
    • TOO SOFT AFTER ROASTING? Roast longer or turn up the heat slightly.

    Quick Fixes for Kitchen Mishaps

    • When tofu sticks, splash a little water on the baking sheet and bake a minute longer.
    • When spice is too mild, sprinkle extra chili powder after roasting.
    • If edges burn, lower oven temp and check sooner.
    • Patch blandness with a splash of soy or hot sauce.
    • Shield tofu from direct heat if it’s charring too quickly.

    Make-Ahead and Storage Tips

    • Marinate the tofu up to 24 hours ahead for deeper flavor.
    • Store leftovers in an airtight container in the fridge for 3 days.
    • Reheat in the oven at 180°C (355°F) for 10 minutes until crispy.
    • The spice flavors intensify slightly after a day, making leftovers even more flavorful.

    10 Practical Q&As about Spicy Roasted Tofu

    1. What kind of tofu should I choose?

    Use firm or extra-firm tofu so it holds up during roasting and gets that nice, crispy exterior.

    2. How do I prepare the tofu before roasting?

    Press the tofu for at least 15 minutes to remove excess water, helping it crisp up better.

    3. Can I skip marinating?

    Marinate the tofu in your spicy sauce for at least 30 minutes; the longer, the more flavor it absorbs.

    4. How long should I roast the tofu?

    Bake at 200°C (390°F) for about 25-30 minutes until edges are golden and crispy.

    5. Is parchment necessary?

    Use a baking sheet lined with parchment to prevent sticking and make cleanup easier.

    6. Can I make it milder?

    Adjust the spice level by adding more or less chili powder or cayenne.

    7. What should I serve with this?

    Serve hot, with a side of rice or greens, to balance the spice and texture.

    8. How do I store leftovers?

    Leftovers keep well in the fridge for 3 days. Reheat in the oven for best crispness.

    9. Can I reheat in the microwave?

    Make sure to toss the tofu in sauce before reheating to restore flavor and moisture.

    10. Any safety tips?

    Be cautious with the hot oven and sharp knives when handling the tofu and cutting boards.

    This dish isn’t just about spice; it’s about the joy of turning something simple into a satisfying snack or main. It’s perfect for busy nights when you want flavor without fuss.

    Sometimes, it’s the straightforward, honest recipes that end up being the most memorable—this roasted tofu included. Keep experimenting with your favorite spices, and it’ll always feel fresh.

  • Air Fryer Roasted Green Beans Recipe

    Green beans in the air fryer—sounds simple, right? But there’s something about that quick, hot blast that transforms them. The smell of roasted garlic mingling with the fresh green aroma can fill your kitchen in minutes.

    This method isn’t just about speed; it’s about capturing that perfect balance of tender and crispy. No oil splatters, no oven heating delays—just a handful of beans and a little heat, and you’re set for a snack or side that feels fresh and satisfying.

    Focusing on the sensory experience of roasting green beans in the air fryer, highlighting the smell, texture, and visual cues.

    Why I keep coming back to this simple snack with a twist

    • I love how this method makes green beans taste fresh and roasted at the same time.
    • Sometimes I get lazy and just toss these in for a quick snack—always satisfying.
    • Seeing the blistered edges pop up makes me feel like I’ve nailed the perfect roast.
    • This recipe reminds me of summer dinners when everything is just a little brighter.

    A personal story of discovering the magic of air fryer green beans

    • I was craving a crispy vegetable snack without the mess of pan-frying. The air fryer seemed perfect.
    • One evening, I threw some beans in without thinking much, and the result blew me away—crisp, fragrant, bright.
    • Now, it’s a regular in my kitchen, especially when I want something quick, healthy, and full of flavor.

    Quick facts and trivia about green beans and air frying

    • Green beans have been a staple in kitchens worldwide for centuries, especially in Mediterranean and Asian cuisines.
    • The air fryer was invented in 2010 and has revolutionized quick cooking, especially for vegetables.
    • Roasting enhances the natural sugars in green beans, giving them a caramelized flavor that’s hard to beat.
    • Adding lemon or cheese at the end is a nod to classic flavor pairings in Southern Italian cooking.

    Ingredient insights: what makes these green beans special

    • Green beans: Fresh, crisp beans give the best snap and flavor. Skip if they’re limp or slimy.
    • Olive oil: Adds flavor and helps beans crisp; use good-quality, extra virgin for best results.
    • Garlic powder: Provides a savory, roasted garlic aroma. Substitute with fresh minced garlic, but watch for burning.
    • Lemon: Brightens the dish with a citrus punch. Lime works too, for a different zing.
    • Parmesan: Adds umami and saltiness. Nutritional yeast is a vegan alternative, less cheesy but still flavorful.

    Spotlight on Green Beans and Olive Oil

    Green beans:

    • Their firm texture and bright green color are key indicators of freshness.
    • Olive oil: Its fruity aroma and rich flavor are essential for roasting, not just for coating.

    Olive oil:

    • Watch how it helps develop a crisp exterior during roasting.
    • Its smoky, fragrant notes deepen as it heats, giving beans a roasted flavor.

    Substitutions to suit your diet and taste

    • Dairy-Free: Use nutritional yeast instead of Parmesan for a cheesy, umami flavor.
    • Low-Oil: Reduce to ½ tablespoon for a lighter, less crispy snack.
    • Vegan: Swap Parmesan for a sprinkle of smoked paprika or nutritional yeast.
    • Spicy: Add chili flakes or cayenne for heat.
    • Herbaceous: Toss in fresh herbs like thyme or rosemary before roasting.

    Equipment & Tools

    • Air fryer: Rapid, even roasting with minimal fuss
    • Mixing bowl: Toss beans with oil and seasonings
    • Silicone spatula or tongs: Mix and handle hot beans safely
    • Lemon or Parmesan (optional): Finish with brightness or umami

    Step-by-step guide to air fryer roasted green beans

    1. Preheat your air fryer to 200°C (400°F).
    2. Trim the ends off your green beans and pat them dry thoroughly.
    3. Toss the beans in a bowl with 1 tablespoon olive oil, ½ teaspoon salt, pepper, and garlic powder.
    4. Spread the beans in a single layer in the air fryer basket. Avoid overcrowding.
    5. Cook for 8–10 minutes, shaking the basket halfway through. Look for blistered spots and a fragrant aroma.
    6. Once done, remove and sprinkle with a squeeze of lemon or a sprinkle of Parmesan if desired.

    Serve immediately for maximum crispness. For presentation, sprinkle with herbs or lemon zest.

    How to Know It’s Done

    • Bright green color with blistered spots
    • A nutty, roasted garlic smell
    • Crispy edges when you lift a bean

    Air Fryer Roasted Green Beans with Garlic

    This dish features fresh green beans roasted in the air fryer until tender and slightly blistered, with a fragrant roasted garlic aroma. The high heat crisps the edges while keeping the beans bright and flavorful, resulting in a vibrant, snackable side or appetizer with a satisfying crunch and smoky aroma.
    Prep Time 5 minutes
    Cook Time 10 minutes
    Total Time 15 minutes
    Servings: 4
    Course: Main Course
    Cuisine: American
    Calories: 120

    Ingredients
      

    • 1 bunch fresh green beans trimmed and thoroughly dried
    • 1 tablespoon extra virgin olive oil good quality for flavor and crisping
    • ½ teaspoon salt to taste
    • ¼ teaspoon black pepper freshly ground
    • ½ teaspoon garlic powder or 2 minced garlic cloves
    • 1 lemon lemon for squeezing after roasting
    • ¼ cup Parmesan cheese optional, for garnish

    Equipment

    • Air fryer
    • Mixing bowl
    • Silicone spatula or tongs

    Method
     

    1. Preheat the air fryer to 200°C (400°F). This quick burst of heat starts the roasting process immediately.
    2. Trim the ends of the green beans and pat them completely dry with a towel to ensure they roast crisply without steaming.
    3. In a mixing bowl, toss the green beans with olive oil, salt, pepper, and garlic powder until evenly coated. The oil helps develop a crispy exterior, and the seasonings add depth of flavor.
    4. Arrange the seasoned green beans in a single layer in the air fryer basket, spreading them out to avoid overlapping for even roasting.
    5. Cook the green beans for 8–10 minutes, shaking the basket halfway through. You’ll hear gentle sizzling and see the beans start to blister and turn a darker green.
    6. Once the beans are blistered and fragrant, remove them from the air fryer. Squeeze fresh lemon juice over the hot beans for a bright, tangy finish.
    7. If desired, sprinkle grated Parmesan cheese over the beans while still warm to melt slightly and add umami flavor.
    8. Serve immediately while the beans are crisp and fragrant, garnished with extra lemon zest or herbs if desired.

    Notes

    For extra flavor, consider adding chili flakes or fresh herbs before serving. Adjust cooking time based on the size and freshness of your green beans.

    Tips and tricks for perfect roasted green beans

    • PREHEAT the air fryer before adding beans—this ensures even roasting.
    • Toss beans in oil and seasonings just before roasting—don’t skimp on oil for better crisp.
    • SHAKE the basket halfway through—this helps achieve uniform color and crunch.
    • Use a light hand with oil; too much can make beans greasy, not crispy.
    • Add a splash of acid like lemon or vinegar at the end to brighten flavors.

    Common mistakes and how to fix them

    • FORGOT to dry beans thoroughly? Drier beans roast crisper—pat them down with a towel.
    • DUMPED too much oil? Use just enough to lightly coat—the beans won’t be greasy.
    • OVER-TORCHED? Reduce cook time or shake more often—aim for blistered, not blackened.
    • SKIPPED shaking? Do it at 4 minutes for even crisping—no one likes soggy spots.

    Quick fixes for common roasting hiccups

    • IF beans are soggy, blast them at 200°C for 2 more minutes.
    • IF they’re underdone, toss back in for 2–3 minutes, shaking frequently.
    • PATCH over-seasoned beans with a squeeze of lemon—acid cuts salt.
    • SHIELD beans from burning by reducing heat or shaking more often.
    • SPLASH a little vinegar or lemon juice if flavors need brightening.

    Make-ahead tips and storage notes

    • Trim and dry the green beans a day ahead. Store in a paper towel-lined container in the fridge.
    • Cooked beans are best eaten fresh, but can be stored in an airtight container for up to 24 hours.
    • Reheating in the air fryer at 180°C (350°F) for 3–4 minutes helps restore some crispness.
    • Adding lemon or Parmesan after reheating keeps flavors bright and fresh.

    10 Practical Q&As About Air Fryer Roasted Green Beans

    1. Can I use frozen green beans? Rossed green beans work best with fresh, firm beans.

    Use fresh green beans for the best snap and flavor. Trim ends and dry thoroughly before cooking.

    2. Should I season the beans before or after cooking? Season before for even flavor.

    Toss beans in olive oil, salt, pepper, and garlic powder before air frying. Don’t overcrowd the basket.

    3. How long do I cook the beans? Typically 8–10 minutes, shaking at the 4-minute mark.

    Cook at 200°C (400°F) for about 8–10 minutes. Shake halfway through to promote even roasting.

    4. How do I know when the beans are done? Bright green, blistered spots, and a nutty smell.

    Look for bright green color, slight blistering, and a fragrant aroma of roasted garlic and beans.

    5. Can I reheat leftovers? Yes, in the air fryer or oven to restore crunch.

    Serve immediately for best crispness. If saving, reheat at 180°C (350°F) for 3–4 minutes.

    6. What tools are best for crisping? Wire racks or perforated trays help keep beans crispy.

    Use a perforated baking sheet or a wire rack to prevent steaming and promote crispness.

    7. How do I avoid burning? Watch closely after 8 minutes and shake often.

    Keep an eye on the beans after 8 minutes to prevent burning. They can go from perfect to charred quickly.

    8. Can I add other seasonings? Yes, cumin, chili flakes, or Parmesan work well.

    Adjust seasonings to taste. Add a squeeze of lemon after cooking for brightness.

    9. Should I use a specific oil? Extra virgin olive oil is best, but avocado oil is a good alternative.

    Use high-quality olive oil for roasting. It adds flavor and helps beans crisp up.

    10. Can I vary the beans? Yes, colorful beans add visual interest and different flavors.

    Try different beans like yellow or purple for visual and flavor variation.

    Once you get the hang of it, roasting green beans in the air fryer becomes a go-to. They’re quick to prep, and the flavor punch is real. Plus, it’s a sneaky way to get more greens into your day without much fuss.

    Next time you need a quick vegetable side, remember how easy and flavorful this method is. It’s a small routine, but it makes a big difference in how vibrant and lively your meal feels.

  • Cranberry Brie Bites Recipe

    During the holiday rush, I started thinking about how small can make a big impact. Cranberry Brie Bites are the chaos of flavor—sweet tart cranberries, rich melting Brie, all nestled in flaky pastry. They’re simple to pull together but pack a punch of cozy, festive vibes.

    These bites are my go-to for quick parties or when I want to impress without stressing. They remind me that sometimes, the best dishes are the ones you can whip up with ingredients you already have, turning humble into spectacular.

    A cook’s notes perspective on creating festive, bite-sized appetizers that combine tradition with a touch of culinary chaos.

    Why I Keep Coming Back to These Bites

    • I love how these bites are both festive and casual, perfect for any gathering.
    • There’s a little chaos in assembling, but that’s part of the fun and gives each bite character.
    • I feel proud when I watch guests devour these, knowing I threw them together in minutes.
    • They remind me of childhood holidays, simple ingredients bringing everyone together.

    A quick holiday miracle

    • This recipe was born out of a holiday party where I had no time but wanted to impress. I started with puff pastry, a handful of cranberries, and Brie—and it all came together in a flash.
    • The sweet-tart cranberries cut through the richness of the cheese, creating perfect little flavor bombs. I realized how versatile they could be—add nuts, herbs, or a splash of balsamic for variation.
    • Now, they’re my quick go-to for any celebration or just a cozy night in with friends.

    A little history behind the bites

    • The combination of cranberries and Brie dates back to early American holiday tables.
    • Miniature appetizers like these have origins in French hors d’oeuvres, but have become universal party staples.
    • Using puff pastry is a quick way to mimic more elaborate tart shells, popular in French patisserie.
    • Cranberries are native to North America and have been used by indigenous peoples for centuries.

    Ingredient quirks and tips

    • Brie: Creamy, oozy, melts beautifully, with a mild, buttery flavor. Swap with Camembert for a similar texture.
    • Cranberries: Tart and juicy, add bright flavor. Dried cranberries soaked in warm water work if fresh aren’t available.
    • Puff Pastry: Flaky and light, with a buttery taste. Phyllo can be used for a thinner, crispier shell.
    • Honey or Sugar: Balances tartness, adds a caramel note. Use maple syrup for a smoky sweetness.
    • Herbs: Fresh thyme or rosemary add aroma and freshness. Dried can be used but less vibrant.

    Spotlight on Cranberries and Brie

    Brie: Its gooey, melting texture is what makes these bites special. At room temp, it slices easily and melts quickly.:

    • Cranberries: Their natural tartness really wakes up the palate, especially when slightly cooked and softened.
    • They can be a little firm if not soaked or cooked enough, so soften them for a better texture.

    Pastry: Flaky, buttery, and tender—crucial for that satisfying crunch.:

    • Brie tends to be mild but becomes intensely flavorful when melted. Watch for bubbling edges, not burnt.
    • The rind is edible and adds a slightly earthy note, but you can peel it for a smoother bite.

    Substitutions for different diets and preferences

    • Dairy-Free: Substitute Brie with a creamy plant-based cheese like cashew cheese, though flavor and melt may vary.
    • Vegan: Use vegan puff pastry and a dairy-free cheese for a plant-based version.
    • Sweetener Swap: Maple syrup instead of honey gives a richer, smokier sweetness.
    • Fresh Cranberries: Dried cranberries soaked in warm water for a softer, less tart bite.
    • Herbs: Dried thyme or rosemary for a more concentrated flavor, added post-baking.

    Equipment & Tools

    • Mini muffin tin: Shape and bake the bites evenly.
    • Rolling pin: Roll out the pastry evenly.
    • Sharp knife or pizza cutter: Cut pastry into squares.
    • Spoon: Fill pastry cups neatly.

    Making Cranberry Brie Bites: A step-by-step guide

    1. Preheat oven to 190°C (375°F). Lightly grease a mini muffin tin.
    2. Roll out puff pastry. Cut into small squares, about 2 inches.
    3. Press each square into the muffin tin cups, shaping the edges to form little cups.
    4. Bake the pastry shells for 8-10 minutes until lightly golden and crisp.
    5. While shells bake, chop Brie into small pieces. Set aside.
    6. In a bowl, mix cranberries (fresh or soaked dried) with a touch of sugar or honey.
    7. Remove pastry shells from oven. Carefully fill each with Brie and cranberries.
    8. Return to oven and bake for another 12-15 minutes until cheese is melted and bubbly.
    9. Check for doneness: the cheese should be oozy, cranberries soft, and pastry golden.
    10. Let sit for 5 minutes. Garnish with herbs or a drizzle of honey if desired.

    Allow bites to rest for 5 minutes before serving. Garnish as desired and serve slightly warm.

    How to Know It’s Done

    • Pastry is golden and crisp.
    • Cheese is melted and bubbly.
    • Cranberries are soft and slightly caramelized.

    Cranberry Brie Bites

    Cranberry Brie Bites are tiny, flaky pastry cups filled with creamy Brie cheese and tart cranberries, baked until bubbling and golden. The dish combines sweet, savory, and flaky textures, making it a festive and impressive appetizer. Their bite-sized, rustic appearance adds charm to any holiday gathering.
    Prep Time 15 minutes
    Cook Time 20 minutes
    Total Time 35 minutes
    Servings: 12
    Course: Main Course
    Cuisine: American
    Calories: 150

    Ingredients
      

    • 1 sheet pack Puff pastry thawed if frozen
    • 8 oz Brie cheese at room temperature, sliced into small pieces
    • 1 cup fresh Cranberries washed and dried
    • 1 tbsp honey Honey optional, for drizzling
    • 1 tbsp sugar Sugar or honey to sweeten cranberries
    • 1 tsp fresh Fresh thyme or rosemary chopped, optional garnish

    Equipment

    • Mini muffin tin
    • Rolling pin
    • Sharp knife or pizza cutter
    • Spoon

    Method
     

    1. Preheat your oven to 190°C (375°F) and lightly grease a mini muffin tin for easy removal of the bites.
    2. Unfold the puff pastry sheet on a lightly floured surface and roll it out gently with a rolling pin to smooth and slightly thin it out, about 1/8 inch thick.
    3. Using a sharp knife or pizza cutter, cut the pastry into 2-inch squares, aiming for even pieces for uniform bites.
    4. Press each pastry square gently into the cups of the prepared mini muffin tin, shaping them into little cups with the edges slightly overlapping the sides.
    5. Bake the pastry shells in the preheated oven for 8-10 minutes until they are lightly golden and crisp.
    6. Meanwhile, chop the Brie into small pieces and set aside; this will make melting easier once assembled.
    7. In a small bowl, toss the cranberries with sugar or honey to sweeten and soften them slightly, which also enhances their tart flavor.
    8. Remove the pastry shells from the oven and carefully fill each with a small piece of Brie followed by a spoonful of the sugared cranberries.
    9. Return the filled pastry cups to the oven and bake for another 12-15 minutes, until the cheese is melted, bubbly, and the cranberries are soft and slightly caramelized.
    10. Once done, remove the bites from the oven and let them rest for 5 minutes. Drizzle with honey and sprinkle with chopped herbs if desired, then serve warm.

    Tips for perfect bites

    • Use cold pastry: Keeps the dough flaky and prevents shrinking.
    • Press gently: Don’t force the pastry into the tin; it’ll hold its shape naturally.
    • Layer ingredients: Place Brie first, cranberries on top for even melting.
    • Watch oven time: Pastry can go from perfect to burnt quickly—set a timer.
    • Add herbs last: Fresh thyme or rosemary should be added after baking for aroma.

    Common pitfalls and how to fix them

    • FORGOT TO CHILL THE DOUGH? Quickly chill it in the freezer for 10 minutes before cutting.
    • DUMPED TOO MUCH CRANBERRIES? Use a slotted spoon to drain excess juice to avoid soggy bites.
    • OVER-TORCHED THE EDGES? Cover with foil and lower the oven temperature for the remaining minutes.
    • PASSED THE BROWNING POINT? Remove early, and bake in short bursts to prevent burning.

    Fast fixes for common issues

    • If the pastry is too soft, chill it for 10 minutes before baking.
    • When cheese isn’t melting evenly, increase oven temp slightly or broil briefly.
    • Splash a little water on the pastry edges if they brown too fast.
    • Patch soggy bottoms with a quick sprinkle of fresh pastry crumbs and a quick bake.
    • Shield the edges with foil if they brown faster than the center.

    Make-ahead and storage tips

    • Prepare pastry cups and fill with cheese and cranberries up to 2 hours in advance. Keep refrigerated.
    • Bake just before serving to keep them crisp. Reheat in a 150°C (300°F) oven for 5 minutes.
    • Cranberries can be soaked in sugar syrup overnight for a sweeter, softer bite.
    • Leftovers can be stored in an airtight container for 24 hours, reheated gently.

    10 Practical Q&As about Cranberry Brie Bites

    1. What kind of pan do I need?

    Use a mini muffin tin to get that perfect bite size and golden crust.

    2. How long do I bake it?

    Bake at 190°C (375°F) for about 12-15 minutes until the edges are golden and bubbly.

    3. Can I use dried cranberries?

    Use fresh cranberries for a tart burst, or dried cranberries soaked in warm water for a softer, sweeter bite.

    4. Can I reheat leftovers?

    Serve warm or at room temperature. If reheating, do so gently in a 150°C (300°F) oven.

    5. How can I elevate the flavor?

    Add a sprinkle of chopped fresh thyme or a drizzle of honey for extra flavor.

    6. Does the Brie need to be at room temperature?

    Use Brie that’s at room temp for easier slicing and better melting.

    7. What kind of pastry works best?

    Line the muffin tin with puff pastry or phyllo for extra crispness and flavor.

    8. Should I chill before baking?

    Chill the assembled bites for 10 minutes before baking to help set the toppings.

    9. How do I fill the pastry cups neatly?

    Use a spoon to carefully fill each pastry cup to avoid mess and overflow.

    10. Should I season the topping?

    Add a tiny pinch of salt or cracked black pepper on top for balance.

    In the end, these bites are about joy and simplicity. They’re perfect for last-minute gatherings or a quiet evening with a glass of wine. The aroma alone—crust, cheese, and cranberries—filling the kitchen is enough to lift anyone’s spirits.

    They may be small, but they carry a lot of warmth and flavor. A little crunch, a burst of tartness, and that gooey cheese—what’s not to love? Plus, they’re so easy to customize, you might find yourself making them all season long.

  • Crispy Baked Tofu Nuggets Recipe

    Sometimes, the crunch on a snack can make all the difference. I’ve found that crispy baked tofu nuggets hit that sweet spot—satisfying, savory, and just crispy enough without the greasy mess.

    It’s not just about eating healthily; it’s about getting that perfect texture that makes you want to reach for seconds. I love how the aroma of toasted breadcrumbs and soy-soaked tofu fills the kitchen, promising something good is happening. It’s simple, honest food, but with a little twist of magic in every bite.

    Focusing on the sensory experience of texture—how each bite crackles and melts, making you feel like you’re eating something indulgent but entirely plant-based.

    Why I Keep Coming Back to This Recipe

    • I love how the smell of toasted breadcrumbs fills my kitchen.
    • Nothing beats the first bite—crisp on the outside, tender inside.
    • I’ve made these for friends who don’t usually eat plant-based, and they loved it.
    • Baking keeps it healthier and less greasy, which I appreciate.

    The story behind the crunch

    • This recipe was born out of a desire to enjoy a crispy snack without deep-frying. I experimented with different coatings and baking times, finally landing on this balance of crunch and tenderness.
    • Every time I make these, I think about how simple ingredients can transform into something unexpectedly satisfying.
    • It’s a reminder that you don’t need complicated techniques—just good ingredients, patience, and a hot oven.

    Quick facts about tofu and crispy coatings

    • Inspired by traditional chicken nuggets, but made entirely from plant-based ingredients.
    • The idea of crispy tofu came from a craving for something crunchy and satisfying without frying.
    • Tofu has been a staple in Asian cuisines for centuries, valued for its versatility and protein content.
    • Using panko breadcrumbs is a Japanese adaptation for extra crunch, dating back to the 19th century.

    Ingredient insights and tweaks

    • Firm tofu: I prefer extra-firm for a sturdy bite, but silken will fall apart—avoid it here.
    • Breadcrumbs: Panko gives a crunch that’s light and airy; regular breadcrumbs work but won’t be as crisp.
    • Soy sauce: Adds umami and salt; swap with tamari for gluten-free or coconut aminos for sweetness.
    • Cornstarch: Helps coating stick; arrowroot is a good gluten-free alternative.
    • Cooking spray: Evenly distributes oil, crucial for crispiness; use a light mister for best results.

    Key ingredients that make or break the crunch

    Tofu:

    • Extra-firm tofu: It’s dense and holds shape; softer tofu turns mushy and soggy.
    • Tofu’s water content: Must be pressed thoroughly—wetness ruins the crisp.
    • Panko breadcrumbs: Light, airy, and perfect for crunch; skip if you want a softer crust.

    Soy sauce:

    • Provides depth; too much can make the coating soggy, so balance it carefully.
    • Marinate briefly to infuse flavor without soaking too long—10 minutes is enough.

    Smart swaps for different diets and flavor profiles

    • Dairy-Free: Use coconut aminos instead of soy for a slightly sweeter, less salty flavor.
    • Gluten-Free: Substitute regular panko with certified gluten-free panko or crushed rice crackers.
    • Low-Sodium: Opt for reduced-sodium soy or coconut aminos to control salt.
    • Flavor Variations: Add smoked paprika or garlic powder to the breadcrumb mixture for extra flavor.
    • Vegan Egg Replacement: Use flaxseed meal mixed with water for binding instead of eggs.

    Equipment & Tools

    • baking sheet: To hold the nuggets while baking
    • parchment paper or silicone mat: Prevent sticking and easy cleanup
    • mixing bowls: Prep stations for coating ingredients
    • spatula or tongs: Handling tofu without breaking it
    • oven: Even heat for baking

    Step-by-step guide to crispy baked tofu nuggets

    1. Preheat your oven to 200°C (400°F). Line a baking sheet with parchment or a silicone mat.
    2. Drain and press the tofu for at least 15 minutes. Cut into bite-sized cubes.
    3. In a bowl, toss the tofu with soy sauce or your preferred marinade. Let sit 10 minutes.
    4. Set up your coating station: one bowl with flour, one with beaten egg or flaxseed mixture, one with panko breadcrumbs.
    5. Dip each tofu piece into the flour, then the egg, then coat thoroughly in breadcrumbs.
    6. Place the coated tofu on the prepared baking sheet, spaced out.
    7. Bake for 12 minutes, flip, then bake another 12 minutes until golden and crispy.
    8. Check the nuggets: they should be crispy, golden, and firm. If not, bake a few minutes longer.
    9. Remove from oven, let rest 5 minutes to firm up.
    10. Serve with your favorite dipping sauce, hot and fresh.

    Let the nuggets rest on a wire rack for 5 minutes after baking to keep them crispy. Serve immediately for best texture.

    How to Know It’s Done

    • Golden-brown color and crispy exterior.
    • A slight crackle when pressed gently.
    • A firm but tender bite, not mushy.

    Crispy Baked Tofu Nuggets

    Crispy baked tofu nuggets are a satisfying plant-based snack with a crunchy exterior and tender inside. Made with firm tofu coated in toasted panko breadcrumbs and baked until golden, they offer a satisfying texture without frying. Their appealing appearance and savory flavor make them perfect for dipping or enjoying on their own.
    Prep Time 20 minutes
    Cook Time 30 minutes
    Total Time 50 minutes
    Servings: 4
    Course: Main Course
    Cuisine: American
    Calories: 250

    Ingredients
      

    • 14 ounces extra-firm tofu pressed and drained
    • 3 tablespoons soy sauce or tamari / coconut aminos
    • 1 cup panko breadcrumbs light and airy for crunch
    • 1 tablespoon cornstarch helps coating stick
    • 1 cup all-purpose flour for coating
    • 1 cup plant-based milk unsweetened, for dredging
    • 1 cup bread crumbs for coating
    • to taste salt and pepper seasoning
    • cooking spray oil spray for crisping

    Equipment

    • Baking sheet
    • Parchment paper or silicone mat
    • Mixing bowls
    • Spatula or tongs
    • Oven

    Method
     

    1. Preheat your oven to 200°C (400°F) and line a baking sheet with parchment paper or a silicone mat.
    2. Drain and press the tofu for at least 15 minutes to remove excess moisture, then cut it into bite-sized cubes.
    3. Toss the tofu cubes with soy sauce in a bowl, letting them marinate briefly—about 10 minutes—to absorb flavor.
    4. Set up your coating station: in one bowl, place the flour; in another, whisk the plant-based milk with a pinch of salt and pepper; in a third, combine the panko breadcrumbs with cornstarch and additional seasonings.
    5. Dip each tofu cube into the flour, ensuring an even coating, then into the milk mixture, and finally roll it thoroughly in the panko breadcrumb mixture, pressing lightly to adhere.
    6. Place the coated tofu nuggets spaced out on the prepared baking sheet, making sure they aren’t touching for maximum crispiness.
    7. Lightly spray the nuggets with cooking oil to help them crisp up in the oven.
    8. Bake for about 12 minutes, then flip the nuggets with tongs or a spatula and bake for another 12 minutes, or until they are golden brown and crispy.
    9. Remove the nuggets from the oven, let them rest for 5 minutes to firm up, then serve hot with your favorite dipping sauce.

    Notes

    For extra flavor, sprinkle with smoked paprika or garlic powder into the breadcrumb mixture. Pressing the tofu thoroughly is key for a crispy crust. Reheat leftovers in a 180°C (350°F) oven for best crispiness.

    Expert tips for perfect baked tofu nuggets

    • THE BREADCRUMB COATING: Use panko for extra crunch, or crushed cornflakes for a different texture.
    • PREHEAT THE OVEN: Ensures even crispness from the first bite.
    • FLIP HALFWAY: Keeps both sides evenly crispy.
    • PRESS THE TOFU: Removes moisture for a better crust.
    • USE A LIGHT SPRAY: Helps breadcrumbs adhere and promotes even browning.

    Common pitfalls and how to fix them

    • FORGOT TO PRESS THE TOFU? Wrap it in a towel and weigh it down for 15 minutes.
    • DUMPED TOO MUCH BREADCRUMBS? Shake off excess for even coating and crunch.
    • OVER-TORCHED? Reduce baking time or lower oven heat slightly.
    • OIL SPLATTERED EVERYWHERE? Use parchment or a silicone mat for cleaner baking.

    Fast fixes for common baking hiccups

    • When nuggets stick, spray with a bit more oil and bake 2 more minutes.
    • If soggy, re-bake at 200°C (400°F) for 5 minutes.
    • Splash a little vinegar or lemon juice to brighten the flavor if it’s bland.
    • Patch a broken nugget with extra coating and bake again.
    • Shield burnt edges with foil and extend baking time for even crispness.

    Prep and store for crispy results

    • You can press and marinate the tofu a day ahead for extra flavor.
    • Coated nuggets can be stored unbaked in the fridge for up to 24 hours, covered tightly.
    • Bake and cool completely before storing in an airtight container, up to 3 days.
    • Reheat in a 180°C (350°F) oven for 8-10 minutes until crispy, watching for that crackle.

    10 Practical Q&As About Crispy Baked Tofu Nuggets

    1. What type of tofu works best?

    Use extra-firm tofu, drained and pressed well, so they hold shape and get that satisfying crunch.

    2. Should I marinate the tofu?

    Marinate or season the tofu beforehand for more flavor, but keep the coating simple for crispiness.

    3. How long to bake?

    Bake at 200°C (400°F) for 25-30 minutes until golden and crispy, flipping halfway.

    4. Can I substitute the breadcrumbs?

    Use panko breadcrumbs for extra crunch, or crushed cornflakes for a different texture.

    5. What dipping sauce works best?

    Serve with a tangy dipping sauce like sweet chili or a creamy vegan ranch.

    6. Why rest after baking?

    Let the nuggets rest 5 minutes after baking to firm up the crust before serving.

    7. How important is oven temperature?

    Ensure the oven is fully preheated to get even, crispy results.

    8. Can I skip parchment?

    Line your baking sheet with parchment to prevent sticking and make cleanup easier.

    9. Should I use a baking mat?

    Use a silicone baking mat for an even crunch and easy cleanup.

    10. How long do leftovers last?

    These nuggets are best eaten fresh but keep leftovers refrigerated for up to 3 days.

    These nuggets aren’t just a quick snack; they’re a reminder that plant-based can be indulgent too. Making them at home means you can tweak the seasoning or crunch level to your liking, which is half the fun.

    Next time you crave something crispy and wholesome, give these a shot. They’re perfect for a lazy weekend or a quick lunch. Plus, they make the kitchen smell like toasted goodness, which is always a bonus.

  • Spooky Culinary Chaos: Halloween Mummy Hot Dogs

    Spooky Culinary Chaos: Halloween Mummy Hot Dogs

    Halloween is the perfect time to embrace the chaos of the kitchen while creating something delightfully spooky. These Mummy Hot Dogs are not only fun to make but bring back childhood nostalgia with a twist of culinary mischief. As the sizzling sausages wrapped in crooked strips of puff pastry emerge from the oven, the aroma of seasoned dough and smoky sausage fills the air, reminding us why this holiday is so unpredictable and lively.

    Mummy Hot Dogs

    Mummy Hot Dogs are baked sausages wrapped in strips of puff pastry that resemble mummies, creating a fun and spooky appetizer. The dish involves wrapping seasoned hot dogs with dough, then baking until golden brown and crispy, with the appearance of bandaged mummies. The final texture features flaky pastry with juicy sausages inside.
    Prep Time 15 minutes
    Cook Time 20 minutes
    Total Time 35 minutes
    Servings: 8
    Course: Main Course
    Cuisine: American
    Calories: 250

    Ingredients
      

    • 8 pieces hot dogs beef or chicken frankfurters
    • 1 sheet puff pastry thawed if frozen
    • 1 egg egg wash beaten, for glazing
    • optional mini eyes for decoration, like small bits of olives or candies

    Equipment

    • Baking sheet
    • Parchment paper
    • Knife
    • Pastry brush

    Method
     

    1. Preheat your oven to 400°F (200°C) and line a baking sheet with parchment paper to keep things tidy.
    2. Unroll the puff pastry sheet on a lightly floured surface, then cut it into strips about 1/4 inch wide — these will become the bandages for your mummies.
    3. Wrap each hot dog with strips of puff pastry, overlapping slightly to mimic bandages, leaving a small space at one end for the sausage’s tip to peek out.
    4. Place the wrapped hot dogs seam side down on the prepared baking sheet, spacing them out evenly.
    5. Brush each mummy with a little beaten egg to give the pastry a shiny, golden finish during baking.
    6. Bake in the preheated oven for about 15-20 minutes, or until the pastry is puffed and golden brown, and the sausages are hot and cooked through.
    7. Remove from the oven and let cool slightly — the pastry should be crisp, and the sausage hot inside.
    8. If desired, add mini eyes made from small bits of olives or candies to give your mummies a spooky face.
    9. Arrange the Mummy Hot Dogs on a serving platter and serve warm, allowing for everyone to enjoy the flaky pastry and juicy sausage inside.

    In the end, these Mummy Hot Dogs are more than just a quick party snack; they’re a mini adventure in each bite. They embody the joyful messiness of Halloween, where accidents turn into happy accidents and presentation is secondary to fun. Let them be the chaos centerpiece at your next spooky gathering, and watch as everyone eagerly reaches onto the platter.

  • Spooky & Delightful: Halloween Eyeball Caprese Bites

    Spooky & Delightful: Halloween Eyeball Caprese Bites

    Halloween is the perfect time to unleash your creativity in the kitchen. These Eyeball Caprese Bites turn a simple appetizer into a whimsical, spooky treat that surprises guests. The fresh basil, creamy mozzarella, and olive eyes come together with a burst of flavor and a dash of fun.

    Imagine the delight as party-goers spot these little eyeballs glistening on a platter. They’re perfect for those who love a mix of chaos, charm, and a hint of sophistication at their spooky gathering. Plus, they’re quick to assemble, so you can focus on the devilish details of your costume.

    Eyeball Caprese Bites

    These Eyeball Caprese Bites are bite-sized appetizers composed of fresh mozzarella, cherry tomatoes, and basil, assembled to resemble spooky eyeballs. They are assembled by stacking ingredients and decorating with olives to create a playful, spooky presentation with a smooth, creamy texture and fresh flavors.
    Prep Time 15 minutes
    Total Time 15 minutes
    Servings: 12
    Course: Main Course
    Cuisine: American
    Calories: 50

    Ingredients
      

    • 12 pieces cherry tomatoes preferably ripe and firm
    • 12 ounces fresh mozzarella balls ciliegine or small mozzarella balls
    • 12 leaves fresh basil leaves whole leaves, no stems
    • 12 pieces black olives stuffed with pimentos pitted and sliced to resemble pupils

    Equipment

    • Toothpicks
    • Serving Platter

    Method
     

    1. Arrange all ingredients in individual bowls for easy assembly.
    2. Place a cherry tomato on a clean work surface and insert a toothpick through the stem end.
    3. Skewering a mozzarella ball onto the toothpick beneath the tomato, so it sits directly under the cherry tomato.
    4. Add a basil leaf on top of the cherry tomato, pressing gently so it slightly fans out, mimicking eyelids.
    5. Thread a sliced olive onto the toothpick, positioning it on top of the basil leaf to resemble an eyeball’s pupil.
    6. Repeat the process with remaining ingredients until all bites are assembled, arranging them on a serving platter.
    7. Serve immediately or refrigerate briefly to keep ingredients fresh until ready to display.

    Notes

    For a more dramatic look, use larger olives or add a dab of olive tapenade around the pupil for depth.
    These eyeball bites are a charming addition to any Halloween spread. They strike just the right balance between creepy and classy, making them a hit with kids and adults alike. Plus, the fresh flavors remind us that sometimes the simplest ingredients yield the most memorable moments.

    Enjoy creating these spooky bites for your next celebration. They’re perfect for parties, get-togethers, or just satisfying a quirky snack craving. No matter how you serve them, they’re sure to leave a lasting impression.

  • Spooky Bats & Green Goodness: Halloween Guacamole with Tortilla Chips

    Spooky Bats & Green Goodness: Halloween Guacamole with Tortilla Chips

    Halloween is the perfect reason to unleash your creativity in the kitchen. This year, I decided to ditch traditional dips and go for something more whimsical and fun: Bat-Shaped Tortilla Chips paired with a vibrant, eerie green guacamole. The combination is a visual treat and a flavor explosion that’s easy enough for kids and impressively spooky for adults.

    What really makes this recipe stand out is the playful design of the chips, perfectly mimicking fluttering bats in flight. The rich, creamy guacamole with a hint of lime and garlic gets a youthful glow of zesty green — much like a cauldron of magic potion. It’s a guaranteed crowd-pleaser at any Halloween gathering or eerie movie marathon.

    WHY I LOVE THIS RECIPE?

    • CRAFTING the bat shapes feels like a little baking adventure, transporting me back to childhood craft days.
    • The rich aroma of fresh cilantro and lime makes everyone gather around, sniffing in anticipation.
    • Mixing the green guacamole awakens my nostalgic memories of every Halloween costume party I’ve thrown over the years.
    • Seeing the delight on kids’ faces when they spot the bat chips is utterly priceless.
    • It’s a guaranteed way to bring a dash of chaos and a lot of smiles to the party table.

    AVOID MY DISASTER (You’re Welcome)

    • FORGOT to pre-cut the chips? Dull scissors can help with bat shapes, keeping the faces crisp and spooky.
    • DUMPED too much lemon in the guac? Stir in more avocado and a pinch of salt to balance the acid.
    • OVER-TORCHED the tortilla chips? Lower the oven temperature and keep a close eye.
    • IGNORED the avocado! It turns brown quickly—use lime juice liberally and serve immediately.

    QUICK FIXES THAT SAVE YOUR DAY

    • IF the guacamole is too thick, splash in a teaspoon of olive oil and stir.
    • WHEN chips are flimsy, re-bake a few minutes at 350°F for crispness.
    • PATCH over burnt chips with a paper towel and save the batch.
    • SHIELD your guac from browning by pressing cling wrap directly on its surface.
    • SPLASH salsa around the chips for extra flavor if they lose crunch.

    In the end, this playful Halloween snack isn’t just about the spooky look — it’s about savoring moments with loved ones, surrounded by fun and flavor. It’s a simple recipe that sparks joy and adds a dash of whimsy to the spooky season.

    Enjoy crafting this eerie, delicious surprise and watch your guests marvel at your creativity. The vibrant green, the cute bat shapes, and the irresistible aroma will make your Halloween table unforgettable.

    Bat-Shaped Tortilla Chips with Green Guacamole

    This dish features crispy tortilla chips cut into playful bat shapes, paired with a vibrant, creamy guacamole colored with lime and garlic. The chips provide a crunchy texture, while the smooth guacamole offers a zesty, green appearance perfect for Halloween festivities.
    Prep Time 15 minutes
    Cook Time 10 minutes
    Total Time 25 minutes
    Servings: 4
    Course: Main Course
    Cuisine: American
    Calories: 180

    Ingredients
      

    • 8 slices corn tortillas preferably fresh
    • 2 tbsp olive oil for brushing
    • 2 avocados ripe avocados pitted and peeled
    • 1 lime lime juiced
    • 1 clove garlic minced
    • 1/4 cup cilantro chopped
    • to taste salt for seasoning

    Equipment

    • Baking sheet
    • Cookie cutter or scissors

    Method
     

    1. Preheat your oven to 350°F (175°C). Lightly brush both sides of the corn tortillas with olive oil to help them crisp up nicely.
    2. Stack the tortillas and use a bat-shaped cookie cutter or scissors to cut out bat silhouettes from each slice. Keep the scraps aside for additional chips or re-shaping.
    3. Arrange the bat-shaped tortilla pieces on a baking sheet in a single layer, ensuring they aren’t overlapping.
    4. Bake the chips in the oven for about 8-10 minutes, or until they turn golden brown and crisp, watching carefully to prevent burning.
    5. While the chips are baking, halve and pit the avocados, then scoop them into a mixing bowl.
    6. Add the minced garlic, chopped cilantro, lime juice, and a pinch of salt to the avocados. Mash everything together with a fork until smooth and creamy, and it turns a vibrant green.
    7. Once the chips are out of the oven and cooled slightly, transfer the guacamole to a serving bowl. Serve the crispy bat-shaped chips immediately alongside the vibrant green guacamole for a fun Halloween snack.

    Notes

    For extra fun, use a small knife to refine the bat shapes before baking. Serve immediately to enjoy maximum crunch. Leftover guacamole can turn brown quickly—press cling wrap directly onto its surface if not eaten right away.

    This Halloween, let your creativity run wild with playful treats like these bat-shaped chips and the irresistibly bright guacamole. It’s a chance to turn simple ingredients into smiles, chaos, and a few giggles around the table.

    Whether you’re hosting friends or just making a fun snack for family night, this recipe is a quick, cheerful way to celebrate the season. No matter the outcome, the joy and chaos you bring to the kitchen will make it all worthwhile. Happy haunting and happy snacking!