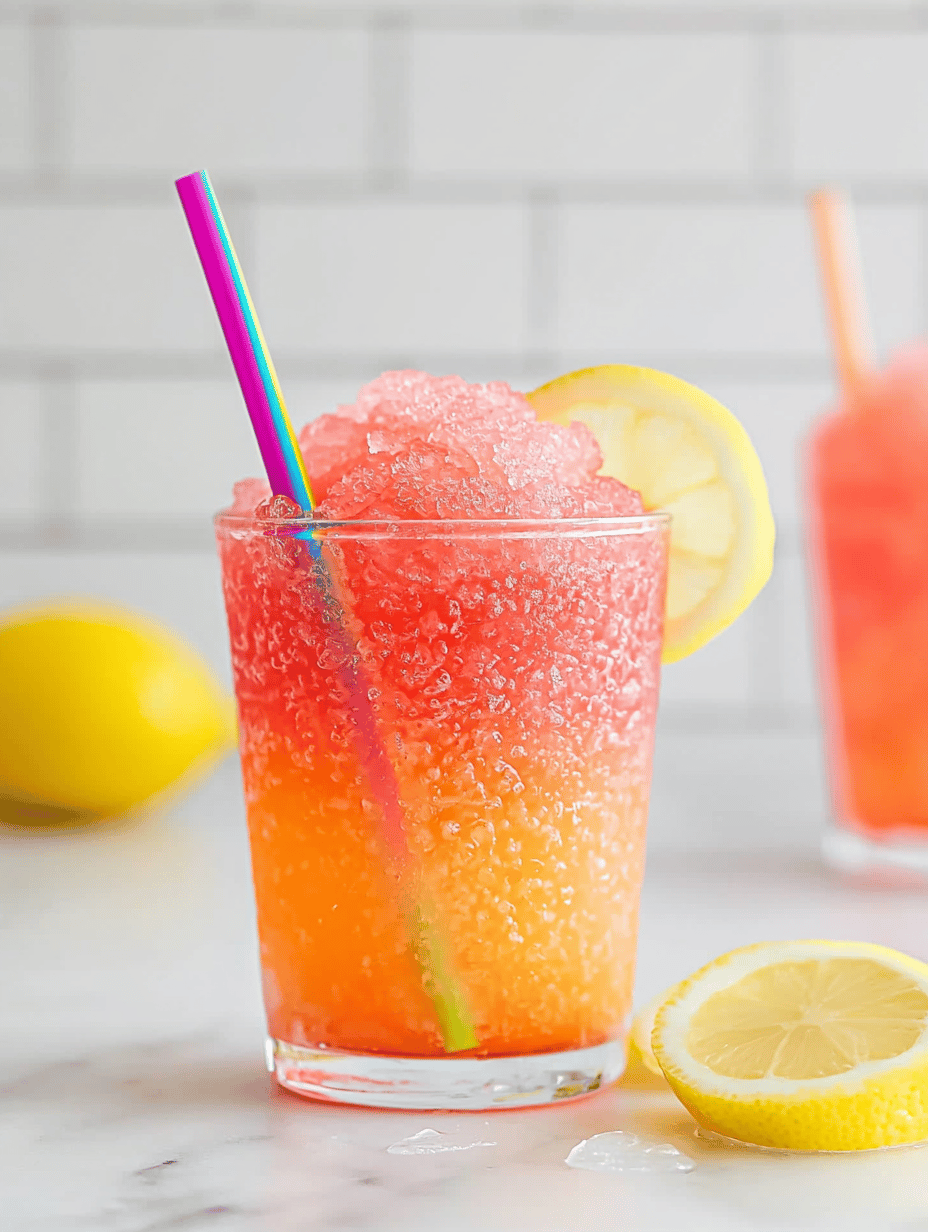
Category: Beverages

  • Enchanting Black Magic Margarita for Halloween

    Enchanting Black Magic Margarita for Halloween

    The Black Magic Margarita isn’t just a cocktail; it’s a portal to a mysterious, spellbinding realm of flavor. As Halloween approaches, this eerie black drink becomes the spotlight, captivating guests with its dark allure and silky texture. The first sip whispers tales of enchanted nights and ghostly gatherings, making every moment feel a little more mystical.

    This recipe dares to challenge the mundane, using a simple yet striking ingredient to turn a classic into something spellbinding. Its deep, coal-black hue is perfect for setting a spooky mood and sparking conversation. Plus, the subtle citrus notes balance the dark mystique with a refreshing zing, creating a drink that’s as exciting to look at as it is to sip.

    Black Magic Margarita

    The Black Magic Margarita is a vibrant cocktail made with tequila, orange liqueur, citrus juice, and activated charcoal to achieve its striking black color. The ingredients are shaken with ice until chilled and smooth, resulting in a glossy, dark drink with a refreshing citrus flavor. Its silky texture and deep hue make it ideal for spooky celebrations or elegant gatherings.
    Prep Time 5 minutes
    Total Time 5 minutes
    Servings: 2
    Course: Main Course
    Cuisine: cocktail
    Calories: 180

    Ingredients
      

    • 2 oz tequila preferably blanco or silver
    • 1 oz orange liqueur such as Cointreau or triple sec
    • 1 oz fresh lime juice about one lime
    • 1/2 teaspoon activated charcoal powder food grade, use sparingly
    • 0.5 oz simple syrup optional for sweetness
    • ice ice cubes for shaking

    Equipment

    • Cocktail shaker
    • Measuring jigger
    • Strainer

    Method
     

    1. Fill a cocktail shaker with ice cubes, about halfway full.
    2. Pour in the tequila, orange liqueur, and fresh lime juice.
    3. Add the activated charcoal powder and simple syrup if using, for a rich black color and balanced sweetness.
    4. Secure the lid on the shaker and shake vigorously for about 15 seconds until well chilled and the mixture turns a deep black.
    5. Remove the shaker lid and place a strainer over it. Pour the cocktail into chilled glasses, ensuring a smooth, even flow.
    6. Garnish with a lime wedge or a black salt rim for extra visual impact and flavor.

    Notes

    Activated charcoal can stain surfaces, so handle with care. Adjust sweetness to taste with more or less simple syrup.
    Crafting this Black Magic Margarita is a playful nod to Halloween’s love for a little darkness with a hint of charm. It’s a striking addition to any spooky soirée or an unexpected treat for a ghostly gathering. Whether you’re celebrating with friends or enjoying a quiet night in, this cocktail adds a whisper of enchantment to the season.

    Enjoy the mysterious allure of this drink and let it inspire your Halloween festivities. Its vivid appearance and layered flavors make it stand out from the usual. Cheers to a night filled with magic, mystery, and a splash of the unusual.

  • The Unconventional Watermelon Slushie That Sparks Joy

    The Unconventional Watermelon Slushie That Sparks Joy

    Instead of your usual icy watermelon drink, this slushie plays with unexpected ingredients to elevate the summer staple. Imagine the crisp freshness of watermelon combined with a hint of mint and a splash of sparkling water, creating a cooling sensation that dances on your taste buds. It’s a simple recipe, but its bold twists make it unforgettable.

    This isn’t just a summer refresher; it’s a nostalgic nod to childhood, mixed with a modern twist. The icy texture contrasts perfectly with the juicy, fragrant watermelon, while a touch of lime adds brightness. This recipe feels like a mini vacation, right in your glass, perfect for any sunny day craving something special.

    Watermelon Mint Slushie

    This watermelon mint slushie is a frozen beverage blending fresh watermelon with mint leaves, lime juice, and sparkling water to create a chilled, refreshing drink. The mixture is pureed until smooth, resulting in an icy texture with a vibrant, juicy appearance. It’s served in a glass with garnishes, offering a cool, fragrant summer treat.
    Prep Time 10 minutes
    Total Time 10 minutes
    Servings: 4
    Course: Main Course
    Cuisine: American
    Calories: 120

    Ingredients
      

    • 4 cups cubed watermelon seedless or de-seeded for smooth blending
    • 10 fresh mint leaves mint leaves
    • 2 tablespoons lime juice freshly squeezed preferred
    • 1 cup sparkling water chilled
    • 1 tablespoon honey or agave syrup optional, for extra sweetness

    Equipment

    • Blender
    • Measuring cups and spoons

    Method
     

    1. Add the cubed watermelon, mint leaves, lime juice, and honey (if using) into the blender.
    2. Blend on high until the mixture is smooth, bright pink, and fully combined, about 30-60 seconds. The texture should be icy and slushy.
    3. Pour in the chilled sparkling water and give a quick pulse just to combine, allowing some of the bubbles to remain for a fizzy effect.
    4. Taste the slushie and adjust sweetness by adding more honey or lime if desired, then blend briefly again to incorporate.
    5. Pour the slushie into glasses, allowing the icy mixture to mound slightly above the rim for a visually appealing presentation.
    6. Garnish each glass with a sprig of mint and a small wedge of lime for a fresh, fragrant finish.
    7. Serve immediately with a straw or spoon to enjoy the icy, juicy texture that feels like a mini vacation in a glass.

    Notes

    For an extra icy texture, freeze the blended mixture for 30 minutes before serving. You can also add a splash of vodka or rum for an adult version.

    Making this watermelon slushie is quick, only requiring a handful of ingredients and a blender. It’s perfect for spontaneous gatherings or a solo moment of bliss. The vibrant pink color and fresh aroma are guaranteed to lift spirits, no matter the season.

    As summer heats up, this recipe becomes a go-to for cooling off without relying on store-bought solutions. It’s simple, refreshing, and endlessly customizable to suit your mood. Enjoy every sip as a small, joyful escape from the everyday hustle.

  • Chill Vibes: The Frozen Margarita Slushie Masterpiece

    Chill Vibes: The Frozen Margarita Slushie Masterpiece

    There nothing quite like the icy blast of a frozen margarita on a hot day, but what if you could turn it into a slushie that feels more like a childhood treat than a cocktail? This recipe transforms your favorite tequila drink into a frosty, beachside snapshot that sparks nostalgia while providing a crisp, refreshing twist. It all about savoring the chaos of summer in a glass, one sip at a time.

    The secret lies in balancing tart lime and sweet syrup with just enough alcohol to keep it adulty but chill enough to feel like a treat. Whip out your blender, gather frozen lime juice, and let the magic happen. This isn just a drink, it your new go-to for spontaneous pool parties and languid Sundays at home.

    Frozen Margarita Slushie

    This frozen margarita slushie is a refreshing icy treat made by blending lime juice, tequila, and sweet syrup until smooth and frosty. It has a vibrant, icy texture with a bright green hue, resembling a chilled frozen drink perfect for hot weather. The final product is a thick, slushy consistency that’s easy to sip through a straw.
    Prep Time 10 minutes
    Total Time 10 minutes
    Servings: 2
    Course: Main Course
    Cuisine: Mexican
    Calories: 150

    Ingredients
      

    • 1 cup frozen lime juice coarse or cubed
    • 2 oz tequila your choice of blanco or silver
    • 0.5 cup simple syrup or adjust to taste
    • 0.5 cup ice cubes to help achieve slushy texture

    Equipment

    • Blender
    • Measuring cups and spoons

    Method
     

    1. Add the frozen lime juice, tequila, simple syrup, and ice cubes to your blender.
    2. Secure the lid and blend on high speed for about 30-40 seconds, until the mixture is smooth and slushy with a vibrant green color.
    3. Stop blending and check the texture; it should be thick, icy, and scoopable.
    4. Pour the frozen margarita slushie into chilled glasses, ensuring you get plenty of the icy mixture.
    5. Garnish with lime wedges or a salt rim if desired, and serve immediately with a straw or spoon.

    Notes

    For extra flavor, add a splash of orange liqueur or a pinch of sea salt on top.

    As the ice crystals melt into a luscious, tangy slush, you reminded that simplicity can be surprisingly revelatory. This frozen margarita slushie isn just a drink, it a celebration of the carefree moments that make summer so sweet. Keep this recipe handy for those days when you want a little chaos and a lot of flavor in a glass.

    Whether you lounging by the pool or need a quick cool-down after a busy day, this slushie delivers. It all about embracing the refreshment, the fun, and the unpredictable pleasure of a perfectly blended drink. Cheers to holding onto that lazy, sun-soaked feeling a little longer.

  • Unearth the Spookiest Vampire Punch for a Ghoulishly Delicious Halloween

    Unearth the Spookiest Vampire Punch for a Ghoulishly Delicious Halloween

    Halloween parties are more than costumes and haunting decor; they’re about creating an atmosphere of mystery and chills. This Vampire Punch with its deep red hue looks straight from a horror film, but it’s refreshingly sweet and tangy at heart. I love how kids and adults alike get a little thrill from sipping something so vividly eerie.

    As I assemble this blood-red concoction, I find myself reminiscing about childhood Halloweens, where candy was king and every sip felt like part of a spell. It’s a recipe that balances playfulness with sophistication. Plus, the vibrant color makes it a showstopper at any spooky gathering.

    WHY I LOVE THIS RECIPE?

    • It combines nostalgic childhood flavors with a theatrical twist.
    • The vivid red color instantly sets a festive mood.
    • Easy to make, perfect for last-minute party planning.
    • The subtle sweetness masks the tart punch underneath.
    • Everyone always asks for the secret ingredient!

    AVOID MY DISASTER (You’re Welcome)

    • FORGOT to chill the juice before mixing — the punch was lukewarm and a bit flat. Chill it overnight next time.
    • DUMPED too much red food coloring — it turned into a horrifying shade of purple. Use sparingly, and add more if needed.
    • OVER-TORCHED the sugar syrup — it smelled burnt and ruined the flavor. Keep the heat low and stir constantly.
    • FAILED to strain out fruit pulp — the punch looked cloudy and unappealing. Strain for clarity, or leave pulp for texture.

    QUICK FIXES THAT SAVE YOUR DAY

    • When the punch is too sour, SPLASH in some club soda for brightness.
    • Patch the flavor by adding a splash of vanilla extract if it’s too tart.
    • When the color dims, SHIELD with a few drops of extra food coloring.
    • When too sweet, ADD a splash of lemon juice to brighten the notes.
    • If it lacks sparkle, CRACKLE in some carbonated water just before serving.

    Preparing this Vampire Punch now makes the season’s eerie charm truly come alive. The crimson glow is perfect for setting a spooky scene, whether for a party or a spooky family get-together. Plus, it’s such a fun way to make Halloween feel special and a little bit daring.

    The vibrant color and bold flavors mark it as a festive centerpiece that invites curiosity and celebrates the spirit of the holiday. It’s more than just a drink—it’s an experience in a glass, ready to cast a spell at your next Halloween celebration.

    Vampire Punch

    Vampire Punch is a vibrant red beverage made with fruit juices, sweetened with syrup, and often enhanced with colorful food coloring. It has a smooth, chilled appearance with a slightly thickened, glossy surface, making it visually striking for Halloween parties or spooky gatherings.
    Prep Time 10 minutes
    Total Time 10 minutes
    Servings: 8
    Course: Main Course
    Cuisine: American
    Calories: 85

    Ingredients
      

    • 2 cups cranberry juice chilled
    • 1 cup apple juice preferably chilled
    • 1/2 cup simple syrup or sugar syrup
    • 2-3 drops reds food coloring add sparingly and adjust for intensity
    • 1 cup club soda for sparkle, optional

    Equipment

    • Large Pitcher
    • Mixing spoon

    Method
     

    1. Pour the chilled cranberry juice and apple juice into a large pitcher, creating a deep red base for the punch.
    2. Add the simple syrup to the juice mixture, stirring gently with a mixing spoon until well combined and slightly thickened.
    3. Introduce 2 to 3 drops of red food coloring, adding sparingly to achieve a vivid, blood-red hue. Stir once more and observe the color intensify.
    4. Once the mixture is uniformly colored, taste and adjust the sweetness or color if needed. For extra sparkle, gently pour in the club soda just before serving, stirring lightly.
    5. Fill glasses with ice cubes and ladle the vampire punch over them, allowing the chilled, vibrant drink to shimmer in the glass.
    6. Enjoy immediately to experience the refreshing, festive, blood-red glow of the Vampire Punch.
    This Vampire Punch packs a punch of color and flavor that’s as thrilling as Halloween itself. It’s perfect for embracing the spooky vibes while still offering a fun, easy-to-make beverage for all ages.

    As the night deepens, the bright red glow of this punch will keep your spirits high. It’s a simple way to add a bit of magic and mystery to your festivities, making each sip a small adventure. Enjoy crafting this eerie delight and watch as your guests become enchanted by its spellbinding charm.

  • Enchanted Green Apple Poison Martini for Spooky Nights

    Enchanted Green Apple Poison Martini for Spooky Nights

    Every Halloween, I find myself craving a drink as playful as the costumes and as mysterious as the moonlit skies. This Poison Apple Martini isn’t just a cocktail; it’s a potion that conjures images of enchanted forests and lurking shadows. The cool, crisp scent of green apple mixed with a hint of mischievous champagne bubbles makes it perfect for celebrating the spooky season with a twist.

    What makes this recipe truly enchanting is its vibrant color and the illusion of a poisoned potion, perfect for parties where guests love a little theatrical flair. The aroma of freshly cut green apples combines with the sweetness of liqueur, creating a scent that’s both tempting and a little dangerous. It’s a drink that invites curiosity and invites you to sip carefully—like a secret knot in a Halloween tale.

    WHY I LOVE THIS RECIPE?

    • It turns a simple martini into a mysterious, vividly green spectacle—like a real potion.
    • The aroma of green apple and bubbly champagne sparks nostalgia for autumn apple orchards.
    • It’s chaos in a glass, with a splash of bright color and a touch of mischief.
    • The aesthetic is perfect for themed parties—visually stunning and easy to make.
    • I love how it balances sweet, tart, and bubbly in one memorable sip.

    AVOID MY DISASTER (You’re Welcome)

    • FORGOT to chill the glasses—worst mistake, the drink warmed instantly. Keep them cold!
    • DUMPED too much grenadine—turned the drink too red. Use sparingly, just a drop.
    • OVER‑TORCHED the lime garnish—caused a burnt smell. Keep flames away from the fruit.
    • FORGOT to measure the vodka—ended up way too strong. Use a shot glass for consistency.

    QUICK FIXES THAT SAVE YOUR DAY

    • When the drink is too tart, splash in a bit more champagne to mellow it out.
    • Patch the color by adding a tiny drop of green food coloring if it’s dull.
    • Shield the rim with a sugared lime for extra sparkle—little things matter.
    • If it’s too bubbly, gently stir to release excess fizz and chill further.
    • When in doubt, sniff for freshness—let the green apple scent guide your adjustments.

    As the nights grow darker and the air smells of pumpkin spice and falling leaves, this Poison Apple Martini seems to fit right in. It’s a drink rooted in the spirit of Halloween—mysterious, playful, and just a little wicked. It’s perfect for setting the mood when guests arrive or for a solo moment of spooky indulgence.

    Whether you’re toasting to ghostly tales or quietly savoring the chill of October, this cocktail makes every sip a tiny celebration. The bright green color and bubbling charm are sure to catch eyes and start conversations. Cheers to a Halloween filled with fun, flair, and just a hint of danger.

    Poison Apple Martini

    A vibrant green cocktail made with green apple liqueur, vodka, and champagne, designed to resemble a mystical potion. The drink features a bubbly, slightly viscous texture with a bright, eye-catching appearance, garnished with a lime and a hint of grenadine for a poisoned effect.
    Prep Time 10 minutes
    Total Time 10 minutes
    Servings: 2
    Course: Main Course
    Cuisine: beverage
    Calories: 210

    Ingredients
      

    • 1 oz green apple liqueur such as sour apple schnapps
    • 1 oz vodka high quality preferred
    • 0.5 oz grenadine use sparingly for color
    • 3 oz champagne chilled, for topping
    • 1 slice lime for garnish
    • a few drops green food coloring optional, to enhance color

    Equipment

    • Cocktail shaker
    • Strainer

    Method
     

    1. Chill your cocktail glasses in the freezer so they are nice and cold for serving.
    2. Fill a cocktail shaker with ice, then pour in the green apple liqueur and vodka.
    3. Add a few drops of green food coloring and a tiny splash of grenadine to the shaker for a vivid, poisoned hue.
    4. Secure the lid and shake vigorously for about 15 seconds, until the mixture is well chilled and slightly frothy.
    5. Remove your chilled glasses from the freezer and strain the cocktail mixture evenly into each glass, creating a bright green, bubbly surface.
    6. Carefully pour a splash of chilled champagne over the mixture in each glass to create a bubbling, effervescent top.
    7. Garnish each drink with a lime slice on the rim and add a tiny drop of grenadine in the center for a poisoned effect.
    8. Serve immediately while chilled and bubbly, with a mysterious green glow perfect for Halloween.

    Notes

    Ensure all ingredients are chilled before mixing for optimal clarity and sparkle. Adjust grenadine sparingly to maintain the vibrant green color without over-red coloring the drink.
    This Poison Apple Martini isn’t just a drink—it’s a Halloween ritual that brings a little magic to the season. Its vivid hue and lively bubbles make it stand out among more traditional fall cocktails. With a few quick fixes and tips, you’ll be ready to impress any ghoulish gathering or enjoy a quiet, spooky evening alone.

    Remember, the charm of this drink is in its playful presentation and bold flavors. Let it be a reminder to indulge in the little moments of Halloween mischief, wrapped up in a glass. Cheers to a season of enchantment, surprises, and fiery green cocktails.

  • Tropical Chill: The Unexpected Charm of Frozen Pineapple Bliss

    Tropical Chill: The Unexpected Charm of Frozen Pineapple Bliss

    Imagine blending the sweet, tangy aroma of ripe pineapples with the cool splash of crushed ice. This pineapple slushie isn’t just a drink; it’s a mini escape into a tropical breeze, right in your glass. What makes it even more fun? You can tweak the ingredients to match your mood or what’s in your pantry.

    This recipe steps away from the usual punch of pineapple juice. Instead, it uses fresh pineapple chunks and a hint of lime for brightness. The texture? Smooth, icy, and refreshingly chaotic, perfect for a quick chill or a spontaneous celebration.

    Pineapple Slushie

    This pineapple slushie combines fresh pineapple chunks with lime juice and crushed ice, blended into a smooth, icy beverage. The final texture is refreshing, slightly thickened, and visually appealing with a frosty appearance that’s perfect for hot days. It showcases a vibrant tropical flavor with an icy consistency.
    Prep Time 10 minutes
    Total Time 10 minutes
    Servings: 2
    Course: Main Course
    Cuisine: tropical
    Calories: 150

    Ingredients
      

    • 2 cups fresh pineapple chunks peeled and trimmed
    • 1 lime lime juice freshly squeezed
    • 1 1/2 cups crushed ice adjust for desired thickness

    Equipment

    • Blender
    • Measuring cups and spoons

    Method
     

    1. Measure out the fresh pineapple chunks and place them into the blender jar.
    2. Squeeze the juice of a fresh lime directly into the blender, then add the lime peel if desired for extra zest.
    3. Add the crushed ice on top of the pineapple and lime in the blender.
    4. Securely attach the lid and blend on high speed until the mixture is smooth, frosty, and thickened, about 30-40 seconds. You should see a vibrant, icy texture forming.
    5. Stop the blender and give the slushie a quick stir with a spoon to ensure even consistency.
    6. Pour the pineapple slushie into chilled glasses, watching the icy, colorful beverage settle inside.
    7. Optional: garnish with a slice of lime or a small pineapple wedge for a festive touch.

    This pineapple slushie isn’t just a drink; it’s a small celebration of summer’s flavors. Its bright notes and icy texture make it a favorite for warm afternoons or a quick rejuvenation. Plus, it’s vegan, dairy-free, and adaptable, so everyone can enjoy it without fuss.

    As seasons change and days grow longer, this refreshing sip reminds us to pause and enjoy the little things. No fancy equipment needed, just ripe pineapple and good cheer. Cheers to simple pleasures that never fail to brighten the day.

  • Chill Out with the Unexpected Cold Brew Iced Tea Slushie

    Chill Out with the Unexpected Cold Brew Iced Tea Slushie

    In the relentless heat of summer, I discovered a secret weapon: an iced tea slushie that combines the robust depth of cold brew with the refreshing chill of a frozen treat. This isn’t your average iced tea; it’s a playful remix that turns a simple drink into a delightful chaos of texture and taste. The aroma of steeped black tea mingling with a splash of vanilla makes my kitchen smell like a cozy café at dawn.

    Iced Tea Cold Brew Slushie

    This frozen beverage combines cold brew coffee or black tea with ice and sweeteners to create a thick, slushy texture. The mixture is blended until smooth and frosty, resulting in a refreshing and visually appealing frozen drink with a velvety consistency.
    Prep Time 10 minutes
    Total Time 10 minutes
    Servings: 2
    Course: Main Course
    Cuisine: Western
    Calories: 110

    Ingredients
      

    • 1 cup cold brew coffee or strongly brewed black tea cooled
    • 1 cup ice cubes
    • 2 tablespoons simple syrup or honey adjust to taste
    • 1 dash vanilla extract

    Equipment

    • Blender
    • Measuring cups and spoons

    Method
     

    1. Pour the cooled cold brew or black tea into the blender.
    2. Add the ice cubes to the blender, ensuring they fill the mixture at least halfway.
    3. Pour in the simple syrup or honey, and add a dash of vanilla extract for added aroma and sweetness.
    4. Secure the lid on the blender and blend on high speed until the mixture is thick, smooth, and frosty, about 30-60 seconds. You should see a velvety texture and a uniform, icy appearance.
    5. Stop the blender and check the consistency; if it’s too thick, add a splash of water or additional tea and blend briefly. If too thin, add more ice and blend again.
    6. Pour the chilled slushie into glasses, allowing the frosty mixture to mound attractively at the top.
    7. Optionally, garnish with a sprig of mint or a slice of lemon for a finishing touch.
    8. Enjoy immediately with a straw or spoon to savor the icy, creamy consistency.

    Notes

    For a richer flavor, consider adding a splash of milk or dairy alternative before blending. You can also experiment with flavored syrups or spices for variation.

    This iced tea slushie is more than just a cold beverage; it’s a small rebellion against the ordinary. Perfect for afternoons when the heat feels like a heavy blanket, it offers a burst of flavor with every sip. Taking a moment to blend and savor this icy concoction reminds me why simple pleasures often become my favorites in the relentless pace of daily life.

  • Frozen Whiskey Bliss: The Surprising Charm of a Summer Slushie

    Frozen Whiskey Bliss: The Surprising Charm of a Summer Slushie

    Imagine a summer evening when the air is thick with the scent of melting ice and the faint aroma of vanilla and caramel from a well-aged whiskey. A frozen whiskey slushie isn’t just a drink; it’s a nostalgic escape that transports you to lazy afternoons and lively gatherings. The secret lies in the chill—combining the warmth of whiskey with a frosty, velvety texture that makes every sip feel like a mini celebration.

    This recipe isn’t your typical frozen beverage. I like to think of it as a rebellious twist on traditional cocktails, perfect for hot days and cool nights. It’s a little chaotic to make but endlessly rewarding. Plus, the intoxicating scent of whiskey mingling with icy sweetness is its own reward.

    Frozen Whiskey Slushie

    A frozen whiskey slushie is a chilled beverage made by blending whiskey with ice and sweeteners until smooth and velvety. It has a thick, icy texture with a glossy appearance, combining the warmth of whiskey with a frosty, refreshing finish. The drink is served cold, with a smooth consistency that melts leisurely on the palate.
    Prep Time 10 minutes
    Total Time 10 minutes
    Servings: 2
    Course: Main Course
    Cuisine: beverage
    Calories: 180

    Ingredients
      

    • 1 cup whiskey preferably well-aged
    • 2 cups ice cubes preferably small or crushed for easier blending
    • 2 tablespoons simple syrup adjust sweetness to taste
    • 1 teaspoon vanilla extract adds depth to the flavor

    Equipment

    • Blender
    • Measuring cups and spoons
    • Ice cube tray

    Method
     

    1. Measure out the whiskey, simple syrup, and vanilla extract, then add them to the blender.
    2. Pile in the ice cubes on top of the liquid ingredients in the blender.
    3. Secure the lid and blend on high speed for about 30-45 seconds until the mixture is thick, slushy, and evenly icy with a smooth, velvety appearance.
    4. Stop the blender and check the texture; if it’s too thick, add a splash of water or more whiskey and blend briefly again until you reach your preferred consistency.
    5. Pour the frozen whiskey slushie into chilled glasses, allowing some of the icy bits to create a frosty, inviting look.
    6. Garnish with a twist of lemon or a sprig of mint if desired, then serve immediately to enjoy the icy, velvety texture.

    Notes

    For a smoother texture, blend longer or add a dash more liquid. Using crushed ice makes the process quicker and yields a creamier consistency.
    As the last bits of slush melt on your tongue, you’ll realize this cocktail isn’t just a fleeting treat. It’s a reminder that even in the simplest ingredients, joy can be crafted through a bit of freezing ingenuity. Whether for a spontaneous gathering or a quiet night alone, this whiskey slushie adds a splash of fun to any moment.

    Remember, the key to a perfect slushie is patience and a little bit of improvisation. So next time the heat is unbearable, just grab your whiskey and a freezer-safe container. This playful, icy sip could become your new summer staple—unexpected, bold, and irresistibly cool.

  • Chill Out with a Sunset: The Art of Making the Perfect Rosé Wine Slushie

    Chill Out with a Sunset: The Art of Making the Perfect Rosé Wine Slushie

    As the days grow longer and the evenings shimmer with golden hues, there’s something irresistible about a cold, refreshing drink that captures the spirit of summer. But why settle for a plain frozen beverage when you can elevate it with the elegance of rosé wine? This recipe transforms simple ingredients into a swirling, icy sip that feels both luxurious and delightfully chaotic.

    Imagine the sweet aroma of ripe strawberries mingling with the floral notes of your favorite rosé, crushed into a vibrant slush. It’s a symphony of flavors and textures — cool, tart, and just a little bit bubbly — perfect for spontaneous gatherings or solo escapes on the porch. This is more than a drink; it’s a mood, a moment, a splash of carefree sophistication.

    Let me take you through why this icy pink wonder is stealing my summer heart, one slushy sip at a time.

    Rosé Strawberry Slush

    This beverage combines ripe strawberries and rosé wine, blended into a vibrant, icy slush. The mixture results in a cool, tart, and slightly bubbly drink with a visually appealing pink hue and a refreshing, semi-frozen texture.
    Prep Time 10 minutes
    Total Time 10 minutes
    Servings: 2
    Course: Main Course
    Cuisine: Summer
    Calories: 150

    Ingredients
      

    • 1 pint ripe strawberries hulled and halved
    • 1 bottle rosé wine chilled
    • 2 tablespoons simple syrup adjust sweetness to taste
    • 1 cup ice cubes

    Equipment

    • Blender
    • Measuring cups and spoons

    Method
     

    1. Add the halved strawberries to a blender and pulse a few times until roughly chopped.
    2. Pour in the chilled rosé wine and add the simple syrup to the blender.
    3. Add the ice cubes to the mixture in the blender.
    4. Blend everything on high until the mixture is smooth, icy, and slushy, with a vibrant pink color and a frosty texture.
    5. Taste the slush and adjust sweetness by adding more simple syrup if desired, then give it a quick pulse to incorporate.
    6. Pour the icy rosé strawberry slush into glasses, garnishing with a fresh strawberry or mint sprig if desired for a pretty finish.

    This rosé slushie embodies the “less is more” approach to summer drinks. It’s easy to customize with your favorite berries or a splash of citrus, making each glass uniquely yours. The faint crackle of ice, the swirl of pink, and that refreshing scent of wine and fruit will stay with you all season.

    In a moment of sweltering heat or lazy sunset days, this icy treat is a quiet celebration of simple pleasures. It’s the kind of recipe that invites you to slow down, take a sip, and savor the fleeting magic of warm nights and cool drinks. Cheers to making your summer just a little bit brighter.

  • Frozen Blue Raspberry Bliss: The Unexpected Art of a Perfect Slushie

    Frozen Blue Raspberry Bliss: The Unexpected Art of a Perfect Slushie

    Imagine a sweltering summer day, sweat trickling down your back, and then finding refuge in a frosty, vibrant blue treat. Blue raspberry slushies aren’t just colorful beverages; they’re a nostalgic throwback to carefree childhood days, but with a modern twist that makes them perfect for any gathering. The secret lies in tapping into that electric blue hue, which sparks joy even before the first sip.

    This recipe dives into the whimsy of creating a slushie that’s not only eye-catching but also refreshingly tart and sweet. It’s about capturing that perfect icy crunch and tart raspberry flavor that awakens your senses. Whether you’re hosting friends or just need a cooling escape, this slushie hits all the right notes, one icy sip at a time.

    Blue Raspberry Slushie

    This frozen beverage is made by blending tart blue raspberry syrup with crushed ice and a splash of lemon juice until smooth and icy. The final texture is slushy and vibrant blue, with a refreshing tart-sweet flavor and a crunchy consistency that cools on the tongue.
    Prep Time 10 minutes
    Total Time 10 minutes
    Servings: 2
    Course: Main Course
    Cuisine: beverage
    Calories: 150

    Ingredients
      

    • 1 cup blue raspberry syrup preferably concentrated
    • 2 cups crushed ice preferably fine or pebble ice
    • 1 tbsp fresh lemon juice adds brightness and balance

    Equipment

    • Blender
    • Measuring cups and spoons
    • Serving glasses

    Method
     

    1. Measure out the blue raspberry syrup and set it aside.
    2. Pour the crushed ice into your blender, filling it about halfway.
    3. Add the measured blue raspberry syrup over the ice in the blender.
    4. Pour in the fresh lemon juice to enhance the tartness and brighten the flavor.
    5. Secure the lid on the blender, then blend on high until the mixture is smooth and slushy, about 30-45 seconds. You should hear a crunching sound and see a vibrant blue mixture with tiny ice particles.
    6. Check the consistency; if it’s too thick, add a splash of water or lemon juice and blend briefly to loosen it. If it’s too thin, add a bit more crushed ice and blend again.
    7. Pour the slushie into chilled glasses, allowing the icy mixture to mound slightly above the rim.
    8. Serve immediately with a straw or spoon to enjoy the crunchy, cold texture that’s perfect for a hot day.

    Notes

    For a more intense blue color, add a drop of blue food coloring. Adjust sweetness by varying the amount of syrup.

    In a world filled with complex desserts, sometimes simplicity wins best. This blue raspberry slushie is a vibrant reminder that fun, flavor, and a splash of nostalgia can come together in a glass. It’s the kind of treat that turns an ordinary day into a memorable one, especially as the season heats up.

    Enjoy experimenting with this recipe—it’s flexible, forgiving, and a true crowd-pleaser. When you get that first icy bite and a burst of tangy raspberry hits your tongue, you’ll know exactly why this recipe deserves a spot in your summer lineup. Keep your freezer stocked and your spirits high—this is the icy delight you didn’t know you needed.

    }