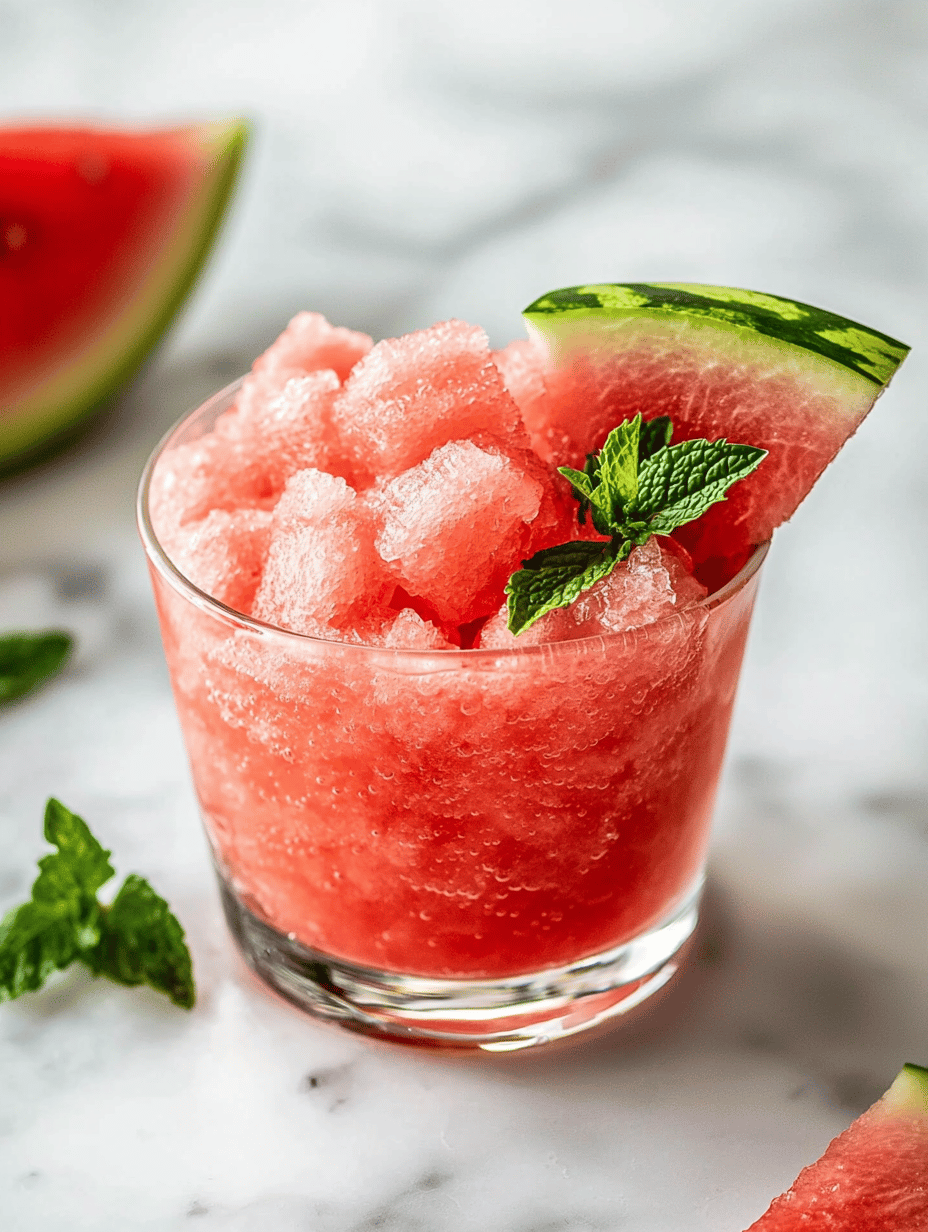
Category: Beverages

  • Mango Slushie: The Unexpectedly Refreshing Summer Escape

    Mango Slushie: The Unexpectedly Refreshing Summer Escape

    Summer heat can turn even the most eager fruit lover into a fruit-hating puddle. My secret weapon? A mango slushie that tastes like a carnival in your mouth, with a twist of familiarity. It’s not just cold mango juice; it’s a flash of sunshine in a glass, perfect for those scorching afternoons when hydration feels like a luxury.

    What makes this recipe stand out is its simplicity, yet it’s packed with flavor that packs a punch. No fancy gadgets required—just ripe mangoes, a hint of lime, and a splash of secret ingredient that takes it from basic to downright addictive. It’s a childhood favorite with a supercharged adult kick, guaranteed to cool and satisfy.

    WHY I LOVE THIS RECIPE?

    • The fresh mango aroma is like a tropical breeze that instantly lifts my mood.
    • Blending this feels like pouring sunshine into a glass—sweet, tart, and so creamy.
    • It reminds me of summer vacations and lazy afternoons at the grill.
    • Making it is a chaos-free zone—just throw ingredients into the blender, and go.
    • It’s perfect for spontaneous gatherings, with minimal prep but maximum charm.

    Mango Slushie

    This mango slushie is a frozen beverage made by blending ripe mango chunks with lime juice and a secret ingredient, resulting in a creamy, icy drink with vibrant flavor. The mixture is smooth and slushy in texture, perfect for hot summer days. Its bright orange color and refreshing profile make it both visually appealing and thirst-quenching.
    Prep Time 10 minutes
    Total Time 10 minutes
    Servings: 2
    Course: Main Course
    Cuisine: tropical
    Calories: 150

    Ingredients
      

    • 2 cups ripe mango chunks peeled and pitted
    • 1/4 cup lime juice freshly squeezed
    • 1 teaspoon secret ingredient could be honey, a splash of coconut rum, or another flavor enhancer
    • 1 cup ice cubes

    Equipment

    • Blender
    • Knife
    • Cutting board

    Method
     

    1. Start by chopping ripe mangoes into smaller chunks, making them easier to blend smoothly and ensuring a bright, vibrant flavor.
    2. Add the mango chunks, lime juice, secret ingredient, and ice cubes into the blender jar.
    3. Secure the lid and blend on high speed for about 30-45 seconds, or until the mixture is completely smooth and icy in texture, with no chunks remaining.
    4. Stop the blender and give the mixture a quick stir to ensure everything is evenly combined and fully chilled.
    5. Pour the vibrant, frosty slushie into glasses, watching as it retains a thick, icy consistency and a beautiful orange hue.
    6. Serve immediately with a straw or a garnish of fresh lime wedge for an extra touch of citrus zest.

    Every sip of this mango slushie transports me to a coastal boardwalk, where the air smells of salt and ripe fruit. It’s a little escape that fits into any hot day, whether you’re relaxing on your porch or hosting friends.

    In a world rushing toward the next trend, this simple treat stays a favorite because of its pure, honest flavor. Plus, it’s so easy to whip up that no one needs a reason to enjoy it. Sometimes, cooling down is just a good blender away.

  • Chill with a Twist: The Coffee Slushie You Never Knew You Needed

    Chill with a Twist: The Coffee Slushie You Never Knew You Needed

    During the sweltering days of summer, I stumbled upon a secret weapon that transformed my caffeine cravings into a frosty delight. It7s a coffee slushie, but with an edge—unexpectedly rich, sweet, and insanely addictive. The secret? A splash of condensed milk and ice that combines into a silky, velvety treat that energizes and cools in one sip.

    My obsession with this drink started on a lazy afternoon when I needed a pick-me-up that didn7t involve ordering takeout or overheating my kitchen. Blending cold brew with frozen ice cubes turned out to be the perfect way to beat the heat while satisfying my coffee fix. Now, I keep ingredients stocked, ready for whenever a caffeine chill calls.

    Coffee Slushie with Condensed Milk

    This coffee slushie combines strong brewed coffee with ice and sweetened condensed milk to create a creamy, velvety frozen beverage. Blended until smooth, it has a frosty texture with a rich, coffee flavor and a hint of sweetness. The mixture appears thick and chilled, perfect for hot days.
    Prep Time 5 minutes
    Total Time 5 minutes
    Servings: 2
    Course: Main Course
    Cuisine: Global
    Calories: 150

    Ingredients
      

    • 1 cup brewed coffee (cooled) strong or espresso brew for richer flavor
    • 3 cups ice cubes preferably small or crushed
    • 1/2 cup sweetened condensed milk adjust for sweetness

    Equipment

    • Blender
    • Measuring cups and spoons

    Method
     

    1. Measure out the brewed coffee and let it cool to room temperature or chill in the fridge.
    2. Add the ice cubes to your blender and pour in the cooled coffee.
    3. Blend the mixture on high speed until the ice is completely crushed and the mixture is smooth and frothy.
    4. Stop the blender and check the texture; it should be thick, creamy, and frosty. If needed, add a few more ice cubes and blend again until desired consistency is reached.
    5. Pour the coffee slushie into glasses and serve immediately for the best icy texture.

    This coffee slushie is more than just a frozen coffee. It’s a reminder of those lazy summer afternoons, where simplicity and flavor blend effortlessly. Its chilled foam, rich aroma, and velvety texture turn ordinary coffee into a refreshing escape.

    In a season that presses pause on hectic mornings, this icy treat offers a moment of relief and indulgence. A quick blend, a few fresh ingredients, and suddenly summer feels a little sweeter, a little cooler—and just right.

  • Chill Out with a Frozen Margarita Slushie: The Unexpected Allergy-Friendly Twist

    Chill Out with a Frozen Margarita Slushie: The Unexpected Allergy-Friendly Twist

    Imagine a summer afternoon where the only thing cooler than the breeze is a frosty beverage that hits all the right notes of citrus and tequila, but without the usual fuss. Frozen margarita slushies are a delightful way to beat the heat, especially when you want something refreshingly simple yet surprisingly adaptable. Today, I discovered how to make a version that’s friendly for those with nut allergies, transforming a classic into a safe and still vibrant treat.

    This recipe isn’t just about the freeze and the zest; it’s about reclaiming the joy of summer sips without worry. Using everyday pantry ingredients turned out to be the secret, creating a smooth, icy texture paired with a zingy punch of lime. It’s an invitation to celebrate spontaneous outdoor gatherings or a solo moment of cool relief after a long day.

    Nut-Free Frozen Margarita Slushie

    This frozen margarita slushie is prepared by blending citrus juice, tequila, and sweeteners with ice to create a smooth, icy beverage. The final texture is a vibrant, cold slush with a refreshing lime flavor, perfect for hot days.
    Prep Time 5 minutes
    Total Time 5 minutes
    Servings: 2
    Course: Main Course
    Cuisine: Mexican
    Calories: 150

    Ingredients
      

    • 1/2 cup fresh lime juice about 2 limes
    • 1 cup tequila blanco preferred
    • 2 tablespoons simple syrup adjust to taste
    • 3 cups ice cubes

    Equipment

    • Blender
    • Measuring cups and spoons
    • Citrus juicer

    Method
     

    1. Juice the limes until you have about half a cup of fresh lime juice, then set it aside.
    2. Add the lime juice, tequila, simple syrup, and ice cubes into the blender jar.
    3. Secure the lid on the blender and blend on high until the mixture becomes thick, slushy, and smooth, about 30-40 seconds.
    4. Stop the blender and check the texture; it should be soft, icy, and well combined. If needed, blend for a few more seconds.
    5. Pour the frozen margarita slushie into glasses, allowing the icy texture to mound attractively in each
    6. Garnish with lime wedges or a sprinkle of salt on the rim if desired, then serve immediately for a refreshing, chilled beverage.

    Notes

    Adjust the sweetness or tartness by adding more or less simple syrup or lime juice. For a creamier texture, consider adding a splash of coconut cream or alternative milk before blending.

    Crafting this frozen margarita slushie was a fun reminder that the simplest ingredients can yield the most satisfying results. It’s perfect for those sweltering days when you need a quick, reliable refreshment. Plus, the allergy-friendly tweak means everyone can join in the celebration without a second thought.

    As summer peaks and fresh fruit options become abundant, this slushie beckons as a versatile and approachable treat. No matter the occasion, it’s a cool little escape right in your own freezer. Cheers to easy, joyful sipping—no compromise needed.

  • Chill Out with an Unusual Milkshake Slushie Twist

    Chill Out with an Unusual Milkshake Slushie Twist

    Imagine turning a simple milkshake into a frosty, chaotic adventure that’s perfect for hot days or just a craving for something wildly different. The secret is in the way you freeze and blend—creating a texture that’s thick, slushy, and surprisingly fun to eat with a straw. This recipe is not just about flavor; it’s about the thrill of the icy crunch mixed with creamy sweetness.

    Most milkshakes stay smooth and predictable, but I love pushing boundaries with icy textures that make every sip feel like a cool splash of nostalgia and chaos dough. It’s a mind-shift from the usual—with playful swirls of fruit, chocolate, or even unexpected ingredients—transforming a routine treat into an adventure of its own. Perfect for sharing (or not sharing), this slushie is a messy, joyful riot in a glass.

    Frosty Chaotic Milkshake

    This frozen dessert transforms a traditional milkshake into a thick, icy slush with a playful, textured appearance. Key ingredients include milk, ice, and sweeteners, blended to create a crunchy, smooth, and visually chaotic final texture. It’s perfect for hot days or when craving a fun, messy treat with vibrant flavor mix-ins.
    Prep Time 10 minutes
    Total Time 10 minutes
    Servings: 2
    Course: Main Course
    Cuisine: none
    Calories: 150

    Ingredients
      

    • 2 cups milk preferably whole milk for creaminess
    • 3 cups ice cubes freshly frozen if possible
    • 3 tablespoons sugar syrup or honey adjust to taste
    • 1 teaspoon vanilla extract optional, for added flavor
    • 1 cup fruit or chocolate mix-ins berries, chocolate chips, or fruit pieces

    Equipment

    • Blender
    • Measuring cups and spoons

    Method
     

    1. Add the milk, ice cubes, sweetener, and vanilla extract into the blender.
    2. Pulse the blender several times to break down the ice slightly, creating a chunky, icy mixture that’s not yet fully smooth.
    3. Blend on high speed until the mixture becomes thick, slushy, and slightly frosty, sounding like crunching ice with a smooth internal texture.
    4. Pour in your chosen mix-ins, like berries or chocolate chips, and briefly pulse again to incorporate while maintaining some texture.
    5. Stop blending and check the texture—if it’s too thick, add a splash of milk and give it one quick blend to loosen it slightly.
    6. Transfer the icy, chaotic milkshake into glasses, using a spoon to help shape the uneven, textured surface if needed.
    7. Serve immediately with colorful straws or toppings to enjoy the full playful, crunchy, creamy experience.

    Notes

    For a more colorful appearance, swirl in fruit purees or food coloring before blending. Best served immediately for maximum icy crunch.

    In a world of refined, predictable cold beverages, this milkshake slushie throws a laugh into the mix. It’s about capturing the carefree spirit of summer, when spilling a little is part of the fun. Whether you’re cooling off after yard work or just embracing the chaos of a hot day, this recipe delivers on both tastes and giggles.

    Every sip brings a burst of cool, sweet relief, punctuated by crunch and surprise. It’s a reminder that the best treats often come from playful experimentation and a little bit of daring in the kitchen. So, toss in your favorite flavors and enjoy the frosty chaos—your new summer obsession awaits.

  • Chill Out with the Watermelon Slushie: A Summer Surprise

    Chill Out with the Watermelon Slushie: A Summer Surprise

    Imagine peeling into a watermelon on a sweltering afternoon and finding it perfectly ripe, with the sweetness bursting in your mouth. Now, picture transforming that juicy goodness into a frosty, revitalizing slushie that feels like summer in a glass. This recipe is a playful twist, blending childhood nostalgia with a fresh, healthful vibe.

    Watermelon is a summer staple, but turning it into a refreshing frozen treat elevates the simple fruit into something special. It’s perfect for backyard gatherings or a quiet moment of cooling down after a walk. Plus, it’s so easy, you’ll want to make it every day.

    Watermelon Slushie

    This watermelon slushie is a frozen beverage made by blending ripe watermelon chunks with sweeteners and citrus juice until smooth. It has a vibrant, icy texture with a bright pink hue, perfect for hot days. The final drink is refreshing, juicy, and enjoyed with a straw or spoon.
    Prep Time 10 minutes
    Total Time 10 minutes
    Servings: 2
    Course: Main Course
    Cuisine: Summer
    Calories: 80

    Ingredients
      

    • 4 cups ripe watermelon chunks seedless or deseeded for smoother blending
    • 2 tablespoons honey or agave syrup adjust sweetness to taste
    • 1 tablespoon fresh lime juice adds a tangy brightness

    Equipment

    • Blender
    • Knife

    Method
     

    1. Place the watermelon chunks in the blender.
    2. Add honey or agave syrup to the blender to sweeten the mixture.
    3. Squeeze in the fresh lime juice for a hint of tang.
    4. Secure the lid on the blender and blend on high until the mixture is smooth and icy, about 30 seconds. You should see a vibrant pink slushie consistency.
    5. Pour the frozen slushie into glasses, using a spoon or straw.
    6. Serve immediately, garnished with a small wedge of lime or a mint sprig if desired.

    Notes

    For a thicker slushie, freeze the watermelon chunks prior to blending. Adjust sweetness by adding more or less honey, depending on the ripeness of your fruit.
    This watermelon slushie isn’t just a cool refreshment; it’s a little burst of sunshine that’s easier to make than you’d think. The vibrant pink hue and the smell of fresh watermelon make every sip refreshing and nostalgic. It reminds me of lazy summer mornings and spontaneous picnics.

    As the heat amps up, this slushie becomes an essential part of my cooling arsenal. Whether you’re looking for a quick snack or a beautiful party treat, it’s quick to whip up and the perfect way to beat the heat. Now, take that watermelon and enjoy a sip of pure summer.

  • Spooky Sweep: The Ultrachic Poison Apple Martini for Halloween

    Spooky Sweep: The Ultrachic Poison Apple Martini for Halloween

    As October leaves crunch underfoot, I find myself craving more than just pumpkin spice—something darkly elegant and a tad mischievous. The Poison Apple Martini is my new obsession; it’s like biting into a crisp apple, but with a wicked twist that makes every sip a playful danger.

    The secret? A clever blend of apple liqueur and a splash of sour apple schnapps, topped with a blood-red splash of grenadine. The shimmering green of the drink invites curious fingers, and the aroma of crisp apples mixed with a hint of cherry promises a spooky delight. Perfect for a hush-hush Halloween gathering or a solo night of haunting tunes and flickering candles.

    This recipe transforms a classic cocktail into a spellbinding potion everyone dreads to love. A little tart, a little sweet, with just the right amount of chilling flair—my new go-to for spooky season parties.

    Poison Apple Martini

    The Poison Apple Martini is a visually striking cocktail featuring a blend of apple liqueur, sour apple schnapps, and grenadine. It has a vibrant green hue with a bloody red garnish, offering a tart, sweet flavor with a sleek, smooth texture, perfect for spooky seasonal celebrations.
    Prep Time 5 minutes
    Total Time 5 minutes
    Servings: 1
    Course: Main Course
    Cuisine: mixed drinks
    Calories: 200

    Ingredients
      

    • 1.5 ounces apple liqueur such as Sour Apple Pucker
    • 0.5 ounces sour apple schnapps adds tartness and depth
    • 0.5 ounces grenadine for blood-red color and sweetness
    • Ice cubes ice cubes for chilling the cocktail

    Equipment

    • Cocktail shaker
    • Strainer
    • Martini glass

    Method
     

    1. Fill the cocktail shaker halfway with ice cubes, ensuring a generous chill.
    2. Add the apple liqueur, sour apple schnapps, and grenadine to the shaker.
    3. Secure the lid tightly and shake vigorously for about 15 seconds, until the mixture is well chilled and frothy.
    4. Remove the shaker lid and place a strainer over it, then pour the cocktail into a chilled martini glass.
    5. Gently pour a small splash of grenadine down the side of the glass, allowing it to settle at the bottom and create a blood-red layer.
    6. Garnish the rim with a thin slice of fresh apple or cherry, if desired, for an extra spooky touch.
    7. Serve immediately and enjoy the dark, vibrant beauty of your Poison Apple Martini.

    Notes

    For a more dramatic look, add a splash of edible glitter or dry ice for a smoky effect (use with caution).
    The Poison Apple Martini isn’t just a pretty face; it’s a conversation starter, especially when served in glow-in-the-dark glasses or with dry ice. It captures that autumnal magic with every pour, blending nostalgia with a daring twist that’s perfect for October.

    Crafting this drink is as much about the experience as drinking it. The clink of ice, the shimmer of grenadine, and the scent of ripe apples make every moment memorable. Embrace its charm, and let this be your signature spooky sip this season.

  • Blood Moon Bliss: Haunted Halloween Vampire Punch

    Blood Moon Bliss: Haunted Halloween Vampire Punch

    Every October, I find myself craving a spooky drink that’s both fun to make and even more exciting to sip. This Vampire Punch is not your average Halloween beverage; it’s a dark, luscious red that practically screams chaos and celebration. The best part? It’s surprisingly simple, yet looks like a potion straight out of a vampire’s lair.

    As someone who loves the thrill of Halloween decorations and creepy costumes, I also adore the little details—like a bubbling punch that smells faintly of cherries and pomegranate. Pouring this crimson concoction feels like unleashing a sweet, cursed magic onto your party table. It’s perfect for making your haunted gathering unforgettable, with just a splash of spooky sophistication.

    Vampire Punch

    Vampire Punch is a vibrant, deep-red beverage made from cherry and pomegranate juices combined with soda and a splash of spirits. It has a smooth, slightly effervescent texture with a striking, dark crimson appearance, perfect for spooky gatherings. The drink is served chilled, often garnished with fruit for an evocative presentation.
    Prep Time 10 minutes
    Cook Time 5 minutes
    Total Time 15 minutes
    Servings: 8
    Course: Main Course
    Cuisine: Halloween/Party Drink
    Calories: 150

    Ingredients
      

    • 2 cups cherry juice preferably unsweetened or lightly sweetened
    • 2 cups pomegranate juice fresh or bottled
    • 1 cup soda water for fizz
    • 1/2 cup vodka or light rum optional for an alcoholic version
    • 1 tablespoon simple syrup adjust to taste
    • ice ice cubes to chill the punch
    • fruit slices for garnish such as cherries, lemon or lime slices, or pomegranate seeds

    Equipment

    • Large pitcher or bowl
    • Mixing spoon
    • Measuring cups and spoons
    • Serving glasses

    Method
     

    1. Pour the cherry juice and pomegranate juice into a large pitcher, creating a dark, rich red base.
    2. Add the simple syrup and stir gently with a mixing spoon until well combined, ensuring the color deepens slightly.
    3. Pour in the vodka or light rum if using, and give the punch a gentle stir to incorporate the spirits evenly.
    4. Fill the pitcher with plenty of ice cubes to chill the mixture and add a frosty shimmer to the drink.
    5. Just before serving, slowly pour the soda water into the pitcher to add fizzy bubbles that will rise and shimmer through the deep crimson liquid.
    6. Garnish the punch with slices of lemon, lime, cherries, or scatter pomegranate seeds on top for a spooky, vibrant presentation.

    Notes

    Serve immediately with additional garnishes if desired. Adjust sweetness with more simple syrup or add extra spirits for a stronger punch.

    This Vampire Punch isn’t just a drink; it’s a centerpiece that sparks conversation and sealed memories. Its vivid color and rich flavor send a delicious shiver down your spine, fitting perfectly with the season’s mood. With just a few ingredients and a dash of chaos, you have a potion that transforms any Halloween into a true night of fright and delight.

    Whether you’re hosting a spooky soirée or just craving a themed treat for yourself, this punch is your new go-to. Keep a pitcher ready—because once you taste its haunting sweetness, you’ll want to sip on it all October long. Cheers to a hauntingly good holiday, filled with ghouls, goblins, and a splash of red magic.

  • Enchanting Black Magic Margarita for Halloween

    Enchanting Black Magic Margarita for Halloween

    The Black Magic Margarita isn’t just a cocktail; it’s a portal to a mysterious, spellbinding realm of flavor. As Halloween approaches, this eerie black drink becomes the spotlight, captivating guests with its dark allure and silky texture. The first sip whispers tales of enchanted nights and ghostly gatherings, making every moment feel a little more mystical.

    This recipe dares to challenge the mundane, using a simple yet striking ingredient to turn a classic into something spellbinding. Its deep, coal-black hue is perfect for setting a spooky mood and sparking conversation. Plus, the subtle citrus notes balance the dark mystique with a refreshing zing, creating a drink that’s as exciting to look at as it is to sip.

    Black Magic Margarita

    The Black Magic Margarita is a vibrant cocktail made with tequila, orange liqueur, citrus juice, and activated charcoal to achieve its striking black color. The ingredients are shaken with ice until chilled and smooth, resulting in a glossy, dark drink with a refreshing citrus flavor. Its silky texture and deep hue make it ideal for spooky celebrations or elegant gatherings.
    Prep Time 5 minutes
    Total Time 5 minutes
    Servings: 2
    Course: Main Course
    Cuisine: cocktail
    Calories: 180

    Ingredients
      

    • 2 oz tequila preferably blanco or silver
    • 1 oz orange liqueur such as Cointreau or triple sec
    • 1 oz fresh lime juice about one lime
    • 1/2 teaspoon activated charcoal powder food grade, use sparingly
    • 0.5 oz simple syrup optional for sweetness
    • ice ice cubes for shaking

    Equipment

    • Cocktail shaker
    • Measuring jigger
    • Strainer

    Method
     

    1. Fill a cocktail shaker with ice cubes, about halfway full.
    2. Pour in the tequila, orange liqueur, and fresh lime juice.
    3. Add the activated charcoal powder and simple syrup if using, for a rich black color and balanced sweetness.
    4. Secure the lid on the shaker and shake vigorously for about 15 seconds until well chilled and the mixture turns a deep black.
    5. Remove the shaker lid and place a strainer over it. Pour the cocktail into chilled glasses, ensuring a smooth, even flow.
    6. Garnish with a lime wedge or a black salt rim for extra visual impact and flavor.

    Notes

    Activated charcoal can stain surfaces, so handle with care. Adjust sweetness to taste with more or less simple syrup.
    Crafting this Black Magic Margarita is a playful nod to Halloween’s love for a little darkness with a hint of charm. It’s a striking addition to any spooky soirée or an unexpected treat for a ghostly gathering. Whether you’re celebrating with friends or enjoying a quiet night in, this cocktail adds a whisper of enchantment to the season.

    Enjoy the mysterious allure of this drink and let it inspire your Halloween festivities. Its vivid appearance and layered flavors make it stand out from the usual. Cheers to a night filled with magic, mystery, and a splash of the unusual.

  • Tropical Chill: The Everything-You-Never-Knew Pineapple Slushie

    Tropical Chill: The Everything-You-Never-Knew Pineapple Slushie

    Most pineapple drinks whisper summer. But this slushie? It screams adventure. It’s the unexpected twist that transforms a simple fruit into a frozen fiesta. What makes it stand out? It’s not just the sweet tang — it’s the icy texture that melts away any lingering worries.

    Imagine crunching through a layer of frosty pineapple to find a burst of juicy, tropical flavor. This isn’t just a drink; it’s a mini escape to a sunny beach, right in your kitchen. Plus, it’s insanely easy to whip up, even in chaos. The secret? A clever use of pantry staples and a splash of imagination.

    Pineapple Slushie

    This pineapple slushie combines fresh pineapple, fruit juice, and ice to create a frozen, icy beverage with a vibrant tropical flavor. The mixture is blended until smooth and slushy, resulting in a refreshing, textured drink with a frosty appearance. It’s perfect for hot days or when you crave a quick, cool treat.
    Prep Time 5 minutes
    Total Time 5 minutes
    Servings: 2
    Course: Main Course
    Cuisine: tropical
    Calories: 120

    Ingredients
      

    • 2 cups fresh pineapple chunks preferably frozen for best slushie texture
    • 1 cup pineapple juice cold
    • 1 cup ice cubes adjust for desired consistency

    Equipment

    • Blender
    • Measuring cups and spoons

    Method
     

    1. Measure out the pineapple chunks and place them in your blender jar.
    2. Add the pineapple juice to the blender, covering the fruit evenly to help with blending.
    3. Add the ice cubes to the blender, ensuring there’s enough to achieve a thick, slushy texture.
    4. Secure the lid and blend on high speed until the mixture is smooth, icy, and vibrant in color, about 30-40 seconds.
    5. Stop the blender and check the consistency; if too thick, add a splash of juice and blend briefly. If too watery, add a few more ice cubes and blend again until desired texture is reached.
    6. Pour the slushie into glasses, allowing some of the frosty, textured mixture to flow over the rim.
    7. Serve immediately with a straw or a slice of fresh pineapple for a tropical touch.
    This pineapple slushie is more than a cooling treat. It’s a reminder that a little creativity can turn everyday ingredients into something memorable. As the seasons shift, having this recipe on hand means you can summon sunshine anytime, no matter the weather.

    So, next time the heat hits hard or you crave a taste of the tropics, reach for this slushie. It’s quick, refreshing, and so satisfying. Honestly, it might just be your new go-to summer fix.

  • Chill Out and Chillax: The Unusual Charm of Iced Tea Slushie

    Chill Out and Chillax: The Unusual Charm of Iced Tea Slushie

    Imagine turning a simple iced tea into a frosty, whimsically textured treat that dances on your tongue. This isn’t just about cooling down on a hot day; it’s about transforming a familiar favorite into an unexpected sensory adventure. The secret lies in the freezing process that turns everyday tea into a slushie that’s both soothing and slightly chaotic in texture.

    What makes this recipe stand apart is its ability to be tailored wildly—think infused with herbs, or even a splash of something bubbly for a sparkling twist. It’s perfect for lazy afternoons, spontaneous gatherings, or when you need a little nostalgic reinvention. This icy delight is just waiting to color your kitchen with its icy shimmer and floral or citrus hints.

    **WHY I LOVE THIS RECIPE?**

    • It captures the essence of childhood summers with a grown-up twist.
    • The unpredictable texture adds a joyful chaos to simple sipping.
    • It’s a palate-cleansing reprieve from summer’s heat and complexity.
    • I love how easy it is to customize with my favorite flavors.

    **AVOID MY DISASTER (You’re Welcome)**

    • FORGOT the sugar? Ended up with a bitter ice block, so I added syrup post-freeze.
    • DUMPED entire lemon in? Puckered face—next time I add zest instead for balance.
    • OVER-TORCHED the tea? Bitter unexpected punch—quick rinse saved it from utter ruin.
    • FROZEN the tea too hot? Crystalized into a mess—let it cool first, then slushify.

    **QUICK FIXES THAT SAVE YOUR DAY**

    • When ice melts too fast, add a splash of cold brewed tea to thicken.
    • SPLASH of citrus juice brightens dull flavors in a flash.
    • PATCH blandness with a drizzle of honey or agave while blending.
    • SHIELD the mixture from freezer burns with a quick wrap — it preserves freshness.
    • When in doubt, stir in a handful of berries for instant flavor boost and color.

    Frosty Iced Tea Slushie

    This frozen treat transforms brewed iced tea into a textured, slushy dessert with a refreshing and vibrant appearance. The preparation involves brewing, sweetening, and freezing the tea, then blending it into a semi-frozen, icy texture that’s both cooling and playful in consistency.
    Prep Time 10 minutes
    Cook Time 15 minutes
    Total Time 25 minutes
    Servings: 2
    Course: Main Course
    Cuisine: Global
    Calories: 80

    Ingredients
      

    • 2 cups brewed iced tea cooled
    • 2 tablespoons sugar adjust to taste
    • ½ cup water hot or warm, for dissolving sugar
    • 1 cup ice cubes

    Equipment

    • Tea kettle or pot
    • Blender

    Method
     

    1. Brew your favorite tea and let it cool completely to room temperature, or chill in the fridge for faster cooling.
    2. Heat a small amount of water and dissolve the sugar until the syrup is clear and smooth, then let it cool slightly.
    3. Pour the cooled tea into a mixing bowl and stir in the simple syrup, tasting and adjusting sweetness if desired.
    4. Transfer the sweetened tea into a shallow dish or freeze-safe container, then place in the freezer.
    5. After about 2 hours, check the tea and scrape with a fork to break up ice crystals. Repeat this process every 30 minutes to develop a slushy texture.
    6. Once the tea has a firm, icy, but scoopable texture (about 4-5 hours total), spoon or scoop the mixture into a blender along with ice cubes.
    7. Blend everything until smooth and creamy, with a fluffy, sorbet-like consistency that looks inviting and vibrant.
    8. Pour the frosty slushie into glasses, and garnish with a lemon wedge or fresh herbs if desired for extra flavor and visual appeal.
    9. Serve immediately with a straw or spoon to enjoy the icy, textured treat right away.

    Notes

    Feel free to infuse the tea with herbs like mint or basil or add a splash of sparkling water after blending for a fizzy twist.

    This icy treat is more than just a refreshment; it’s a gateway to rediscovering the simple pleasure of chilled tea. In the heart of summer, it offers a cool reprieve that’s surprisingly adaptable, whether you stick to classic flavors or experiment with wild infusions.

    As the warm days stretch on, this slushie recipe becomes a small daily ritual—easy, quick, and endlessly customizable. It’s perfect for those moments when you need a splash of cool to keep going. Sometimes, a frozen glass of tea is just what you need to remind you of slow summer afternoons and lazy moments.