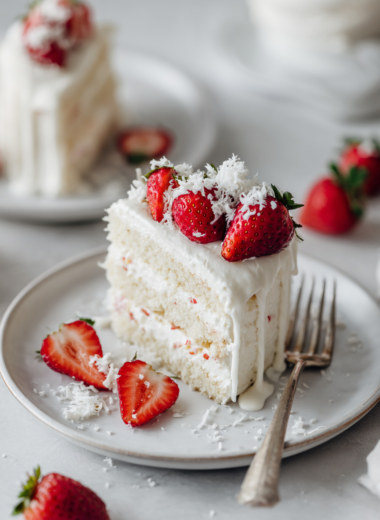
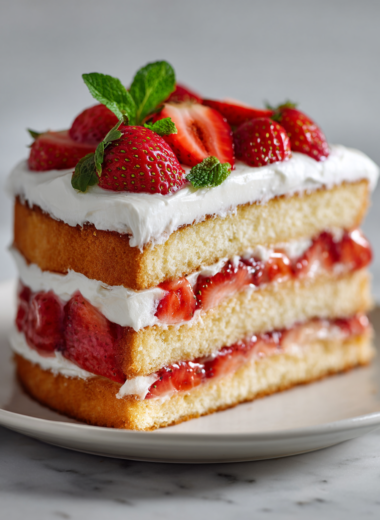
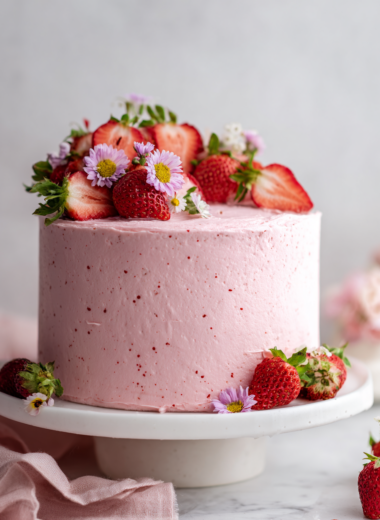
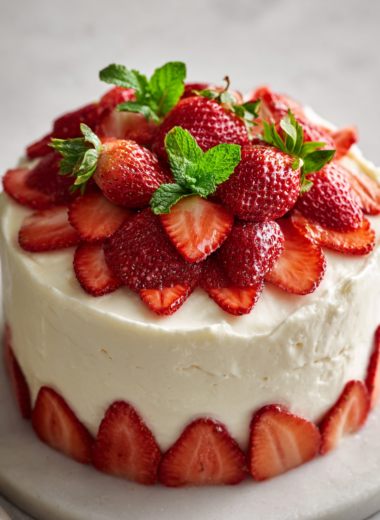
Category: Desserts

  • Beware the Sweet Poison: Halloween Toffee Apples with a Spooky Twist

    Beware the Sweet Poison: Halloween Toffee Apples with a Spooky Twist

    Halloween is the perfect time to indulge in treats that look as sinister as they taste. These Poison Toffee Apples aren’t just your average candied apples—they’re a theatrical display of glossy, dark toffee coating transforming ordinary fruit into a thrilling spectacle. As you dip each apple into the molten sugar mixture, the scent of caramelized sugar and a hint of vanilla fill the air, creating a little pre-Halloween magic.

    What makes these apples truly special is their ability to balance a crisp, juicy bite with a rich, addictive toffee shell that crackles delightfully. The addition of spooky, edible decorations turns each one into a miniature piece of haunted art. Whether for a Halloween party or a playful kitchen experiment, these apples are guaranteed to raise eyebrows and ignite the holiday spirit.

    Poison Toffee Apples

    Poison Toffee Apples involve dipping crisp, juicy apples into a rich toffee mixture to create a glossy, crunchy shell. The toffee coating forms a dark, shiny layer around the fruit, resulting in a sweet, crisp texture with a distinct caramel flavor and a crackling bite. They are often decorated with spooky edible embellishments for a themed Halloween presentation.
    Prep Time 20 minutes
    Cook Time 10 minutes
    Total Time 30 minutes
    Servings: 4
    Course: Main Course
    Cuisine: Halloween
    Calories: 250

    Ingredients
      

    • 4 small apples preferably firm and crisp
    • 2 cups granulated sugar for toffee
    • 1/2 cup water
    • 1 tablespoon unsalted butter adds richness to the toffee
    • 1 teaspoon vanilla extract vanilla extract for flavor
    • optional spooky edible decorations such as candy eyes or black sugar sprinkles

    Equipment

    • Kitchen thermometer
    • Wooden sticks or skewers

    Method
     

    1. Start by washing and thoroughly drying the apples, then insert a wooden stick into the stem end of each apple to serve as handles.
    2. Combine the sugar and water in a heavy saucepan over medium heat, stirring gently until the sugar dissolves completely.
    3. Attach a kitchen thermometer to the saucepan and cook the sugar mixture without stirring, swirling gently occasionally, until it reaches 300°F (hard crack stage).
    4. Remove the saucepan from heat and stir in the butter and vanilla extract until the toffee is smooth and glossy.
    5. Working quickly but carefully, dip each apple into the hot toffee, tilting the pan to cover the entire surface evenly, then lift and let the excess drip off.
    6. Place the coated apples on a parchment-lined tray and immediately decorate with spooky edible decorations if desired.
    7. Allow the toffee to set and harden at room temperature for about 15-20 minutes, resulting in a shiny, crackly shell.
    8. Once the toffee is firm and glossy, the Poison Toffee Apples are ready to enjoy or display for your Halloween festivities!

    Notes

    Ensure careful attention to temperature when making toffee to prevent burning. Work swiftly during dipping to prevent the toffee from setting before coating is complete.
    Making Poison Toffee Apples is a mix of chaos and charm, but the results are worth every messy step. They add that perfect note of spooky fun and nostalgic sweetness to your Halloween celebration.

    As you bite into these glossy, dark-adorned apples, remember the thrill of transforming simple fruit into a theatrical treat. It’s the kind of homemade fun that sparks conversations and creates lasting memories. Enjoy every cracking, caramel-coated moment—trick or treat just got a lot more delicious.

  • Hidden Spice Charm in Pumpkin Cookies

    Hidden Spice Charm in Pumpkin Cookies

    Every autumn, I find myself craving something warm and nostalgic, but this year I wanted to add a twist. These pumpkin cookies are not just your typical fall treat — they hide a secret spice blend that sparks surprise with every bite. The aroma alone can transform any gloomy day into a festive moment.

    What makes this recipe unusual is the balance of warmth and a hint of unexpected tang, thanks to a special dash of ginger and a tiny pinch of cayenne. It’s a cookie experience that nudges your senses and lingers long after the last crumb. Perfect for cozy gatherings or a simple afternoon pick-me-up.

    Spiced Pumpkin Cookies

    These pumpkin cookies are soft and chewy with a slightly crisp edge, featuring a warm blend of spices including ginger and cayenne. The dough is mixed and chilled before being shaped into rounds and baked until golden brown. The final cookies have a moist interior with a fragrant spice aroma and a hint of heat on the finish.
    Prep Time 20 minutes
    Cook Time 15 minutes
    Total Time 35 minutes
    Servings: 12
    Course: Main Course
    Cuisine: American
    Calories: 150

    Ingredients
      

    • 1 cup pureed pumpkin canned or homemade
    • 1/2 cup granulated sugar
    • 1/4 cup brown sugar packed
    • 1 large egg
    • 1/2 cup unsalted butter melted
    • 2 cups all-purpose flour
    • 1 teaspoon baking soda
    • 1/2 teaspoon ground ginger
    • 1/4 teaspoon cayenne pepper tiny pinch for heat
    • 1/2 teaspoon ground cinnamon
    • 1/4 teaspoon salt

    Equipment

    • Mixing bowls
    • Baking sheet

    Method
     

    1. Preheat your oven to 350°F (175°C) and line a baking sheet with parchment paper to prevent sticking.
    2. In a large mixing bowl, combine the pureed pumpkin, granulated sugar, brown sugar, and melted butter. Whisk until the mixture is smooth and fragrant, about 1-2 minutes.
    3. Add the egg to the wet mixture and beat until fully incorporated. This helps the dough relax and ensures even moisture distribution.
    4. In a separate bowl, sift together the all-purpose flour, baking soda, ground ginger, cayenne pepper, cinnamon, and salt to evenly distribute the spices.
    5. Gradually fold the dry ingredients into the wet mixture, mixing gently until just combined. The dough will be slightly sticky but firm enough to scoop.
    6. Chill the dough in the refrigerator for at least 20 minutes to firm up, making it easier to shape and helping the flavors to meld.
    7. Once chilled, scoop tablespoon-sized portions of dough and roll them into balls. Place them onto the prepared baking sheet about 2 inches apart.
    8. Gently flatten each ball with the back of a fork or your fingers, creating a slight disc shape.
    9. Bake in the preheated oven for 12-15 minutes, or until the edges turn golden brown and the cookies feel set around the edges.
    10. Remove the cookies from the oven and let them cool on the baking sheet for 5 minutes before transferring them to a wire rack. This helps them set and prevents breaking.
    11. Once cooled, enjoy these fragrant, spicy pumpkin cookies with a warm cup of tea or milk.

    Notes

    Chilling the dough enhances flavor and texture. Adjust cayenne to taste for more or less heat.

    In times when comfort food needs a twist, these pumpkin cookies stand out. The tender crumb, combined with the spicy zing, feels like a little celebration in every bite. Plus, they’re so easy to make that you might just find yourself sneaking more than one.

    The seasonal flavors coupled with a touch of spice make them fitting for both nostalgic fall mornings and unexpected guests. As the days grow shorter and cooler, these cookies become a small, spicy adventure on your table.

  • Spooky Web of Flavors: Halloween Spider Web Cake

    Spooky Web of Flavors: Halloween Spider Web Cake

    As autumn leaves crunch underfoot, I often find myself craving a dessert that captures the essence of Halloween. This spider web cake isn’t just visually haunting; it’s a nostalgic nod to childhood ghost stories and costume hunts. Its intricate web design makes every slice feel like a tiny mystery waiting to be uncovered.

    The smell of vanilla and cocoa wafts through my kitchen as I decorate this cake, each swirl and spiral adding to the enchantment. It’s a perfect centerpiece for any Halloween gathering, blending chaos and charm in every bite. Making this cake transforms a simple bake into a spirited celebration of spooky fun.

    WHY I LOVE THIS RECIPE?

    • The web pattern adds an unexpected artistic twist, making baking an engaging craft.
    • It evokes fond childhood memories of Halloween night adventures and candy hunts.
    • The combination of chocolate and vanilla balances decadence with comfort.
    • Decorating this cake is a playful, chaotic joy—think dripping ganache and sugar webs.
    • It’s a showstopper that unites friends and family with its spooky elegance.

    AVOID MY DISASTER (You’re Welcome)

    • FORGOT the cake cooling—caused the web to smudge; refrigerate before decorating next time.
    • DUMPED the piping bag—used too much pressure, icing spilled everywhere; switch to a sturdy bag.
    • OVER‑TORCHED the chocolate—turns bitter, add chocolate later and melt gently in double boiler.
    • SCRAMBLED the web design—missed the outline, sketch lightly with a toothpick beforehand.

    QUICK FIXES THAT SAVE YOUR DAY

    • When the web looks uneven, SPLASH a little hot water over design, smooth with a spatula.
    • Patch cracks in the cake with leftover frosting; it’s almost invisible once smoothed out.
    • Flour on your hands? SHIELD the edges of the cake for clean decorating.
    • When icing is too thick, MIX in a splash of milk to get the right consistency.
    • Feeling overwhelmed by decoration? REVEAL a hidden pattern with edible glitter for sparkle.

    Halloween Spider Web Cake

    This spider web cake features a layered chocolate and vanilla sponge decorated with piped web patterns that resemble a spooky spider web. The cake’s smooth frosting creates a clean surface for intricate web designs, resulting in an elegant and haunting Halloween centerpiece with a moist, tender crumb and a rich, sweet flavor.
    Prep Time 45 minutes
    Cook Time 35 minutes
    Total Time 1 hour 20 minutes
    Servings: 12
    Course: Main Course
    Cuisine: American
    Calories: 420

    Ingredients
      

    • 2 cups all-purpose flour sifted
    • 1 1/2 cups granulated sugar
    • 3/4 cup unsweetened cocoa powder preferably Dutch-processed
    • 1 1/2 teaspoons baking powder
    • 1/2 teaspoon baking soda
    • 1/2 teaspoon salt
    • 1 cup buttermilk room temperature
    • 1/2 cup vegetable oil
    • 2 large eggs at room temperature
    • 2 teaspoons vanilla extract
    • 2 1/2 cups all-purpose flour sifted, for vanilla sponge
    • 1 1/2 cups granulated sugar
    • 1/2 cup unsalted butter softened
    • 3 large eggs at room temperature
    • 1 teaspoon vanilla extract
    • 1/4 cup milk whole or 2%
    • Chocolate ganache for decoration prepared ahead
    • White royal icing for web piping prepared and colored as needed

    Equipment

    • Mixing bowls
    • Electric mixer
    • Layer cake pans
    • Cooling rack
    • Piping bags

    Method
     

    1. Preheat your oven to 350°F (175°C). Grease and flour two cake pans, then set aside.
    2. Mix the chocolate cake batter by combining flour, sugar, cocoa powder, baking powder, baking soda, and salt in a bowl. In a separate bowl, whisk together buttermilk, oil, eggs, and vanilla extract.
    3. Gradually add the wet mixture into the dry ingredients, mixing until smooth and no lumps remain. Pour the batter evenly into the prepared pans.
    4. Bake for about 30-35 minutes, or until a toothpick inserted in the center comes out clean. Remove from oven and let the cakes cool in pans for 10 minutes before transferring to a wire rack to cool completely.
    5. Meanwhile, prepare the vanilla sponge by mixing flour, sugar, and softened butter until fluffy. Add eggs one at a time, then stir in vanilla and milk. Divide the batter into the pans and bake for 25-30 minutes, then cool completely.
    6. Level the cooled cakes with a serrated knife if needed, then spread a layer of frosting between the chocolate and vanilla layers. Stack the layers and apply a thin crumb coat all over the assembled cake. Chill for 30 minutes for a smooth surface.
    7. Frost the entire cake with a smooth layer of your preferred frosting, creating an even finish. Chill the cake for 15 minutes to set the frosting before decorating.
    8. Fill a piping bag fitted with a small round tip with white royal icing. Pipe concentric circles from the center outward on the top surface of the cake, then use a toothpick to gently drag lines outward from the center to create the web pattern.
    9. Decorate additional web lines around the sides and add spider decorations or other accents as desired for a spooky effect.
    10. Finish by draping chocolate ganache over the cake or adding edible decorations if you like. Slice and serve to reveal a layered, web-patterned interior, perfect for Halloween celebrations.

    Notes

    For best web piping, practice drawing circles on parchment paper first. Chill the decorated cake if not serving immediately to ensure the web pattern stays sharp.
    This Halloween spider web cake is more than a dessert; it’s a seasonal story told through chocolate and web-like details. Its blend of spooky style and nostalgic flavor makes it a memorable piece on the holiday table. Every time I see its intricate patterns and smell its rich aroma, I remember why I fell for baking in the first place.

    As nights grow colder and shadows lengthen, this cake writes its own tale of festivity and fun. It’s perfect for those cozy, mischievous gatherings with friends, young and old. In its web of sweetness, we find a little magic to chase away the autumn chill.

  • Peach Crumble: The Unexpected Secret to Summertime Bliss

    Peach Crumble: The Unexpected Secret to Summertime Bliss

    As summer reaches its peak, I find myself longing for a dessert that captures the season’s essence without fuss. Peach crumble is that quietly nostalgic treat that transforms ripe, juicy peaches into a warm, fragrant showdown of flavors and textures. The crunch of crumble, the sweetness of peaches, and a dash of cinnamon make every bite feel like a tender hug from grandmother’s kitchen.

    What makes this recipe even more special is the way it invites improvisation—use fresh peaches, or swap in those slightly overripe ones hiding in your fruit bowl. It’s perfect for spontaneous gatherings, beach picnics, or lazy afternoons on the porch. The aroma alone, with caramelized sugars and baked fruit, signals summer’s end while still enjoying its bounty.

    Peach Crumble

    Peach crumble combines ripe peaches with a buttery, oat-based topping to create a warm, tender dessert. The dish features soft, caramelized fruit underneath a crunchy, golden-brown crumble, assembled and baked until bubbling and fragrant.
    Prep Time 15 minutes
    Cook Time 40 minutes
    Total Time 55 minutes
    Servings: 4
    Course: Main Course
    Cuisine: American
    Calories: 250

    Ingredients
      

    • 4 cups ripe peaches, sliced peeled and pitted if desired
    • 1/2 cup sugar
    • 1 tablespoon lemon juice to enhance flavor and prevent browning
    • 1 cup all-purpose flour
    • 1 cup old-fashioned oats
    • 1/2 cup cold unsalted butter, diced
    • 1/2 cup brown sugar light or dark
    • pinch of salt

    Equipment

    • Mixing bowls
    • Baking dish
    • Pastry cutter or fork
    • Measuring cups and spoons
    • Oven

    Method
     

    1. Preheat your oven to 350°F (175°C) and lightly grease a baking dish.
    2. Combine sliced peaches, sugar, and lemon juice in a mixing bowl. Gently toss until the fruit is evenly coated and set aside to let the juices meld for about 10 minutes.
    3. In a separate bowl, whisk together the flour, oats, brown sugar, cinnamon, and salt.
    4. Add the diced cold butter to the dry mixture. Use a pastry cutter or fork to cut the butter into the mixture until it resembles coarse crumbs with some pea-sized bits.
    5. Spread the peeled and sugared peaches evenly into the prepared baking dish, creating a uniform layer.
    6. Sprinkle the crumb topping evenly over the peaches, covering the entire surface.
    7. Bake in the preheated oven for about 35 to 40 minutes, or until the topping is golden brown and bubbly along the edges.
    8. Remove from the oven and let cool slightly. The crumble should be fragrant with a crunchy topping and tender, caramelized peaches beneath.
    9. Serve warm, optionally with a scoop of vanilla ice cream or a dollop of whipped cream for added indulgence.

    Notes

    For a tart contrast, sprinkle a bit of ground ginger or nutmeg into the fruit mixture. Using ripe peaches ensures maximum sweetness and flavor.

    This peach crumble is more than just a dessert; it’s a storybook of summer memories coming alive in every forkful. Simple, approachable, and deeply satisfying, it’s a reminder that beauty can be found in the imperfect ripeness of fruit and the rustic charm of a well-loved recipe.

    As the season shifts and the days grow shorter, this crumble offers a comforting sign of sunshine and fresh fruit. A perfect ending to a warm evening or a reason to linger longer over family and friends. Just a scoop, a crackling top, and a burst of juicy sweetness—what more could you ask for?

  • Spook-tacular Witch Finger Cookies That Will Bewitch Your Halloween

    Spook-tacular Witch Finger Cookies That Will Bewitch Your Halloween

    Halloween is my favorite time to get a little creative in the kitchen, and these Witch Finger Cookies are my secret weapon for a creepy, fun treat. The moment I shape the dough into tiny, gnarled fingers, I feel a mischievous thrill—it’s like casting a sweet spell on everyone who sees them. Plus, the scent of melting butter and almond extract fills the kitchen with a hauntingly good aroma.

    What makes these cookies stand out is their perfect combo of crunch and chew, with that creepy little almond nail on top. They’re surprisingly easy to make, even at the last minute, and they turn a simple baking session into a hilarious zombie-haunt. Kids and adults alike love the unsettling look and delicious taste, making them the highlight of any Halloween party.

    Witch Finger Cookies

    Witch Finger Cookies are shaped into small, bony-looking fingers and baked until crisp, featuring a delicate almond nail on each. The dough is made with buttery, almond-flavored ingredients, which give them a crunchy exterior with a slight chew. They have a spooky, gnarled appearance perfect for Halloween celebrations.
    Prep Time 20 minutes
    Cook Time 15 minutes
    Total Time 35 minutes
    Servings: 24
    Course: Main Course
    Cuisine: Halloween
    Calories: 120

    Ingredients
      

    • 1 cup unsalted butter softened
    • 1 cup granulated sugar
    • 1 large egg
    • 1/2 teaspoon almond extract
    • 2 1/2 cups all-purpose flour
    • 1/2 teaspoon baking powder
    • 1/4 teaspoon salt
    • small quantity almond slice for the nail

    Equipment

    • Mixing bowls
    • Baking sheet
    • Parchment paper
    • Small knife or toothpick

    Method
     

    1. Cream together the softened butter and sugar in a mixing bowl until the mixture is light and fluffy, with a pale color and a slightly velvety texture.
    2. Beat in the egg and almond extract until fully incorporated, giving the mixture a fragrant aroma and a smooth consistency.
    3. In a separate bowl, whisk together the flour, baking powder, and salt to evenly distribute the dry ingredients.
    4. Gradually add the dry mixture to the wet ingredients, mixing gently until a cohesive dough forms that’s soft but manageable.
    5. Preheat your oven to 350°F (175°C) and line a baking sheet with parchment paper.
    6. Divide the dough into small portions and roll each into a thin, finger-length shape, tapering the ends slightly to resemble fingers.
    7. Place the shaped fingers on the prepared baking sheet, spacing them slightly apart.
    8. Use a small knife or toothpick to create knuckle marks along each finger, giving them a gnarled, creepy appearance.
    9. Press an almond slice onto the top of each finger to create a spooky nail, embedding it slightly into the dough.
    10. Bake the cookies for about 15 minutes, until they are lightly golden around the edges and feel firm to the touch.
    11. Remove the cookies from the oven and allow them to cool completely on a wire rack, which helps them set and crisp up.
    12. Once cooled, enjoy these spooky, crunchy witch finger cookies that are perfect for Halloween treats.

    Adorning my haunted dessert table wouldn’t be complete without these ghoulish little fingers. Each bite offers a crisp snap, followed by a buttery, almondy sweetness that’s impossible to resist. They’re not just treats—they’re tiny pieces of spooky art that bring my Halloween décor to life.

    This recipe is a reminder that sometimes, the simplest ingredients can create the most theatrically spooky results. As the shadows stretch and the night grows cold, these cookies carve out a special, slightly chaotic, but wholly fun spot in my holiday tradition.

  • Spooky Glee: Halloween Dirt Cake with Gummy Worms

    Spooky Glee: Halloween Dirt Cake with Gummy Worms

    Every Halloween, I take a moment to embrace the chaos of the holiday. This year, I wanted something playful that sparks nostalgia and a bit of mischief. Enter the Halloween Dirt Cake—an edible soilscape topped with squiggly gummy worms that seem to crawl out of the dessert itself.

    Watching kids’ eyes light up when they see the dark, crumbly ‘earth’ with bright gummy worms is pure magic. It’s a simple treat, but its creepy, crawly charm makes it perfect for haunted gatherings or any spooky celebration. Plus, the smell of chocolate and vanilla mixing together feels like a warm hug amidst the ghostly moonlight outside.

    WHY I LOVE THIS RECIPE?

    • I adore the childhood nostalgia it stirs up with every gooey gummy worm.
    • Creating edible ‘dirt’ makes me feel like a witch conjuring playful fright spells.
    • The combination of smooth pudding and crunchy crumbs is oddly satisfying.
    • It’s chaos in a bowl—messy, fun, and utterly delicious.

    AVOID MY DISASTER (You’re Welcome)

    • FORGOT to chill the pudding properly? It turned runny and messy—freeze for 10 minutes instead.
    • DUMPED crushed cookies everywhere? Use a wide bowl to control the mess.
    • OVER-TORCHED the gummy worms? Briefly microwave them for a shiny, less stiff look.
    • FORGOT the gummy worms? No worries—use licorice snakes for the same creepy crawl effect.

    QUICK FIXES THAT SAVE YOUR DAY

    • When the pudding is too thick, stir in a splash of milk for a silky texture.
    • Splash a bit of vanilla extract on the crumbs to intensify the chocolate flavor.
    • When gummy worms are unavailable, use jelly snakes for quick creepy crawlers.
    • Patch a crumbly surface by gently pressing more cookie crumbs on top.
    • When your look is flat, add a few more gummy worms for a wriggly pop of color and fun.

    As the night falls and pumpkin lanterns flicker, this dirt cake adds a mischievous touch to the spread. Its simplicity makes it easy to assemble before the guests arrive, and its playful appearance will surely spark giggles and squeals.

    This dessert is more than just a treat; it’s an experience that captures the whimsy and wild spirit of Halloween. No matter your age, digging into a bowl of creepy crust and squirmy worms always makes October nights memorable. Give it a try, and enjoy the delightful mess!

    Halloween Dirt Cake

    Honey-themed pudding layered with crushed cookies creates a crumbly soil-like texture, topped with squiggly gummy worms for a playful, creepy look. The final dessert has a rich, chocolatey flavor with a crunchy “earth” base and chewy, colorful toppings that resemble crawling worms. Its appearance is dark and crumbly with vibrant worm accents, evoking a spooky garden scene.
    Prep Time 15 minutes
    Cook Time 10 minutes
    Total Time 25 minutes
    Servings: 8
    Course: Main Course
    Cuisine: Halloween
    Calories: 220

    Ingredients
      

    • 1 package chocolate pudding mix instant, for quick setting
    • 2 cups milk to prepare pudding
    • 1 cup vanilla wafer cookies crushed into crumbs
    • 1 cup chocolate cookie crumbs store-bought or homemade crushed cookies
    • 1 cup gummy worms squiggly worms for topping
    • optional jelly snakes alternative creepy crawlies

    Equipment

    • Mixing bowls
    • Rubber spatula
    • Pudding whisk or spoon
    • Serving dish or bowls
    • Measuring cups and spoons
    • Food processor or zip-top bag and rolling pin

    Method
     

    1. Pour the instant chocolate pudding mix into a mixing bowl and whisk in cold milk according to package instructions until the pudding is smooth and slightly thickened; allow it to set in the refrigerator for about 5 minutes.
    2. Use a food processor or place cookies in a zip-top bag and crush with a rolling pin until finely ground, resembling soil or dirt.
    3. Spread half of the crushed cookie crumbs evenly in the bottom of serving bowls or a large dish to form the crusty ‘earth’ base.
    4. Pour the prepared pudding over the cookie crumbs, smoothing it out with a spatula for a even layer that resembles damp soil.
    5. Add the remaining crushed cookie crumbs on top of the pudding, gently pressing them down to create a crumbly top layer that looks like freshly turned earth.
    6. Decorate the surface with gummy worms, sticking them into the crumb layer so they appear to crawl out of the dirt, creating a playful, creepy effect.
    7. If desired, add jelly snakes or other creepy candy crawlers for extra texture and fun color, arranging them around the gummy worms for a spooky crawl scene.
    8. refrigerate the dirt cake for at least 1 hour before serving, allowing the flavors to meld and the pudding to fully set for clean slices and tidy presentation.
    9. Serve the Halloween Dirt Cake in individual bowls or a large platter, displaying the dark crumbly soil topped with crawling gummy worms for a fun, spooky treat.

    The beauty of this Halloween Dirt Cake is how it turns an ordinary dessert into an adventure in every bite. Its blend of creamy sweetness and crunchy crumbs, topped with gummy worms, makes it a favorite for both kids and adults alike. Plus, it’s a great way to add a little spooky fun without any fuss.

    As the season’s chills set in, this treat reminds us that sometimes the simplest things—like a bowl of chocolate and crushed cookies—bring the biggest smiles. It’s all about creating moments of joy and mischief, one squirmy worm at a time. Happy haunting and happy snacking to all who love a good spooky kitchen experiment!

  • Pumpkin Bread with a Surprise Twist: Sunflower Seeds and Spices

    Pumpkin Bread with a Surprise Twist: Sunflower Seeds and Spices

    Walking through a crisp autumn market, the smell of spiced pumpkin compels me to seek out new ways to celebrate this seasonal bounty. Instead of the usual pumpkin pie, I decided to craft a loaf that combines hearty texture with a hint of unexpected flavor. The result is a moist, fragrant bread that brings out the best nuances of fall.

    This recipe’s charm lies in its simple ingredients seasoned with a dash of cinnamon and nutmeg, yet it’s heightened by the crunch of sunflower seeds. It’s perfect for those cozy mornings or a surprise addition to holiday tables. Every slice reveals a warm, inviting aroma with a tender crumb that embraces each bite.

    Spiced Pumpkin Walnut Bread

    This pumpkin walnut bread is a moist, fragrant loaf made with pureed pumpkin, warm spices like cinnamon and nutmeg, and crunchy walnuts. The batter is mixed gently to retain the tender crumb, then baked until golden and fragrant. The bread’s rustic appearance and tender, moist interior make it perfect for autumn mornings or holiday tables.
    Prep Time 15 minutes
    Cook Time 50 minutes
    Total Time 1 hour 5 minutes
    Servings: 8
    Course: Main Course
    Cuisine: American
    Calories: 250

    Ingredients
      

    • 1 cup pureed pumpkin fresh or canned
    • 1/2 cup vegetable oil
    • 3 large eggs
    • 1 1/2 cups all-purpose flour
    • 1 cup brown sugar packed
    • 1 1/2 teaspoons ground cinnamon
    • 1/2 teaspoon ground nutmeg
    • 1/2 teaspoon salt
    • 1 cup chopped walnuts toasted if desired
    • 1 teaspoon vanilla extract

    Equipment

    • Mixing bowl
    • Whisk
    • Loaf pan
    • Spatula
    • Oven

    Method
     

    1. Preheat your oven to 350°F (175°C) and grease a loaf pan to prevent sticking.
    2. In a large mixing bowl, whisk together the eggs, pumpkin puree, and vegetable oil until the mixture is smooth and well combined, and the eggs are slightly doubled in volume.
    3. Add the vanilla extract and brown sugar to the wet ingredients and stir until the sugar begins to dissolve, creating a slightly thickened batter.
    4. In a separate bowl, sift together the flour, cinnamon, nutmeg, and salt to evenly distribute the spices and prevent clumping.
    5. Gradually fold the dry ingredients into the wet mixture using a spatula, mixing gently just until combined—being careful not to overmix to keep the bread tender.
    6. Fold in the chopped walnuts, ensuring they are evenly distributed throughout the batter.
    7. Pour the batter into your prepared loaf pan, smoothing the top with a spatula to ensure even baking.
    8. Bake in the preheated oven for about 50-55 minutes, or until a toothpick inserted in the center comes out clean and the top is golden brown.
    9. Remove the loaf from the oven and let it cool in the pan for 10 minutes, then transfer it to a wire rack to cool completely for best slicing.
    10. Once cooled, slice the bread and enjoy its moist, aromatic crumb with the crunchy walnuts adding texture with every bite.

    Making this pumpkin bread feels like capturing a small piece of autumn’s essence. It’s a comforting aroma filled with spice and earthiness, inviting you to take a moment to slow down. Whether enjoyed warm with a smear of butter or cooled for a snack, it’s a treat for the senses.

    As the leaves turn and temperatures dip, this bread provides a savory counterpoint to the season’s crisp air. It’s a reminder that simple, honest baking can bring a little joy and warmth to the cooler days ahead.

  • Apple Cake Reinvented: A Cozy Kitchen Secret

    Apple Cake Reinvented: A Cozy Kitchen Secret

    Imagine a cake that captures the essence of fall whenever you slice into it—a moist, fragrant apple cake with a touch of cinnamon that evokes warm memories. This recipe broadens the horizon beyond traditional apple pie, offering a slice of nostalgia with each bite. It’s perfect for those quiet mornings or a sweet ending to a busy day.

    What makes this apple cake truly special is the way it balances tender apples with a subtly spiced crumb. The aroma alone can turn a Monday into a celebration. It’s a versatile treat, equally comforting when served warm with a scoop of vanilla ice cream or at room temperature with a cup of tea.

    Apple Cinnamon Cake

    This apple cinnamon cake features tender slices of apples embedded within a moist, spiced batter that balances sweetness and warm aromas. The cake has a soft crumb with a slightly caramelized top, showcasing the natural textures of the cooked apples and tender cake layers. It is baked until golden and fragrant, resulting in a comforting dessert or breakfast treat.
    Prep Time 15 minutes
    Cook Time 45 minutes
    Total Time 1 hour
    Servings: 8
    Course: Main Course
    Cuisine: American
    Calories: 250

    Ingredients
      

    • 2 large apples peeled, cored, and sliced
    • 1 1/2 cups all-purpose flour
    • 1 cup granulated sugar
    • 1/2 cup unsalted butter melted
    • 2 large eggs
    • 1/4 cup milk
    • 1 1/2 teaspoons ground cinnamon
    • 1 teaspoon vanilla extract

    Equipment

    • Mixing bowls
    • Whisk
    • Rubber spatula
    • Loaf pan or cake pan
    • Oven

    Method
     

    1. Preheat your oven to 350°F (175°C) and grease your chosen baking pan to prevent sticking.
    2. In a mixing bowl, whisk together the flour, sugar, and ground cinnamon until evenly combined. This creates a fragrant, spiced dry mixture.
    3. In a separate bowl, beat the eggs and then add the melted butter, milk, and vanilla extract. Whisk until the mixture is smooth and slightly frothy.
    4. Pour the wet mixture into the dry ingredients, folding gently with a spatula until just combined and no streaks remain; avoid over-mixing to keep the batter tender.
    5. Fold in the sliced apples, distributing them evenly throughout the batter so each slice is coated with batter and will bake moist and tender.
    6. Pour the batter into your prepared baking pan, spreading it out evenly with a spatula to create a smooth top surface.
    7. Bake in the preheated oven for about 40-45 minutes, or until the top is golden brown and a toothpick inserted into the center comes out clean.
    8. Remove the cake from the oven and let it cool in the pan for 10 minutes, allowing the structure to set and making it easier to slice.
    9. Transfer the cake to a wire rack or serving plate, and allow it to cool completely or serve warm for a fragrant, comforting slice.
    10. Slice and enjoy this moist, cinnamon-scented apple cake as is or with a dusting of powdered sugar or a dollop of whipped cream.

    This apple cake is more than just a dessert; it’s a little ritual for me during the orchard season. Sharing it with loved ones always sparks conversations about past harvests and childhood apple picking adventures. It reminds me that simple ingredients can create moments of pure joy.

    In times of busyness, this recipe offers a comforting escape. The blend of tart apples and sweet cinnamon makes it ideal for seasonal gatherings or a spontaneous bake sale. Every bite brings a sense of home, no matter where you are or what the calendar says.

  • Spooky Sweetness: Halloween Graveyard Pudding Cups That Amaze

    Spooky Sweetness: Halloween Graveyard Pudding Cups That Amaze

    Like tiny haunted landscapes, these Halloween Graveyard Pudding Cups transform a simple dessert into a midnight scene of chaos and charm. Layers of chocolate and vanilla pudding mimic earth and sky, while crushed cookies resemble dirt, topped with creepy candy tombstones. They’re perfect for adding a dash of spooky surprise to the kids dinner table or a festive treat for eerie gatherings.

    Assembling these little graveyards feels like creating edible magic. The smell of rich chocolate mingles with vanilla, invoking Halloween nights filled with anticipation and mischief. Every spoonful offers a delightful crunch and smooth, creamy textures that keep everyone reaching back for more.

    Halloween Graveyard Pudding Cups

    This dessert features layered chocolate and vanilla puddings to create an earth and sky effect, with crushed cookies representing dirt and candy tombstones for a spooky touch. The assembled cups have a smooth, creamy texture with crunchy elements, resembling a mini haunted landscape. The final presentation is playful and eerie, perfect for festive Halloween celebrations.
    Prep Time 20 minutes
    Total Time 20 minutes
    Servings: 6
    Course: Main Course
    Cuisine: Halloween
    Calories: 250

    Ingredients
      

    • 1 package vanilla pudding mix for the vanilla layer
    • 1 package chocolate pudding mix for the chocolate layer
    • 2 cups milk for pudding mixing
    • 1 cup crushed chocolate cookies for dirt layer
    • 6 cups small candies or candy tombstones for spooky grave markers

    Equipment

    • Mixing bowls
    • Whisk
    • Piping bags or plastic sandwich bags
    • Serving cups or small jars

    Method
     

    1. Prepare the vanilla pudding: whisk the vanilla pudding mix into 1 cup of milk until well combined and slightly thickened.
    2. In a separate bowl, prepare the chocolate pudding by whisking the chocolate pudding mix into the remaining 1 cup of milk until smooth and thickened.
    3. Chill both puddings in the refrigerator for about 5-10 minutes to allow them to set slightly, making layering easier.
    4. Fill each serving cup about one-third full with the chocolate pudding, creating a dark ‘earth’ base.
    5. Gently spoon or pipe the vanilla pudding over the chocolate layer, filling the cup to about two-thirds full, to resemble the sky or lighter earth.
    6. Sprinkle crushed cookies over the vanilla pudding layer to mimic dirt about the ‘graveyard’ area, creating a rough, uneven surface for a natural look.
    7. Place spooky candy tombstones or small candies into the crushed cookie layer, positioning them to look like gravestones emerging from the dirt.
    8. Optionally, add additional crushed cookies on top of the vanilla layer for more dirt effect or to hide the transitions.
    9. Repeat the layering process in remaining cups, creating multiple mini Halloween landscape scenes.
    10. Serve immediately or refrigerate for up to 2 hours to allow flavors to meld; serve cold, with the spooky graveyard on display.

    Notes

    Ensure cookies are crushed small for a realistic dirt effect. Use varied-sized candies for a more natural look, and consider adding edible glitter or spooky sprinkles for extra flair.

    Creating these graveyard pudding cups taps into the fun of Halloween without the fuss. They look fantastically spooky but are quick to assemble, making them perfect for last-minute parties. Plus, the contrasting textures keep every bite interesting and satisfying.

    This eerie treat perfectly captures the spirit of the season—playful, a little bit spooky, and full of familiar flavors. As autumn settles in and nights grow longer, these pudding cups bring a touch of magic to any spooky celebration. Just the right mix of chaos and charm for a memorable Halloween.

  • Rescue Your Peach Crisp: Quick Fixes for Perfect Results

    Rescue Your Peach Crisp: Quick Fixes for Perfect Results

    Imagine biting into a warm, bubbly peach crisp just as the sweet aroma tingles your senses. But sometimes, in the chaos of baking, things don’t go as planned—maybe your topping turns soggy or your peaches release too much juice. This recipe isn’t just about making peach crisp; it’s about turning kitchen mishaps into triumphs with a few simple tricks.

    Peach crisp is a season’s gift—bright, fragrant, and bursting with sunshine. Yet few things are more satisfying than knowing you can salvage a less-than-perfect bake with a handful of pantry staples and a bit of confidence. Let’s explore how to keep that peachy glow alive, no matter what culinary curveballs come our way.

    Peach Crisp

    Peach crisp is a baked dessert featuring juicy, ripe peaches topped with a buttery, crumbly streusel. The dish combines fruit and a crunchy topping, resulting in a warm, soft inside with a crisp, golden crust on top. It is served ideally with a scoop of vanilla ice cream or whipped cream.
    Prep Time 15 minutes
    Cook Time 35 minutes
    Total Time 50 minutes
    Servings: 6
    Course: Main Course
    Cuisine: American
    Calories: 250

    Ingredients
      

    • 4 cups fresh peaches peeled and sliced
    • 1/2 cup granulated sugar
    • 1 tablespoon lemon juice
    • 1 cup old-fashioned oats
    • 1/2 cup all-purpose flour
    • 1/2 cup brown sugar
    • 1/2 cup unsalted butter cold and cubed
    • 1/2 teaspoon ground cinnamon
    • 1/4 teaspoon salt

    Equipment

    • Mixing bowls
    • Baking dish

    Method
     

    1. Preheat your oven to 350°F (175°C) and lightly grease a baking dish to prevent sticking.
    2. In a large bowl, combine sliced peaches, sugar, and lemon juice. Gently toss everything together until the peaches are evenly coated and set aside to allow the juices to develop.
    3. In another bowl, mix oats, flour, brown sugar, cinnamon, and salt. Stir to combine and create a uniform crumb mixture.
    4. Add the cold, cubed butter to the dry mixture. Using your fingers or a pastry cutter, work the butter into the mixture until it resembles coarse crumbs with some larger pea-sized pieces.
    5. Pour the peach mixture into the prepared baking dish, spreading it out evenly with a spatula or spoon.
    6. Sprinkle the crumble topping evenly over the peaches, covering the surface completely.
    7. Bake in the preheated oven for about 35 minutes, or until the topping is golden brown and bubbling around the edges.
    8. Remove from the oven and let it cool for a few minutes to thicken slightly. Serve warm, ideally with a scoop of vanilla ice cream or whipped cream for extra indulgence.
    Now that you’ve got these handy tips, baking peach crisp becomes less about perfection and more about the joy of improvisation. Whether it’s a spontaneous picnic or a cozy evening snack, this dessert adapts to your kitchen’s mood.

    Remember, even the most seasoned bakers encounter mishaps. The key is to keep calm, fix swiftly, and enjoy the process as much as the final spoonful. This peach crisp is more than a recipe; it’s a reminder that with a little ingenuity, dessert mishaps turn into sweet stories.