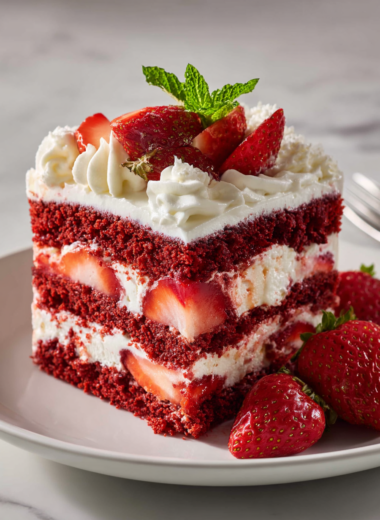
Category: Desserts

  • Halloween Trifle: A Spooky Layered Dessert with a Twist

    Halloween Trifle: A Spooky Layered Dessert with a Twist

    This Halloween trifle is my take on a childhood favorite turned spooky spectacle. It’s a messy, colorful, delightfully chaotic way to celebrate the season without fussing over perfect plating. I love how the layers peek through the glass, revealing a mischievous mix of textures and flavors.

    Making this isn’t about precision; it’s about having fun and embracing the little imperfections. It’s perfect for last-minute gatherings or when you want a dessert that’s as playful as it is tasty. Plus, the smell of chocolate, vanilla, and candy fills the kitchen like a haunted house in full swing.

    Why This Haunted Trifle Deserves Repeating

    It’s imperfectly perfect, messy in all the right ways, and endlessly customizable. Every time I make it, I remember childhood Halloween nights, the chaos of costumes, and the thrill of sweet surprises. The smell of chocolate and vanilla, the crunch of cookies, and the playful glee of decorating keep drawing me back. Plus, it’s the kind of dessert that invites creativity and laughs—what’s not to love?

    Spooky Ingredients Breakdown

    • Chocolate cookies: Crushed into fine crumbs for that crunchy, dark base—substitute with graham crackers if needed.
    • Chocolate pudding: Rich, velvety, and deeply chocolatey. Use instant for quickness or homemade for depth.
    • Heavy cream: Whipped to cloud-like fluff; adds lightness. Dairy-free alternatives work if you prefer.
    • Candy eyes and gummy worms: Fun, creepy decorations that add color and texture—use marzipan for a different twist.
    • Halloween sprinkles: Sparkly and colorful, they make every layer pop—skip if you’re feeling minimalist.
    • Vanilla extract: Boosts flavor in pudding and cream; a splash adds brightness—omit if allergic.

    Tools of the Spooky Trade

    • Large glass trifle bowl: Show off those colorful layers and keep everything visible.
    • Mixing bowls: Prepare pudding, whipped cream, and crushed cookies easily.
    • Electric mixer: Whip cream to fluffy perfection—resist overbeating.
    • Spatula: Layer ingredients smoothly and cleanly.
    • Decorating tools (small spatula, tweezers): Place candies and spooky decorations precisely.

    Crafting Your Haunted Dessert: Step-by-Step

    Step 1: Gather your ingredients and set out your clear glass trifle bowl or a large, transparent dessert dish.

    Step 2: Prepare the spooky layers: crush cookies, make pudding, and whip cream, all while thinking about how the layers will peek through.

    Step 3: Layer the ingredients starting with cookies, then pudding, then whipped cream. Repeat until the dish is full, ending with whipped cream.

    Step 4: Decorate with candy eyes, gummy worms, or spooky sprinkles for that haunted look.

    Step 5: Chill in the fridge for at least 2 hours before serving to let the flavors mingle and the layers set.

    Tips for a Perfectly Spooky Trifle

    • Cookies should be crushed finely but still have some texture for crunch.
    • Pudding must be smooth and set, not runny or grainy.
    • Whipped cream peaks should be fluffy and hold their shape.
    • Layer colors should be distinct and visible through the glass for that dramatic effect.

    Avoid These Haunted Mistakes

    • Layers blending together into a muddy mess.? Use a gentle hand when layering to prevent mixing colors.
    • Pudding too runny, causing layers to collapse.? Chill the pudding until just set, not frozen.
    • Cream turns grainy or buttery-looking.? Whip cream until stiff peaks form, not overwhipped into butter.
    • Decorations wilting or melting.? Decorate just before serving to keep toppings crisp.

    Halloween Spooky Trifle

    This Halloween trifle layers crushed chocolate cookies, rich chocolate pudding, and whipped cream in a clear glass dish, creating a colorful, chaotic dessert with contrasting textures. Decorated with candy eyes, gummy worms, and sprinkles, it offers a playful and visually striking treat that’s perfect for last-minute gatherings. The final product is a messy, delightful spectacle with vibrant layers and a sweet, creamy aroma.
    Prep Time 20 minutes
    Cook Time 10 minutes
    Total Time 30 minutes
    Servings: 8
    Course: Main Course
    Cuisine: Halloween
    Calories: 350

    Ingredients
      

    • 1 1/2 cups chocolate cookies crushed into fine crumbs
    • 2 cups chocolate pudding prepared and chilled
    • 1 1/2 cups heavy cream for whipping
    • 1 cup candy eyes for decorating
    • 1 cup gummy worms fun spooky decorations
    • 1/4 cup Halloween sprinkles colorful and sparkly
    • 1 teaspoon vanilla extract optional, for flavor boost

    Equipment

    • Large glass trifle bowl
    • Mixing bowls
    • Electric mixer
    • Spatula
    • Decorating tools (small spatula, tweezers)

    Method
     

    1. Gather all your ingredients and set up your glass trifle bowl on a clean workspace.
    2. Crush the chocolate cookies into fine crumbs using a zip-top bag and a rolling pin or a food processor; set aside.
    3. Prepare the chocolate pudding according to package instructions and chill it in the fridge for at least 10 minutes until set and smooth.
    4. Pour the heavy cream into a mixing bowl and whip with an electric mixer until soft peaks form, about 3-4 minutes. Add vanilla extract if using.
    5. Gently fold the whipped cream into the chilled pudding until well combined and fluffy.
    6. Start layering by spooning a layer of crushed cookies into the bottom of the trifle bowl, creating a dark, crunchy base.
    7. Spread a thick layer of chocolate pudding over the cookies, smoothing it out with a spatula for an even surface.
    8. Add a generous layer of whipped cream on top of the pudding, creating a light, fluffy layer.
    9. Repeat the layering process—cookies, pudding, whipped cream—until the dish is nearly full, finishing with a layer of whipped cream.
    10. Decorate the top with candy eyes, gummy worms, and colorful sprinkles to give it a spooky, chaotic look.
    11. Place the assembled trifle in the fridge and chill for at least 2 hours to let the flavors meld and the layers set.
    12. Serve chilled, letting everyone enjoy the messy, colorful layers and playful decorations. Dig in with a spoon and enjoy the spooky chaos!

    Notes

    For extra fun, let kids help decorate the top with candies and worms. Keep decorations just before serving to maintain crispness.
    This Halloween trifle isn’t just about the spooky look; it’s about the fun of building it, bit by bit, layer by layer. It’s perfect for a quick party dessert that lets you unleash your inner kid. Plus, it’s adaptable—swap in your favorite candies or seasonal fruits to make it truly yours. So go ahead, make this with a little chaos, a lot of flavor, and a lot of love.

  • Halloween Trifle: A Spooky Layered Dessert with a Twist

    Halloween Trifle: A Spooky Layered Dessert with a Twist

    This Halloween trifle is my take on a childhood favorite turned spooky spectacle. It’s a messy, colorful, delightfully chaotic way to celebrate the season without fussing over perfect plating. I love how the layers peek through the glass, revealing a mischievous mix of textures and flavors.

    Making this isn’t about precision; it’s about having fun and embracing the little imperfections. It’s perfect for last-minute gatherings or when you want a dessert that’s as playful as it is tasty. Plus, the smell of chocolate, vanilla, and candy fills the kitchen like a haunted house in full swing.

    Why This Haunted Trifle Deserves Repeating

    It’s imperfectly perfect, messy in all the right ways, and endlessly customizable. Every time I make it, I remember childhood Halloween nights, the chaos of costumes, and the thrill of sweet surprises. The smell of chocolate and vanilla, the crunch of cookies, and the playful glee of decorating keep drawing me back. Plus, it’s the kind of dessert that invites creativity and laughs—what’s not to love?

    Spooky Ingredients Breakdown

    • Chocolate cookies: Crushed into fine crumbs for that crunchy, dark base—substitute with graham crackers if needed.
    • Chocolate pudding: Rich, velvety, and deeply chocolatey. Use instant for quickness or homemade for depth.
    • Heavy cream: Whipped to cloud-like fluff; adds lightness. Dairy-free alternatives work if you prefer.
    • Candy eyes and gummy worms: Fun, creepy decorations that add color and texture—use marzipan for a different twist.
    • Halloween sprinkles: Sparkly and colorful, they make every layer pop—skip if you’re feeling minimalist.
    • Vanilla extract: Boosts flavor in pudding and cream; a splash adds brightness—omit if allergic.

    Tools of the Spooky Trade

    • Large glass trifle bowl: Show off those colorful layers and keep everything visible.
    • Mixing bowls: Prepare pudding, whipped cream, and crushed cookies easily.
    • Electric mixer: Whip cream to fluffy perfection—resist overbeating.
    • Spatula: Layer ingredients smoothly and cleanly.
    • Decorating tools (small spatula, tweezers): Place candies and spooky decorations precisely.

    Crafting Your Haunted Dessert: Step-by-Step

    Step 1: Gather your ingredients and set out your clear glass trifle bowl or a large, transparent dessert dish.

    Step 2: Prepare the spooky layers: crush cookies, make pudding, and whip cream, all while thinking about how the layers will peek through.

    Step 3: Layer the ingredients starting with cookies, then pudding, then whipped cream. Repeat until the dish is full, ending with whipped cream.

    Step 4: Decorate with candy eyes, gummy worms, or spooky sprinkles for that haunted look.

    Step 5: Chill in the fridge for at least 2 hours before serving to let the flavors mingle and the layers set.

    Tips for a Perfectly Spooky Trifle

    • Cookies should be crushed finely but still have some texture for crunch.
    • Pudding must be smooth and set, not runny or grainy.
    • Whipped cream peaks should be fluffy and hold their shape.
    • Layer colors should be distinct and visible through the glass for that dramatic effect.

    Avoid These Haunted Mistakes

    • Layers blending together into a muddy mess.? Use a gentle hand when layering to prevent mixing colors.
    • Pudding too runny, causing layers to collapse.? Chill the pudding until just set, not frozen.
    • Cream turns grainy or buttery-looking.? Whip cream until stiff peaks form, not overwhipped into butter.
    • Decorations wilting or melting.? Decorate just before serving to keep toppings crisp.

    Halloween Trifle

    This colorful Halloween trifle layers crushed chocolate cookies, rich chocolate pudding, and fluffy whipped cream in a clear glass bowl, creating a playful, chaotic dessert with peekaboo layers and fun decorations. The dish is assembled in a relaxed, imperfect style, emphasizing creativity and festive flair over precision. Finished with spooky candies and sprinkles, it offers a delightful mix of textures and flavors that evoke childhood Halloween joy.
    Prep Time 20 minutes
    Cook Time 10 minutes
    Total Time 30 minutes
    Servings: 8
    Course: Main Course
    Cuisine: American
    Calories: 350

    Ingredients
      

    • 200 grams chocolate cookies crushed into fine crumbs
    • 3 cups chocolate pudding prepared and smooth
    • 2 cups heavy cream chilled for whipping
    • 1 cup candy eyes for decoration
    • 1 cup gummy worms fun, creepy topping
    • ½ cup Halloween sprinkles colorful, sparkly toppings
    • 1 teaspoon vanilla extract optional, enhances flavor

    Equipment

    • Large glass trifle bowl
    • Mixing bowls
    • Electric mixer
    • Spatula
    • Decorating tools (small spatula, tweezers)

    Method
     

    1. Gather all your ingredients and set out your glass trifle bowl so everything is within reach.
    2. Crush the chocolate cookies into fine crumbs, leaving some small pieces for texture. This will be your crunchy base layer.
    3. Prepare the chocolate pudding according to package instructions, or make your own from scratch until velvety and smooth. Set aside.
    4. Whip the chilled heavy cream with an electric mixer until stiff peaks form—watch for fluffy, cloud-like texture and a gentle squeak when you lift the beaters.
    5. Start layering your trifle: spoon a layer of crushed cookies at the bottom of the bowl, spreading it evenly.
    6. Next, pour a generous layer of chocolate pudding over the cookies, smoothing it out with a spatula.
    7. Spread a layer of whipped cream on top of the pudding, using a spatula to create a light, airy layer.
    8. Repeat the layers: cookies, pudding, whipped cream until the bowl is nearly full, finishing with a thick layer of whipped cream on top.
    9. Decorate the top with candy eyes, gummy worms, and sprinkles to give it a spooky, chaotic look. Use decorating tools for precise placement if desired.
    10. Place the trifle in the refrigerator and chill for at least 2 hours, allowing flavors to meld and layers to set.
    11. Once chilled, serve the Halloween trifle directly from the bowl, showcasing its colorful, playful layers and spooky decorations.

    Notes

    For added fun, get creative with your decorations—use marzipan, additional candies, or themed toppers. Make sure to decorate just before serving to keep toppings crisp and vibrant.
    This Halloween trifle isn’t just about the spooky look; it’s about the fun of building it, bit by bit, layer by layer. It’s perfect for a quick party dessert that lets you unleash your inner kid. Plus, it’s adaptable—swap in your favorite candies or seasonal fruits to make it truly yours. So go ahead, make this with a little chaos, a lot of flavor, and a lot of love.

  • Halloween Trifle: A Spooky Layered Dessert with a Twist

    Halloween Trifle: A Spooky Layered Dessert with a Twist

    This Halloween trifle is my take on a childhood favorite turned spooky spectacle. It’s a messy, colorful, delightfully chaotic way to celebrate the season without fussing over perfect plating. I love how the layers peek through the glass, revealing a mischievous mix of textures and flavors.

    Making this isn’t about precision; it’s about having fun and embracing the little imperfections. It’s perfect for last-minute gatherings or when you want a dessert that’s as playful as it is tasty. Plus, the smell of chocolate, vanilla, and candy fills the kitchen like a haunted house in full swing.

    Why This Haunted Trifle Deserves Repeating

    It’s imperfectly perfect, messy in all the right ways, and endlessly customizable. Every time I make it, I remember childhood Halloween nights, the chaos of costumes, and the thrill of sweet surprises. The smell of chocolate and vanilla, the crunch of cookies, and the playful glee of decorating keep drawing me back. Plus, it’s the kind of dessert that invites creativity and laughs—what’s not to love?

    Spooky Ingredients Breakdown

    • Chocolate cookies: Crushed into fine crumbs for that crunchy, dark base—substitute with graham crackers if needed.
    • Chocolate pudding: Rich, velvety, and deeply chocolatey. Use instant for quickness or homemade for depth.
    • Heavy cream: Whipped to cloud-like fluff; adds lightness. Dairy-free alternatives work if you prefer.
    • Candy eyes and gummy worms: Fun, creepy decorations that add color and texture—use marzipan for a different twist.
    • Halloween sprinkles: Sparkly and colorful, they make every layer pop—skip if you’re feeling minimalist.
    • Vanilla extract: Boosts flavor in pudding and cream; a splash adds brightness—omit if allergic.

    Tools of the Spooky Trade

    • Large glass trifle bowl: Show off those colorful layers and keep everything visible.
    • Mixing bowls: Prepare pudding, whipped cream, and crushed cookies easily.
    • Electric mixer: Whip cream to fluffy perfection—resist overbeating.
    • Spatula: Layer ingredients smoothly and cleanly.
    • Decorating tools (small spatula, tweezers): Place candies and spooky decorations precisely.

    Crafting Your Haunted Dessert: Step-by-Step

    Step 1: Gather your ingredients and set out your clear glass trifle bowl or a large, transparent dessert dish.

    Step 2: Prepare the spooky layers: crush cookies, make pudding, and whip cream, all while thinking about how the layers will peek through.

    Step 3: Layer the ingredients starting with cookies, then pudding, then whipped cream. Repeat until the dish is full, ending with whipped cream.

    Step 4: Decorate with candy eyes, gummy worms, or spooky sprinkles for that haunted look.

    Step 5: Chill in the fridge for at least 2 hours before serving to let the flavors mingle and the layers set.

    Tips for a Perfectly Spooky Trifle

    • Cookies should be crushed finely but still have some texture for crunch.
    • Pudding must be smooth and set, not runny or grainy.
    • Whipped cream peaks should be fluffy and hold their shape.
    • Layer colors should be distinct and visible through the glass for that dramatic effect.

    Avoid These Haunted Mistakes

    • Layers blending together into a muddy mess.? Use a gentle hand when layering to prevent mixing colors.
    • Pudding too runny, causing layers to collapse.? Chill the pudding until just set, not frozen.
    • Cream turns grainy or buttery-looking.? Whip cream until stiff peaks form, not overwhipped into butter.
    • Decorations wilting or melting.? Decorate just before serving to keep toppings crisp.

    Spooky Halloween Trifle

    This Halloween trifle layers crushed chocolate cookies, rich chocolate pudding, and fluffy whipped cream in a clear glass dish, creating a colorful and chaotic dessert that’s both playful and delicious. The vibrant decorations like candy eyes, gummy worms, and sprinkles add a spooky touch, making it a perfect centerpiece for Halloween celebrations. Its messy, layered look invites fun and creativity, with textures that range from crunchy to velvety smooth.
    Prep Time 20 minutes
    Cook Time 10 minutes
    Total Time 2 hours 10 minutes
    Servings: 8
    Course: Main Course
    Cuisine: Halloween
    Calories: 350

    Ingredients
      

    • 200 grams chocolate cookies crushed into fine crumbs
    • 4 cups chocolate pudding prepared or store-bought
    • 2 cups heavy cream chilled for whipping
    • 0.5 teaspoon vanilla extract optional but recommended
    • candy eyes candy eyes for decoration
    • gummy worms gummy worms for a spooky effect
    • sprinkles Halloween sprinkles colorful and sparkly

    Equipment

    • Large glass trifle bowl
    • Mixing bowls
    • Electric mixer
    • Spatula
    • Decorating tools (small spatula, tweezers)

    Method
     

    1. Crush the chocolate cookies into fine crumbs and set aside.
    2. Prepare the chocolate pudding if using instant, whisking until smooth and glossy. Chill until ready to layer.
    3. Whip the chilled heavy cream with vanilla extract using an electric mixer until stiff peaks form, creating a light and fluffy texture.
    4. Begin layering in the glass trifle bowl: add a layer of crushed cookies at the bottom, spreading evenly with a spatula.
    5. Spoon a generous layer of chocolate pudding over the cookies, smoothing it out gently.
    6. Add a layer of whipped cream on top of the pudding, creating a soft, cloud-like appearance.
    7. Repeat the layers—cookies, pudding, whipped cream—until the dish is nearly full, finishing with a thick layer of whipped cream on top.
    8. Decorate the top with candy eyes, gummy worms, and colorful sprinkles to create a spooky, chaotic look.
    9. Cover the trifle and chill in the refrigerator for at least 2 hours, allowing flavors to meld and layers to set.
    10. Once chilled, serve the trifle directly from the glass dish, encouraging guests to dig in and enjoy the colorful chaos.

    Notes

    For extra spookiness, add more decorations just before serving. Feel free to customize with different candies or themed toppings to make it uniquely yours.
    This Halloween trifle isn’t just about the spooky look; it’s about the fun of building it, bit by bit, layer by layer. It’s perfect for a quick party dessert that lets you unleash your inner kid. Plus, it’s adaptable—swap in your favorite candies or seasonal fruits to make it truly yours. So go ahead, make this with a little chaos, a lot of flavor, and a lot of love.

  • Halloween Trifle: A Spooky Layered Dessert with a Twist

    Halloween Trifle: A Spooky Layered Dessert with a Twist

    This Halloween trifle is my take on a childhood favorite turned spooky spectacle. It’s a messy, colorful, delightfully chaotic way to celebrate the season without fussing over perfect plating. I love how the layers peek through the glass, revealing a mischievous mix of textures and flavors.

    Making this isn’t about precision; it’s about having fun and embracing the little imperfections. It’s perfect for last-minute gatherings or when you want a dessert that’s as playful as it is tasty. Plus, the smell of chocolate, vanilla, and candy fills the kitchen like a haunted house in full swing.

    Why This Haunted Trifle Deserves Repeating

    It’s imperfectly perfect, messy in all the right ways, and endlessly customizable. Every time I make it, I remember childhood Halloween nights, the chaos of costumes, and the thrill of sweet surprises. The smell of chocolate and vanilla, the crunch of cookies, and the playful glee of decorating keep drawing me back. Plus, it’s the kind of dessert that invites creativity and laughs—what’s not to love?

    Spooky Ingredients Breakdown

    • Chocolate cookies: Crushed into fine crumbs for that crunchy, dark base—substitute with graham crackers if needed.
    • Chocolate pudding: Rich, velvety, and deeply chocolatey. Use instant for quickness or homemade for depth.
    • Heavy cream: Whipped to cloud-like fluff; adds lightness. Dairy-free alternatives work if you prefer.
    • Candy eyes and gummy worms: Fun, creepy decorations that add color and texture—use marzipan for a different twist.
    • Halloween sprinkles: Sparkly and colorful, they make every layer pop—skip if you’re feeling minimalist.
    • Vanilla extract: Boosts flavor in pudding and cream; a splash adds brightness—omit if allergic.

    Tools of the Spooky Trade

    • Large glass trifle bowl: Show off those colorful layers and keep everything visible.
    • Mixing bowls: Prepare pudding, whipped cream, and crushed cookies easily.
    • Electric mixer: Whip cream to fluffy perfection—resist overbeating.
    • Spatula: Layer ingredients smoothly and cleanly.
    • Decorating tools (small spatula, tweezers): Place candies and spooky decorations precisely.

    Crafting Your Haunted Dessert: Step-by-Step

    Step 1: Gather your ingredients and set out your clear glass trifle bowl or a large, transparent dessert dish.

    Step 2: Prepare the spooky layers: crush cookies, make pudding, and whip cream, all while thinking about how the layers will peek through.

    Step 3: Layer the ingredients starting with cookies, then pudding, then whipped cream. Repeat until the dish is full, ending with whipped cream.

    Step 4: Decorate with candy eyes, gummy worms, or spooky sprinkles for that haunted look.

    Step 5: Chill in the fridge for at least 2 hours before serving to let the flavors mingle and the layers set.

    Tips for a Perfectly Spooky Trifle

    • Cookies should be crushed finely but still have some texture for crunch.
    • Pudding must be smooth and set, not runny or grainy.
    • Whipped cream peaks should be fluffy and hold their shape.
    • Layer colors should be distinct and visible through the glass for that dramatic effect.

    Avoid These Haunted Mistakes

    • Layers blending together into a muddy mess.? Use a gentle hand when layering to prevent mixing colors.
    • Pudding too runny, causing layers to collapse.? Chill the pudding until just set, not frozen.
    • Cream turns grainy or buttery-looking.? Whip cream until stiff peaks form, not overwhipped into butter.
    • Decorations wilting or melting.? Decorate just before serving to keep toppings crisp.

    Halloween Spooky Trifle

    This colorful Halloween trifle layers crushed chocolate cookies, rich chocolate pudding, and whipped cream in a transparent glass bowl, creating a playful, chaotic dessert with peekaboo layers. Decorated with candy eyes, gummy worms, and sprinkles, it offers a fun and messy presentation perfect for festive gatherings. The final texture is creamy and crunchy with vibrant, layered visual appeal.
    Prep Time 20 minutes
    Cook Time 10 minutes
    Total Time 30 minutes
    Servings: 8
    Course: Main Course
    Cuisine: Halloween
    Calories: 350

    Ingredients
      

    • 2 cups chocolate cookies crushed into fine crumbs
    • 2 cups chocolate pudding prepared or instant
    • 2 cups heavy cream chilled for whipping
    • 1/2 cup candy eyes for decoration
    • 1 cup gummy worms for spooky decoration
    • 1/4 cup Halloween sprinkles colorful and sparkly
    • 1 teaspoon vanilla extract optional, enhances flavor

    Equipment

    • Large glass trifle bowl
    • Mixing bowls
    • Electric mixer
    • Spatula
    • Decorating tools (small spatula, tweezers)

    Method
     

    1. Gather all ingredients and set your large glass trifle bowl on the counter.
    2. Crush the chocolate cookies into fine crumbs using a rolling pin or food processor; set aside. The crumbs should be dark and slightly granular for a crunchy base.
    3. Prepare the chocolate pudding according to package instructions, whisking until smooth and glossy. Chill it in the fridge until ready to layer.
    4. Use an electric mixer to whip the chilled heavy cream on medium-high speed until soft peaks form, about 3-4 minutes. Add vanilla extract if using, and whip until stiff peaks are achieved.
    5. Start layering the trifle by spooning a layer of cookie crumbs into the bottom of the bowl, creating a dark, crunchy foundation.
    6. Follow with a generous layer of chocolate pudding, spreading evenly over the cookie crumbs.
    7. Add a layer of fluffy whipped cream, smoothing it gently with a spatula for a light, airy layer.
    8. Repeat these layers—cookie crumbs, pudding, whipped cream—until the bowl is nearly full, ending with a final layer of whipped cream for a cloud-like top.
    9. Decorate the top with candy eyes, gummy worms, and a sprinkle of Halloween sprinkles to create a spooky, colorful finish.
    10. Cover the trifle with plastic wrap and chill in the refrigerator for at least 2 hours, allowing flavors to meld and layers to set with a slightly firm texture.
    11. Once chilled, serve the Halloween trifle directly from the glass bowl, marveling at the vibrant, layered look, and enjoy the playful combination of crunchy, creamy, and chocolatey textures.

    Notes

    Feel free to customize decorations with different candies or add more layers for extra fun. For a dairy-free version, substitute whipped cream with coconut cream and use dairy-free cookies and pudding.
    This Halloween trifle isn’t just about the spooky look; it’s about the fun of building it, bit by bit, layer by layer. It’s perfect for a quick party dessert that lets you unleash your inner kid. Plus, it’s adaptable—swap in your favorite candies or seasonal fruits to make it truly yours. So go ahead, make this with a little chaos, a lot of flavor, and a lot of love.

  • Halloween Trifle: A Spooky Layered Dessert with a Twist

    Halloween Trifle: A Spooky Layered Dessert with a Twist

    This Halloween trifle is my take on a childhood favorite turned spooky spectacle. It’s a messy, colorful, delightfully chaotic way to celebrate the season without fussing over perfect plating. I love how the layers peek through the glass, revealing a mischievous mix of textures and flavors.

    Making this isn’t about precision; it’s about having fun and embracing the little imperfections. It’s perfect for last-minute gatherings or when you want a dessert that’s as playful as it is tasty. Plus, the smell of chocolate, vanilla, and candy fills the kitchen like a haunted house in full swing.

    Why This Haunted Trifle Deserves Repeating

    It’s imperfectly perfect, messy in all the right ways, and endlessly customizable. Every time I make it, I remember childhood Halloween nights, the chaos of costumes, and the thrill of sweet surprises. The smell of chocolate and vanilla, the crunch of cookies, and the playful glee of decorating keep drawing me back. Plus, it’s the kind of dessert that invites creativity and laughs—what’s not to love?

    Spooky Ingredients Breakdown

    • Chocolate cookies: Crushed into fine crumbs for that crunchy, dark base—substitute with graham crackers if needed.
    • Chocolate pudding: Rich, velvety, and deeply chocolatey. Use instant for quickness or homemade for depth.
    • Heavy cream: Whipped to cloud-like fluff; adds lightness. Dairy-free alternatives work if you prefer.
    • Candy eyes and gummy worms: Fun, creepy decorations that add color and texture—use marzipan for a different twist.
    • Halloween sprinkles: Sparkly and colorful, they make every layer pop—skip if you’re feeling minimalist.
    • Vanilla extract: Boosts flavor in pudding and cream; a splash adds brightness—omit if allergic.

    Tools of the Spooky Trade

    • Large glass trifle bowl: Show off those colorful layers and keep everything visible.
    • Mixing bowls: Prepare pudding, whipped cream, and crushed cookies easily.
    • Electric mixer: Whip cream to fluffy perfection—resist overbeating.
    • Spatula: Layer ingredients smoothly and cleanly.
    • Decorating tools (small spatula, tweezers): Place candies and spooky decorations precisely.

    Crafting Your Haunted Dessert: Step-by-Step

    Step 1: Gather your ingredients and set out your clear glass trifle bowl or a large, transparent dessert dish.

    Step 2: Prepare the spooky layers: crush cookies, make pudding, and whip cream, all while thinking about how the layers will peek through.

    Step 3: Layer the ingredients starting with cookies, then pudding, then whipped cream. Repeat until the dish is full, ending with whipped cream.

    Step 4: Decorate with candy eyes, gummy worms, or spooky sprinkles for that haunted look.

    Step 5: Chill in the fridge for at least 2 hours before serving to let the flavors mingle and the layers set.

    Tips for a Perfectly Spooky Trifle

    • Cookies should be crushed finely but still have some texture for crunch.
    • Pudding must be smooth and set, not runny or grainy.
    • Whipped cream peaks should be fluffy and hold their shape.
    • Layer colors should be distinct and visible through the glass for that dramatic effect.

    Avoid These Haunted Mistakes

    • Layers blending together into a muddy mess.? Use a gentle hand when layering to prevent mixing colors.
    • Pudding too runny, causing layers to collapse.? Chill the pudding until just set, not frozen.
    • Cream turns grainy or buttery-looking.? Whip cream until stiff peaks form, not overwhipped into butter.
    • Decorations wilting or melting.? Decorate just before serving to keep toppings crisp.

    Halloween Spooky Trifle

    This Halloween trifle layers crushed chocolate cookies, rich chocolate pudding, and fluffy whipped cream in a clear glass bowl, creating a colorful, chaotic dessert that’s as fun as it is tasty. Decorated with candy eyes, gummy worms, and sprinkles, it offers a playful mix of textures and flavors with an eye-catching presentation. Perfect for last-minute gatherings, it’s all about embracing imperfections and celebrating the season with a messy, delightful treat.
    Prep Time 15 minutes
    Cook Time 10 minutes
    Total Time 3 hours
    Servings: 8
    Course: Main Course
    Cuisine: Halloween
    Calories: 350

    Ingredients
      

    • 200 grams chocolate cookies crushed into fine crumbs
    • 2 cups chocolate pudding prepared and smooth
    • 1 cup heavy cream whipped to soft peaks
    • to taste candy eyes for decoration
    • gummy worms amount gummy worms for decoration
    • sprinkles amount Halloween sprinkles for added color and sparkle
    • 1 teaspoon vanilla extract to enhance pudding and whipped cream flavor

    Equipment

    • Large glass trifle bowl
    • Mixing bowls
    • Electric mixer
    • Spatula
    • Decorating tools (small spatula, tweezers)

    Method
     

    1. Gather all your ingredients and set up your large glass trifle bowl for layering.
    2. Crush the chocolate cookies into fine crumbs using a rolling pin or food processor; set aside.
    3. Prepare the chocolate pudding according to package instructions or make your homemade version, then let it cool slightly until it’s thick and velvety.
    4. Whip the heavy cream with vanilla extract using an electric mixer until soft peaks form; keep it light and fluffy.
    5. Start layering by spooning crushed cookies into the bottom of the bowl, creating a dark crunchy base.
    6. Top the cookie layer with a generous layer of chocolate pudding, spreading it smoothly with a spatula.
    7. Add a dollop of whipped cream over the pudding layer, spreading it gently to cover completely.
    8. Repeat the layers—cookies, pudding, whipped cream—until the dish is full, finishing with a layer of whipped cream on top.
    9. Decorate the top with candy eyes, gummy worms, and sprinkles, arranging them playfully for a spooky effect.
    10. Place the trifle in the refrigerator and chill for at least 2 hours to let the flavors mingle and the layers set.
    11. Once chilled, serve directly from the glass bowl, making sure to showcase the colorful, chaotic layers and spooky decorations.

    Notes

    Feel free to customize decorations with different candies or add more layers for a taller, more dramatic effect. For extra flavor, drizzle caramel or chocolate sauce over the top before decorating.
    This Halloween trifle isn’t just about the spooky look; it’s about the fun of building it, bit by bit, layer by layer. It’s perfect for a quick party dessert that lets you unleash your inner kid. Plus, it’s adaptable—swap in your favorite candies or seasonal fruits to make it truly yours. So go ahead, make this with a little chaos, a lot of flavor, and a lot of love.

  • Candy Corn Fudge: An Unexpected Fall Favorite with a Nostalgic Twist

    Candy Corn Fudge: An Unexpected Fall Favorite with a Nostalgic Twist

    Candy corn fudge is one of those recipes that sneaks up on you. It’s a simple candy that turns into something unexpectedly decadent and satisfying. I love making it around fall because it feels like a little edible celebration of the season’s colors and flavors.
    The best part? It’s quick, doesn’t require fancy ingredients, and the end result looks as cheerful as a basket of autumn leaves. Plus, it’s one of those recipes that invites a bit of chaos in the kitchen—melting, mixing, and pouring—before you get to enjoy the sweet reward.

    Why I Keep Coming Back to This Fudge

    It’s a quick batch that delivers big nostalgic feels, perfect for busy fall days. The candy corn’s playful texture and vibrant colors make it a hit for friends and family. Plus, it’s forgiving—mess it up slightly and you still end up with something sweet and satisfying.

    The Building Blocks of Candy Corn Fudge

    • White chocolate chips: They melt into a smooth, creamy base that’s sweet and rich. Swap for white baking chocolate if you prefer a less sweet option.
    • Sweetened condensed milk: Adds sweetness and helps everything meld together. You can try evaporated milk for a lighter version.
    • Candy corn: The star, chewy and colorful, with a buttery vanilla flavor. Mix in mini marshmallows for extra gooeyness.
    • Vanilla extract: Enhances sweetness and depth. Almond extract can be a fun twist if you like a nutty aroma.
    • Salt: Balancing element to temper the sweetness, bringing out flavors.

    Tools You Need for Perfect Candy Corn Fudge

    • Heavy-bottomed saucepan: To melt the chocolate smoothly without scorching.
    • Rubber spatula: To stir the mixture and scrape every bit from the pan.
    • 20cm (8-inch) square pan: To set and cut the fudge into perfect squares.
    • Parchment paper: To prevent sticking and make removal easy.

    Step-by-Step to Sweet, Chewy Candy Corn Fudge

    Step 1: Line a 20cm (8-inch) square pan with parchment paper, leaving some overhang.

    Step 2: In a heavy-bottomed saucepan, combine 2 cups of white chocolate chips and 1 cup of sweetened condensed milk.

    Step 3: Heat over low, stirring constantly, until the mixture is smooth and shiny, about 5 minutes.

    Step 4: Add 1 teaspoon of vanilla extract and a pinch of salt, stir to combine.

    Step 5: Fold in 1 cup of candy corn, ensuring they are evenly distributed.

    Step 6: Pour the mixture into the prepared pan, smoothing the top with a spatula.

    Step 7: Let it sit at room temperature for 30 minutes, then refrigerate for at least 2 hours, until firm.

    Step 8: Once set, lift the fudge out using the parchment overhang and cut into squares.

    Cooking Checks and Tips to Nail the Texture

    • Ensure your mixture is smooth and glossy before pouring—lumps mean it’s not fully melted.
    • The fudge should jiggle slightly when gently shaken—if it’s wobbly, it needs more chilling.
    • Watch the color—once the white chocolate is fully melted, it should be shiny and uniform.

    Common Mistakes and How to Fix Them

    • Too high heat or lack of stirring.? FUDGE IS GRAINY—Stir constantly and keep heat low.
    • Insufficient chilling time.? Fudge is too soft—Chill longer or add a bit more chocolate.
    • Over-mixing or stirring too vigorously.? Candy corn sinks—Fold gently to keep pieces suspended.
    • Overworking the mixture.? Surface cracks—Avoid over-melting or over-stirring after removing from heat.

    Candy Corn Fudge

    Candy Corn Fudge is a cheerful, colorful treat made by melting white chocolate chips and sweetened condensed milk into a smooth, creamy base, then folding in vibrant candy corn for a chewy texture. The mixture is poured into a pan, chilled until firm, and cut into sweet squares, showcasing a glossy surface and fun, chewy bits of candy corn throughout. It’s a quick, festive dessert perfect for fall celebrations and nostalgic snacking.
    Prep Time 10 minutes
    Cook Time 10 minutes
    Total Time 2 hours
    Servings: 12
    Course: Main Course
    Cuisine: American
    Calories: 180

    Ingredients
      

    • 2 cups white chocolate chips or white baking chocolate
    • 1 cup sweetened condensed milk
    • 1 teaspoon vanilla extract
    • 1 cup candy corn chewy and colorful
    • a pinch salt balances sweetness

    Equipment

    • Heavy-bottomed saucepan
    • Rubber spatula
    • 20cm (8-inch) square pan
    • Parchment paper

    Method
     

    1. Line your square pan with parchment paper, leaving some overhang on the sides for easy removal.
    2. Combine the white chocolate chips and sweetened condensed milk in a heavy-bottomed saucepan.
    3. Heat over low heat, stirring constantly, until the mixture is smooth, shiny, and fully melted—about 5 minutes. You’ll hear a gentle bubbling and see the mixture turn creamy.
    4. Stir in the vanilla extract and a pinch of salt, blending well until evenly incorporated.
    5. Gently fold in the candy corn, making sure they’re evenly distributed throughout the mixture. It will look colorful and slightly sticky.
    6. Pour the mixture into the prepared pan, using a spatula to spread it out into an even layer. The surface should be smooth and glossy.
    7. Let the fudge sit at room temperature for about 30 minutes, allowing it to cool slightly before refrigerating.
    8. Refrigerate for at least 2 hours until the fudge is firm and set. It should feel solid and give a slight jiggle when gently shaken.
    9. Use the overhang to lift the fudge out of the pan, then cut into squares with a sharp knife for clean edges.
    10. Serve the squares on a plate, revealing the colorful, chewy candy corn nestled within a shiny, creamy base.

    Notes

    For extra fun, add mini marshmallows or sprinkle a few more candy corns on top before chilling.
    This fudge isn’t just a treat; it’s a reminder of childhood Halloweens, with a twist of sophistication. The creamy white chocolate pairs perfectly with the chewiness of candy corn, giving each bite a nostalgic punch. It’s simple enough to make in an afternoon, and the result is a colorful, festive centerpiece. Feel free to experiment with different candy additions for your own spin.

  • Unconventional Charm: Halloween Sugar Cookies with a Twist

    Unconventional Charm: Halloween Sugar Cookies with a Twist

    Halloween sugar cookies are a nostalgic treat, but I’ve always loved giving them a little unexpected twist. Something about adding a hint of citrus zest or a splash of bourbon makes them feel fresh and personal. Plus, the process of shaping and decorating adds a fun, messy, creative layer to the spooky season.

    Why These Cookies Keep Calling Me Back

    They’re simple yet forgiving, perfect for busy spooky weekends. The smell of baking sugar and vanilla in the oven pulls me back every time. Plus, decorating them is chaos and calm in one, a small act of creativity amidst the season’s frenzy.

    A Closer Look at the Ingredients Behind the Spook

    • Unsalted butter: Gives that rich, tender crumb and a hint of creaminess; use high-quality for best flavor.
    • Sugar: Sweetens and browns the edges; superfine melts quicker, making for a smoother dough.
    • Egg: Binds the dough and adds moisture; a large egg works best, but you can swap with egg replacer.
    • Flour: The backbone of the cookie; all-purpose is standard, but bread flour adds chewiness.
    • Vanilla extract: A splash adds warmth and depth; try almond or lemon for a twist.
    • Baking powder: Leavening that helps cookies rise just enough, keeping them tender.
    • Seasonal spices or zest: Optional but fun—think cinnamon, nutmeg, or lemon zest for bright contrast.

    Tools of the Trade for Spookily Perfect Cookies

    • Rolling pin: To flatten the dough evenly.
    • Cookie cutters: To cut out fun Halloween shapes.
    • Baking sheet: To hold the cookies during baking.
    • Parchment paper: Prevent sticking and make cleanup easier.
    • Cooling rack: Cool cookies evenly and keep their shape.

    Crafting Sugar Cookies: A Step-by-Step Guide

    Step 1: In a mixing bowl, cream together 1 cup unsalted butter and 1 cup sugar until pale and fluffy, about 3 minutes.

    Step 2: Add 1 large egg and 1 teaspoon vanilla extract; mix until well combined.

    Step 3: Gradually sift in 2 ½ cups all-purpose flour, ½ teaspoon baking powder, and a pinch of salt.

    Step 4: Divide dough into two, wrap in plastic, and chill in the fridge for at least 1 hour.

    Cooking Tricks and Tips for Perfect Halloween Sugar Cookies

    • Dough should be firm but pliable, not sticky. If sticky, add a little more flour.
    • Cookies should be golden at the edges, not dark. Keep an eye after 8-10 minutes.
    • Use a light touch when rolling out the dough to keep it even and prevent cracks.
    • Chill dough thoroughly; warm dough spreads too much in the oven, losing shape.

    Troubleshooting Halloween Cookie Disasters

    • Dough was too warm when baked.? If cookies spread too much, chill the dough longer before baking.
    • Cutting shapes with dull cutters.? Use a thinner, sharper cutter if shapes blur.
    • Cookies baked at too low a temperature.? If cookies are pale, increase oven temp by 10°C (20°F) for 2 minutes.
    • Dough too dry.? Add a pinch more flour if dough cracks when rolling.

    Halloween Citrus Bourbon Sugar Cookies

    These sugar cookies are a festive treat with a twist, featuring a tender crumb and crisp edges. The dough is flavored with vanilla, citrus zest, and a splash of bourbon, then rolled out and cut into fun Halloween shapes. Once baked, they’re perfect for decorating with spooky icing or sprinkles, offering a delightful mix of sweetness, brightness, and a hint of warmth.
    Prep Time 20 minutes
    Cook Time 10 minutes
    Total Time 2 hours 10 minutes
    Servings: 24
    Course: Main Course
    Cuisine: American
    Calories: 150

    Ingredients
      

    • 1 cup unsalted butter softened
    • 1 cup sugar
    • 1 large egg
    • 1 teaspoon vanilla extract
    • 1 teaspoon citrus zest lemon or orange
    • 1 tablespoon bourbon
    • 2 ½ cups all-purpose flour
    • ½ teaspoon baking powder
    • Pinch salt

    Equipment

    • Mixing bowls
    • Whisk or electric mixer
    • Measuring cups and spoons
    • Rolling pin
    • Cookie cutters
    • Baking sheet
    • Parchment paper
    • Cooling rack

    Method
     

    1. Begin by creaming softened butter and sugar together in a mixing bowl using a whisk or electric mixer until the mixture is light, fluffy, and pale in color, about 3 minutes. This fills the kitchen with a sweet aroma and a soft texture to the mixture.
    2. Add the large egg, vanilla extract, citrus zest, and bourbon to the bowl. Mix until thoroughly combined, and the mixture is smooth and slightly glossy.
    3. In a separate bowl, sift together the flour, baking powder, and salt. Gradually add this dry mixture to the wet ingredients, mixing on low speed or folding gently until a soft dough forms. It should be cohesive but not sticky.
    4. Divide the dough in half, shape each into a flat disc, wrap tightly in plastic wrap, and chill in the refrigerator for at least 1 hour. Chilling helps the dough relax and makes it easier to roll out.
    5. Preheat your oven to 350°F (175°C). Line a baking sheet with parchment paper to prevent sticking. Remove one chilled dough disc from the fridge and place it on a lightly floured surface.
    6. Use a rolling pin to gently roll the dough to about ¼ inch thickness, maintaining an even surface. If the dough becomes sticky, lightly dust with more flour.
    7. Cut out Halloween-themed shapes with cookie cutters, pressing firmly but gently to get clean edges. Transfer the cutouts carefully to the prepared baking sheet.
    8. Bake the cookies in the preheated oven for 8-10 minutes, or until the edges are golden brown. Keep an eye on them to prevent over-baking, which can make the edges too dark.
    9. Once baked, remove the cookies from the oven and let them cool on the baking sheet for a few minutes before transferring them to a cooling rack. This allows them to firm up and prevents breakage.
    10. Repeat the rolling, cutting, and baking process with the second dough disc. Once completely cooled, decorate with icing, sprinkles, or edible glitter to make them spooky and fun for Halloween.
    11. Enjoy these bright, flavorful sugar cookies with a hint of citrus and bourbon, perfect for celebrating the season with a touch of creativity and sweetness.

    Notes

    Chilling the dough thoroughly is key to achieving crisp edges and clean shapes. Feel free to experiment with different shapes and decorations for a festive touch.
    These cookies aren’t just about sugar and spice; they carry a nostalgic whisper of childhood Halloweens. The slightly chewy center with crisp edges makes every bite a small celebration. Feel free to add your own spooky decorations or tweak the flavors—maybe a dash of cinnamon or some finely chopped nuts. No matter how you personalize them, they’re sure to bring a little magic to your kitchen.

  • Monster Rice Krispie Treats: A Chewy, Gooey Monster Mash

    Monster Rice Krispie Treats: A Chewy, Gooey Monster Mash

    These monster rice krispie treats started as an accidental kitchen experiment that turned into a messy, delightful creation. I love how the gooey marshmallow binds everything together into a chaotic, chewy mass that’s both nostalgic and wildly fun. They’re perfect for when you want something sweet and a little wild, a treat that’s as playful as a monster at heart.

    Why I Keep Coming Back to These Monster Treats

    They’re chaos in the best way—messy, sweet, and endlessly customizable. Every batch feels like an experiment, and the smell of melting marshmallows always pulls me in. Plus, they’re a quick fix for any sweet craving, and I love how forgiving they are when I tweak ingredients.

    Monster Ingredients & Their Secrets

    • Marshmallows: The gooey core that binds everything. Use mini for easier melting, or giant for extra goo.
    • Butter: Adds richness and helps marshmallows melt smoothly. Swap for coconut oil for a dairy-free version.
    • Rice cereal: The crunchy base that makes these treat-like. Brown rice cereal adds a nuttier flavor.
    • Add-ins (chocolate chips, sprinkles): Personalize your monster. Use whatever adds a pop of color or flavor.
    • Salt: A pinch enhances sweetness and balances flavors.
    • Vanilla extract: A splash deepens flavor and gives a fragrant aroma.

    Tools of the Monster Mood

    • Large saucepan: Melting butter and marshmallows evenly.
    • Sturdy spatula: Folding ingredients without breaking the gooey mess.
    • 9×13 inch pan: Holding the treats as they set.
    • Parchment paper or greased pan: Preventing sticking for easy cleanup.

    Crafting the Monster Treats: Step-by-Step

    Step 1: Gather a large mixing bowl and a sturdy spatula.

    Step 2: Melt butter in a large saucepan over medium heat, about 3 minutes, until it smells rich and nutty.

    Step 3: Add marshmallows to the melted butter, stirring constantly until they are completely melted and glossy.

    Step 4: Pour in the rice cereal, folding gently to coat everything evenly, then press into a greased 9×13 inch pan.

    Step 5: Let it sit at room temperature for 30 minutes to set before cutting.

    Cooking Cues: How to Know When Your Monster Is Ready

    • The mixture is glossy and fully melted, with marshmallows no longer visible.
    • Press a small amount into the pan—if it holds shape but is still soft, it’s perfect.
    • The edges should look slightly toasted and set, not greasy or overly shiny.
    • The treat feels firm enough to hold its shape when pressed, but still chewy inside.

    Monster Mishaps & How to Fix Them

    • Over-torching marshmallows.? Reduce heat if marshmallows scorch and turn bitter.
    • The mixture is too stiff to fold.? Add a splash of warm water if mixture is too thick and dry.
    • Too much marshmallow or butter.? Quickly stir in extra cereal if the mixture is too runny.
    • Waiting too long to press into the pan.? Spread the mixture immediately if it starts to harden in the pan.

    Monster Rice Krispie Treats

    These playful rice krispie treats are made by melting marshmallows and butter, then folding in crunchy rice cereal and colorful add-ins. Once pressed into a pan, they set into a chewy, gooey mass with a fun, chaotic appearance that’s perfect for satisfying sweet cravings. Their texture is soft and sticky, with a vibrant, inviting look.
    Prep Time 10 minutes
    Cook Time 10 minutes
    Total Time 20 minutes
    Servings: 12
    Course: Main Course
    Cuisine: American
    Calories: 150

    Ingredients
      

    • 4 cups mini marshmallows for easy melting
    • 3 tablespoons unsalted butter or coconut oil for dairy-free
    • 6 cups rice cereal brown rice cereal adds nuttiness
    • 0.5 cups chocolate chips optional, for extra flavor
    • 0.25 teaspoons salt enhances sweetness
    • 1 teaspoon vanilla extract deepens flavor

    Equipment

    • Large saucepan
    • Sturdy spatula
    • 9×13 inch pan
    • Parchment paper or greased pan

    Method
     

    1. Gather a large saucepan, a sturdy spatula, and a 9×13 inch pan lined with parchment paper or lightly greased.
    2. Melt the butter in the saucepan over medium heat, stirring occasionally. Let it cook for about 2-3 minutes until it smells rich and nutty, and the butter is fully melted.
    3. Add the mini marshmallows to the melted butter. Stir constantly with the spatula until the marshmallows are completely melted, glossy, and smooth. You’ll hear a gentle bubbling and see the mixture turn shiny.
    4. Remove the saucepan from heat and stir in the vanilla extract and salt. Mix until well combined and fragrant.
    5. Pour in the rice cereal gradually, folding gently with the spatula until the cereal is evenly coated with the marshmallow mixture. The mixture will be thick and sticky, pulling away from the sides of the pan.
    6. If you’re using chocolate chips or colorful add-ins, fold them in now for a fun, chaotic look.
    7. Transfer the mixture into the prepared pan. Using the spatula or your hands (lightly greased if needed), press the mixture firmly into an even layer. The mixture should be slightly sticky but hold together well.
    8. Let the treats sit at room temperature for about 30 minutes to set and firm up. The edges may start to turn a slight golden brown, and the surface will look glossy and chewy.
    9. Once set, cut into squares or your preferred shapes. The treats will be chewy, gooey, and delightfully chaotic-looking with colorful bits poking out.
    10. Enjoy your wild, playful monster rice krispie treats as a fun snack or dessert, perfect for sharing and customizing with your favorite add-ins!
    These monster rice krispie treats are not just a snack; they’re a playful chaos of textures and flavors. You can customize the mix-ins—think chocolate chips, sprinkles, or even crushed cookies—to match your mood or the occasion. Once cooled, slicing into jagged, uneven pieces makes them look even more wild and fun. They’re perfect for sharing, or just for sneaking bites between chaos.

  • Pumpkin Cheesecake Bars: A Cozy Fall Indulgence with a Twist

    Pumpkin Cheesecake Bars: A Cozy Fall Indulgence with a Twist

    Pumpkin cheesecake bars are a sneaky way to get that cozy fall flavor in a portable form. I love how the pumpkin’s mellow sweetness pairs with the creamy cheese and warm spices. It’s a recipe born from late-night craving and a need to keep things simple but satisfying.

    Why I keep making these pumpkin cheesecake bars

    They remind me of autumn afternoons at my grandma’s house—warm, inviting, full of familiar spices. The process is straightforward, but the result feels indulgent, like a little celebration. Plus, they’re a crowd-pleaser, so I keep coming back to share slices with friends and family.

    Breaking down the ingredients for pumpkin cheesecake bars

    • Graham cracker crumbs: Gives the crust a buttery, crunchy base. Use digestive biscuits as a swap for a different flavor.
    • Cream cheese: Creamy and tangy, it forms the core of the cheesecake. Full-fat works best, but Neufchâtel can lighten it.
    • Canned pumpkin puree: The mellow, sweet base for the filling. Fresh pumpkin can be roasted and pureed if you prefer.
    • Warm spices (cinnamon, nutmeg, ginger): Add cozy warmth and depth. Adjust to taste, or swap for pumpkin pie spice.
    • Eggs: Bind everything together. Use large, room-temperature eggs for best results.
    • Sugar: Sweetens the mixture. Brown sugar adds a caramel note if desired.
    • Vanilla extract: Enhances the flavors with a fragrant note. Vanilla bean paste is a lush alternative.

    Tools and equipment for baking pumpkin cheesecake bars

    • 9×13 inch baking pan: To hold the crust and filling, baked in a single layer.
    • Parchment paper: For easy removal and clean edges.
    • Mixing bowls: To combine crust ingredients and filling.
    • Electric mixer or whisk: To blend the cream cheese and pumpkin mixture smoothly.
    • Spatula: To spread and smooth the filling evenly.
    • Cooling rack: To cool the bars without sogginess.

    Step-by-step guide to perfect pumpkin cheesecake bars

    Step 1: Preheat your oven to 175°C (350°F).

    Step 2: Line a 9×13 inch baking pan with parchment paper, leaving some overhang.

    Step 3: Mix crushed graham crackers, melted butter, and a pinch of salt. Press into the bottom of the pan to form a crust.

    Step 4: Bake the crust for 10 minutes until golden and fragrant.

    Step 5: While the crust cools slightly, beat softened cream cheese, sugar, and pumpkin puree until smooth.

    Step 6: Add eggs one at a time, then stir in warm spices and vanilla.

    Step 7: Pour filling over the baked crust. Smooth the top with a spatula.

    Step 8: Bake for 40-45 minutes until the edges are set but the center slightly jiggles.

    Step 9: Let the bars cool in the pan for at least an hour, then chill in the fridge for several hours or overnight.

    Step 10: Cut into squares and serve chilled or at room temperature with a dollop of whipped cream.

    Cooking checkpoints and tips to ensure success

    • Crust should be golden and firm before adding the filling.
    • The filling needs to slightly jiggle in the center when done, not be liquid.
    • Edges should be set and slightly puffed, with a gentle crack on top.
    • If the filling cracks upon cooling, try not to overbake or chill too quickly.

    Common mistakes and how to fix them

    • Not baking the crust enough.? Ensure the crust is baked until golden; underbaked crust is soggy.
    • Overmixing the cheesecake filling.? Don’t overmix the filling; it can cause cracks.
    • Serving before the cheesecake is fully chilled.? Chill the bars thoroughly to set the texture.
    • Frequent oven door openings causing cracks.? Avoid opening the oven door too often during baking.

    Pumpkin Cheesecake Bars

    Pumpkin cheesecake bars combine a buttery graham cracker crust with a creamy, spiced pumpkin filling, baked to a smooth, slightly jiggle center and topped with a gentle crack. The dish showcases the mellow sweetness of pumpkin paired with warming cinnamon, nutmeg, and ginger, resulting in an indulgent yet portable fall treat.
    Prep Time 20 minutes
    Cook Time 50 minutes
    Total Time 1 minute
    Servings: 12
    Course: Main Course
    Cuisine: American
    Calories: 350

    Ingredients
      

    • 1 1/2 cups graham cracker crumbs or digestive biscuits
    • 1/2 cup unsalted butter melted
    • 1/4 teaspoon salt
    • 16 oz cream cheese softened
    • 1 cup canned pumpkin puree or roasted fresh pumpkin
    • 1 cup granulated sugar
    • 3 large eggs room temperature
    • 1 1/2 teaspoons ground cinnamon
    • 1/2 teaspoon ground nutmeg
    • 1/2 teaspoon ground ginger
    • 1 teaspoon vanilla extract

    Equipment

    • 9×13-inch baking pan
    • Parchment paper
    • Mixing bowls
    • electric mixer or whisk
    • Spatula
    • Cooling rack

    Method
     

    1. Preheat the oven to 175°C (350°F). Line your baking pan with parchment paper, creating a slight overhang for easy removal.
    2. In a mixing bowl, combine graham cracker crumbs, melted butter, and salt. Stir until the mixture looks like wet sand.
    3. Press the crumb mixture evenly into the bottom of the prepared pan, creating a firm, flat crust. Bake for about 10 minutes until fragrant and golden.
    4. While the crust cools slightly, beat softened cream cheese, pumpkin puree, and sugar together using an electric mixer until smooth and creamy, about 2-3 minutes.
    5. Add eggs one at a time to the mixture, mixing well after each addition to fully incorporate. The mixture should become smooth and slightly fluffy.
    6. Stir in ground cinnamon, nutmeg, ginger, and vanilla until evenly distributed, filling the air with warm, spicy aromas.
    7. Pour the pumpkin filling over the baked crust, smoothing the top with a spatula to ensure an even layer.
    8. Bake for 40-45 minutes, or until the edges are set and the center jiggles slightly when shaken. The top may develop a gentle crack, signaling it’s ready.
    9. Remove the pan from the oven and let the bars cool in the pan on a cooling rack for at least an hour. The filling will firm up as it cools.
    10. Once cooled, refrigerate the bars for several hours or overnight to fully set and develop flavor.
    11. Use the parchment overhang to lift the bars from the pan. Cut into squares with a sharp knife.
    12. Serve chilled or at room temperature, optionally topped with whipped cream for extra indulgence. Enjoy the creamy, spiced pumpkin goodness!
    These bars are the quiet triumph of autumn baking, blending the earthiness of pumpkin with the creamy tang of cheesecake. They’re easy enough to throw together on a busy day but special enough to serve at a gathering. Feel free to sprinkle with toasted pepitas or drape with caramel for extra flair. Enjoy every bite, knowing you’ve captured a little seasonal magic.

  • Black Velvet Cupcakes: A Deep Dive into Rich, Unconventional Chocolate Elegance

    Black Velvet Cupcakes: A Deep Dive into Rich, Unconventional Chocolate Elegance

    Black velvet cupcakes aren’t just about the dark hue—they’re about embracing a richer, more complex side of chocolate. This recipe is my go-to when I want something that feels a little rebellious but still familiar. The color alone sparks curiosity, and the flavor keeps everyone coming back for seconds.

    Why I keep coming back to this recipe

    Every time I make these cupcakes, I discover something new—an extra pinch of salt, a dash of espresso powder, or a different kind of dark chocolate. They remind me that baking is about patience and intuition, not perfection. Plus, the deep, smoky flavor is a comfort that feels right for quiet mornings or rainy afternoons—simple, honest, and just a little daring.

    Breaking down the dark magic: ingredients

    • Dark chocolate: Gives that deep, smoky flavor. Use good-quality chocolate for richness—avoid milk chocolate here.
    • Butter: Adds moisture and tenderness. Unsalted is best, but salted can add a subtle contrast.
    • Eggs: Bind everything together and give structure. Room temperature helps everything mix smoothly.
    • Sugar: Sweetens and balances the bitterness. Brown sugar can add a slightly caramel note.
    • Flour: Provides structure. Sift to avoid lumps and ensure a light crumb.
    • Salt: Enhances all the flavors, making the chocolate pop.
    • Vanilla extract: A splash lifts the chocolate and deepens the flavor profile.

    Tools of the trade for perfect cupcakes

    • Mixing bowls: To combine ingredients without fuss.
    • Saucepan: Melting chocolate and butter gently.
    • Whisk: Getting those eggs and sugar to fluffy.
    • Muffin tin and paper liners: Shape and contain the cupcakes.
    • Wire rack: Cooling evenly and preventing sogginess.

    Step-by-step guide to mastering black velvet cupcakes

    Step 1: Preheat your oven to 180°C (350°F). Line a muffin tin with paper liners.

    Step 2: In a saucepan, gently melt 200g of dark chocolate with 100g of butter over low heat until smooth.

    Step 3: In a bowl, whisk together 2 eggs, 150g sugar, and a teaspoon of vanilla until light and creamy.

    Step 4: Mix in the melted chocolate and butter, then sift in 100g of all-purpose flour and a pinch of salt.

    Step 5: Divide batter evenly into the liners, filling about 3/4 full.

    Step 6: Bake for 20-22 minutes, until the tops are just set but still slightly jiggle.

    Step 7: Remove from oven, let cool in the tin for 10 minutes, then transfer to a wire rack.

    Step 8: Once cooled, frost with a dark chocolate ganache or your favorite frosting.

    Step 9: Chill the cupcakes for at least 30 minutes before serving to let the flavors meld.

    Cooking checkpoints and tips for perfect cupcakes

    • The batter should be smooth and glossy, not grainy or lumpy.
    • The cupcakes should be just set on top, with a slight jiggle in the center when done.
    • The edges should be slightly cracked and have a matte finish, not shiny or wet.
    • Use a toothpick inserted in the center—if it comes out clean, they’re ready.

    Common pitfalls and how to fix them

    • Batter is too thin and won’t hold shape.? Add a pinch more flour if the batter is too runny.
    • Cupcakes are underbaked and gooey inside.? Bake for a minute longer if the tops aren’t set.
    • Over-torched edges ruining the appearance.? Reduce oven temperature slightly if the edges burn.
    • Holes or tunnels in the crumb.? Gently tap the tin to release air bubbles before baking.

    Black Velvet Cupcakes

    Black velvet cupcakes feature a rich, dark chocolate flavor with a deep, smoky hue that sparks curiosity. The batter is mixed until smooth and glossy, then baked into tender, moist cupcakes with a slightly cracked matte top. Once cooled, they are often topped with decadent dark chocolate ganache or frosting, creating a striking and indulgent treat.
    Prep Time 15 minutes
    Cook Time 20 minutes
    Total Time 35 minutes
    Servings: 12
    Course: Main Course
    Cuisine: Dessert
    Calories: 350

    Ingredients
      

    • 200g g dark chocolate good quality for richness
    • 100g g unsalted butter softened if possible
    • 2 eggs room temperature
    • 150g g granulated sugar
    • 1 tsp vanilla extract
    • 100g g all-purpose flour sifted before measuring
    • pinch salt

    Equipment

    • Mixing bowls
    • Saucepan
    • Whisk
    • Muffin tin and paper liners
    • Wire rack

    Method
     

    1. Preheat your oven to 180°C (350°F) and line a muffin tin with paper liners, setting it aside.
    2. Gently melt the dark chocolate with the butter in a saucepan over low heat, stirring until smooth and glossy, filling the kitchen with a rich chocolate aroma.
    3. In a large bowl, whisk together the eggs, sugar, and vanilla until the mixture becomes light, fluffy, and slightly pale, about 3-4 minutes.
    4. Pour the melted chocolate and butter into the egg mixture, stirring gently until well combined and smooth.
    5. Sift the flour and salt into the wet mixture, then fold gently with a spatula until just incorporated, ensuring a shiny, smooth batter without overmixing.
    6. Divide the batter evenly among the lined muffin cups, filling each about three-quarters full, and tap the tin lightly on the counter to release any air bubbles.
    7. Bake the cupcakes in the preheated oven for 20-22 minutes, until the tops are just set and a toothpick inserted in the center comes out with moist crumbs.
    8. Remove the cupcakes from the oven, let them cool in the tin for about 10 minutes, then transfer to a wire rack to cool completely.
    9. Once cooled, frost the cupcakes with dark chocolate ganache or your favorite frosting for an extra decadent touch.
    10. Chill the cupcakes in the refrigerator for at least 30 minutes to allow the flavors to meld and the frosting to set before serving.
    These cupcakes are a celebration of the deep, smoky side of chocolate—no fuss, just pure, honest flavor. The richness is balanced by the softness of the crumb, making each bite a tiny indulgence. Feel free to tweak the frosting to add a hint of citrus or a sprinkle of sea salt for extra depth. Enjoy baking these for a quiet moment or to share with friends craving something a little different.