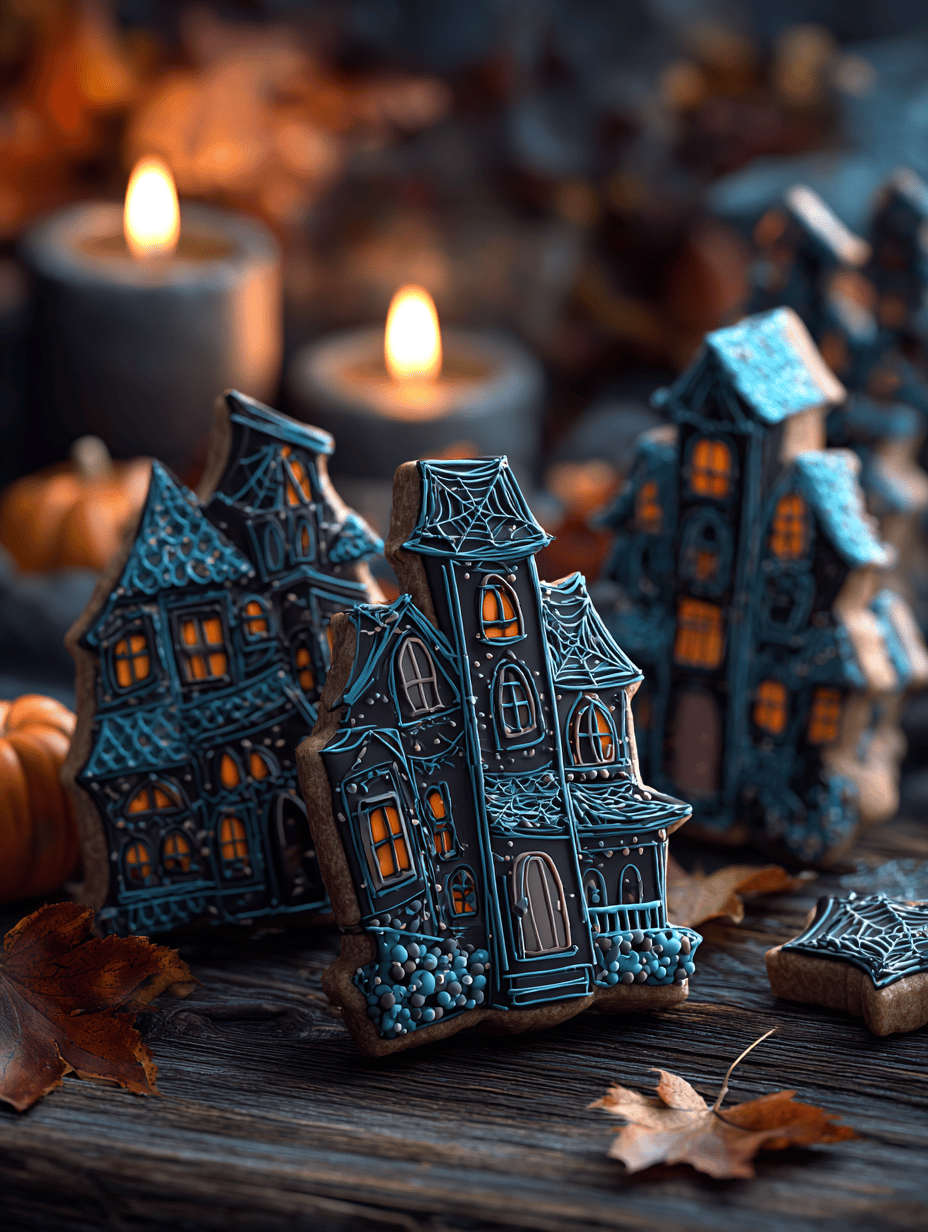
Category: Desserts

  • Spooky Season Pumpkin Cheesecake: A Cozy Twist

    Spooky Season Pumpkin Cheesecake: A Cozy Twist

    As the air turns crisp and pumpkin spice becomes impossible to ignore, I recently discovered a twist that made my autumn baking even more special. This pumpkin cheesecake isn’t just a dessert; it’s a celebration of the season’s cozy, spicy soul with a hint of unexpected richness. It’s perfect for carving out a moment of calm amidst the chaos of fall festivities.

    The secret lies in a subtle infusion of cinnamon and ginger into the creamy filling, which elevates this cheesecake to a new level. The crust, a crunchy graham cracker base, balances the velvety pumpkin layer beautifully. Every bite envelops you in warm spices and nestled sweetness—a true fall indulgence that feels luxe yet attainable.

    Spiced Pumpkin Cheesecake

    This pumpkin cheesecake combines a crunchy graham cracker crust with a creamy filling infused with cinnamon and ginger, creating a smooth dessert that showcases seasonal flavors. The batter is poured into a prepared crust and baked until set, resulting in a velvety texture with a lightly spiced aroma and a slightly golden top.
    Prep Time 20 minutes
    Cook Time 1 hour
    Total Time 1 hour 20 minutes
    Servings: 10
    Course: Main Course
    Cuisine: American
    Calories: 420

    Ingredients
      

    • 1 1/2 cups graham cracker crumbs for crust
    • 1/4 cup granulated sugar for crust
    • 6 tablespoons unsalted butter melted, for crust
    • 24 oz cream cheese softened
    • 1 cup granulated sugar
    • 1/2 cup canned pumpkin pure pumpkin puree
    • 3 large eggs
    • 1 teaspoon ground cinnamon
    • 1/2 teaspoon ground ginger
    • 1/2 teaspoon salt
    • 1/2 cup sour cream or heavy cream for richness

    Equipment

    • Springform pan
    • Mixing bowls
    • Electric mixer
    • Spatula

    Method
     

    1. Combine graham cracker crumbs, sugar, and melted butter in a mixing bowl until the mixture resembles wet sand. Press this mixture firmly into the bottom of a springform pan, creating an even crust. Chill in the refrigerator while preparing the filling.
    2. In a large mixing bowl, beat the softened cream cheese until smooth and creamy with an electric mixer, about 2-3 minutes. Add sugar and continue to beat until combined and fluffy.
    3. Mix in the pumpkin puree, blending until fully incorporated and the mixture is smooth. Add eggs one at a time, beating well after each addition. This creates a silky, thick batter.
    4. Stir in cinnamon, ginger, and salt into the batter until evenly distributed, releasing warm aromas and giving the filling its signature spice flavor.
    5. Gently fold in the sour cream using a spatula to ensure a smooth, creamy consistency. Smooth out the top of the filling with the spatula.
    6. Pour the filling over the chilled crust, spreading it evenly with the spatula. Tap the pan gently on the counter to settle the batter and release any air bubbles.
    7. Bake in a preheated oven at 350°F (175°C) for about 60 minutes, or until the edges are set and the center slightly jiggles when nudged.
    8. Remove the cheesecake from the oven and let it cool in the pan for 30 minutes. Then, refrigerate for at least 4 hours or overnight to fully set and develop flavor.
    9. Run a knife around the edge of the pan and carefully remove the springform’s sides. Slice the cheesecake and serve chilled, perhaps with a dusting of cinnamon or whipped cream.

    Notes

    Ensure the cream cheese is fully softened for a smooth batter. Chilling the crust before adding filling helps it stay firm during baking.
    Whether you’re sharing this cheesecake at a gathering or keeping it all for yourself, it’s sure to become a seasonal favorite. The combination of smooth pumpkin and spiced cream cheese delivers a comforting reminder of autumn’s simple joys. And the best part? It fills your kitchen with a tantalizing aroma that lingers long after the last slice is gone.

  • Halloween Candy Corn Parfait Magic: A Nostalgic Twist

    Halloween Candy Corn Parfait Magic: A Nostalgic Twist

    Theres something irresistibly charming about the way candy corn transforms into a playful dessert layer. This recipe turns that familiar Halloween treat into a visually stunning parfait, combining nostalgia with inventive flair. Its perfect for those looking to elevate their seasonal gathering with a touch of whimsy and a dash of flavor.

    Imagine scoops of creamy pudding nestled between vibrant layers of crushed candy corn and crunchy graham cracker crumbs. The scent of vanilla and the sweet crunch of candy corn create a sensory delight that sparks childhood memories and festive anticipation. This dessert is as fun to assemble as it is to devour, making it a true showstopper on any Halloween table.

    Candy Corn Parfait

    This dessert features layers of creamy vanilla pudding, crushed candy corn, and crunchy graham cracker crumbs layered in a glass or jar, creating a colorful and festive treat. The assembly involves layering the ingredients to achieve a visually appealing parfait with contrasting textures and flavors, culminating in a fun and nostalgic presentation.
    Prep Time 20 minutes
    Cook Time 10 minutes
    Total Time 30 minutes
    Servings: 4
    Course: Main Course
    Cuisine: American
    Calories: 250

    Ingredients
      

    • 1 package vanilla pudding mix instant or prepared as per package instructions
    • 2 cups milk for pudding preparation if using instant mix
    • 1 cup crushed candy corn for layering and decoration
    • 1 cup graham cracker crumbs for crunch and base layers
    • additional whole candy corn for garnish and layering

    Equipment

    • Mixing bowls
    • Whisk
    • Small spoon
    • Serving glasses or jars
    • Graham cracker bag and rolling pin or food processor

    Method
     

    1. Prepare the vanilla pudding according to the package instructions, whisking until smooth and creamy. Once ready, set aside to cool slightly.
    2. Crush the graham crackers into fine crumbs using a rolling pin inside a sealed plastic bag or with a food processor for an even texture. Set aside.
    3. If the candy corn isn’t already crushed, break some into small pieces to add a crunchy texture in the layers. Reserve a few whole candies for garnish.
    4. Layer a spoonful of graham cracker crumbs at the bottom of each glass or jar, creating a crunchy base.
    5. Follow with a generous layer of vanilla pudding, spreading it evenly over the crumbs to create a smooth, creamy layer.
    6. Add a layer of crushed candy corn on top of the pudding, giving the dessert its vibrant color and a hint of sweetness.
    7. Repeat the layering process: graham cracker crumbs, pudding, and crushed candy corn, until the glasses are filled, finishing with a layer of crushed candy corn.
    8. Top each parfait with a whole candy corn for a festive look, and add any remaining graham cracker crumbs for extra crunch.
    9. Chill the parfaits in the refrigerator for at least 30 minutes to allow the flavors to meld and the layers to set slightly.
    10. Serve the candies corn parfaits cold, enjoying the colorful layers, crunchy textures, and creamy pudding.

    As the last layers settle, these parfaits become a delightful centerpiece that invites curiosity and joy. The combination of textures and the burst of nostalgic sweetness make them an instant hit. This simple, colorful dessert is a playful way to celebrate the season with friends and family, blending comfort and creativity effortlessly.

    In a world where dessert often leans towards the sophisticated, these candy corn parfaits remind us that sometimes, joy is in the simplest pleasures. Theyre perfect for both a festive gathering or a quiet night of indulging in Halloween memories. Heres to celebrating with a bit of sweet chaos and a splash of fun.

  • Peach Crumble: The Unexpected Secret to Summertime Bliss

    Peach Crumble: The Unexpected Secret to Summertime Bliss

    As summer reaches its peak, I find myself longing for a dessert that captures the season’s essence without fuss. Peach crumble is that quietly nostalgic treat that transforms ripe, juicy peaches into a warm, fragrant showdown of flavors and textures. The crunch of crumble, the sweetness of peaches, and a dash of cinnamon make every bite feel like a tender hug from grandmother’s kitchen.

    What makes this recipe even more special is the way it invites improvisation—use fresh peaches, or swap in those slightly overripe ones hiding in your fruit bowl. It’s perfect for spontaneous gatherings, beach picnics, or lazy afternoons on the porch. The aroma alone, with caramelized sugars and baked fruit, signals summer’s end while still enjoying its bounty.

    Peach Crumble

    Peach crumble combines ripe peaches with a buttery, oat-based topping to create a warm, tender dessert. The dish features soft, caramelized fruit underneath a crunchy, golden-brown crumble, assembled and baked until bubbling and fragrant.
    Prep Time 15 minutes
    Cook Time 40 minutes
    Total Time 55 minutes
    Servings: 4
    Course: Main Course
    Cuisine: American
    Calories: 250

    Ingredients
      

    • 4 cups ripe peaches, sliced peeled and pitted if desired
    • 1/2 cup sugar
    • 1 tablespoon lemon juice to enhance flavor and prevent browning
    • 1 cup all-purpose flour
    • 1 cup old-fashioned oats
    • 1/2 cup cold unsalted butter, diced
    • 1/2 cup brown sugar light or dark
    • pinch of salt

    Equipment

    • Mixing bowls
    • Baking dish
    • Pastry cutter or fork
    • Measuring cups and spoons
    • Oven

    Method
     

    1. Preheat your oven to 350°F (175°C) and lightly grease a baking dish.
    2. Combine sliced peaches, sugar, and lemon juice in a mixing bowl. Gently toss until the fruit is evenly coated and set aside to let the juices meld for about 10 minutes.
    3. In a separate bowl, whisk together the flour, oats, brown sugar, cinnamon, and salt.
    4. Add the diced cold butter to the dry mixture. Use a pastry cutter or fork to cut the butter into the mixture until it resembles coarse crumbs with some pea-sized bits.
    5. Spread the peeled and sugared peaches evenly into the prepared baking dish, creating a uniform layer.
    6. Sprinkle the crumb topping evenly over the peaches, covering the entire surface.
    7. Bake in the preheated oven for about 35 to 40 minutes, or until the topping is golden brown and bubbly along the edges.
    8. Remove from the oven and let cool slightly. The crumble should be fragrant with a crunchy topping and tender, caramelized peaches beneath.
    9. Serve warm, optionally with a scoop of vanilla ice cream or a dollop of whipped cream for added indulgence.

    Notes

    For a tart contrast, sprinkle a bit of ground ginger or nutmeg into the fruit mixture. Using ripe peaches ensures maximum sweetness and flavor.

    This peach crumble is more than just a dessert; it’s a storybook of summer memories coming alive in every forkful. Simple, approachable, and deeply satisfying, it’s a reminder that beauty can be found in the imperfect ripeness of fruit and the rustic charm of a well-loved recipe.

    As the season shifts and the days grow shorter, this crumble offers a comforting sign of sunshine and fresh fruit. A perfect ending to a warm evening or a reason to linger longer over family and friends. Just a scoop, a crackling top, and a burst of juicy sweetness—what more could you ask for?

  • Unearth the Halloween Mystery: Spooky Dirt Cake with Gummy Worms

    Unearth the Halloween Mystery: Spooky Dirt Cake with Gummy Worms

    Every Halloween, I hunt for treats that stir the playful chaos of the night. This year, I stumbled upon a recipe that transports you to a haunted garden—dirt cake with gummy worms. It’s a delightful mess, perfect for kids and nostalgic for adults who loved digging in the yard as kids.

    The first whiff of crushed Oreo and the sight of squirming gummy worms make this dessert an instant conversation starter. It’s not just a cake; it’s a story wrapped in chocolate and sugar, perfect for creating a little spooky fun at your table. Plus, it’s shockingly simple, yet wildly impressive when served.

    **WHY I LOVE THIS RECIPE?**

    • I cherish edible chaos; messy treats bring out the giggles and the nostalgia of childhood.
    • This cake captures the essence of Halloween—spooky, sweet, and just a little gross.
    • Crushing Oreos releases a rich chocolate aroma that invites curiosity and anticipation.
    • Gummy worms squirm their way into the centerpiece, causing delighted squeals and marveling eyes.

    **AVOID MY DISASTER (You’re Welcome)**

    • FORGOT to chill the whipped cream? The top became a watery mess—pop it back in the fridge for 10 minutes.
    • DUMPED too much milk into the pudding? It stays runny—add a bit more instant pudding powder to thicken.
    • OVER-TORCHED the chocolate crumbs? Burnt aroma ruins the look—smell for a gentle chocolate scent instead.
    • FORGOT the gummy worms? The cake lacks the signature squirm—keep a stash for that authentic effect.

    **QUICK FIXES THAT SAVE YOUR DAY**

    • When the pudding is too thin, splash in extra pudding mix and chill before serving.
    • Patch a runny whipped topping with a bit of cream cheese whipped with sugar.
    • Shield burned crumbs with a layer of fresh crushed Oreos for a quick correction.
    • When the gummy worms melt or break, simply replace them with fresh ones and hide the damage.
    • If the cake feels too dry, sprinkle a little milk over the top for moisture and shimmer.

    Dirt Cake with Gummy Worms

    This dessert features layers of crushed Oreo cookies mixed with butter to resemble dirt, topped with creamy pudding and whipped topping, and decorated with squirming gummy worms. The final appearance mimics a muddy garden bed, with a moist, crumbly texture and playful, edible
    Prep Time 20 minutes
    Cook Time 10 minutes
    Total Time 30 minutes
    Servings: 8
    Course: Main Course
    Cuisine: American
    Calories: 350

    Ingredients
      

    • 24 cookies Oreo cookies for the crust and topping
    • 1/2 cup unsalted butter melted
    • 3.5 oz instant chocolate pudding mix for the pudding layer
    • 2 cups cold milk for pudding
    • 1 cup heavy whipping cream for whipped topping
    • 2 tablespoons granulated sugar for whipped cream
    • 10 gummy worms gummy worms for decoration and atmosphere

    Equipment

    • Mixing bowls
    • Food processor or zip-top bag and rolling pin
    • 9×13 inch baking dish or similar
    • Whisk
    • Rubber spatula

    Method
     

    1. Place Oreo cookies in a food processor and pulse until finely crushed, resembling dirt. Alternatively, put them in a zip-top bag and crush with a rolling pin.
    2. Mix melted butter into the crushed Oreos until well combined. This mixture will form the base layer that resembles muddy earth.
    3. Press the Oreo mixture evenly into the bottom of a 9×13 inch dish to create a crust. Use the back of a spoon or your fingers to smooth it out.
    4. In a bowl, whisk together the instant chocolate pudding mix and cold milk until the pudding begins to thicken and is smooth. Let it sit for a few minutes to fully set.
    5. In a separate bowl, whip the heavy cream and sugar together with a whisk or mixer until soft peaks form and the mixture is fluffy.
    6. Fold the whipped cream gently into the thickened pudding until fully combined, creating a light and creamy layer.
    7. Spread the pudding and whipped topping mixture evenly over the Oreo crust, smoothing the top with a spatula.
    8. Decorate the top with gummy worms, tucking some into the dirt layer and letting a few crawl out for a fun, spooky effect.
    9. Refrigerate the cake for at least 2 hours to let the flavors meld and the layers set firmly.
    10. Before serving, optionally add more gummy worms on top for extra whimsy, and serve chilled for a fun, messy, and spooky dessert.

    Notes

    For an extra gross effect, add a few crushed cookies or edible dirt topping on the gummy worms. Keep refrigerated and serve within 24 hours for best texture.
    This Halloween dirt cake is more than just a fun treat; it’s a chance to bring friends and family together around a dessert that sparks both joy and chaos. Its nostalgic appeal and playful presentation fit perfectly into this year’s spooky palettes and love for simple yet amusing sweets. Let it become a tradition to dig into the dirt and uncover gummy worms hiding beneath the chocolate crumble each October.

  • Unexpected Twist: Reinventing Pumpkin Bread for the Curious Baker

    Unexpected Twist: Reinventing Pumpkin Bread for the Curious Baker

    Fall mornings call for something that awakens more than just the senses—it’s about capturing the essence of cozy chaos. This pumpkin bread isn’t just the usual cinnamon-sweet loaf. Imagine infusing it with a hint of fiery ginger and a swirl of caramel that surprises the palate at every bite.

    In my kitchen, I love to challenge the familiar—turning classic recipes into experiments of texture and flavor. The aroma of roasted pumpkin mingling with toasted spices creates a nostalgic scent that fills the house and sparks spontaneous smiles. Each slice promises a story of tradition mingled with a splash of adventure.

    WHY I LOVE THIS RECIPE?

    • The buttery crumb is perfectly moist, with a surprising crunchy topping that’s totally addictive.
    • The spice blend is personalized—more ginger, less cinnamon—tailored for my bold taste buds.
    • Using roasted pumpkin adds richness and deep flavor complexity I hunt down every fall.
    • It’s foolproof, forgiving, and makes the entire house smell like a bakery on a chilly day.

    AVOID MY DISASTER (You’re Welcome)

    • FORGOT to line the baking pan? Sticky mess. Always parchment, or risk a despair-filled spoon scrape.
    • DUMPED too much pumpkin puree? Dense, soggy loaf. Measure carefully and smooth out that batter.
    • OVER-TORCHED the edges? Burnt aroma and tough crust. Bake in the middle rack, watch it closely.
    • FAILED to mix spices well? Uneven taste, weird bites. Sift spice powders together first for even distribution.

    QUICK FIXES THAT SAVE YOUR DAY

    • When batter is too thick, splash in a tablespoon of buttermilk to loosen.
    • Patch a sinking center by carefully pressing in more chopped nuts or cranberries.
    • Shield over-baked edges with foil if they start to darken too quickly.
    • When loaf cracks on top, quickly reduce oven temp by 25°F and keep an eye.
    • Ever smell something burning? Open the oven immediately and check with a wooden skewer—don’t wait!

    Spiced Pumpkin Bread with Caramel and Ginger

    This pumpkin bread combines roasted pumpkin with warming spices, fiery ginger, and a caramel swirl, baked to a moist and tender crumb with a crunchy top. The loaf features a rich, velvety interior with a golden crust, showcasing a harmonious blend of sweet, spicy, and smoky flavors. Its layered textures include a soft, moist center and a slightly crisp exterior.
    Prep Time 15 minutes
    Cook Time 50 minutes
    Total Time 1 hour 5 minutes
    Servings: 8
    Course: Main Course
    Cuisine: American
    Calories: 320

    Ingredients
      

    • 1 1/2 cups all-purpose flour
    • 1 cup granulated sugar
    • 1/2 cup unsalted butter melted
    • 1 cup roasted pumpkin puree cooled
    • 3 large eggs
    • 1 1/2 teaspoons baking soda
    • 1/2 teaspoon salt
    • 1 teaspoon ground cinnamon
    • 1/2 teaspoon ground ginger
    • 1/2 cup brown sugar
    • 1/4 cup caramel sauce for swirl

    Equipment

    • Mixing bowls
    • Loaf pan
    • Whisk
    • Rubber spatula
    • Oven

    Method
     

    1. Preheat your oven to 350°F (175°C) and line a loaf pan with parchment paper for easy removal.
    2. In a large mixing bowl, whisk together the melted butter, granulated sugar, and brown sugar until smooth and creamy, with a slight sheen.
    3. Add the eggs one at a time, whisking well after each addition to incorporate fully and create a smooth batter.
    4. Gently fold in the roasted pumpkin puree, mixing until evenly distributed throughout the batter. The mixture should be well combined and slightly fluffy.
    5. Sift together the flour, baking soda, salt, cinnamon, and ginger in a separate bowl to ensure even spice distribution.
    6. Gradually add the dry ingredients to the wet mixture, folding gently with a spatula until just combined. Avoid overmixing to keep the bread moist and tender.
    7. Pour half of the batter into the prepared loaf pan, spreading it evenly with a spatula.
    8. Drizzle the caramel sauce over this layer, then add the remaining batter on top, smoothing out the surface.
    9. Use a toothpick or skewer to gently swirl the caramel into the batter for a marbled effect, creating streaks that will melt into the loaf as it bakes.
    10. Bake in the preheated oven for 50–55 minutes, or until a toothpick inserted into the center comes out clean with just a few moist crumbs.
    11. Remove the bread from the oven and let it cool in the pan for 10 minutes, then transfer it to a wire rack to cool completely before slicing.
    12. Slice into thick pieces to showcase the marbled caramel swirls and serve warm or at room temperature. Enjoy the moist crumb with a burst of spicy, caramelized flavor in every bite.
    This pumpkin bread isn’t just a treat for the palate; it’s a celebration of seasonal bounty. Sharing it feels effortless, yet each slice carries a hint of alchemy—perfect for crisp mornings or a cozy afternoon snack. The blend of textures and flavors makes it a steadfast keeper in my recipe box.

    As the seasons turn and pumpkins hit their peak, I find joy in turning this humble ingredient into a statement loaf. No matter what chaos surrounds the day, a warm slice reminds me of simple pleasures: good smells, familiar tastes, and the satisfaction of a recipe well loved.

  • The Secret Ingredient That Turns Apple Cake into a Magic Trick

    The Secret Ingredient That Turns Apple Cake into a Magic Trick

    Most apple cake recipes focus on the fruit and spices, but I like to think outside the box. Today, I want to share a version that uses a surprising twist in the batter—a hint of cardamom and a splash of vanilla that elevates each bite.

    This cake looks humble, with its golden crust and tender crumb, but when you take a bite, a wave of fragrant spice and caramelized apple explodes on your palate. It’s perfect for those who want a comforting dessert that also sparks curiosity with its subtle complexity.

    Recently, I discovered that baking with imperfect apples—slightly bruised and soft—actually adds more flavor. That’s what inspired me to create this recipe, turning everyday fruit into something extraordinary. It’s a cozy bake that feels like a little secret shared among close friends.

    Spiced Apple Cake with Cardamom and Vanilla

    This apple cake combines tender, moist crumb with fragrant spices like cardamom and a splash of vanilla, creating a cozy dessert with a subtle complexity. The cake features a golden crust with caramelized apple pieces throughout, offering a soft texture and aromatic flavor with each bite.
    Prep Time 20 minutes
    Cook Time 45 minutes
    Total Time 1 hour 5 minutes
    Servings: 8
    Course: Main Course
    Cuisine: baking
    Calories: 320

    Ingredients
      

    • 2 cups all-purpose flour sifted
    • 1.5 cups granulated sugar
    • 1 teaspoon baking powder
    • 0.5 teaspoon ground cardamom freshly ground for best aroma
    • 0.25 teaspoon salt
    • 0.5 cup unsalted butter melted and slightly cooled
    • 2 large eggs at room temperature
    • 1 teaspoon vanilla extract
    • 3 medium apples preferably slightly bruised or soft, peeled and diced

    Equipment

    • Mixing bowls
    • Wooden spoon or spatula
    • 8-inch cake pan
    • Parchment paper
    • Knife
    • Cutting board
    • Measuring cups and spoons

    Method
     

    1. Preheat your oven to 350°F (175°C) and line an 8-inch cake pan with parchment paper.
    2. In a large mixing bowl, whisk together the sifted flour, sugar, baking powder, ground cardamom, and salt until well combined.
    3. In another bowl, whisk the eggs, then add melted butter, vanilla extract, and mix until smooth and fragrant.
    4. Pour the wet mixture into the dry ingredients and fold gently with a spatula until just combined, creating a thick batter.
    5. Fold the diced apples into the batter, distributing them evenly throughout the mixture.
    6. Pour the batter into the prepared cake pan, spreading it evenly with a spatula to fill all corners.
    7. Bake in the preheated oven for about 45 minutes, or until the top is golden and a toothpick inserted into the center comes out clean.
    8. Remove the cake from the oven and let it cool in the pan for 10 minutes before transferring to a wire rack to cool completely.
    9. Once cooled, slice and serve the cake with a dusting of powdered sugar or a dollop of whipped cream if desired.

    Whether you’re craving a slice during a chilly afternoon or sharing with loved ones at a weekend gathering, this apple cake fits the bill. Its warm aroma and gentle sweetness make it a memorable treat for any season.

    Once you get the hang of it, you’ll see how a few unexpected ingredients can change a simple cake into an impressive and soulful dessert. Enjoy watching the cake disappear, piece by piece, and savoring every crumb. That’s my kind of baking magic.

  • Hauntedly Delicious: The Art of Crafting Halloween Graveyard Pudding Cups

    Hauntedly Delicious: The Art of Crafting Halloween Graveyard Pudding Cups

    Every October, I find myself mysteriously drawn to the eerie glow of jack-o’-lanterns and the whispered secrets of spooky tales. This year, I decided to channel that thrill into something unexpectedly delightful: Halloween Graveyard Pudding Cups. These little cups of chaos are not just treats, but edible scenes that spark nostalgic chills and sweet satisfaction.

    Crafting this dessert feels like setting the scene for a ghostly gathering—dirt, tombstones, and creeping creepers made from simple pantry items. It’s a wonderful way to turn a basic pudding into a spooky spectacle that mesmerizes both kids and adults. Plus, assembling these tiny graveyards sparks a mischievous fun I can’t resist sharing.

    Halloween Graveyard Pudding Cups

    Halloween Graveyard Pudding Cups are layered desserts featuring creamy chocolate pudding topped with crumbled cookies to resemble dirt, along with edible tombstones and creeping greenery for spooky effect. The main ingredients include pudding, crushed cookies, and candy decorations, creating a textured and visually eerie treat with a smooth and crunchy combination. These miniature scenes are assembled in cups, making them a fun and spooky presentation for Halloween parties.
    Prep Time 20 minutes
    Cook Time 10 minutes
    Total Time 30 minutes
    Servings: 6
    Course: Main Course
    Cuisine: Halloween
    Calories: 250

    Ingredients
      

    • 1 package chocolate pudding mix instant variety
    • 2 cups cold milk
    • 1 cup crushed chocolate cookies for dirt topping
    • 6 small graham cracker tombstones pre-made or homemade
    • small handful green jelly or gummy creepers for creeping vines
    • optional candy gravestones or Halloween-themed decorations

    Equipment

    • Mixing bowls
    • Whisk
    • Measuring cups and spoons
    • Small cups or jars
    • Plastic sandwich bags or piping bags
    • Cookie sheet

    Method
     

    1. In a mixing bowl, whisk together the instant chocolate pudding mix with cold milk for about 2 minutes until the mixture thickens and becomes smooth.
    2. Divide the pudding evenly among small cups or jars, filling each about three-quarters full to create a base layer.
    3. Sprinkle crushed cookies over the pudding to mimic dirt, covering the surface evenly with a crumbly texture.
    4. Place pre-made graham cracker tombstones into each cup, pressing them slightly into the crumb layer for stability.
    5. Add green gummies or jelly creepers around the tombstones and along the edges to resemble creeping vines and foliage.
    6. Optionally, add candy gravestones or Halloween-themed decorations on top to enhance the spooky scene.
    7. Allow the assembled pudding cups to set in the refrigerator for at least 1 hour before serving, so the layers firm up and the decorations stay in place.
    8. Once chilled, serve the Halloween Graveyard Pudding Cups with a spooky straw or spoon for a delightfully eerie treat.
    As the evening winds down and the candles flicker low, these pudding cups serve as a reminder of how playful and inventive Halloween can be. Each spoonful carries the echoes of laughter, scare stories, and the thrill of a well-loved holiday tradition.

    This project is more than just dessert; it’s a nostalgic toast to childhood fears and the magic of dressing up. Whether you’re hosting a party or just sneaking fun into a quiet night, these graveyard cups bring a bit of mischief and a lot of sweetness to the celebration.

  • Spooky Delight: Halloween Monster Eyeball Cake Pops

    Spooky Delight: Halloween Monster Eyeball Cake Pops

    Imagine biting into a cake pop that looks eerily like a monster’s eyeball, complete with veins and a glossy iris. The vibrant red, green, or even purple colors create a chilling effect, perfect for any haunted gathering. These creepy treats turn simple cake pops into a conversational centerpiece that’s as fun to make as they are to eat.

    Using unconventional food dyes and a splash of spooky imagination, you can transform ordinary ingredients into creepy masterpieces. I love how these little monsters bring a mix of chaos and charm to my Halloween celebrations. Plus, the process of assembling their tiny, squishy eyes sparks a creative frenzy I eagerly embrace each year.

    Monster’s Eyeball Cake Pops

    These cake pops are decorated to resemble creepy eyeballs, featuring a smooth, rounded shape with colorful or eerie-colored coating. The glossy finish is achieved through a candy shell, while the detailed veins and iris are added with food coloring and edible accents for a striking final appearance. They combine a moist cake interior with a firm, shiny exterior, making them both fun and spooky treats perfect for Halloween and themed parties.
    Prep Time 30 minutes
    Cook Time 20 minutes
    Total Time 50 minutes
    Servings: 10
    Course: Main Course
    Cuisine: American
    Calories: 150

    Ingredients
      

    • 1 box store-bought cake (or homemade) preferably vanilla or chocolate
    • 1/4 cup butter or shortening for richness
    • 1 cup cream cheese softened
    • 2 cups powdered sugar for sweetness and structure
    • 16 oz white chocolate or candy melts for coating
    • food coloring various colors for irises and veins
    • 1 cup vanilla frosting or gluing mixture for attaching decorations

    Equipment

    • Mixing bowl
    • Baking Pan
    • food processor or crumb cutter
    • melting pot or microwave-safe bowl
    • lollipop sticks
    • Saucepan
    • Baking sheet
    • piping bags or toothpicks

    Method
     

    1. Crumble the cake into a large mixing bowl until fine, then add softened cream cheese and mix thoroughly to create a dough-like consistency.
    2. Using your hands, form the mixture into small, round balls about one inch in diameter. Place them on a baking sheet lined with parchment paper.
    3. Insert a lollipop stick into each cake ball about halfway, then freeze the balls for at least 30 minutes until firm.
    4. While the cake balls chill, melt the white chocolate or candy melts in a microwave or double boiler until smooth and glossy.
    5. Dip each frozen cake pop into the melted chocolate, rotating to cover completely, then gently tap to remove excess coating. Place on a parchment-lined sheet to set.
    6. Once the coating is set, use food coloring mixed with a small amount of frosting or edible glue to create detailed veins, irises, and sclera around each eye for a creepy, realistic look.
    7. Add a small dot of contrasting colored icing or candy to simulate the pupil and give the eyeball a spooky glare.
    8. Allow all decorations to dry briefly, then serve these creepy eyeball cake pops to add a fun, chilling feature to your Halloween spread.

    Notes

    You can customize the colors and details to match different monster or zombie themes. For extra creepiness, use edible glitter or dust to add a spooky shimmer.

    Halloween is the perfect time to indulge in playful, spooky desserts that make everyone smile. These monster eyeball cake pops combine creativity with a deliciously sweet taste that fits the season perfectly. They’re a fun project to share with friends or carve out a few moments of chaotic kitchen joy alone.

    Despite the spooky appearance, these treats are surprisingly simple to make with just a few ingredients and a dash of imagination. As you craft each eyeball, you’ll feel a childlike thrill—knowing you’ve turned ordinary cake into something delightfully horrifying.

  • A Rustic Twist on Peach Crisp That Will Transform Your Summer Desserts

    A Rustic Twist on Peach Crisp That Will Transform Your Summer Desserts

    Imagine walking into a kitchen filled with the sweet, summery aroma of ripe peaches and cinnamon. This Peach Crisp recipe isn’t just about satisfying your sweet tooth; it’s about capturing the carefree spirit of peaches in season, with a crunchy topping that adds the perfect texture. The magic lies in how simple ingredients become a nostalgic, comforting dish with minimal fuss.

    What’s special about this recipe is its versatility. You can personalize it with your favorite nuts or a splash of vanilla. It’s equally delicious warm straight from the oven or cooled with a dollop of whipped cream. Gathering around this peach crisp feels like a celebration of summer’s fleeting bounty.

    Peach Crisp

    Peach Crisp is a baked dessert featuring ripe, sweet peaches topped with a crunchy dating mixture of oats, flour, butter, and cinnamon. The dish results in a bubbling, golden-brown topping with tender, juicy fruit inside, offering a balance of soft and crispy textures.
    Prep Time 15 minutes
    Cook Time 40 minutes
    Total Time 55 minutes
    Servings: 6
    Course: Main Course
    Cuisine: American
    Calories: 250

    Ingredients
      

    • 4 cups ripe peaches, sliced peeling optional
    • 1 cup granulated sugar
    • 1 tablespoon lemon juice to enhance flavor and prevent browning
    • 1 cup old-fashioned rolled oats
    • 1 cup all-purpose flour
    • 1/2 cup brown sugar
    • 1/2 cup cold unsalted butter, cubed cold helps create a crumbly topping
    • 1 teaspoon ground cinnamon

    Equipment

    • Mixing bowls
    • Baking dish
    • pastry cutter or two forks
    • Measuring cups and spoons
    • Knife
    • peeler

    Method
     

    1. Slice the peaches and peel them if desired. Toss the slices with sugar and lemon juice in a large mixing bowl until coated evenly.
    2. Transfer the peach mixture to a greased baking dish, spreading it out into an even layer. This forms the juicy base for your crisp.
    3. In a separate bowl, combine oats, flour, brown sugar, and cinnamon. Stir to blend the dry ingredients thoroughly.
    4. Add the cold, cubed butter to the dry mixture. Use a pastry cutter or two forks to cut in the butter until the mixture resembles coarse crumbs with some pea-sized pieces.
    5. Sprinkle the crumbly topping evenly over the peaches, covering the surface completely to ensure a crunchy top.
    6. Bake in a preheated oven at 350°F (175°C) for about 40 minutes, until the topping is golden brown and the filling is bubbling at the edges.
    7. Remove from the oven and let cool slightly. Serve warm with whipped cream or vanilla ice cream if desired.

    Notes

    Peach Crisp can be customized with chopped nuts or a splash of vanilla in the topping. Properly cooled leftovers can be stored in the refrigerator for up to two days.
    This Peach Crisp is a wonderful way to honor the fleeting sweetness of summer fruits. It’s a dish that brings people together, whether at a family gathering or a quiet evening alone with a good book. The irresistible aroma and the burst of juicy peaches make every spoonful a small escape.

    As the seasons shift, this recipe becomes a nostalgic reminder to cherish the simple joys of fresh, ripe fruit. It’s easy to prepare, comforting, and full of sunshine—perfect for those lingering summer days or bright autumn mornings. Sometimes, the best dessert is the one that makes you feel right at home.

  • Spooktacular Ghost Brownies: An Unforgettable Halloween Treat

    Spooktacular Ghost Brownies: An Unforgettable Halloween Treat

    Halloween is the perfect excuse to break out the spooky baking tools we rarely use the rest of the year. This year, I decided to create something that’s just as whimsical as it is delicious—Ghost Brownies that seem to float off the plate. The smell of rich chocolate mingling with vanilla and a hint of vanilla extract is enough to make anyone’s spirits lift.

    What makes these brownies stand out isn’t just their ghostly appearance, but how surprisingly easy they are to whip up. Whether you’re a seasoned baker or just looking for a quick Halloween project, these treats transform your ordinary brownie into a haunted delight. Plus, the little marshmallow ghosts add a playful crunch and adorable vibe for every age.

    They’re perfect for last-minute parties or when you want a little pumpkin spice magic mixed with gooey chocolate. Nothing beats the joy of seeing kids’ faces light up when they spot these floating phantoms on the dessert table.

    Ghost Brownies

    Ghost Brownies are rich, fudgy chocolate brownies topped with fluffy marshmallow ghosts that appear to float on the surface. The recipe involves baking a chocolate batter until set and then decorating with marshmallow figures to create a whimsical Halloween treat with a soft, chewy interior and a slightly crisp crust.
    Prep Time 15 minutes
    Cook Time 35 minutes
    Total Time 50 minutes
    Servings: 12
    Course: Main Course
    Cuisine: American
    Calories: 250

    Ingredients
      

    • 1 cup unsalted butter melted
    • 2 cups granulated sugar
    • 4 large eggs beaten
    • 1 teaspoon vanilla extract
    • 1 cup all-purpose flour
    • 0.5 cup unsweetened cocoa powder preferably Dutch-processed
    • 0.25 teaspoon salt
    • 1 cup semi-sweet chocolate chips
    • 36 marshmallows for ghost decorations

    Equipment

    • Mixing bowl
    • Whisk
    • Baking Pan
    • Parchment paper
    • Cooling rack
    • Small Microwave-safe Bowl
    • Spoon or Spatula

    Method
     

    1. Preheat your oven to 350°F (175°C) and line a 9×13-inch baking pan with parchment paper for easy removal.
    2. In a large mixing bowl, whisk together melted butter and sugar until smooth and slightly shiny.
    3. Add the beaten eggs and vanilla extract to the wet mixture, whisking until fully combined and silky.
    4. Sift together the cocoa powder, flour, and salt in a separate bowl to aerate and remove lumps.
    5. Gradually fold the dry ingredients into the wet mixture using a spatula, just until no streaks remain.
    6. Stir in the chocolate chips, ensuring they are evenly distributed throughout the batter.
    7. Pour the batter into the prepared pan, spreading it evenly with a spatula to smooth the top.
    8. Bake in the preheated oven for about 35 minutes, or until a toothpick inserted in the center comes out with a few moist crumbs.
    9. Once baked, let the brownies cool completely in the pan on a wire rack for about 15-20 minutes.
    10. Meanwhile, cut the marshmallows in half diagonally to create ghost shapes; set aside.
    11. Arrange the marshmallow ghosts on top of the cooled brownies, pressing gently to adhere.
    12. Optionally, use chocolate or icing to add small eyes to the marshmallow ghosts for extra detail.
    13. Slice into squares and serve these spooky, chocolaty treats, perfect for Halloween parties or haunted movie nights!
    As the evening winds down, these Ghost Brownies will linger in your mind long after the last crumb is gone. Their playful look and nostalgic chocolate aroma make them a true crowd-pleaser, perfect for celebrating the spooky season to its fullest.

    Baking these adds a dash of chaos and fun to your Halloween preparations. They remind us that sometimes, the simplest ingredients can turn into the most memorable treats, especially when dressed up as ghosts. Enjoy the magic of Halloween with these charming, hauntingly delicious brownies.