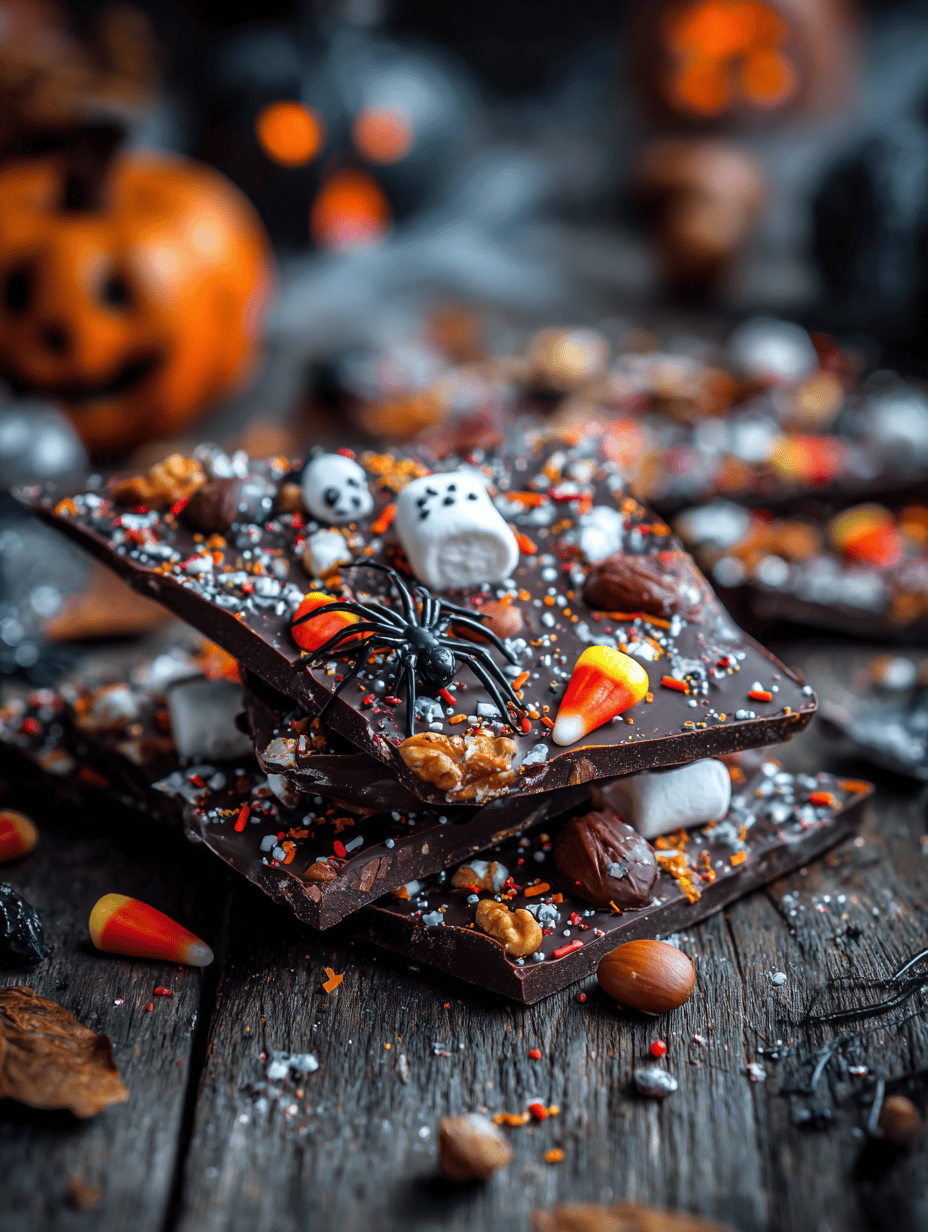
Category: Desserts

  • Spooky Cool: The Halloween Brain Jello Mold That Warms the Ghoulish Heart

    Spooky Cool: The Halloween Brain Jello Mold That Warms the Ghoulish Heart

    Halloween is the one night when chaos reigns and every mealtime becomes a playful experiment. This year, I dared to craft a Brain Jello Mold that’s more creepy than cute but totally edible and delicious. The squishy, translucent texture feels like real brain tissue, except it’s sweet, fruity, and no one will mind if you slice into its grotesque shape.

    What makes this project irresistible is how it combines nostalgic childhood science projects with spooky season flair. Plus, the act of transforming plain Jello into something eerily brain-like sparks a happy chaos in my kitchen. It’s perfect for impressing party guests—or just satisfying a bizarre craving for gory goodies.

    Brain Jello Mold

    This dish is a spooky, gelatin-based dessert molded into a brain-like shape that features a translucent, squishy texture. Made with fruit-flavored gelatin and layered to resemble brain tissue, it is both eerie in appearance and sweet in flavor, with a soft, jiggle-inducing final texture.
    Prep Time 20 minutes
    Cook Time 10 minutes
    Total Time 30 minutes
    Servings: 8
    Course: Main Course
    Cuisine: Seasonal / Halloween
    Calories: 120

    Ingredients
      

    • 1 box fruit-flavored gelatin (e.g., cherry or berry) preferably unflavored gelatin powder for clearer effect
    • 2 cups boiling water
    • 1 cup cold water
    • 1 can sweetened condensed milk optional, for a creamier texture

    Equipment

    • Heatproof mixing bowl
    • Whisk
    • Brain-shaped mold or silicone mold
    • Measuring cups and spoons
    • Saucepan
    • Spray bottle or non-stick spray

    Method
     

    1. Spray your brain-shaped mold with non-stick spray to ensure easy removal later.
    2. Pour the dry gelatin powder into a heatproof mixing bowl.
    3. Add boiling water to the gelatin and whisk thoroughly until completely dissolved, about 2-3 minutes. The mixture should be smooth and glossy.
    4. Add cold water and stir to combine. If using sweetened condensed milk for a creamier effect, mix it in now for a richer, opaque appearance.
    5. Pour the gelatin mixture carefully into the prepared mold, filling it all the way to the top for full brain shape.
    6. Place the mold on a tray and transfer it to the refrigerator. Chill for at least 4 hours or until fully set and firm to the touch.
    7. Once set, gently loosen the edges of the gelatin with a small spatula or knife, then invert the mold onto a serving plate to reveal the brain-like shape.
    8. If desired, use a spoon or small knife to add details or texture to the surface for a more realistic or grotesque effect.
    9. Slice into portions and serve, showcasing its squishy, translucent, brain-like appearance with a fruity aroma.

    Notes

    For extra creepiness, add red-colored syrup or fruit coulis around the mold before serving to mimic blood vessels.
    This Brain Jello Mold isn’t just a conversation starter; it’s a reminder that food can be fun and spooky at the same time. As the season chills into fall, embracing these playful recipes helps make moments memorable, whether for friends or fun solo experiments.

    When the last piece is sliced and served, the giggles and shudders make all the prep worth it. Plus, it’s a fantastic way to get creative with upcycling leftover jello or experimenting with vibrant, eerie colors. Halloween tables just got a lot more interesting—and so will your kitchen adventures.

  • Spooky Seasonal Delight: Halloween Pumpkin Cheesecake Bars

    Spooky Seasonal Delight: Halloween Pumpkin Cheesecake Bars

    Every October, I find myself craving something that captures the essence of fall’s mystery and sweetness. This year, I decided to craft a dessert that marries the creamy richness of cheesecake with the warm, spicy notes of pumpkin and autumnal spices. The process transforms simple ingredients into a layered masterpiece that’s as fun to make as it is to eat.

    What makes these Halloween Pumpkin Cheesecake Bars truly special is their unexpected flavor twist. They’re a bit nostalgic, a little chaotic, and perfectly suited for the season’s festivities. Plus, they sneak in a healthy dose of pumpkin, giving you that cozy, festive feeling in every bite.

    Halloween Pumpkin Cheesecake Bars

    Pumpkin cheesecake bars are a layered dessert combining a buttery crust, a creamy pumpkin-flavored cheesecake layer, and a spiced topping. The dish is baked until set, resulting in a smooth, dense texture with a vibrant orange hue and warming autumnal spices throughout.
    Prep Time 20 minutes
    Cook Time 45 minutes
    Total Time 1 hour 5 minutes
    Servings: 12
    Course: Main Course
    Cuisine: American
    Calories: 350

    Ingredients
      

    • 1 ½ cups graham cracker crumbs
    • ¼ cup granulated sugar
    • ½ cup unsalted butter, melted
    • 16 oz cream cheese, softened
    • 1 cup pumpkin purée
    • ¾ cup granulated sugar
    • 3 large eggs
    • 1 ½ tsps cinnamon
    • ½ tsp ground ginger
    • ¼ tsp ground nutmeg
    • ¼ tsp clove
    • 1 cup sour cream
    • ¼ cup brown sugar
    • ½ tsp vanilla extract

    Equipment

    • 8×8 inch baking pan
    • Mixing bowls
    • Rubber spatula
    • electric mixer or whisk
    • Measuring cups and spoons
    • Oven

    Method
     

    1. Preheat your oven to 350°F (175°C). Combine graham cracker crumbs and sugar in a bowl, then stir in melted butter until the mixture resembles wet sand. Press this mixture firmly into the bottom of your baking pan to form an even crust. Bake for 10 minutes to set, then set aside to cool slightly.
    2. In a large mixing bowl, beat the softened cream cheese until smooth and creamy, about 2 minutes. Add pumpkin purée, sugar, eggs, cinnamon, ginger, nutmeg, and clove, mixing until fully combined and the batter is smooth.
    3. Pour the pumpkin cheesecake filling over the cooled crust, spreading it evenly with a spatula. Smooth the top for a flat surface.
    4. Bake for 40–45 minutes, or until the edges are set and the center slightly jiggles when shaken. The surface may crack slightly, which is normal. Remove from oven and let cool completely to room temperature.
    5. In a small bowl, mix sour cream, brown sugar, and vanilla until smooth and slightly thickened. Spread this topping gently over the cooled cheesecake layer, smoothing with a spatula to cover evenly.
    6. Refrigerate the bars for at least 2 hours, or until fully chilled and set. Slice into squares and serve, enjoying the creamy pumpkin flavor with a hint of spice.

    Notes

    For a festive touch, decorate the top with whipped cream or candy eyes before serving.
    These bars are not just a treat; they’re a conversation starter at any seasonal gathering. They bring a sense of joy and chaos, and maybe a little nostalgia, to your Halloween table. As the cool air settles in, they serve as a reminder that some of the sweetest moments come from simple, homemade delights. So, embrace the mess, the spice, and the pumpkin magic—happy haunting!

  • Spooky Charm: Halloween Pumpkin Rice Krispie Treats You Can’t Miss

    Spooky Charm: Halloween Pumpkin Rice Krispie Treats You Can’t Miss

    As October darkens the days and the air turns crisp, I find myself craving more than just the usual sweets for Halloween. This year, I decided to combine the nostalgic crunch of Rice Krispie treats with a festive pumpkin twist that surprises both the eyes and the taste buds. The smell of melting butter mingled with cinnamon and pumpkin spice instantly creates a cozy, autumnal atmosphere in my kitchen.

    There’s something irresistible about these treats—they’re easy to make, and they spark joy on a busy, candy-filled night. Plus, the vibrant orange color and adorable pumpkin faces make them perfect for sharing at parties or handing out to trick-or-treaters. This recipe is my way of embracing the chaos of Halloween while still keeping it sweet and simple.

    Pumpkin-Spiced Rice Krispie Treats

    These treats combine the classic crispy texture of Rice Krispie squares with a seasonal pumpkin flavor and warm spices. Made by melting butter and marshmallows, then mixing in pumpkin puree, cinnamon, and cereal, they form a vibrant orange, slightly sticky treat that can be shaped into fun pumpkins or bars.
    Prep Time 10 minutes
    Cook Time 15 minutes
    Total Time 25 minutes
    Servings: 12
    Course: Main Course
    Cuisine: American
    Calories: 150

    Ingredients
      

    • 4 cups mini marshmallows
    • 3 tablespoons unsalted butter
    • 1 cup canned pumpkin puree
    • 1 teaspoon ground cinnamon
    • 1/2 teaspoon pumpkin pie spice
    • 6 cups Rice Krispies cereal
    • optional orange food coloring for vibrant color

    Equipment

    • Large saucepan
    • Mixing spoon
    • 9×13 inch baking dish
    • Parchment paper
    • Cookie cutter or knife for shaping

    Method
     

    1. Grease a 9×13 inch baking dish with butter or line it with parchment paper to prevent sticking.
    2. In a large saucepan, melt the butter over medium heat while stirring occasionally until it’s melted and starts to bubble gently.
    3. Add the marshmallows to the melted butter and stir continuously until completely melted and smooth, creating a glossy mixture with a faint aroma of toasted marshmallows.
    4. Stir in the pumpkin puree, cinnamon, and pumpkin pie spice until well combined and the mixture turns a warm orange hue, releasing a fragrant, autumnal scent.
    5. If you wish to intensify the color, stir in a few drops of orange food coloring until evenly blended.
    6. Remove the saucepan from heat and immediately pour the Rice Krispies cereal into the mixture, folding gently with a spatula to coat all the cereal evenly and avoid crushing the flakes.
    7. Transfer the mixture into the prepared baking dish and press it down firmly with a spatula or greased hands to create an even layer. Let it cool for about 15 minutes to set.
    8. Once cooled and firm, use a cookie cutter or a sharp knife to cut into pumpkin shapes or bars, creating neat, festive pieces.
    9. Arrange the treats on a serving platter and enjoy their crispy, chewy texture with bursts of pumpkin spice flavor.

    Notes

    For added fun, decorate the pumpkin faces with chocolate chips or orange icing.

    Crafting these pumpkin Rice Krispie treats is a small act of seasonal celebration. They’re quick to assemble, and the kids love helping decorate the faces with chocolates and sprinkles. Every bite offers a comforting crunch, layered with a whisper of pumpkin spice that feels just right for fall.

    Whether you’re hosting a spooky gathering or want a charming treat for the school party, these are bound to delight. They embody the playful spirit of Halloween, with a flavor that’s as joyful as the costumes and decorations around you. Enjoy the magic of the season with this easy, festive sweet option.

  • Unexpectedly Delicious: The Cozy Pumpkin Muffin That Turns Heads

    Unexpectedly Delicious: The Cozy Pumpkin Muffin That Turns Heads

    Imagine a pumpkin muffin that combines the comforting aroma of cinnamon and nutmeg with a surprising twist of zesty orange zest. This recipe was born from my quest to elevate the humble pumpkin muffin into something that sparks joy at first bite. As the season shifts, I find myself craving these warm, spiced bites that remind me of autumn mornings with a hint of citrus freshness.

    Each muffin is a mini celebration of fall, with a moist crumb and a fragrant top that crackles slightly. The secret ingredient? A splash of vanilla bean extract that amplifies the cozy, nostalgic flavors. It’s perfect for lazy Sunday mornings or when you want to bring a little sunshine to your afternoon snack.

    Spiced Pumpkin Orange Muffins

    These pumpkin muffins are infused with warm spices like cinnamon and nutmeg, complemented by a hint of fresh orange zest. The batter is mixed until just combined, then baked until moist and golden with a slightly crackled top. The addition of vanilla bean extract enhances the cozy, aromatic flavor profile, resulting in a tender muffin with a moist crumb and a fragrant crust.
    Prep Time 15 minutes
    Cook Time 20 minutes
    Total Time 35 minutes
    Servings: 12
    Course: Main Course
    Cuisine: American
    Calories: 200

    Ingredients
      

    • 1 1/2 cups all-purpose flour
    • 1/2 cup granulated sugar
    • 1 cup canned pumpkin puree
    • 1/3 cup vegetable oil
    • 2 large eggs
    • 1 teaspoon ground cinnamon
    • 1/2 teaspoon ground nutmeg
    • 1 teaspoon vanilla bean extract
    • Zest of 1 orange orange zest
    • 1 teaspoon baking powder
    • 1/2 teaspoon salt

    Equipment

    • Mixing bowls
    • Whisk
    • Muffin tin
    • Paper muffin liners or cooking spray
    • Grater or zester
    • Measuring cups and spoons
    • Spatula

    Method
     

    1. Preheat your oven to 350°F (175°C). Line a muffin tin with paper liners or lightly grease it to prevent sticking.
    2. In a large mixing bowl, whisk together the flour, sugar, baking powder, salt, cinnamon, and nutmeg until evenly combined. This creates a flavorful dry mixture.
    3. In another bowl, whisk the pumpkin puree, eggs, vegetable oil, vanilla extract, and orange zest until smooth and slightly frothy.
    4. Pour the wet mixture into the dry ingredients. Gently fold with a spatula until just combined; avoid overmixing to keep the muffins tender.
    5. Using a scoop or spoon, divide the batter evenly among the muffin cups, filling each about two-thirds full.
    6. Bake in the preheated oven for 20-22 minutes or until the tops are golden and a toothpick inserted in the center comes out clean.
    7. Remove the muffins from the oven and let them cool slightly in the tin for about 5 minutes, then transfer them to a wire rack to cool completely.
    8. Once cooled, the muffins should be moist inside with a fragrant aroma and slightly crackled tops, ready to serve.
    There’s something irresistibly comforting about a pumpkin muffin, especially one that’s subtly spiked with citrus. As the days grow shorter and cooler, baking these fills my kitchen with a welcoming atmosphere and an aroma that lingers long after the muffins are gone.

    No matter if you’re baking for friends or just for yourself, these muffins turn simple ingredients into a small, joyful ritual. The next time the craving strikes, I’ll be reaching for this recipe, knowing it never fails to bring a smile—and a full belly.

  • Spook-tacular Witch Finger Cookies That Will Bewitch Your Halloween

    Spook-tacular Witch Finger Cookies That Will Bewitch Your Halloween

    Halloween is my favorite time to get a little creative in the kitchen, and these Witch Finger Cookies are my secret weapon for a creepy, fun treat. The moment I shape the dough into tiny, gnarled fingers, I feel a mischievous thrill—it’s like casting a sweet spell on everyone who sees them. Plus, the scent of melting butter and almond extract fills the kitchen with a hauntingly good aroma.

    What makes these cookies stand out is their perfect combo of crunch and chew, with that creepy little almond nail on top. They’re surprisingly easy to make, even at the last minute, and they turn a simple baking session into a hilarious zombie-haunt. Kids and adults alike love the unsettling look and delicious taste, making them the highlight of any Halloween party.

    Witch Finger Cookies

    Witch Finger Cookies are shaped into small, bony-looking fingers and baked until crisp, featuring a delicate almond nail on each. The dough is made with buttery, almond-flavored ingredients, which give them a crunchy exterior with a slight chew. They have a spooky, gnarled appearance perfect for Halloween celebrations.
    Prep Time 20 minutes
    Cook Time 15 minutes
    Total Time 35 minutes
    Servings: 24
    Course: Main Course
    Cuisine: Halloween
    Calories: 120

    Ingredients
      

    • 1 cup unsalted butter softened
    • 1 cup granulated sugar
    • 1 large egg
    • 1/2 teaspoon almond extract
    • 2 1/2 cups all-purpose flour
    • 1/2 teaspoon baking powder
    • 1/4 teaspoon salt
    • small quantity almond slice for the nail

    Equipment

    • Mixing bowls
    • Baking sheet
    • Parchment paper
    • Small knife or toothpick

    Method
     

    1. Cream together the softened butter and sugar in a mixing bowl until the mixture is light and fluffy, with a pale color and a slightly velvety texture.
    2. Beat in the egg and almond extract until fully incorporated, giving the mixture a fragrant aroma and a smooth consistency.
    3. In a separate bowl, whisk together the flour, baking powder, and salt to evenly distribute the dry ingredients.
    4. Gradually add the dry mixture to the wet ingredients, mixing gently until a cohesive dough forms that’s soft but manageable.
    5. Preheat your oven to 350°F (175°C) and line a baking sheet with parchment paper.
    6. Divide the dough into small portions and roll each into a thin, finger-length shape, tapering the ends slightly to resemble fingers.
    7. Place the shaped fingers on the prepared baking sheet, spacing them slightly apart.
    8. Use a small knife or toothpick to create knuckle marks along each finger, giving them a gnarled, creepy appearance.
    9. Press an almond slice onto the top of each finger to create a spooky nail, embedding it slightly into the dough.
    10. Bake the cookies for about 15 minutes, until they are lightly golden around the edges and feel firm to the touch.
    11. Remove the cookies from the oven and allow them to cool completely on a wire rack, which helps them set and crisp up.
    12. Once cooled, enjoy these spooky, crunchy witch finger cookies that are perfect for Halloween treats.

    Adorning my haunted dessert table wouldn’t be complete without these ghoulish little fingers. Each bite offers a crisp snap, followed by a buttery, almondy sweetness that’s impossible to resist. They’re not just treats—they’re tiny pieces of spooky art that bring my Halloween décor to life.

    This recipe is a reminder that sometimes, the simplest ingredients can create the most theatrically spooky results. As the shadows stretch and the night grows cold, these cookies carve out a special, slightly chaotic, but wholly fun spot in my holiday tradition.

  • The Secret Ingredient That Turns Pumpkin Cheesecake into Autumn’s Best-kept Secret

    The Secret Ingredient That Turns Pumpkin Cheesecake into Autumn’s Best-kept Secret

    As the air turns crisp and the leaves crunch underfoot, my obsession with pumpkin desserts grows deeper. This year, I decided to elevate a classic pumpkin cheesecake by infusing it with a hint of unexpected spice—cardamom. The aroma alone transforms your kitchen into a cozy autumn retreat, promising warmth in every bite.

    This recipe isn’t just about capturing fall flavors; it’s about creating a moment of nostalgia mixed with a dash of chaos in the kitchen. I’ve tweaked the usual ingredients to include a secret swirl of dulce de leche that makes each slice irresistibly rich and caramelized. It’s a dessert that balances tradition and a touch of daring, perfect for showcasing at your next gathering.

    Spiced Pumpkin Cheesecake with Dulce de Leche Swirl

    This pumpkin cheesecake is baked with warm spices like cardamom, resulting in a creamy, dense texture with a smooth appearance. A swirl of dulce de leche is incorporated into the cheesecake batter, creating ribbons of caramel flavor throughout the dessert.
    Prep Time 30 minutes
    Cook Time 1 hour
    Total Time 1 hour 30 minutes
    Servings: 8
    Course: Main Course
    Cuisine: American
    Calories: 480

    Ingredients
      

    • 1 1/2 cups graham cracker crumbs for crust
    • 1/4 cup granulated sugar for crust
    • 1/2 cup unsalted butter melted, for crust
    • 16 oz cream cheese softened
    • 1 cup granulated sugar for filling
    • 1 cup unsweetened pumpkin puree canned
    • 3 large eggs
    • 1 1/2 teaspoons ground cinnamon
    • 1/2 teaspoon ground cardamom adds warm spice
    • 1/2 teaspoon salt
    • 1/2 cup dulce de leche for swirl

    Equipment

    • Springform pan
    • Mixing bowls
    • Electric mixer
    • Rubber spatula
    • Baking sheet
    • Oven

    Method
     

    1. Combine graham cracker crumbs and sugar in a bowl, then stir in melted butter until the mixture resembles wet sand. Press this mixture evenly into the bottom of a springform pan to form a crust. Bake in a preheated oven at 350°F (175°C) for 10 minutes to set the crust, then cool slightly.
    2. In a large mixing bowl, beat softened cream cheese with an electric mixer until smooth and fluffy, about 2-3 minutes.
    3. Gradually add sugar and continue beating until well combined and creamy. Mix in pumpkin puree, ensuring an even color and consistency.
    4. Add eggs one at a time, beating on low speed after each addition to incorporate fully. Mix in cinnamon, cardamom, and salt until fragrant and evenly distributed.
    5. Pour the pumpkin cheesecake batter over the crust in the springform pan. Use a spatula to smooth the top for an even surface.
    6. Spoon dollops of dulce de leche over the surface of the batter in random spots. Use a toothpick or skewer to gently swirl the dulce de leche into the batter, creating beautiful ribbons.
    7. Place the springform pan on a baking sheet and bake in the preheated oven at 350°F (175°C) for 60 minutes, or until the edges are set and the center is slightly jiggly.
    8. Remove the cheesecake from the oven and let it cool in the pan for about 30 minutes, then refrigerate for at least 4 hours or overnight to set fully.
    9. Once chilled, carefully run a knife around the edges of the springform to loosen, then unlock the sides and remove the pan.
    10. Slice the cheesecake with a heated knife for clean, smooth cuts, and serve chilled to enjoy its rich, creamy texture with swirls of dulce de leche visible throughout.
    As you cut through the smooth, spiced pumpkin filling, the scent of cinnamon and cardamom fills the air, sealing the deal on this cozy indulgence. It’s a dessert that makes every holiday table feel just a little more special.

    This cheesecake not only celebrates the bounty of fall but also offers a comforting escape from the busy season’s hustle. With its creamy texture and festive spices, it’s sure to be a conversation starter. A slice of this pumpkin cheesecake will forever be your new seasonal tradition.

  • Spooky Sweet: Halloween Candy Corn Parfaits That Charm and Surprise

    Spooky Sweet: Halloween Candy Corn Parfaits That Charm and Surprise

    As the leaves turn and the air gets crisper, I find myself craving something playful yet nostalgic. These Halloween Candy Corn Parfaits offer a delightful twist on traditional treats, blending creamy textures with the vibrant colors of fall. They’re perfect for when you want to impress guests or simply indulge in a bit of seasonal fun.

    What makes these parfaits stand out is their unexpected elegance—layered visuals combined with familiar flavors. They’re easy to assemble but feel special enough for a Halloween party centerpiece or a cozy night by the fireplace. Bright, sweet, and slightly mischievous, this dessert captures the spirit of October’s festivities.

    Halloween Candy Corn Parfaits

    These layered parfaits feature creamy vanilla pudding interleaved with vibrant orange and yellow fruit or jelly layers, mimicking the iconic candy corn colors. They are assembled in clear glasses to showcase the colorful strata, resulting in a sweet, smooth, and visually playful dessert.
    Prep Time 15 minutes
    Cook Time 10 minutes
    Total Time 25 minutes
    Servings: 4
    Course: Main Course
    Cuisine: seasonal/holiday
    Calories: 250

    Ingredients
      

    • 1 box vanilla instant pudding mix or prepared pudding
    • 2 cups milk for the pudding
    • 1 cup orange jelly or fruit puree for the orange layer
    • 1 cup yellow jelly or fruit puree for the yellow layer
    • 1 cup whipped cream optional, for topping

    Equipment

    • Mixing bowls
    • Whisk
    • Measuring cups and spoons
    • Parfait glasses or small jars
    • Spatula

    Method
     

    1. Start by whisking the vanilla pudding mix with the cold milk in a mixing bowl until thoroughly combined and the mixture has thickened, about 2-3 minutes. This creates a smooth, creamy base.
    2. Pour the orange jelly or fruit puree into a separate bowl and stir well to break up any lumps, ensuring a bright, smooth layer.
    3. Pour the yellow jelly or fruit puree into another bowl and mix until it’s smooth and uniform in color.
    4. Begin assembling the parfaits by spooning a layer of the prepared vanilla pudding into each glass or jar, filling about one-third of the way up.
    5. Follow with a spoonful of the orange jelly or fruit puree, adding a vibrant, opaque layer on top of the pudding.
    6. Add another layer of vanilla pudding over the orange, smoothing gently with the back of a spoon.
    7. Next, layer the yellow jelly or fruit puree, spreading it carefully over the cream layer for a bright contrast.
    8. Finish with a final dollop of vanilla pudding on the top, creating a smooth surface to showcase the colorful layers.
    9. If desired, top each parfait with a swirl of whipped cream for a festive finish.
    10. Chill the parfaits in the refrigerator for at least 1 hour to allow the flavors to set and the layers to firm up before serving.

    Notes

    You can customize the layers with different fruits or colors to suit your taste or theme. Ensure each layer is set before adding the next for clean, distinct visuals.

    These candy corn parfaits are a reminder that even the simplest ingredients can be transformed into something enchanting. The combination of silky custard, crunchy candy, and fluffy whipped cream makes every spoonful a tiny celebration of fall. Plus, they’re a charming way to use up leftover candy or prep for a last-minute gathering.

    Seasons come and go, but the joy of crafting a playful dessert like this remains constant. With their cheerful colors and nostalgic taste, they’re sure to bring smiles and a few giggles. Nothing beats a treat that’s as fun to look at as it is to eat.