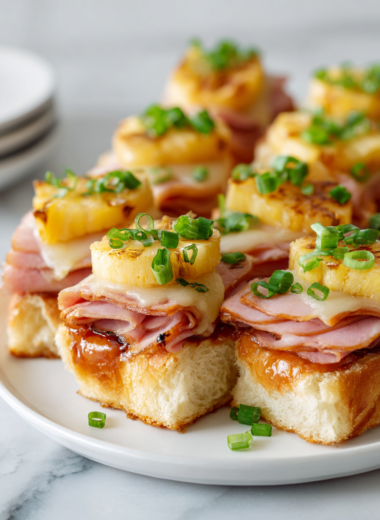
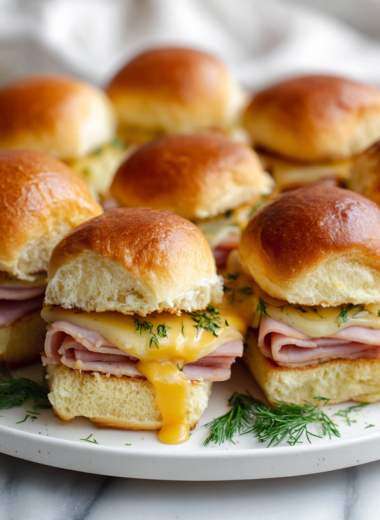
Category: Main Course

  • Sesame Apricot Tofu Bowl Recipe

    This Sesame Apricot Tofu Bowl started as a way to bring comfort and a little bit of childhood sweetness into my busy week. I love the way the sticky apricot glaze contrasts with the crispy tofu and the fresh crunch of vegetables. It’s one of those dishes that feels like a hug, but with a bit of a grown-up edge.

    I’m always looking for ways to make plant-based meals more exciting, and this bowl hits all those notes. It’s quick to throw together, but the layers of flavor make it feel special. Plus, it’s perfect for a cozy night in or a quick lunch that leaves you satisfied.

    Cooking with a nostalgic twist: reviving childhood flavors in a modern bowl.

    Why I keep coming back to this bowl

    • I love how the apricot glaze adds a sweet, sticky contrast to the crispy tofu.
    • Cooking this dish always makes me nostalgic for summer afternoons and fruit stands.
    • It’s satisfying to see everything come together quickly, making weeknights feel a bit more special.

    My inspiration story

    • This recipe was born out of a need for quick comfort food that doesn’t compromise on flavor.
    • I wanted something that felt indulgent but was still wholesome and fresh.
    • The apricot glaze was a happy accident, inspired by a jar of jam I almost forgot I had.

    Background and trivia about the ingredients and inspiration

    • Inspired by Asian flavors but with a Western twist, blending sweet apricot with savory tofu.
    • Apricot preserves have been used in cooking since the Middle Ages, often in sauces and jams.
    • Sesame seeds are one of the oldest oilseed crops, dating back over 3,000 years in China.
    • Tofu, originating from China, became popular worldwide as a versatile plant protein.
    • This dish echoes the trend of bowl meals that combine grains, protein, and veggies in one package.

    Ingredient insights and tweaks

    • Firm tofu: I prefer pressing it to remove excess moisture, making it chewier and crispier. Swap with tempeh for a nuttier bite.
    • Apricot preserves: They give that glossy, sweet glaze. Use peach jam if apricot isn’t available, but expect a different aroma.
    • Sesame seeds: Toast for a nutty flavor—instant aroma boost. Substitute with chopped nuts for crunch.
    • Vegetables: Carrots and peppers add color and sweetness; try snap peas or broccoli for variety.
    • Ginger: Fresh gives a zesty punch, but ground ginger works in a pinch, just half as much.

    Spotlight on Apricot and Tofu

    Tofu: Firm and chewy, it takes on flavors well and develops a crispy exterior when baked or pan-fried.:

    • Apricot preserves: Oozy and bright, it caramelizes beautifully, adding a sticky sweetness that’s hard to resist.
    • It melts into the glaze, giving it a shiny, almost lacquered look.

    Apricot preserves: Thick, sticky, with a tangy sweetness—think of biting into a fresh, ripe fruit.:

    • Tofu’s spongy texture absorbs marinades, making every bite flavorful.
    • It’s forgiving—if you overcook slightly, it still holds up well.

    Substitutions to suit your pantry and preferences

    • Dairy-Free: Use apricot jam or compote for sweetness, and swap honey for agave.
    • Gluten-Free: Ensure soy sauce is gluten-free and use rice vinegar instead of regular vinegar.
    • Vegetables: Use whatever’s fresh—zucchini, mushrooms, or kale—whatever makes you happy.
    • Tofu: Silken works for cold dishes, but for this, firm or extra-firm is best.
    • Seeds: Pumpkin or sunflower seeds can replace sesame for a different crunch.

    Equipment & Tools

    • baking sheet: roast tofu and vegetables
    • pans: toast sesame seeds and cook glaze
    • whisk: mix glaze ingredients
    • sharp knife: chop vegetables
    • cutting board: prepare ingredients

    Step-by-step for the Sesame Apricot Tofu Bowl

    1. Press and cube the tofu, then marinate with soy sauce and sesame oil for 30 minutes.
    2. Preheat oven to 200°C (400°F). Spread the tofu on a baking sheet lined with parchment. Bake for 25 minutes, flipping halfway, until golden and crispy.
    3. While tofu bakes, whisk together apricot preserves, a splash of soy sauce, and a teaspoon of grated ginger for the glaze.
    4. Chop your favorite vegetables—bell peppers, carrots, snap peas—and toss with oil, salt, and pepper.
    5. Roast the vegetables on a separate sheet at 200°C (400°F) for 20-25 minutes, until caramelized.
    6. In a small pan, toast sesame seeds over medium heat until golden and fragrant, about 2-3 minutes.
    7. Once everything is cooked, assemble the bowl: start with rice or grains, then add roasted tofu and vegetables.
    8. Drizzle generously with the apricot glaze and sprinkle with toasted sesame seeds.
    9. Finish with a squeeze of lime or a dash of chili flakes for extra zing.

    Let the bowl sit for 5 minutes before serving to allow flavors to meld. Garnish with extra sesame seeds or herbs if desired.

    How to Know It’s Done

    • Tofu should be crispy and golden.
    • Vegetables should be caramelized and slightly charred.
    • The glaze should be sticky and glossy, coating everything evenly.

    Sesame Apricot Tofu Bowl

    This vibrant tofu bowl features crispy pressed tofu glazed with a sticky, sweet apricot sauce, complemented by roasted vegetables and toasted sesame seeds. The dish combines contrasting textures—crunchy, tender, and glossy—creating a comforting yet sophisticated meal. Perfect for a quick weeknight dinner or a cozy lunch, it’s both nourishing and visually appealing.
    Prep Time 10 minutes
    Cook Time 35 minutes
    Total Time 45 minutes
    Servings: 4
    Course: Main Course
    Cuisine: fusion
    Calories: 320

    Ingredients
      

    • 14 oz firm tofu pressed to remove excess moisture
    • 2 tablespoons soy sauce for marinating
    • 1 teaspoon sesame oil for marinating
    • 1/2 cup apricot preserves for glaze
    • 1 teaspoon fresh ginger grated
    • 2 cups mixed vegetables such as bell peppers, carrots, snap peas
    • 2 tablespoons vegetable oil for roasting vegetables
    • 1 tablespoon toasted sesame seeds
    • 1 lime lime for squeezing on top

    Equipment

    • Baking sheet
    • pans
    • Whisk
    • Sharp knife
    • Cutting board

    Method
     

    1. Cube the pressed tofu into bite-sized pieces and place in a bowl. Mix soy sauce and sesame oil, then toss the tofu to coat evenly. Let it marinate for about 10 minutes while you prepare the vegetables.
    2. Preheat your oven to 200°C (400°F). Spread the marinated tofu on a parchment-lined baking sheet and bake for 25 minutes, flipping halfway, until the tofu is golden and crispy.
    3. Meanwhile, whisk together the apricot preserves, grated ginger, and a splash of soy sauce in a small bowl to create a glossy glaze. Set aside.
    4. Chop your preferred vegetables into bite-sized pieces. Toss them with vegetable oil, salt, and pepper, then spread them out on a separate baking sheet.
    5. Roast the vegetables in the oven for 20-25 minutes, until they are caramelized and slightly charred around the edges.
    6. While everything is baking, toast the sesame seeds in a dry pan over medium heat until golden and fragrant, about 2-3 minutes, shaking the pan occasionally.
    7. Once the tofu is crispy and the vegetables are roasted, assemble your bowl. Start with a base of cooked rice or grains if desired, then layer the roasted tofu and vegetables on top.
    8. Drizzle the apricot glaze generously over the tofu and vegetables, allowing it to coat everything in a shiny, sticky sheen.
    9. Sprinkle the toasted sesame seeds over the bowl for added crunch and nutty flavor. Squeeze fresh lime juice over the top for brightness.
    10. Serve immediately while hot, allowing the flavors to meld and the tofu to stay crispy. Enjoy this comforting, colorful bowl with a satisfying contrast of textures and flavors.

    Tips and tricks for perfect results

    • TOFU: Press thoroughly to avoid sogginess.
    • SEAR FIRST: Sear tofu in hot oil until golden before baking for extra crisp.
    • GLAZE: Warm the apricot preserves slightly for easier mixing.
    • ROAST VEG: Spread veggies in a single layer to ensure even caramelization.
    • SEASON SEEDS: Toast until fragrant but not burned for the best flavor.
    • USE FRESH GINGER: Grate just before using for a bright, zingy flavor.
    • SERVE HOT: As soon as assembled, for the best texture and flavor.

    Common mistakes and how to fix them

    • FORGOT to press tofu? Use a heavy pan to squeeze out excess moisture.
    • DUMPED too much oil on vegetables? Toss them again and roast at a slightly lower temp.
    • OVER-TORCHED sesame seeds? Lower heat and toast for less time.
    • SWEETENED the glaze too much? Balance with a splash of rice vinegar.

    Fast fixes for common kitchen hiccups

    • When tofu sticks, splash a little water or oil into the pan.
    • If glaze is too thick, thin with a splash of warm water.
    • Patch over burnt sesame seeds with fresh ones.
    • Shield vegetables with foil if they brown too fast.
    • Splash a bit of soy or vinegar if flavors are bland.

    Make-ahead and storage tips

    • Marinate the tofu up to a day ahead for extra flavor.
    • Roast the vegetables and tofu and store in airtight containers for 2 days.
    • The glaze can be made in advance and kept refrigerated for up to a week.
    • Reheat in the oven at 180°C (350°F) for 10 minutes, or until warm and crispy.

    10 Practical Q&As about the Sesame Apricot Tofu Bowl

    1. Can I use softer tofu?

    Use firm tofu, pressed well for 15 minutes, to get a chewy, satisfying bite.

    2. Should I marinate the tofu?

    Marinate the tofu in a bit of soy sauce and sesame oil for at least 30 minutes for extra flavor.

    3. Can I substitute the apricot?

    Apricot preserves work best for sweetness, but you can also try apricot jam or fresh apricots pureed.

    4. How do I know when the vegetables are done?

    Roast the veggies at 200°C (400°F) until caramelized, about 20-25 minutes.

    5. Do I need to toast the sesame seeds?

    Toast the sesame seeds until golden and fragrant, about 2-3 minutes on medium heat.

    6. Can I use a different pan?

    Use a non-stick or well-seasoned skillet to prevent sticking and ensure even cooking.

    7. How long does leftovers last?

    Serve immediately for best crispness, but leftovers keep well in the fridge for 2 days.

    8. How do I reheat without losing texture?

    For best flavor, reheat the bowl in the oven at 180°C (350°F) for 10 minutes.

    9. Can I tweak the flavors?

    Adjust the sweetness or acidity by adding a splash of rice vinegar or a pinch of chili flakes.

    There’s something satisfying about making a meal that hits both sweet and savory notes, especially when it’s as colorful as this. It’s a dish that can be customized easily, making it versatile for whatever veggies or fruit you have on hand.

    Cooking this bowl reminds me how simple ingredients can come together to make something memorable. It’s a little messy, a little sweet, and a little spicy—exactly how I like my weeknight dinners.

  • Vegan Broccoli Cheddar Soup Recipe

    This soup isn’t about perfection. It’s about grabbing what’s in your fridge and making it work—bright green broccoli, a handful of nutritional yeast, some garlic. The smell of bubbling broth and melting yeast feels like a small victory, even if you’re juggling kids or a busy afternoon.

    Cooking this soup reminds me that comfort can be quick and unpolished. It’s those little imperfect moments—bits of cheese sticking to the pot, broccoli giving a little crunch—that make it real. It’s a simple, honest bowl that warms you from the inside out, no fancy tricks needed.

    The unpolished, honest notes of a home cook navigating a cozy, imperfect kitchen adventure.

    Why This Soup Matters to Me

    • I love how forgiving this recipe is. It’s a bit chaotic but always satisfying.
    • There’s a nostalgic feeling in blending up a warm, cheesy soup on a chilly day.
    • I feel a tiny surge of pride every time I make this from scratch, knowing it’s all plant-based.
    • It’s become my go-to when I want something quick, nourishing, and honest.

    A Cozy Inspiration

    • One cold evening, I tossed broccoli and pantry staples into a pot, craving comfort without dairy. The smell of garlic and melting nutritional yeast felt like a small victory. It reminded me how simple ingredients can create something warm and satisfying.
    • It’s a reminder that good food doesn’t need to be complicated.
    • Sometimes, improvising with what’s in the fridge leads to the best dishes.

    A Little Soup History and Trivia

    • This soup is inspired by classic comforting flavors but made entirely plant-based.
    • Nutritional yeast gives it that cheesy flavor without dairy, a trick many vegans swear by.
    • Broccoli was chosen for its quick cooking and vibrant color, symbolizing health and vitality.
    • The combination of garlic and smoked paprika adds depth, reminiscent of traditional cheesy sauces.

    Ingredient Breakdown & Tips

    • Broccoli: I love its bright flavor and quick cook time. For a softer, more melded flavor, steam it first.
    • Nutritional Yeast: It’s my secret to cheesy flavor. If you’re out, try a pinch of smoked paprika or vegan cheese.
    • Garlic: Adds warmth and depth. Use fresh for pungency, or garlic powder in a pinch.
    • Plant-Based Milk: Keeps the soup smooth and creamy. Almond or cashew work well, but skip coconut if you want neutral.
    • Salt: Enhances everything. Taste as you go to avoid overdoing it.

    Spotlight on Broccoli and Nutritional Yeast

    Nutritional Yeast: It’s flaky, cheesy, and umami-rich. It melts into the soup, creating a rich, velvety texture.:

    • Bright green broccoli: It cooks quickly, so add it later in the process for a vibrant color and fresh flavor.
    • It has a slightly bitter note when raw, which mellows out as it cooks, releasing a sweet, earthy aroma.

    Broccoli: It’s a versatile veggie that’s quick to cook—perfect for a weeknight dinner.:

    • The yeast’s nutty aroma intensifies when heated, giving the soup its signature cheesy flavor.
    • It’s a quick way to add depth without dairy, but beware—it can be salty, so taste before adding extra salt.

    Substitutions for Every Need

    • Dairy-Free: Use coconut milk or cashew cream for creaminess, but expect a different flavor profile.
    • Gluten-Free: Ensure broth and thickeners are gluten-free if needed.
    • Soy-Free: Skip soy-based ingredients, and choose coconut or almond milk.
    • Extra Protein: Add cooked chickpeas or tofu cubes for a heartier soup.
    • Flavor Boost: A dash of smoked paprika or liquid smoke can add smoky depth.

    Equipment & Tools

    • Large pot: To cook and simmer the soup.
    • Immersion blender: To puree the soup directly in the pot.
    • Measuring cups and spoons: To measure ingredients accurately.
    • Ladle: For serving.

    Simple Step-by-Step to Creamy Vegan Broccoli Cheddar Soup

    1. Heat a large pot over medium heat, about 180°C (355°F). Add a splash of oil and sauté diced onion until translucent, about 5 minutes.
    2. Add minced garlic and cook until fragrant, about 30 seconds. Then stir in chopped broccoli, cooking for another 3–4 minutes until slightly tender.
    3. Pour in vegetable broth—about 4 cups (960 ml)—and bring to a gentle simmer. Cook until broccoli is very soft, about 10 minutes.
    4. Lower heat, and use an immersion blender to puree the soup directly in the pot until smooth. Or transfer to a blender in batches.
    5. Stir in nutritional yeast, a teaspoon of smoked paprika (for depth), and season with salt and pepper. Simmer for 5 more minutes.
    6. Taste and adjust seasoning. If it’s too thick, stir in a splash of plant-based milk. If too thin, simmer uncovered to thicken.
    7. Finish with a squeeze of lemon juice or a dash of hot sauce if you want a bright kick.

    Let the soup sit for a minute after blending, then taste and adjust seasoning before serving.

    How to Know It’s Done

    • Soup is bright green and fragrant after sautéing.
    • Broccoli is very soft and easily pierced with a fork.
    • Soup is smooth and velvety after blending.

    Simple Vegan Broccoli Cheddar Soup

    This hearty, comforting soup combines bright green broccoli with a savory, cheesy flavor from nutritional yeast, all blended into a smooth, velvety texture. Made with basic pantry ingredients and fresh vegetables, it’s a quick, nourishing meal that feels warm and satisfying. The final look is a vibrant green, creamy bowl with bits of tender broccoli and a slightly cheesy aroma.
    Prep Time 10 minutes
    Cook Time 20 minutes
    Total Time 30 minutes
    Servings: 4
    Course: Main Course
    Cuisine: Comfort Food
    Calories: 150

    Ingredients
      

    • 1 medium onion diced
    • 3 cloves garlic minced
    • 4 cups vegetable broth
    • 2 cups broccoli florets fresh or thawed frozen
    • 1/4 cup nutritional yeast for cheesy flavor
    • 1 teaspoon smoked paprika optional, for depth
    • 1 cup plant-based milk such as almond or cashew
    • to taste salt and pepper
    • 1 squeeze lemon juice optional, for brightness

    Equipment

    • Large pot
    • Immersion blender
    • Measuring cups and spoons
    • Ladle

    Method
     

    1. Heat a large pot over medium heat and add a splash of oil. Sauté the diced onion until it becomes translucent and fragrant, about 5 minutes. You should hear a gentle sizzle and see the onions turn clear.
    2. Add the minced garlic to the pot and cook for about 30 seconds until it releases a warm, fragrant aroma. Stir frequently to prevent burning.
    3. Stir in the broccoli florets and cook for another 3-4 minutes, stirring occasionally, until they begin to soften and turn vibrant green.
    4. Pour in the vegetable broth and bring the mixture to a gentle simmer. Cover the pot and cook until the broccoli is very tender, about 10 minutes. You’ll notice the broth bubbling softly and the broccoli softening.
    5. Remove the pot from heat and use an immersion blender to puree the soup until smooth and velvety. Alternatively, transfer the mixture to a blender in batches, blending until silky, then return to the pot.
    6. Stir in the nutritional yeast, smoked paprika (if using), and season with salt and pepper. Pour in the plant-based milk and stir until everything is combined and heated through, about 5 minutes. The soup should be creamy, bright green, and fragrant.
    7. Taste the soup and adjust the seasoning with more salt, pepper, or a squeeze of lemon juice for brightness. If the soup is too thick, stir in a little more plant-based milk or broth until it reaches your desired consistency.
    8. Serve hot in bowls, garnished with a sprinkle of nutritional yeast or fresh herbs if desired. Enjoy the comforting, vibrant green soup with bits of tender broccoli and a cheesy aroma.

    Notes

    For extra creaminess, add a spoonful of vegan cheese or a splash of coconut milk. This soup is best enjoyed fresh but can be stored in the fridge for up to 3 days or frozen for longer storage.

    Tips & Tricks for Perfect Soup

    • GARLIC: Sauté garlic just until fragrant, don’t let it burn—bitterness shows.
    • CREAMY TEXTURE: Use an immersion blender for silky consistency—less mess, more control.
    • SEASONING: Taste before adding salt; nutritional yeast can be salty.
    • VIBRANT COLOR: Add a squeeze of lemon at the end to brighten the greens.
    • THICKENING: If too thick, stir in hot broth or plant milk—avoid over-thickening with flour.

    Common Mistakes and How to Fix Them

    • FORGOT TO salt early? Add a pinch during cooking for better flavor.
    • DUMPED in all the broth at once? Add gradually and taste as you go.
    • OVER-BOILED the soup? Lower the heat and simmer gently.
    • SPLASHED the hot soup on your hand? Run under cold water immediately.

    Fast Fixes for Common Issues

    • If too salty, add a splash of plain water or unsalted broth.
    • When it’s too thin, simmer uncovered a few extra minutes.
    • Splash in lemon juice if flavor feels flat.
    • Patch overcooked broccoli by pureeing with fresh herbs.
    • Shield from overcooking by removing from heat once broccoli is soft.

    Prep and Storage Tips

    • Pre-chop broccoli and onions to save time later.
    • Soup can be refrigerated for up to 3 days; reheat gently and stir in a splash of plant milk.
    • Freeze in portions for up to 2 months. Thaw overnight in the fridge.
    • Flavor deepens after a day, so it’s often better the next day.

    10 practical Q&As about Vegan Broccoli Cheddar Soup

    1. Can I use frozen broccoli?

    Use fresh broccoli florets for the best flavor and texture. Frozen works in a pinch, but fresh gives a brighter taste.

    2. Should I thaw the broccoli beforehand?

    Yes, but be sure to thaw and drain excess water to prevent diluting the soup.

    3. What can I use instead of cheese?

    Opt for nutritional yeast instead of cheese for that cheesy, umami punch without animal products.

    4. How should I cook the soup to keep it smooth?

    Simmer gently, don’t boil vigorously, to keep the flavors bright and avoid a grainy texture.

    5. Can I blend the soup in a regular blender?

    Use a good blender or immersion blender. Puree until silky for that comforting, creamy feel.

    6. When should I add lemon or vinegar?

    Taste and adjust seasoning at the end. A splash of lemon juice can brighten the whole bowl.

    7. How do I balance flavors?

    Add salt gradually, tasting as you go. Broccoli and nutritional yeast can be slightly bitter.

    8. What should I serve with this soup?

    Serve with crusty bread or a sprinkle of chives for extra flavor and texture.

    9. How do I fix a too-thick soup?

    Stir in a splash of plant-based milk if it thickens too much upon reheating.

    10. How long does the soup last?

    Store leftovers in airtight containers for up to 3 days in the fridge; freeze for longer.

    Once you’ve got it simmering, this soup becomes a kind of cozy ritual. It’s forgiving, forgiving enough that even a little extra garlic or a splash more plant milk won’t ruin it.

    And honestly, I find myself craving it more in the middle of a hectic week, when I need that warm, cheesy hug in a bowl without all the fuss.

  • Peanut Butter Sauce (savory) Recipe

    When I first started playing around with peanut butter beyond breakfast toast, I was surprised by how versatile it can be. This sauce isn’t just a condiment; it’s a way to give a familiar meal a whole new depth—savory, slightly spicy, and deeply satisfying.

    I love how it’s practically foolproof, yet it feels a bit rebellious to use peanut butter in something other than a sweet spread. It’s the kind of recipe that makes you want to keep a jar handy, ready to whip up a quick, flavorful punch for anything from noodles to roasted vegetables.

    The unusual angle I picked is how this savory peanut butter sauce can be a secret weapon for transforming simple, everyday ingredients into something unexpectedly rich and complex—like turning plain grilled chicken into a crave-worthy dish with just a spoonful.

    Why this sauce matters to me

    • I love how a simple jar of peanut butter can turn into a rich, savory sauce.
    • This recipe is my go-to when I want something quick but flavorful — it’s almost magical.
    • I’ve fed this to friends who thought it was a secret ingredient, and they’ve all asked for the recipe.

    My inspiration for this savory peanut butter sauce

    • I once made this sauce on a whim for a weeknight dinner, and it turned a boring chicken into something memorable. It’s become a staple ever since.
    • The idea sparked from a craving for bold flavors that didn’t require a long list of ingredients.
    • Every time I whip it up, I think about how versatile and forgiving it is—perfect for improvising with what’s in the fridge.

    A brief history and fun facts about peanut sauce

    • Peanut butter has been used in Asian cuisine for centuries, especially in Thailand and Malaysia.
    • The savory peanut sauce is a modern twist on traditional satay sauces, which often include coconut milk and spices.
    • In some cultures, peanut sauces are used as a dipping condiment for everything from vegetables to grilled meats.
    • Peanuts are technically legumes, but their flavor and texture blend perfectly into savory sauces like this one.

    Ingredient insights: what makes each component special

    • Peanut butter: I prefer natural, slightly gritty. It gives a rich, authentic flavor—skip if too thick.
    • Soy sauce: Adds salt and umami. Light soy is milder; dark soy offers deeper color and richness—choose based on your flavor preference.
    • Rice vinegar: Brightens the sauce with a lemon-bright tang. Apple cider vinegar can be a good substitute.
    • Honey or maple syrup: Balances the saltiness with a touch of sweetness. Adjust to taste for a smooth, shiny finish.
    • Garlic: Provides warmth and depth. Use fresh for the best aroma, or roasted for a mellow sweetness.

    Spotlight on key ingredients

    Peanut Butter:

    • Its natural oils help emulsify the sauce, creating a silky texture that clings beautifully.
    • It’s best to stir well before measuring, as the oil can separate—think of that oozy, nutty aroma.

    Soy Sauce:

    • It’s the salty backbone that ties everything together, giving the sauce its umami punch.
    • Watch out for its saltiness; taste and adjust quantities to prevent overpowering.

    Substitutions to customize your sauce

    • Dairy-Free: Coconut aminos substitute soy sauce for a sweeter, more tropical flavor.
    • Vegan: Use maple syrup instead of honey—still rich, just a bit earthier.
    • Gluten-Free: Tamari works as a soy sauce alternative with a nuttier, less salty profile.
    • Low-Sodium: Choose reduced-sodium soy sauce to control salt levels.
    • Spicy: Add more chili flakes or a dash of hot sauce for extra heat.

    Equipment & Tools

    • Small saucepan: To gently heat and combine ingredients
    • Whisk: To blend ingredients into a smooth sauce
    • Measuring spoons and cups: To measure ingredients accurately

    Step-by-step guide to making savory peanut butter sauce

    1. Gather your ingredients: peanut butter, soy sauce, rice vinegar, a little honey or maple syrup, garlic, chili flakes, and water.
    2. In a small saucepan over medium heat (about 160°C/320°F), warm the peanut butter gently—just enough to loosen it.
    3. Add soy sauce, rice vinegar, honey, and minced garlic. Stir constantly until the mixture is smooth and fragrant—about 2 minutes.
    4. If the sauce is too thick, stir in water a teaspoon at a time until it reaches your desired consistency.
    5. Simmer gently for another minute, tasting and adjusting the salt or spice. It should be glossy and slightly thickened, with a faint crackle of garlic.
    6. Remove from heat. Let it rest for a few minutes to allow flavors to meld. It thickens slightly as it cools.
    7. Serve warm or at room temperature. Drizzle over grilled chicken, roasted veggies, or toss with noodles.
    8. For a thicker dip, let it sit a bit longer. For thinner, stir in a splash more water or broth.
    9. Check the consistency: it should coat the back of a spoon, shiny and smooth.
    10. If you notice separation, give it a quick whisk over low heat or add a bit more water.

    Let the sauce cool for 5 minutes. Serve immediately or store in an airtight container. Reheat gently, stirring to restore smoothness.

    How to Know It’s Done

    • Sauce should be glossy and smooth—no oil separation.
    • Aromas of garlic and roasted peanut should be fragrant.
    • Consistency should be thick enough to cling, but pourable.

    Savory Peanut Butter Sauce

    This versatile sauce combines natural peanut butter with soy sauce, rice vinegar, honey, and garlic to create a rich, savory, and slightly spicy condiment. Its smooth, glossy texture makes it perfect for drizzling over grilled meats, roasted vegetables, or tossing with noodles for an easy, flavorful meal.
    Prep Time 5 minutes
    Cook Time 10 minutes
    Total Time 15 minutes
    Servings: 4
    Course: Main Course
    Cuisine: Asian-inspired
    Calories: 150

    Ingredients
      

    • 1/2 cup natural peanut butter preferably slightly gritty
    • 2 tablespoons soy sauce light or dark, based on preference
    • 1 tablespoon rice vinegar brightens the sauce
    • 1 teaspoon honey or maple syrup balances saltiness
    • 1 clove garlic minced
    • 1/4 teaspoon chili flakes optional, for heat
    • 2-3 tablespoons water to adjust consistency

    Equipment

    • Small saucepan
    • Whisk
    • Measuring spoons and cups

    Method
     

    1. Place the small saucepan on the stove over medium heat. Add the natural peanut butter and gently warm it for about a minute until it loosens and becomes slightly runny, releasing a nutty aroma.
    2. Whisk in soy sauce, rice vinegar, honey, and minced garlic, stirring constantly. Continue whisking until all ingredients are well combined and the mixture is smooth, fragrant, and slightly glossy, about 2 minutes.
    3. If the sauce feels too thick, gradually add water one teaspoon at a time, whisking after each addition until you reach your desired pourable consistency. The sauce should coat the back of a spoon smoothly.
    4. Sprinkle in chili flakes if you like a bit of heat, then give the sauce a final whisk. Let it simmer gently for another minute, allowing the flavors to meld and the sauce to thicken slightly.
    5. Remove the saucepan from heat and let the sauce rest for a couple of minutes. It will tighten up a bit as it cools but remain silky and shiny.
    6. Transfer the sauce to a serving bowl or pour directly over your prepared dish. It’s perfect warm or at room temperature, ready to add a burst of savory flavor to grilled chicken, roasted vegetables, or noodles.

    Notes

    For a creamier texture, blend the sauce in a blender until smooth. Store leftovers in an airtight container in the fridge for up to 3 days, reheating gently and stirring before serving.

    Cooking tips and tricks to perfect your sauce

    • FLAVOR: Toast the garlic briefly before adding for a smoky, rounded depth.
    • BALANCE SALT: Taste as you go—soy sauce can vary in saltiness, so adjust accordingly.
    • USE ROOM TEMP: Keep ingredients like peanut butter at room temp for easier mixing.
    • CONTROL SPICE: Add chili flakes gradually; start small for a gentle heat.
    • SILKY TEXTURE: Whisk constantly during heating to prevent sticking or burning.

    Common mistakes and how to fix them

    • FORGOT to stir? Whisk vigorously over low heat to reincorporate any separation.
    • DUMPED in too much water? Add a spoonful of peanut butter to thicken it up again.
    • OVER-TORCHED the garlic? Rinse the pan and start over with fresh garlic.
    • SOUR taste? Balance with a touch more honey or sugar, and check your soy sauce for saltiness.

    Quick fixes for common kitchen mishaps

    • When sauce thickens too much, splash in warm water and whisk until smooth.
    • Splash in a dash of lime for brightness if the sauce seems dull.
    • Patch over a runny sauce with a spoonful of peanut butter and heat gently.
    • Shield from overcooking by removing from heat as soon as ingredients are combined.
    • When garlic burns, start over to avoid bitter flavor, then reheat the sauce.

    Make-ahead and storage tips for this sauce

    • Prepare the sauce a day in advance to let flavors meld—refrigerate in an airtight container.
    • It keeps well for up to 3 days in the fridge; stir before reheating.
    • The flavors intensify after sitting, so don’t worry if it tastes sharper initially.
    • Reheat gently over low heat, stirring until smooth, then serve.

    10 Practical Q&As About Making Savory Peanut Butter Sauce

    1. Can I use smooth peanut butter instead of chunky?

    Use natural peanut butter for a richer, more oozing texture and a true nutty flavor.

    2. What if my sauce turns out too thick?

    Yes, but smooth will give you a creamier, less textured sauce—less chewy, more silk.

    3. How do I fix a runny peanut sauce?

    Add a splash of warm water or broth, whisk until smooth, then cook a bit longer to blend.

    4. Is it okay to make this sauce ahead of time?

    Simmer it gently, stirring often, until it thickens up and clings to a spoon.

    5. How should I reheat it?

    Absolutely, store it in the fridge for up to 3 days; warm gently before serving.

    6. Can I freeze this sauce?

    Reheat over low heat, stirring constantly—add a touch of water if it thickens too much.

    7. What flavors pair well with this sauce?

    Yes, in an airtight container for up to a month, though texture might slightly change.

    8. Can I make this vegan?

    It’s great with grilled chicken, roasted veggies, or tossed into noodles for a quick stir-fry.

    9. What’s the best way to serve this for a crowd?

    Yes, it’s already vegan if you use plant-based ingredients, no animal products needed.

    10. How do I adjust the spice level?

    Pour over a big platter of roasted veggies, or serve as a dipping sauce for spring rolls.

    This sauce isn’t just a pantry staple; it’s a little secret in my kitchen. It’s quick to toss together, but it elevates even the simplest ingredients.

    Once you get the hang of balancing the salt, spice, and acidity, you’ll find yourself reaching for this sauce more often than you’d expect—because it’s just that good, that easy, and that adaptable.

  • Red Lentil Curry Recipe

    Sometimes, I just want a meal that feels like a warm hug after a long day. Red lentil curry, with its earthy aroma and silky texture, hits that spot for me. It’s not fancy, but it’s honest, filling, and adaptable—perfect for those nights when I want simplicity and flavor.

    I’ve learned that the secret is in the slow simmer, letting the spices and lentils mingle until the house fills with a smoky, spicy scent. It’s a dish that invites improvisation—use what you’ve got, taste as you go, and trust the process.

    From a cook who’s learning to embrace the imperfect, rustic charm of home cooking—no fancy ingredients, just honest flavors.

    Why this recipe matters to me

    • I love how forgiving this dish is—errors just add character.
    • There’s a nostalgic comfort in the smoky aroma filling the kitchen.
    • Making this curry reminds me of cozy weekends spent experimenting.
    • It’s a humble meal that always turns into a conversation starter.

    Personal story behind this simple comfort food

    • I started making this curry during a hectic week when I needed something quick, nourishing, and satisfying. It’s become a go-to because it’s forgiving and adaptable.
    • It’s forgiving: overcooked lentils still taste good—soft and earthy.
    • It’s versatile: add spinach, coconut milk, or leftover veggies.
    • It’s economical: lentils are cheap and filling.

    Trivia and roots of Red Lentil Curry

    • Red lentils are a staple in Middle Eastern and Indian cuisines, prized for their quick cooking and creamy texture.
    • The dish can be traced back to ancient trade routes where legumes were a vital protein source.
    • In some cultures, this curry is a comfort food, made in large pots for family gatherings.
    • The spice blend varies widely—some add coconut milk, others prefer a tangy tomato base.

    Ingredient insights and tweaks

    • Red lentils: I love their creamy texture and quick cook time. If you prefer more bite, cook a bit less.
    • Onion: Adds sweetness and depth. Use yellow for sweetness or white for sharper flavor.
    • Ginger: Brightens the dish with a zesty punch. Use fresh for the best aroma—avoid dried.
    • Curry powder: The backbone of flavor. Adjust to your spice level; I often add a pinch of cayenne.
    • Lemon juice: Brightens everything. Use fresh lemon for that zing—can substitute with vinegar in a pinch.

    Spotlight on Key Ingredients

    Ginger:

    • Red Lentils: They break down into a silky sauce, the true heart of this dish. Expect a soft, almost velvety bite.
    • Onions: They soften and sweeten as they cook, filling the kitchen with a warm aroma.

    Ginger:

    • It’s pungent and fiery, adding a fresh, zesty note. During cooking, it becomes mellow but still bright.
    • It’s best to grate ginger fresh—dried or ground misses that sharpness.

    Ingredient swaps and tips

    • Dairy-Free: Use coconut milk for creaminess—adds a subtle sweetness and richer texture.
    • Gluten-Free: This dish is naturally gluten-free, just ensure your broth is labeled gluten-free.
    • Spice Level: Add more chili or cayenne for heat, or reduce if you prefer milder flavors.
    • Vegetarian/Vegan: Skip any animal-derived broth, use vegetable stock instead.
    • Add Greens: Stir in spinach or kale at the end for extra nutrition and color.

    Equipment & Tools

    • Large pot: To cook the lentils and spice base
    • Wooden spoon: To stir and combine ingredients
    • Measuring cups and spoons: To measure spices and liquids
    • Knife and cutting board: To prep onion, garlic, ginger
    • Lemon squeezer (optional): To extract juice for brightness

    Step-by-step guide to making Red Lentil Curry

    1. Rinse 1 cup of red lentils under cold water until the water runs clear.
    2. Heat 2 tbsp oil in a large pot over medium heat. Add 1 chopped onion and cook until translucent, about 5 minutes.
    3. Stir in 2 minced garlic cloves and 1 inch grated ginger. Cook until fragrant, about 1 minute.
    4. Add 1 tbsp curry powder, 1 tsp cumin, and 1/2 tsp turmeric. Toast spices for 30 seconds, until fragrant.
    5. Pour in 4 cups of water or broth. Bring to a boil, then add lentils.
    6. Reduce heat to low, cover, and simmer for 20-25 minutes, stirring occasionally.
    7. Check lentils—should be tender and the sauce slightly thickened. If too thick, add a splash of hot water.
    8. Stir in a squeeze of lemon juice and adjust seasoning with salt and pepper.
    9. Let rest for 5 minutes, then serve with rice or bread, garnished with herbs.

    Let the curry rest for 5 minutes off the heat, then stir and serve immediately.

    How to Know It’s Done

    • Lentils are tender but not falling apart.
    • The sauce is thick and coats the lentils evenly.
    • The aroma is smoky and spicy, inviting you to taste.

    Red Lentil Curry

    This comforting red lentil curry features tender, creamy lentils simmered with aromatic spices, onions, garlic, and ginger until the flavors meld into a silky, fragrant sauce. The dish boasts a rustic, hearty texture with a warm, smoky aroma, perfect for a simple, satisfying meal served over rice or bread.
    Prep Time 10 minutes
    Cook Time 30 minutes
    Total Time 40 minutes
    Servings: 4
    Course: Main Course
    Cuisine: Indian, Middle Eastern
    Calories: 250

    Ingredients
      

    • 1 cup red lentils rinsed until water runs clear
    • 2 tbsp oil vegetable or olive oil
    • 1 large onion chopped
    • 2 cloves garlic minced
    • 1 inch ginger fresh, grated
    • 1 tbsp curry powder
    • 1 tsp cumin
    • 1/2 tsp turmeric
    • 4 cups water or broth vegetable or chicken
    • 1 squeeze lemon juice fresh
    • to taste salt and pepper

    Equipment

    • Large pot
    • Wooden spoon
    • Measuring cups and spoons
    • Knife and cutting board
    • Lemon squeezer

    Method
     

    1. Start by rinsing the red lentils under cold water until the water runs clear; set aside.
    2. Heat the oil in a large pot over medium heat. Add the chopped onion and cook, stirring often, until it’s soft and translucent—about 5 minutes—filling your kitchen with a warm aroma.
    3. Add the minced garlic and grated ginger to the onions. Cook for another minute until fragrant, hearing a gentle sizzle and noticing the mixture turning slightly golden.
    4. Stir in the curry powder, cumin, and turmeric. Toast the spices for about 30 seconds until they release a rich, smoky scent—this step deepens their flavor.
    5. Pour in the water or broth and bring the mixture to a boil. Once bubbling, add the rinsed lentils and stir well.
    6. Reduce the heat to low, cover the pot, and let the lentils simmer gently for about 20-25 minutes, stirring occasionally. The lentils will turn soft, and the sauce will thicken into a creamy, velvety consistency.
    7. Check the lentils; they should be tender and the sauce slightly thickened. If it’s too thick, stir in a splash of hot water to loosen it up.
    8. Squeeze in fresh lemon juice and season with salt and pepper to taste. Stir well and let it sit for a few minutes to let flavors meld.
    9. Give the curry a final stir, taste again, and adjust seasoning if needed. It should be fragrant, smoky, and silky—ready to serve.
    10. Spoon the warm lentil curry into bowls and enjoy it over rice or with crusty bread for a comforting, honest meal.

    Cooking tips for perfect Lentil Curry

    • SPICE: Toast spices first to unlock their full aroma.
    • LENTILS: Cook at a gentle simmer, not a rolling boil, for even softness.
    • HEAT: Keep the heat medium-low after boiling to prevent sticking.
    • FLAVOR: Use fresh garlic and ginger for that sharp, pungent kick.
    • TEXTURE: Stir occasionally to prevent lentils from sticking to the bottom.

    Common issues and how to fix them

    • FORGOT TO RINSE THE LENTILS? Rinse now to remove dust and bitterness.
    • DUMPED TOO MUCH WATER? Reduce heat and simmer uncovered to thicken.
    • OVER-TORCHED SPICES? Add a splash of water or broth and start over with fresh spices.
    • SEASONING OFF? Add a squeeze of lemon or more salt to balance.

    Fast fixes for common kitchen snafus

    • When too watery, simmer uncovered until thickened.
    • Splash in some coconut milk if you want creaminess.
    • Patch blandness with lemon juice or hot sauce.
    • Shield overcooked lentils with a splash of broth.
    • When spices burn, start fresh with new spices and a clean pan.

    Make-ahead and storage tips

    • Chop onions, garlic, and ginger ahead for quick assembly.
    • Cook lentils and store in fridge for up to 3 days, or freeze for a month.
    • The flavors deepen overnight, making it even better the next day.
    • Reheat gently on stove, adding a splash of water to loosen the sauce, until steaming and fragrant.

    10 Practical Q&As about Red Lentil Curry

    1. Can I use other types of lentils?

    Use a good quality red lentil, like French or Moroccan, for a softer, creamier texture. Rinse well to remove dust.

    2. How do I know when the lentils are done?

    Cook the lentils until they are tender but not mushy, about 20-25 minutes after boiling. They should hold their shape slightly.

    3. Can I make it spicier?

    Adjust the spicing to your taste, adding more chili or ginger if you like it fiery. Taste as you go.

    4. Should I add acid before or after cooking?

    Stir in fresh lemon juice or a splash of vinegar before serving to brighten the flavors.

    5. What should I serve it with?

    Serve with warm basmati rice or crusty bread. The bread helps scoop up the thick, flavorful sauce.

    6. My curry is too thick—what do I do?

    If the curry gets too thick, thin it with a little hot water or broth. It should be spoonable but not watery.

    7. Can I freeze leftover curry?

    Use fresh herbs like cilantro or parsley as a garnish. They add a fresh, herbal note that balances the spices.

    8. How long does it keep?

    Yes, store in an airtight container for up to 3 days in the fridge or 1 month in the freezer.

    9. How do I reheat without losing flavor?

    Reheat gently on the stove or in the microwave, stirring often. Add a splash of water if needed.

    10. How can I make leftovers taste fresh again?

    Add a pinch of salt or a squeeze of lemon after reheating to refresh the flavor.

    This curry isn’t just about the flavors; it’s about the process, the little adjustments, and the comfort of a homemade meal. It keeps well in the fridge, and I find myself reaching for it on busy nights, knowing it’s nourishing and satisfying.

    Sometimes, I toss in whatever greens I have or a dash of coconut milk for a richer vibe. It’s a dish that grows with you, forgiving and warm, just like a good conversation over a simple meal.

  • Turmeric Lentil Vegetable Soup Recipe

    This isn’t your average lentil soup. It’s a warm bowl that captures the aroma of turmeric, the gentle crackle of sautéed vegetables, and the satisfying feel of soft lentils melting in your mouth. I like to think of it as a sensory experience—each spoonful a little more vivid and comforting than the last.

    Making this soup was born from needing something nourishing but quick, and it turned into a ritual of balancing flavors and textures. It’s one of those recipes that feels like a warm hug, especially after a busy day when the kitchen feels too quiet, and you just want a little glow from within.

    Every time I make this, I remember my grandmother’s kitchen—her love for simple, vibrant food. It’s a reminder that good cooking doesn’t need fancy ingredients, just honest hands and a bit of patience.

    Unusual focus on the sensory journey of the soup, emphasizing the contrast of earthy turmeric and soft, hearty lentils.

    Why This Soup Matters to Me

    • I love how the turmeric transforms the color and aroma.
    • There’s a satisfying moment when the lentils melt into the broth.
    • I always feel a little smarter after eating something this bright and earthy.
    • It’s a simple dish, but it feels like a warm secret.
    • Making this soup reminds me it’s the small, honest ingredients that matter most.

    Personal Inspiration Behind the Soup

    • This recipe came from a Sunday afternoon craving for something warm and bright. I had a bunch of lentils, a fresh piece of turmeric, and a handful of vegetables that needed using up. It’s a no-fuss dish that’s become my go-to when I want comfort without the fuss.
    • The magic is in the aroma—earthy, slightly spicy, and just a little smoky from the paprika. It fills the kitchen and makes everyone feel at home, even if it’s just me cooking.
    • Every spoonful feels like a little celebration of simple, honest ingredients. It’s proof that you don’t need fancy stuff to make something truly nourishing.

    A Little History and Trivia About This Vibrant Soup

    • Turmeric has been used in Indian cooking for over 4,000 years.
    • Lentils are one of the oldest cultivated legumes, dating back thousands of years.
    • This soup combines influences from Indian and Middle Eastern cuisines.
    • Turmeric’s active compound, curcumin, is known for its anti-inflammatory properties.
    • In some cultures, yellow-colored foods like turmeric are believed to bring good luck.

    Ingredient Insights for This Vibrant Soup

    • Turmeric: I love fresh turmeric for its pungent, ginger-like aroma and vivid color. Use more or less based on your taste or what’s available; it’s the star here.
    • Lentils: I use red or yellow lentils for their quick cooking and soft texture. Green or brown lentils can work but will hold their shape more.
    • Vegetables: Carrots and onions are my base, but you can toss in celery, zucchini, or even sweet potatoes for extra flavor.
    • Broth: Homemade or store-bought—both work. Look for a low-sodium variety so you can control the salt.
    • Lemon: Brightens everything. Add just before serving for that fresh, zingy pop.

    Spotlight on Turmeric and Lentils

    Turmeric:

    • It’s earthy and pungent; a little goes a long way. Watch for staining—wear an apron!
    • Turmeric’s vibrant color is a sign it’s packed with curcumin, a potent anti-inflammatory compound.
    • Lentils: They’re quick-cooking, hearty, and melt into the soup. Rinse well to remove dust and excess starch.

    Lentils:

    • They absorb flavors beautifully. Cook until just tender—slightly firm is best for texture.
    • They develop a smooth, almost creamy mouthfeel as they break down, adding richness to the broth.

    Smart Substitutions to Customize Your Soup

    • Fresh Turmeric: Swap with ½ teaspoon ground turmeric for convenience, but expect a milder flavor.
    • Vegetable Broth: Use chicken or beef broth if you prefer a richer, more savory base.
    • Lentils: Green or brown lentils can replace red/yellow for a firmer bite and different appearance.
    • Greens: Spinach or kale can be added at the end for more greens and nutrients.
    • Lemon Juice: Replace with a splash of apple cider vinegar for tang without citrus.

    Equipment & Tools

    • Large heavy-bottomed pot: Even heat for simmering
    • Wooden spoon or spatula: Stirring and preventing sticking
    • Measuring spoons and cups: Accurate ingredient measuring
    • Knife and chopping board: Chopping vegetables and herbs

    Step-by-Step Guide to Making Turmeric Lentil Vegetable Soup

    1. Heat a tablespoon of oil in a large pot over medium heat. Add chopped onion, carrot, and celery. Cook for 8-10 minutes until soft and fragrant.
    2. Stir in minced garlic and grated fresh turmeric. Cook for 1 minute until aromatic.
    3. Add 1 cup of rinsed lentils, 1 teaspoon of cumin, ½ teaspoon of smoked paprika, and a pinch of chili flakes if you like heat.
    4. Pour in 4 cups of vegetable broth. Bring to a boil, then lower to a simmer.
    5. Simmer for 25-30 minutes, until lentils are tender, stirring occasionally. Check for doneness: lentils should be soft but not falling apart.
    6. Taste and adjust seasoning with salt and lemon juice. If the soup is too thick, add a splash of water or broth.
    7. Optional: blend a portion of the soup for a creamier texture, then stir back into the pot.
    8. Finish with chopped greens if desired, letting them wilt in the hot soup for 3-5 minutes.

    Let the soup sit for 5 minutes after turning off heat. Serve hot, garnished with fresh herbs or a squeeze of lemon.

    How to Know It’s Done

    • Lentils are tender and breaking apart.
    • The soup has a bright, earthy aroma from turmeric.
    • The color is a vibrant yellow-orange, inviting and warm.

    Turmeric Lentil Vegetable Soup

    This vibrant lentil soup combines earthy turmeric, tender vegetables, and hearty lentils cooked in a flavorful broth. The soup develops a bright yellow hue and a comforting, melt-in-your-mouth texture, finished with a splash of lemon for brightness. It’s a nourishing, easy-to-make dish with a satisfying, velvety consistency.
    Prep Time 10 minutes
    Cook Time 30 minutes
    Total Time 40 minutes
    Servings: 4
    Course: Main Course
    Cuisine: fusion
    Calories: 250

    Ingredients
      

    • 1 tablespoon olive oil
    • 1 medium onion chopped
    • 1 large carrot diced
    • 2 stalks celery chopped
    • 3 cloves garlic minced
    • 1 inch fresh turmeric grated
    • 1 cup red or yellow lentils rinsed
    • 4 cups vegetable broth
    • ½ teaspoon smoked paprika
    • 1 tablespoon lemon juice freshly squeezed
    • to taste salt

    Equipment

    • Large heavy-bottomed pot
    • Wooden spoon or spatula
    • Measuring spoons and cups
    • Knife and chopping board

    Method
     

    1. Heat a tablespoon of olive oil in a large pot over medium heat until shimmering, then add chopped onion, carrot, and celery. Sauté for 8-10 minutes until the vegetables are soft, fragrant, and slightly translucent.
    2. Add minced garlic and grated fresh turmeric to the pot. Cook for about 1 minute, stirring constantly, until aromatic and fragrant, with the mixture turning a warm golden hue.
    3. Stir in rinsed lentils along with smoked paprika, and cook for another minute to toast the spices and coat the lentils in flavor.
    4. Pour in the vegetable broth, bringing the mixture to a gentle boil. Once bubbling, reduce the heat to low and cover the pot.
    5. Let the soup simmer gently for 25-30 minutes, stirring occasionally. You’ll see the lentils soften and break down, creating a velvety, bright yellow-orange broth.
    6. Uncover the pot and taste the soup. Adjust the seasoning with salt and add a squeeze of fresh lemon juice to brighten the flavors and add a zesty contrast.
    7. If you prefer a creamier texture, use an immersion blender to blend part of the soup directly in the pot until smooth, then stir to combine.
    8. Optional: stir in chopped greens like spinach or kale, allowing them to wilt for 3-5 minutes, adding fresh color and nutrients.
    9. Serve the soup hot, garnished with additional lemon wedges or fresh herbs if desired. Enjoy the velvety, aromatic bowl that feels like a warm hug.

    Cooking Tips & Tricks to Elevate Your Soup

    • FLAVOR: Toast spices in the oil at the start for a deeper, richer flavor.
    • TEXTURE: Rinse lentils well to remove dust and reduce foam.
    • HEAT: Keep the heat at medium to avoid burning garlic or turmeric.
    • COLOR: Use fresh turmeric for a more vibrant hue and sharper flavor.
    • GREEN: Add greens at the end to retain their color and nutrients.

    Common Mistakes and How to Fix Them

    • FORGOT to add lemon? Squeeze fresh lemon juice just before serving for brightness.
    • DUMPED too much broth? Thicken with a bit of mashed lentils or a splash of coconut milk.
    • OVER-TORCHED the garlic? Quickly add a splash of water to cool the pan and save the flavor.
    • SALT too early? Wait until the end to adjust salt; too early can make the soup bitter.

    Quick Fixes for Common Soup Snags

    • When too thick, splash in hot water and stir until smooth.
    • When bland, add a pinch more salt or a squeeze of lemon.
    • Splash a dash of soy sauce or tamari for umami boost.
    • Patch over undercooked lentils with a quick blend and stir.
    • Shield from overcooking greens by adding them at the last moment.

    Make-Ahead and Storage Tips

    • Chop vegetables and measure spices ahead; store in airtight containers, up to 2 days in the fridge.
    • Cooked lentils can be stored in the fridge for up to 3 days, ready to reheat.
    • Soup thickens as it cools; add a splash of hot water when reheating to loosen.
    • Flavor may deepen overnight, so taste and adjust seasoning after reheating.
    • Reheat on low heat, stirring until steaming hot and fragrant again.

    10 Practical Q&As About Turmeric Lentil Vegetable Soup

    1. Can I use dried turmeric instead of fresh?

    Use fresh turmeric if possible for a brighter, earthier flavor. If dried, reduce the quantity slightly, as it’s more concentrated.

    2. When should I add turmeric during cooking?

    Yes, just add dried turmeric earlier with the spices to give it time to bloom and release flavor.

    3. How do I know when the lentils are done?

    Lentils should be tender but not mushy, about 25-30 minutes after simmering begins.

    4. How often should I stir the soup while cooking?

    Stir occasionally to prevent sticking and ensure even cooking, especially if using a thicker bottom pot.

    5. How long does this soup keep in the fridge?

    You can store leftovers in an airtight container for up to 4 days in the fridge.

    6. How do I reheat without losing flavor?

    Reheat gently on the stove or in the microwave, adding a splash of water or broth if it thickens too much.

    7. Should I add lemon juice before or after reheating?

    Adjust salt and lemon juice after reheating to brighten the flavors again.

    8. Can I blend the soup for a smoother texture?

    For a creamier texture, blend part of the soup before serving.

    9. How can I make this spicier?

    Yes, adding a pinch of cayenne or chili flakes can give it a gentle heat.

    10. Can I add greens to the soup?

    Feel free to add chopped spinach or kale for extra greens, stirring in at the end until wilted.

    This soup is more than just a meal; it’s a quiet moment, a pause to breathe and enjoy the simple, honest flavors. Sometimes, I find myself craving that earthy warmth, especially on chilly evenings or when I need a reminder that comfort comes in a bowl.

    It’s easy to customize, too, which makes it perfect for whatever you have in the fridge. A little more spice, some greens, or a squeeze of lemon—each tweak transforms it into your own cozy creation.

  • Vegan Pasta Bake Recipe

    This vegan pasta bake isn’t just about filling the belly; it’s about the way flavors transform in the oven, how the sauce thickens and clings to each pasta piece, and the scent of toasty herbs rising as it bakes. I love that moment when I pull it out—crisp edges, bubbling cheesy sauce, that smoky aroma filling the kitchen.

    It’s a dish that feels cozy yet bright, a perfect quick comfort that’s also a little fancy with fresh herbs and a golden crust. I’ve made this so many times, tweaking ingredients here and there, and each time it’s a little new story on my plate. It’s honest, it’s straightforward, but it never fails to warm me up in the best way.

    Focusing on how the textures and flavors evolve from fresh to baked, emphasizing sensory layers.

    Why This Vegan Pasta Bake Matters to Me

    • I love how this dish smells as it bakes—garlic, herbs, and that hint of smoky cheese fill the house.
    • There’s relief in knowing I can toss this together on a busy night and still get something wholesome on the table.
    • It’s a nostalgic reminder of family dinners, but with a modern, vegan twist I feel good about.

    My Inspiration

    • Inspired by childhood casseroles, I wanted a version that’s simple, satisfying, and plant-friendly.
    • The trick was balancing creamy with crispy, and making sure every bite was flavorful without dairy.
    • I keep tweaking the seasonings and toppings, always chasing that perfect cheesy, smoky note.

    A Little History

    • This dish evolved from traditional Italian baked pasta recipes, adapted for plant-based ingredients.
    • Vegetable bakes like this became popular in the 1960s as a quick, hearty way to use up leftovers.
    • Nutritional yeast, used here for cheesy flavor, was once a health food secret before becoming a kitchen staple.
    • The name ‘pasta bake’ varies globally—sometimes called ‘pasta al forno’ in Italy—each with local twists.

    Main Ingredients Breakdown

    • Pasta: I prefer short shapes for sauce cling; use what you love, but aim for al dente texture.
    • Tomato Sauce: I like a chunky, flavorful variety—opt for a good quality jar or homemade if you have time.
    • Vegan Cheese: Melty and smoky, it transforms this dish; nutritional yeast adds umami, but can be skipped if needed.
    • Herbs: Fresh basil or parsley brighten the dish—add after baking for maximum flavor.
    • Breadcrumbs: For topping, they add crunch and a toasty aroma—try seasoned varieties for extra flavor.

    Ingredient Spotlight: Nutritional Yeast & Vegan Cheese

    Nutritional Yeast:

    • Has a cheesy, nutty aroma that enhances the sauce; it’s a staple in vegan cooking.
    • Vegan Cheese: Melts into a gooey layer—look for brands with good meltability and smoky notes.

    Vegan Cheese:

    • Expect a mild, smoky flavor; it should stretch and melt smoothly without gritty texture.
    • Choose based on flavor profile—cheddar-style for richness, or mozzarella for stretch.

    Ingredient Substitutions

    • Gluten-Free: Use gluten-free pasta—cooks quicker, slightly softer, but still delicious.
    • Nut-Free: Swap almond milk for oat or soy milk—creaminess remains, no nutty flavor.
    • Extra Protein: Add cooked lentils or chickpeas—boosts texture and makes it more filling.
    • Herb Variations: Use cilantro or dill instead of basil—adds a fresh, unexpected twist.
    • Breadcrumbs: Swap for crushed crackers or gluten-free crumbs—maintains crunch.

    Equipment & Tools

    • Large pot: Cook pasta
    • Skillet: Make sauce
    • 9×13 inch baking dish: Bake the dish
    • Oven: Finish baking
    • Spatula or spoon: Mix and serve

    How to Make a Vegan Pasta Bake

    1. Preheat oven to 180°C (350°F). Grease a 9×13 inch baking dish with a little olive oil.
    2. Cook pasta in salted boiling water for 8 minutes, until just al dente. Drain and set aside.
    3. In a large skillet, heat 1 tbsp olive oil over medium. Add chopped onion and garlic, cook until fragrant, about 3 minutes.
    4. Stir in tomato sauce, nutritional yeast, and plant-based milk. Simmer for 5 minutes until slightly thickened and flavorful.
    5. Mix cooked pasta into the sauce, ensuring each piece is coated well. Pour into the prepared dish.
    6. Sprinkle with vegan cheese or breadcrumbs. Bake uncovered for 20-25 minutes until bubbly and golden.
    7. Check the top: if it’s too dark, tent with foil. Use a fork to test if the sauce is thick and bubbling around edges.
    8. Remove from oven, let rest for 8 minutes. Garnish with fresh herbs before serving.

    Rest for 8 minutes, then sprinkle with herbs and serve warm.

    How to Know It’s Done

    • Sauce is bubbling and slightly thickened.
    • Top is golden and crispy.
    • Pasta is tender but not mushy.

    Vegan Pasta Bake

    This vegan pasta bake combines al dente pasta coated in a rich, flavorful tomato sauce with a cheesy, smoky topping. Baked until bubbling and golden, it offers a crispy edge with a tender center, filling the kitchen with the scent of herbs and roasted garlic. The dish features layers of textures—creamy sauce, crispy topping, and perfectly cooked pasta—that come together in a comforting, visually appealing casserole.
    Prep Time 10 minutes
    Cook Time 25 minutes
    Total Time 35 minutes
    Servings: 4
    Course: Main Course
    Cuisine: Italian
    Calories: 400

    Ingredients
      

    • 8 oz short pasta (penne, fusilli, rigatoni) al dente
    • 2 cups tomato sauce chunky or smooth
    • 1 cup plant-based milk unsweetened
    • 1 cup vegan cheese melty and smoky
    • 2 tbsp nutritional yeast adds cheesy umami flavor
    • 2 cloves garlic minced
    • 1 small onion chopped
    • 2 tbsp olive oil
    • 0.5 cup breadcrumbs for topping
    • to taste salt and pepper for seasoning
    • fresh herbs basil or parsley chopped, for garnish

    Equipment

    • Large pot
    • Skillet
    • 9×13 inch baking dish
    • Oven
    • Spatula or spoon

    Method
     

    1. Preheat your oven to 180°C (350°F). Lightly grease a 9×13 inch baking dish with a splash of olive oil.
    2. Cook the pasta in a large pot of salted boiling water for about 8 minutes until just al dente. Drain and set aside.
    3. While the pasta cooks, heat olive oil in a skillet over medium heat. Add chopped onion and cook for 3 minutes until fragrant and translucent. Toss in minced garlic and cook for another 30 seconds until aromatic.
    4. Pour in the tomato sauce and plant-based milk. Stir in nutritional yeast and season with salt and pepper. Let the sauce simmer gently for 5 minutes, allowing flavors to meld and sauce to thicken slightly.
    5. Combine the cooked pasta with the sauce, stirring well so each piece is coated evenly. Transfer this mixture into your prepared baking dish, spreading it out into an even layer.
    6. Sprinkle the shredded vegan cheese or breadcrumbs generously over the top of the pasta mixture, creating a crispy, golden crust during baking.
    7. Bake uncovered in the preheated oven for about 20-25 minutes, until bubbling around the edges and the top is golden brown. If it browns too quickly, tent with foil to prevent burning.
    8. Remove from the oven and let the dish rest for about 8 minutes. This helps the sauce set and makes serving easier.
    9. Garnish with freshly chopped herbs like basil or parsley for a burst of color and freshness before serving.
    10. Serve warm and enjoy the crispy edges, gooey cheese, and flavorful, tender pasta.

    Cooking Tips & Tricks

    • Use a deep skillet for the sauce—less splatter, better flavor meld.
    • Salt pasta water generously—salty water makes pasta more flavorful.
    • Stir often during sauce simmering—prevents sticking and ensures even flavor.
    • Keep an eye on the bake—edges should be crispy, center bubbling gently.
    • Let it rest—resting 8 minutes keeps slices neat and flavors settle.

    Common Mistakes & How to Fix Them

    • FORGOT TO TASTE THE SAUCE: Adjust salt and pepper before assembling to prevent blandness.
    • DUMPED TOO MUCH WATER: Use less pasta water next time or cook pasta slightly less—aim for a firm bite.
    • OVER-TORCHED TOP: Cover with foil early in baking or lower oven temp if it browns too fast.
    • UNDERSALTED: Add a pinch more salt to the sauce during cooking to enhance flavors.

    Quick Fixes for Common Kitchen Snags

    • When sauce is too thick, splash in hot water and stir until smooth.
    • Splash extra plant milk if sauce is grainy or too thick.
    • Patch over burnt edges with a little cheese or breadcrumbs for color.
    • Shield top with foil if it browns too quickly in the oven.
    • When in doubt, bake a few extra minutes until bubbly and golden.

    Make-Ahead & Storage Tips

    • Prepare and assemble the dish up to 24 hours in advance; keep covered in the fridge.
    • The flavors deepen overnight, making it even more comforting the next day.
    • Reheat in the oven at 160°C (320°F) for 15-20 minutes, until hot and bubbling, with a slight crisp on top.
    • Add fresh herbs after reheating for a bright finish.

    Practical Q&As for Vegan Pasta Bake

    1. What pasta should I use?

    Use a mix of your favorite pasta shapes—penne, fusilli, or rigatoni all work well. Cook until just al dente, about 8 minutes. It holds up better in the bake and absorbs flavors nicely.

    2. Can I make it gluten-free?

    Yes, you can swap in gluten-free pasta or even spiralized vegetables. Just keep an eye on cooking times; they’re usually a bit shorter.

    3. What cheese or cheesy alternative works best?

    Use a good quality vegan cheese or nutritional yeast for that cheesy flavor. It should melt smoothly and not be gritty.

    4. Can I add milk?

    A splash of plant-based milk helps keep the sauce creamy. Almond or oat milk are mild options, just add gradually.

    5. How long and at what temperature?

    Bake in a preheated oven at 180°C (350°F) for about 20-25 minutes, until bubbling and golden on top.

    6. Should I rest it before serving?

    Let it rest for 5-10 minutes after baking. It firms up, making serving neater and flavors to meld.

    7. Can I add herbs?

    Add fresh herbs like basil or parsley after baking for a bright, fresh contrast to the rich sauce.

    8. Can I make it ahead?

    Yes, you can prepare the dish a day ahead. Cover tightly and refrigerate for up to 24 hours.

    9. How do I reheat leftovers?

    Reheat in the oven at 160°C (320°F) for 15-20 minutes, covered. Expect the top to crisp slightly.

    10. How do I prevent burning?

    Keep an eye on the bake; if it gets too brown, tent with foil. Use a probe to check internal temp if unsure.

    This bake is one of those dishes that feels like a small victory—simple ingredients coming together in a dish that’s hearty and satisfying. It’s perfect for when you want a little bit of comfort, but also something nourishing and bright.

    There’s a quiet joy in watching it bubble and crisp, knowing it’s all made from scratch with love. It’s a reminder that good food doesn’t need to be complicated; sometimes, it’s just about trusting the process and enjoying the smell of it all coming together.

  • Creamy Vegan Tomato Pasta Recipe

    This recipe isn’t just about eating; it’s about crafting a bowl that feels like a hug. The creamy tomato sauce, bursting with fresh, bright flavors, makes me think of lazy Sunday afternoons and kitchen magic. I love how simple ingredients come together into something so rich and satisfying.

    Cooking this dish is a small act of self-care. No fancy gadgets needed—just a pot, a spoon, and good tomatoes. It’s a reminder that sometimes, the best meals come from the simplest things, done with care and a little patience.

    A cook’s notes on making this dish as comforting as a warm blanket on a chilly day.

    Why this recipe hits home for me

    • I love how this dish comes together so quickly, perfect for a weeknight.
    • The smell of garlic and tomatoes simmering instantly lifts my mood.
    • I’ve made this so many times, I can do it in my sleep and still find joy in every step.
    • It reminds me of my grandma’s kitchen, where simplicity was the secret to happiness.

    The story behind my favorite tomato pasta

    • I was inspired by a trip to Italy, where I fell in love with simple, fresh pasta dishes. I wanted to recreate that feeling at home, but make it vegan and accessible.
    • This sauce is forgiving—once you get the base right, you can tweak it endlessly.
    • It’s a reminder that good food doesn’t need to be complicated or fancy; it just needs love, good ingredients, and a little patience.

    A brief history and fun facts about this dish

    • This dish echoes Italian classics but with a modern, vegan twist.
    • Tomatoes have been cultivated in Italy for over 2,000 years, shaping many regional dishes.
    • Coconut milk or cashew cream mimics the creamy texture of dairy, a vegan innovation from the 20th century.
    • Pasta shapes like fusilli hold onto the sauce better, making every bite more flavorful.

    Deep dive into key ingredients

    • Tomatoes: Ripe, flavorful tomatoes like heirlooms give a naturally sweet, juicy base.
    • Garlic: Fresh garlic adds a sweet, pungent aroma; use more for a bolder punch.
    • Coconut milk: Creamy and subtly sweet, it balances acidity and adds richness.
    • Fresh basil: Bright, fragrant leaves that lift the dish; add at the end for maximum freshness.
    • Olive oil: Good quality oil enhances flavor; use a drizzle for finishing.

    Spotlight on Tomatoes and Basil

    Basil: Fresh leaves provide a bright, aromatic lift that freshens the dish.:

    • Tomatoes: Their juicy flesh releases a vibrant, sweet-tangy burst when simmered.
    • They soften and become jammy, infusing the sauce with natural umami.
    • Look for ripe, fragrant tomatoes for the best flavor.

    Coconut Milk: Adds a silky, rich texture with a subtle sweetness, balancing acidity.:

    • Basil: Tear leaves just before adding to preserve aroma and avoid bitterness.
    • The scent of basil blooming in the pan signals perfect timing.
    • Use a good handful for a noticeable flavor boost.

    Smart ingredient swaps and their effects

    • Dairy-Free: Swap coconut milk for cashew cream or almond milk for a nutty twist.
    • Creaminess stays, but flavor shifts slightly depending on choice.
    • Extra virgin olive oil can be replaced with avocado oil for a neutral taste.
    • Fresh basil can be substituted with dried, but flavor won’t be as vibrant.
    • Use sun-dried tomatoes for a concentrated, smoky flavor.

    Equipment & Tools

    • Large skillet: To cook the sauce evenly.
    • Large pot: To boil pasta.
    • Wooden spoon: Stirring and mixing.
    • Measuring cups and spoons: Accurate ingredient addition.
    • Ladle or tongs: To toss pasta with sauce.

    Step-by-step guide to creamy vegan tomato pasta

    1. Heat a large skillet over medium heat, add a tablespoon of olive oil, and sauté chopped garlic until fragrant, about 30 seconds.
    2. Add chopped ripe tomatoes or canned crushed tomatoes, stir, and simmer on low heat for 15 minutes, stirring occasionally.
    3. Meanwhile, cook your pasta in boiling salted water until al dente, about 8-10 minutes, then drain.
    4. Once the sauce thickens slightly and smells sweet and savory, stir in a splash of coconut milk or cashew cream to add richness.
    5. Taste and adjust salt, pepper, and a pinch of sugar if needed to balance acidity.
    6. Toss the drained pasta into the sauce, stirring gently to coat evenly.
    7. Cook together for 2-3 minutes until heated through, the sauce clings to the pasta.
    8. Finish with fresh basil leaves torn into pieces, and a squeeze of lemon juice for brightness.

    Let the pasta sit for 2 minutes after mixing, then serve with extra basil or a drizzle of olive oil.

    How to Know It’s Done

    • Sauce should be rich and glossy, coating the back of a spoon.
    • Pasta should be al dente, with a slight bite.
    • The aroma should be sweet, garlic-y, with a hint of basil and tomato.

    Creamy Vegan Tomato Pasta

    This dish features a rich, velvety tomato sauce simmered with fresh garlic and bright basil, tossed with your favorite pasta for a comforting, satisfying meal. The sauce’s smooth, glossy texture clings beautifully to the pasta, creating a hearty yet fresh dish perfect for weeknights or lazy weekends. Simple ingredients come together into a flavorful, creamy masterpiece with minimal fuss.
    Prep Time 10 minutes
    Cook Time 25 minutes
    Total Time 35 minutes
    Servings: 4
    Course: Main Course
    Cuisine: Italian
    Calories: 420

    Ingredients
      

    • 4 cloves garlic minced
    • 4 cups ripe tomatoes chopped or crushed, or use canned crushed tomatoes
    • 12 oz pasta fusilli, penne, or spaghetti
    • 1 cup coconut milk or cashew cream
    • 1/4 cup extra virgin olive oil for sautéing and finishing
    • 1/4 cup fresh basil torn just before adding
    • to taste salt and pepper
    • 1 dash lemon juice optional for brightness

    Equipment

    • Large skillet
    • Large pot
    • Wooden spoon
    • Measuring cups and spoons
    • Ladle or tongs

    Method
     

    1. Start by heating a large skillet over medium heat, then add a tablespoon of olive oil and sauté the minced garlic until fragrant, about 30 seconds. You’ll notice the aroma filling the air as the garlic becomes golden and soft.
    2. Add the chopped or crushed tomatoes to the skillet, stirring well. Reduce the heat to low and let the sauce simmer gently for about 15 minutes, stirring occasionally. The tomatoes will soften and release their juices, turning into a rich, slightly jammy sauce with a vibrant aroma.
    3. While the sauce simmers, bring a large pot of salted water to a boil. Add your pasta and cook until al dente, according to package instructions—about 8 to 10 minutes. Drain the pasta and set aside.
    4. Once the tomato sauce has thickened and smells sweet and savory, stir in the coconut milk or cashew cream to add a silky richness. Mix thoroughly until the sauce turns smooth and glossy.
    5. Taste the sauce and adjust the seasoning with salt, pepper, and a squeeze of lemon juice if desired. This balancing step enhances the brightness and depth of flavors.
    6. Transfer the cooked pasta into the skillet with the sauce, using a ladle or tongs to toss and coat the noodles evenly. Cook together for another 2-3 minutes until heated through and the sauce clings to every strand.
    7. Remove from heat and stir in torn basil leaves for a burst of fresh aroma. Drizzle with a little extra olive oil for finishing touches.
    8. Serve immediately, garnished with more basil or a drizzle of olive oil if desired. The sauce should be glossy and cling beautifully to the pasta, with a vibrant, fragrant aroma inviting you to dig in.

    Notes

    For extra flavor, sprinkle with nutritional yeast or vegan Parmesan. Use ripe, fragrant tomatoes for best flavor. Feel free to swap coconut milk for almond or cashew cream for a different nutty richness.

    Cooking tips & tricks for perfect creamy tomato pasta

    • GARLIC: Sauté garlic until just fragrant, not browned, to keep it sweet and mild.
    • TOMATOES: Use ripe tomatoes or good-quality canned ones for a richer, more vivid flavor.
    • CREAM: Add coconut milk or cashew cream at the end to prevent curdling and preserve creaminess.
    • BASIL: Tear basil leaves just before adding for maximum aroma.
    • HEAT: Keep heat medium-low after simmering to prevent burning and sticking.

    Common mistakes and how to fix them

    • FORGOT to taste the sauce? Add a pinch of sugar or lemon to brighten.
    • DUMPED too much water from pasta? Save a splash to loosen the sauce.
    • OVER-TORCHED garlic? Rinse pan, start fresh with new garlic.
    • Sauce too acidic? Stir in a tiny bit of maple syrup or a pinch of baking soda.

    Quick fixes for common kitchen mishaps

    • When sauce is too thin, simmer longer until it thickens with a shiny glaze.
    • Splash in a bit more coconut milk if sauce separates or looks oily.
    • Patch blandness with a dash of balsamic vinegar or lemon juice.
    • Shield over-salted sauce with a handful of unsalted cashews blended into a quick cream.
    • When pasta sticks, rinse with cold water briefly and toss with a splash of olive oil.

    Make-ahead and storage tips

    • The sauce can be made 1-2 days ahead and stored in the fridge, flavors deepen overnight.
    • Reheat gently in a saucepan, stirring often, until steaming and fragrant.
    • Cooked pasta is best fresh, but leftovers can be refrigerated for up to 2 days.
    • Add a splash of water or plant milk when reheating to restore creaminess.

    10 Practical Q&As for Creamy Vegan Tomato Pasta

    1. Can I use canned tomatoes?’

    Use ripe, flavorful tomatoes like heirlooms or vine-ripened for the best natural sweetness.

    2. What type of pasta works best?

    Absolutely. Opt for good-quality whole peeled or crushed tomatoes, and blend or crush them smooth.

    3. How do I get a really creamy texture?

    Any shape you like—penne, fusilli, or even spaghetti—just cook until al dente, about 8-10 minutes.

    4. Can I make this ahead?

    Adding a splash of coconut milk or cashew cream at the end makes it extra luscious.

    5. Is this suitable for a crowd?

    Yes, store in an airtight container in the fridge for up to 2 days. Reheat gently on low heat.

    6. What if I don’t have fresh basil?

    Definitely. Double or triple the ingredients, and use a large skillet or pot.

    7. How do I prevent the sauce from burning?

    Dried basil works, but add it earlier in cooking for better flavor infusion.

    8. What’s a good side to serve with this?

    Stir frequently and keep heat at medium-low after simmering to avoid sticking and scorching.

    9. Can I add protein?

    A simple green salad or crusty bread makes a perfect pairing.

    10. What if the sauce is too thick?

    Yes, toss in cooked chickpeas or tofu for extra nourishment.

    Once plated, I like to sprinkle a little extra basil or a drizzle of good olive oil. It’s those small touches that make the dish feel complete. Eating this, I’m reminded that comfort food doesn’t have to be complicated, just honest and made with love.

    Whenever I make this, it’s a little celebration of everyday cooking—simple, soulful, and deeply satisfying. Plus, it’s perfect for those busy nights when you want something wholesome but don’t want to spend hours in the kitchen. It’s a go-to that feels like a warm welcome home.

  • Sheet Pan Ratatouille Recipe

    There’s something about roasting vegetables on a sheet pan that feels like magic. The way they caramelize, releasing those sweet, smoky aromas that fill the kitchen. It’s honest, unpretentious, and perfect for when you want fresh flavors without fuss.

    This recipe turns simple ratatouille into a one-pan wonder, making cleanup a breeze and flavor intense. It’s a way to celebrate summer’s bounty or make the most of late-season produce, all while staying cozy in your kitchen.

    Turning a humble vegetable medley into a vibrant, roasted masterpiece that’s perfect for busy weeknights or rustic dinners.

    Why this recipe matters to me

    • I love how this dish makes my kitchen smell like summer.
    • It’s my go-to when I want something healthy but full-flavored.
    • The caramelized edges make me feel like I’ve achieved something special.
    • I get proud when I see the vibrant colors on the pan.
    • There’s a chaos in chopping, but the oven does the magic.

    A personal story of inspiration and discovery

    • One summer, I visited Provence and fell in love with the local produce and simple flavors. That trip ignited my obsession with roasting vegetables.
    • Watching the vegetables turn into a caramelized, colorful spread inspired me to try this method at home.
    • I realized that roasting transforms humble ingredients into something stunning—no fuss needed.

    A brief history and fun facts about ratatouille

    • Ratatouille originated in Provence, France, as a rustic vegetable stew.
    • The name means ‘stir-up’ or ‘reunion’ in Occitan, reflecting its communal origins.
    • Traditionally cooked slowly in a cast iron pot, but roasting is a modern shortcut.
    • Eggplant, zucchini, and peppers are classic, but seasonal veggies can be swapped in.
    • Roasting intensifies flavors and creates a more concentrated, smoky profile.

    Ingredient insights and tips

    • Eggplant: absorbs oil well, so toss generously; look for a shiny, firm skin.
    • Zucchini: stays tender but not mushy; slice evenly for uniform cooking.
    • Bell Peppers: add sweetness and vibrant color; choose firm, unblemished peppers.
    • Garlic: infuses the oil with flavor; roast whole cloves for a mellow, smoky note.
    • Tomatoes: add juiciness; use ripe, fragrant tomatoes for best flavor.

    Focusing on Eggplant and Zucchini

    Eggplant:

    • absorbs flavors and oil, so slice evenly and toss well.
    • It develops a soft, almost creamy texture when roasted, with a smoky aroma.
    • Watch out for bitter spots—choose firm, shiny eggplants with no blemishes.

    Zucchini:

    • tender but holds shape, with a slightly sweet, grassy flavor.
    • Slice uniformly to promote even roasting and prevent mushiness.
    • Look for smaller zucchinis for a more tender bite.

    Substitutions for different dietary needs

    • Dairy-Free: Swap butter with olive oil for a rich, fruity note—no change in flavor.
    • Gluten-Free: This dish is naturally gluten-free, just ensure herbs and seasonings are safe.
    • Vegan: Omit any cheese or animal products, and it’s fully plant-based.
    • Extra herbs? Add parsley or oregano for a different aromatic profile.
    • Missing fresh herbs? Use dried, but add at the start for flavor infusion.

    Equipment & Tools

    • large rimmed baking sheet: Hold all vegetables for even roasting
    • sharp knife: Slice vegetables uniformly
    • mixing bowl: Toss vegetables with oil and herbs
    • spatula or tongs: Stir vegetables during roasting

    Roasting vegetables for perfect ratatouille

    1. Preheat your oven to 200°C (400°F). Gather a large, rimmed baking sheet.
    2. Slice eggplant, zucchini, bell peppers, and tomatoes into even pieces, about 1 cm thick.
    3. Toss the vegetables with olive oil, minced garlic, salt, pepper, and chopped herbs like thyme or basil.
    4. Spread everything out in a single layer on the baking sheet. Don’t crowd.
    5. Roast for 25-30 minutes, stirring halfway through, until edges are golden and fragrant.
    6. Check for doneness: peppers should be tender, eggplant soft, zucchini slightly caramelized.
    7. Remove from oven and let rest for 5 minutes. Garnish with fresh herbs before serving.

    Let the dish rest for 5 minutes to allow flavors to meld. Serve directly from the sheet or transfer to a platter, garnished with fresh herbs.

    How to Know It’s Done

    • Vegetables are tender with slightly charred edges.
    • Smell a fragrant, smoky aroma.
    • Color is vibrant with caramelized bits on edges.

    Sheet Pan Roasted Ratatouille

    This dish features a medley of fresh vegetables like eggplant, zucchini, peppers, and tomatoes roasted on a sheet pan until caramelized and tender. The roasting process enhances their natural sweetness and smoky aroma, creating a vibrant, rustic dish with a beautiful color and rich flavor. It’s a simple, one-pan meal that’s perfect for busy weeknights or casual dinners, with a satisfying, slightly charred finish.
    Prep Time 15 minutes
    Cook Time 30 minutes
    Total Time 45 minutes
    Servings: 4
    Course: Main Course
    Cuisine: French
    Calories: 150

    Ingredients
      

    • 1 large eggplant firm and shiny
    • 2 medium zucchini small size preferred
    • 2 bell peppers bell peppers any color, stem removed
    • 4 ripe tomatoes tomatoes fragrant and ripe
    • 3 cloves garlic minced
    • 2 tablespoons olive oil extra virgin preferred
    • 1 teaspoon dried thyme or fresh thyme if available
    • to taste salt and pepper

    Equipment

    • large rimmed baking sheet
    • Sharp knife
    • Mixing bowl
    • Spatula or tongs

    Method
     

    1. Preheat your oven to 200°C (400°F). Place a large rimmed baking sheet in the oven to heat up while you prepare the vegetables.
    2. While the oven heats, wash and slice the eggplant, zucchini, and bell peppers into even 1 cm thick pieces. Cut the tomatoes into halves or quarters, depending on size.
    3. In a mixing bowl, toss the sliced vegetables with minced garlic, olive oil, dried thyme, salt, and pepper until everything is evenly coated and fragrant.
    4. Carefully remove the hot baking sheet from the oven and spread the coated vegetables in a single layer, ensuring they are not crowded. Spread the tomatoes among the other vegetables.
    5. Return the pan to the oven and roast for 25-30 minutes, stirring gently halfway through, until the vegetables are tender and edges are caramelized with a slight char.
    6. Check for doneness: the peppers should be soft, eggplant melt-in-your-mouth, and zucchini slightly caramelized. Remove from the oven and let rest for about 5 minutes.
    7. Garnish with additional fresh herbs if desired, then serve directly from the sheet or transfer to a serving platter. Enjoy the smoky, tender vegetables with crusty bread or as a hearty side.

    Tips & tricks for perfect sheet pan ratatouille

    • High heat caramelizes sugars quickly—don’t skimp on preheating.
    • Use a wide pan to ensure vegetables roast rather than steam.
    • Toss vegetables with oil and herbs thoroughly for even flavor.
    • Stir halfway so edges caramelize evenly.
    • Finish with fresh herbs for brightness and contrast.

    Common mistakes and how to fix them

    • FORGOT to preheat? Turn oven on early and start roasting as you prep.
    • DUMPED too much oil? Wipe excess with paper towel before roasting.
    • OVER-TORCHED veggies? Reduce oven temp slightly or cover with foil.
    • FAILED to stir? Vegetables might burn or stick—stir halfway to prevent this.

    Quick fixes for common issues

    • If veggies are soggy, blast under the broiler for 2-3 minutes to crisp edges.
    • When too dry, splash with a little lemon juice or vinegar to brighten.
    • Patch over uneven roasting by broiling for a quick, smoky finish.
    • Splash a little hot sauce or smoked paprika if flavor feels flat.
    • If herbs wilt, add fresh right before serving to keep their brightness.

    Make ahead and storage tips

    • Chop vegetables a day ahead, store in airtight container in fridge for up to 24 hours.
    • Roasted leftovers keep for 3-4 days in the fridge; reheat in a hot skillet until steaming.
    • The flavors deepen overnight, making it even better the next day.
    • Reheat at 180°C (350°F) until warmed through; add a splash of water or broth if dry.

    10 Practical Q&As About Sheet Pan Ratatouille

    1. Why use a sheet pan for ratatouille?

    Use a large, rimmed baking sheet to give everything room to breathe and cook evenly.

    2. How do I prepare the vegetables?

    Slice the vegetables uniformly so they cook at the same pace and look appealing.

    3. What seasoning is best for roasting?

    Toss the veggies with olive oil, salt, pepper, and herbs before roasting for flavor.

    4. What’s the ideal roasting time?

    Roast at 200°C (400°F) for about 25-30 minutes until the edges are slightly charred and fragrant.

    5. Should I stir during roasting?

    Stir the vegetables halfway through to promote even caramelization.

    6. How do I know when it’s ready?

    Check for doneness when the peppers are tender, eggplant is soft, and zucchini is just starting to brown.

    7. How should I serve it?

    Serve hot, garnished with fresh herbs, or at room temperature, maybe with crusty bread.

    8. How do I store and reheat?

    Leftovers keep well in the fridge for 3-4 days; reheat in a hot pan until steaming.

    9. Can I add a smoky touch?

    For a smoky flavor, broil for 2-3 minutes at the end, watching closely to prevent burning.

    10. What tools do I need?

    Use a sharp knife and a sturdy baking sheet to keep prep safe and efficient.

    This dish reminds me how a few good vegetables, a hot oven, and a bit of patience can create something unexpectedly satisfying. It’s a humble reminder that great meals don’t need to be complicated or perfect.

    In the end, it’s about the process—the smell, the sizzle, the color—more than the presentation. Sometimes, a simple sheet pan is all you need to turn everyday veggies into something memorable.

  • Cauliflower Steaks Recipe

    Cauliflower steaks aren’t just a pretty plate — they’re a chance to rethink how we treat that humble vegetable. Cutting through a whole head, you get a thick, satisfying slab that sears beautifully, almost like a steak, with a smoky crust and tender insides.

    This approach is perfect for those nights when you want something hearty yet veggie-driven, without the fuss of breading or complicated sauces. It’s a simple, honest way to celebrate cauliflower in all its roasted glory.

    Focusing on the texture and cooking process to highlight the crispy, caramelized edges that make cauliflower steaks irresistible.

    Why I Keep Coming Back to Cauliflower Steaks

    • I love how the smell of searing cauliflower fills the kitchen, smoky and inviting.
    • There’s a satisfying crunch that makes it feel indulgent, like a cheat meal.
    • I’ve had moments of chaos trying to cut perfect steaks, but practice makes it easier.
    • Seeing someone’s face light up when they taste that crispy edge — priceless.

    My inspiration for this recipe

    • I first tried cauliflower steaks at a small bistro, and it felt like a revelation. The way the edges caramelized, the smoky aroma — it was so satisfying.
    • It’s a dish that invites improvisation, whether with spices, toppings, or cooking method.
    • It’s also a reminder that vegetables can be hearty and full-flavored, not just side dishes.

    Fun facts about cauliflower and its culinary journey

    • Cauliflower has been cultivated for over 2,000 years, with roots tracing back to the Mediterranean.
    • The “steak” style cut became popular in the 2010s as part of the veggie-forward trend.
    • Using a cast-iron skillet helps develop a more intense sear due to its heat retention.
    • Cauliflower is a cruciferous vegetable, related to broccoli, cabbage, and kale.

    Ingredient insights and tweaks

    • Cauliflower: First-person — I look for a firm, heavy head with tight florets. Swap with Romanesco for a visual twist.
    • Olive oil: First-person — I love a fruity extra virgin for depth, but light canola works if you want a neutral base.
    • Lemon: First-person — Adds brightness and cuts richness, especially after searing. Lime is a lively alternative.
    • Spices: First-person — Paprika adds smoky sweetness, cumin gives warmth. Adjust to your flavor mood.
    • Herbs: First-person — Parsley or cilantro adds fresh, grassy notes, brightening the plate.

    Spotlight on Cauliflower and Oil

    Cauliflower:

    • Dense, with a slightly nutty aroma when fresh. Holds up well to high heat, develops a caramelized crust.
    • Olive oil: Slightly grassy and fruity, it helps achieve a perfect sear. Too much can make it greasy.

    Olive oil:

    • The key to crispy, golden edges. Watch for smoke — it signals high heat.
    • It’s forgiving, but avoid overusing to prevent sogginess.

    Substitutions for different diets and tastes

    • Dairy-Free: Swap butter for olive oil or coconut oil for a similar sear and flavor.
    • Low-Sodium: Use herbs and lemon to boost flavor without salt.
    • Spice Variations: Use turmeric or curry powder for different flavor profiles.
    • Gluten-Free: This dish is naturally gluten-free, no swaps needed.
    • Extra Crunch: Add a sprinkle of panko or crushed nuts after cooking.

    Equipment & Tools

    • Sharp chef’s knife: To cut through the dense cauliflower evenly.
    • Cast-iron skillet or heavy frying pan: To achieve a good sear and even heat.
    • Tongs or a spatula: To flip the steaks carefully.
    • Paper towels: To drain excess oil after cooking.

    Step-by-step guide to perfect cauliflower steaks

    1. Trim the leaves and core of the cauliflower head, leaving a sturdy base.
    2. Place the cauliflower on a cutting board, and slice into 1-inch thick steaks, about 2-3 per head.
    3. Brush both sides with olive oil, then season generously with salt, pepper, and optional spices like paprika or cumin.
    4. Heat a heavy skillet (preferably cast-iron) over medium-high heat, about 200°C (390°F).
    5. Place the steaks in the hot pan, cook for 4-5 minutes until golden and crispy on the underside.
    6. Flip carefully using tongs or a spatula, and cook the other side until similarly crisp and golden.
    7. Check the doneness: edges should be dark caramel, and the insides tender when pierced with a knife.
    8. Remove from pan and let rest for 2 minutes. Finish with a squeeze of lemon or a sprinkle of herbs.
    9. Serve hot, with extra lemon or a drizzle of tahini if desired.

    Let the steaks rest for a couple of minutes to settle, then finish with fresh lemon juice or herbs for brightness.

    How to Know It’s Done

    • Look for a deep golden brown crust.
    • Ensure the interior is tender when pierced.
    • Edges should be crisp and slightly smoky.

    Cauliflower Steaks

    Cauliflower steaks are thick, hearty slices of cauliflower that are seared until crispy and caramelized on the edges, showcasing the vegetable’s tender interior. They’re cooked in a cast-iron skillet with olive oil and seasoned simply with salt, pepper, and spices, resulting in an irresistibly smoky and crunchy texture. The final dish is a visually striking, flavorful vegetable centerpiece with a satisfying bite.
    Prep Time 10 minutes
    Cook Time 15 minutes
    Total Time 25 minutes
    Servings: 4
    Course: Main Course
    Cuisine: Vegetarian
    Calories: 150

    Ingredients
      

    • 1 head cauliflower preferably fresh and heavy
    • 2 tbsp olive oil extra virgin preferred
    • to taste salt adjust to preference
    • to taste black pepper freshly ground
    • 1 tsp paprika for smoky flavor
    • 1 tbsp lemon juice for brightness

    Equipment

    • Sharp chef’s knife
    • Cast-iron skillet or heavy frying pan
    • Tongs or spatula
    • Paper towels

    Method
     

    1. Start by trimming the leaves and core of the cauliflower, leaving a sturdy base for slicing.
    2. Place the cauliflower on a cutting board and carefully slice it into 1-inch thick steaks, aiming for about 2-3 slices per head. Use a sharp knife, and don’t worry if some edges crack — you can gently press them back together later.
    3. Brush both sides of each steak generously with olive oil, making sure to coat the surface evenly. The oil helps develop that beautiful sear and crispy edges.
    4. Sprinkle salt, pepper, and paprika over the steaks, seasoning them well. Feel free to get creative with additional spices if you like.
    5. Heat a cast-iron skillet or heavy frying pan over medium-high heat until hot — you should hear a gentle sizzle when you add the steaks.
    6. Carefully place the cauliflower steaks into the hot pan using tongs or a spatula, pressing them down slightly to ensure good contact with the surface. Sear for about 4-5 minutes until the edges turn deep golden brown and crispy.
    7. Flip each steak carefully and cook the other side for another 4-5 minutes, until similarly golden and crispy, and the cauliflower inside feels tender when pierced with a knife.
    8. Once cooked, transfer the steaks to a plate lined with paper towels to drain any excess oil and let them rest for a couple of minutes.
    9. Squeeze fresh lemon juice over the steaks for a bright finish, and sprinkle with chopped herbs if desired. Serve hot and enjoy the satisfying crunch and smoky aroma.

    Tips & tricks for perfect cauliflower steaks

    • Use a cast-iron skillet → It retains heat and creates a better crust.
    • Slice evenly → Thicker steaks are easier to handle and cook more uniformly.
    • Don’t overcrowd the pan → Cook in batches if needed for that crispy texture.
    • Finish with acid → Lemon juice brightens the flavor and cuts through richness.
    • Use a spatula to flip → Gentle handling prevents breaking the steaks.

    Common mistakes and how to fix them

    • FORGOT TO PREHEAT THE PAN? → Crank up the heat and give it a minute before adding steaks.
    • DUMPED TOO MUCH OIL? → Use just enough to lightly coat the surface, no pooling.
    • OVER-TORCHED THE EDGES? → Reduce heat slightly and cook in shorter bursts.
    • STEAKS STICKING? → Ensure the pan is hot and oil is evenly spread before adding.

    Quick fixes for common issues

    • When steaks stick, splash a little water to release them.
    • Patch burnt bits with a sprinkle of salt and a splash of vinegar.
    • Shield delicate edges with foil if they start to overbrown.
    • When in doubt, finish in the oven at 180°C (350°F) for 5–7 minutes.
    • If the steaks are soggy, crisp them up in a hot pan for a minute or two.

    Make ahead and storage tips

    • Slice the cauliflower steaks a day ahead, keep covered in the fridge.
    • Cooked steaks can be stored in the fridge for 2-3 days, reheated in a hot skillet.
    • Flavor intensifies slightly after sitting, but texture may soften.
    • Reheat in a skillet over medium-high heat until crisp and heated through, about 3-4 minutes.

    10 Practical Q&As About Cauliflower Steaks

    1. How do I cut the cauliflower into steaks?

    Use a sharp, heavy knife to cut through the cauliflower’s core. It’s firm, so don’t rush.

    2. What thickness should the steaks be?

    Aim for about 1-inch thick slices. Thinner ones may fall apart, thicker ones take longer to cook.

    3. What pan is best for searing?

    A hot pan, around 200°C (390°F), ensures a good sear. Use a cast-iron skillet if possible.

    4. How do I know when the steaks are done?

    Cook until golden brown on each side, about 4-5 minutes per side. Look for crispy edges and a slight smoky aroma.

    5. Should I rest the cauliflower steaks?

    Drain excess oil on paper towels. Rest for 2 minutes before serving to keep the texture firm.

    6. Can I swap the oil?

    Use olive oil for a mild flavor, or sesame oil for a nutty twist. Keep it light to avoid sogginess.

    7. What garnishes work well?

    Add a squeeze of lemon after cooking for brightness. Fresh herbs like parsley or cilantro brighten the dish.

    8. Can I keep leftovers?

    Cook in batches if needed. Keep cooked steaks warm in a low oven, around 90°C (194°F).

    9. How do I store leftovers?

    Slice leftovers thin and fry for a crispy topping or add to salads. Keep in fridge for 2-3 days.

    10. How to reheat without losing texture?

    Reheat in a hot skillet or oven to regain crispiness. Avoid microwave to prevent sogginess.

    Once you get the hang of it, cauliflower steaks become a regular in your veggie lineup. They’re versatile, forgiving, and naturally satisfying in texture and flavor.

    Plus, once you love that caramelized crust, it’s hard to go back to plain roasted florets. It’s a little ritual — slice, sear, savor — that makes vegetables feel like a real main.

  • Chickpea Buddha Bowl Recipe

    This chickpea Buddha bowl isn’t just a meal, it’s a sensory journey. The crispness of roasted chickpeas, the tender greens, and the fluffy grains all come together in a harmony that’s satisfying and honest.

    I like to think of it as a blank canvas—each component can be tweaked, swapped, or added based on what I have in the fridge or what I’m craving that day.

    It’s a dish that reminds me how simple ingredients can turn into something nourishing, textured, and full of flavor, with just a little bit of effort.

    Focusing on the tactile experience of textures—crunchy chickpeas, soft greens, fluffy grains—making each bite a contrast of sensations.

    Why this bowl matters to me

    • I love how roasting transforms chickpeas into a crispy, smoky snack.
    • Getting the greens just right—soft but still vibrant—feels like a tiny victory.
    • I often make this bowl on busy mornings—quick, nourishing, and no fuss.
    • There’s a calm satisfaction in arranging everything neatly—like a little edible painting.

    My inspiration behind the Chickpea Buddha Bowl

    • This recipe was born out of a need for something quick yet nourishing, especially on busy days.
    • I wanted a dish that was flexible, so I could adapt it to what I had in the fridge.
    • The act of roasting chickpeas started as a way to make a snack, but I loved adding them to bowls.
    • Now, it’s become my go-to for a satisfying, textured meal that’s easy to throw together.

    The story behind the Chickpea Buddha Bowl

    • Chickpeas have been a staple in Middle Eastern and Indian cuisines for thousands of years.
    • The Buddha bowl concept gained popularity in the early 2000s, emphasizing balanced, plant-based meals.
    • Roasting chickpeas enhances their nutty flavor and crunch, making them a perfect snack or topping.
    • Using massage on greens is a technique borrowed from kale salads to tenderize and flavor greens.
    • This dish is flexible across seasons—adapt toppings and greens based on what’s fresh and available.

    Ingredient insights and tweaks

    • Canned chickpeas: I prefer the convenience, but dried are cheaper and more customizable. Soak and cook, then roast for crunch.
    • Lemon: Brightens everything, adds freshness. Use freshly squeezed for the best flavor, or swap with lime for a different citrus note.
    • Tahini: Creamy and nutty, it’s the backbone of the dressing. Adjust water to reach your preferred consistency, and add garlic for depth.
    • Greens: Kale is hearty and chewy, massaged with lemon to tenderize. Spinach is softer, just add at the end to wilt.
    • Grains: Quinoa is quick and fluffy, but brown rice adds earthiness. Cook to slightly al dente for better texture.

    Spotlight on Chickpeas and Lemon

    Lemon:

    • Chickpeas turn golden and crispy when roasted—look for even color and a firm crunch.
    • They should sound crackly when you bite into them, not soft or soggy.

    Lemon zest:

    • Lemon juice brightens the dressing with a zesty, tangy punch—use fresh for best aroma.
    • The zest can be added for extra citrus aroma, but avoid the bitter pith.

    Substitutions for dietary needs and flavor tweaks

    • Dairy-Free: Swap tahini with sunflower seed butter for a nutty, creamy dressing—less bitter, more sweet.
    • Gluten-Free: Use quinoa or rice instead of bulgur—still fluffy and hearty.
    • Vegan: Ensure toppings like honey or yogurt are plant-based or omit.
    • Low-Sodium: Rinse chickpeas thoroughly and use a low-sodium spice blend in roasting.
    • Extra Protein: Add tofu cubes or a boiled egg—adjust cooking times accordingly.

    Equipment & Tools

    • Oven: Roast chickpeas evenly.
    • Baking sheet: Hold chickpeas for roasting.
    • Sauce blender or whisk: Make dressing smoothly.
    • Cooking pot: Cook grains.
    • Massaging spoon or hands: Massage greens.

    Step-by-step guide for the Chickpea Buddha Bowl

    1. Preheat oven to 200°C (400°F). Rinse and drain canned chickpeas.
    2. Pat chickpeas dry, then toss with olive oil, salt, and spices like paprika or cumin.
    3. Spread on a baking sheet, roast for 20-25 minutes until crispy, shaking halfway.
    4. Cook grains (quinoa or rice) in boiling water according to package, about 15 minutes.
    5. While grains cook, prepare greens: massage with lemon juice and a pinch of salt until wilted.
    6. Make dressing: blend tahini, lemon juice, garlic, water, salt, and pepper until smooth and creamy.
    7. Assemble the bowl: layer grains, chickpeas, greens, and your chosen toppings.
    8. Finish with a drizzle of dressing and a sprinkle of seeds or nuts.
    9. Let the bowl rest for a minute, then serve at room temperature or slightly warm.
    10. Check chickpeas: they should be crunchy, not burnt; greens should be tender, grains fluffy.

    Let the assembled bowl sit for a minute before eating, to allow flavors to meld. Drizzle with dressing just before serving.

    How to Know It’s Done

    • Chickpeas are crispy and golden.
    • Greens are vibrant and slightly wilted from massage.
    • Grains are fluffy and fully cooked.

    Chickpea Buddha Bowl

    This chickpea Buddha bowl features crispy roasted chickpeas, tender greens, and fluffy grains, creating a vibrant dish with contrasting textures. It involves roasting, massaging greens, and assembling all components into a balanced, nourishing meal. The final appearance is colorful and inviting, with a mix of crunchy, soft, and fluffy textures.
    Prep Time 10 minutes
    Cook Time 30 minutes
    Total Time 40 minutes
    Servings: 4
    Course: Main Course
    Cuisine: Mediterranean
    Calories: 450

    Ingredients
      

    • 1 can can chickpeas rinsed and drained
    • 2 cups grain (quinoa or rice) cooked according to package instructions
    • 4 cups greens (kale or spinach) fresh
    • 2 tablespoons olive oil for roasting and greens
    • 1 lemon lemon for juice and zest
    • 2 tablespoons tahini for dressing
    • 1 clove garlic minced
    • 1/2 teaspoon paprika optional, for chickpeas
    • 1/2 teaspoon cumin optional, for chickpeas
    • Salt and pepper to taste

    Equipment

    • Oven
    • Baking sheet
    • Sauce blender or whisk
    • Cooking pot
    • Massaging spoon or hands

    Method
     

    1. Preheat your oven to 200°C (400°F). Rinse and drain the canned chickpeas thoroughly, then pat them dry with a paper towel to remove excess moisture.
    2. In a bowl, toss the chickpeas with a tablespoon of olive oil, salt, paprika, and cumin until evenly coated. Spread them out on a baking sheet lined with parchment paper.
    3. Roast the chickpeas in the oven for 20-25 minutes, shaking the pan halfway through, until they are golden and crispy with a crackling sound when you bite into them.
    4. Meanwhile, cook your grains—quinoa or rice—according to package instructions until fluffy, about 15 minutes. Fluff with a fork and set aside.
    5. While the grains cook, prepare the greens by placing them in a bowl. Squeeze the juice of half a lemon over them, add a pinch of salt, and massage gently with your hands or a spoon until they are tender and slightly wilted, but still vibrant in color.
    6. In a small bowl or blender, combine tahini, juice of the lemon, minced garlic, a splash of water, salt, and pepper. Whisk or blend until the dressing is smooth, creamy, and slightly pourable—adjust water to reach your preferred consistency.
    7. To assemble, start with a base of grains in each bowl. Top with the roasted chickpeas and the massaged greens, arranging them artfully for a colorful presentation.
    8. Drizzle the tahini lemon dressing over the assembled bowls and sprinkle with any additional toppings like seeds or nuts if desired. Give everything a gentle toss or serve as is.
    9. Enjoy your vibrant, textured Chickpea Buddha Bowl immediately, appreciating the contrast of crunchy chickpeas, tender greens, and fluffy grains.

    Tips & tricks for perfect Chickpea Buddha Bowl

    • Properly dry chickpeas—moisture prevents crisping.
    • Massage greens thoroughly—squeeze out excess water for better texture.
    • Toast seeds or nuts separately—avoid burning and get even color.
    • Use fresh lemon juice—brightens everything and enhances flavors.
    • Taste and adjust dressing before serving—balance acidity and salt.

    Common mistakes and how to fix them

    • FORGOT TO DRY CHICKPEAS: Pat dry with paper towels before roasting for maximum crunch.
    • DUMPED TOO MUCH OIL: Use sparingly—just enough to coat and crisp, not drown.
    • OVER-TORCHED CHICKPEAS: Reduce roasting time or lower oven temp to avoid burnt flavor.
    • DRESSING SEPARATES: Whisk well before drizzling, add a splash of water if too thick.

    Quick fixes for common kitchen hiccups

    • When chickpeas aren’t crispy enough, pop them back in the oven for 5 minutes.
    • Splash a little vinegar or lemon on greens if they’re bland.
    • Patch over burnt chickpeas with fresh ones if needed.
    • Shield delicate toppings like avocado from crushing by placing them last.
    • When grains stick, add a splash of water and fluff with a fork.

    Make ahead and storage tips

    • Roast chickpeas can be made a day ahead; store in an airtight container for crispness.
    • Cook grains ahead; they keep well in the fridge for up to 3 days. Reheat or serve cold.
    • Prep toppings like sliced veggies or pickles in advance, up to 2 days ahead.
    • Dress greens just before serving to keep them fresh and vibrant.

    10 Practical Q&As About Chickpea Buddha Bowl

    1. Can I use dried chickpeas instead of canned?

    Use canned chickpeas for quick prep or cook dried ones in advance. Rinse well to remove excess sodium or dirt.

    2. How do I make chickpeas crispy?

    Roast chickpeas in the oven at 200°C (400°F) for 20-25 minutes until crispy, shaking halfway through.

    3. Which greens work best for the bowl?

    Choose hearty greens like kale or spinach. Massage with lemon juice and olive oil to soften and flavor them.

    4. How do I make the dressing creamy?

    Use a simple tahini lemon dressing—blend tahini, lemon juice, garlic, water, salt, and pepper until smooth.

    5. What grains suit this bowl best?

    Cook grains like quinoa or brown rice according to package, then fluff and season lightly.

    6. What are good toppings?

    Add toppings like avocado, pickled vegetables, seeds, or nuts for added texture and flavor.

    7. How do I assemble the bowl?

    Assemble the bowl with grains at the bottom, then arrange chickpeas, greens, and toppings artfully.

    8. How long does it keep?

    Serve immediately for the freshest texture, or store separately for up to 2 days.

    9. Can I serve the chickpeas warm?

    Warm chickpeas slightly if you prefer them heated, but best served at room temp for crispness.

    10. How do I customize the flavor?

    Adjust seasoning to taste, adding more lemon or salt if needed for brightness.

    Sometimes, I find myself craving something straightforward but packed with personality. This bowl hits that sweet spot—no fuss, just real flavors and textures in every bite.

    Plus, it’s flexible—what you toss in can reflect what’s seasonal or what you’ve got lurking in your pantry. That’s what makes it a staple for me, a kind of edible comfort zone.