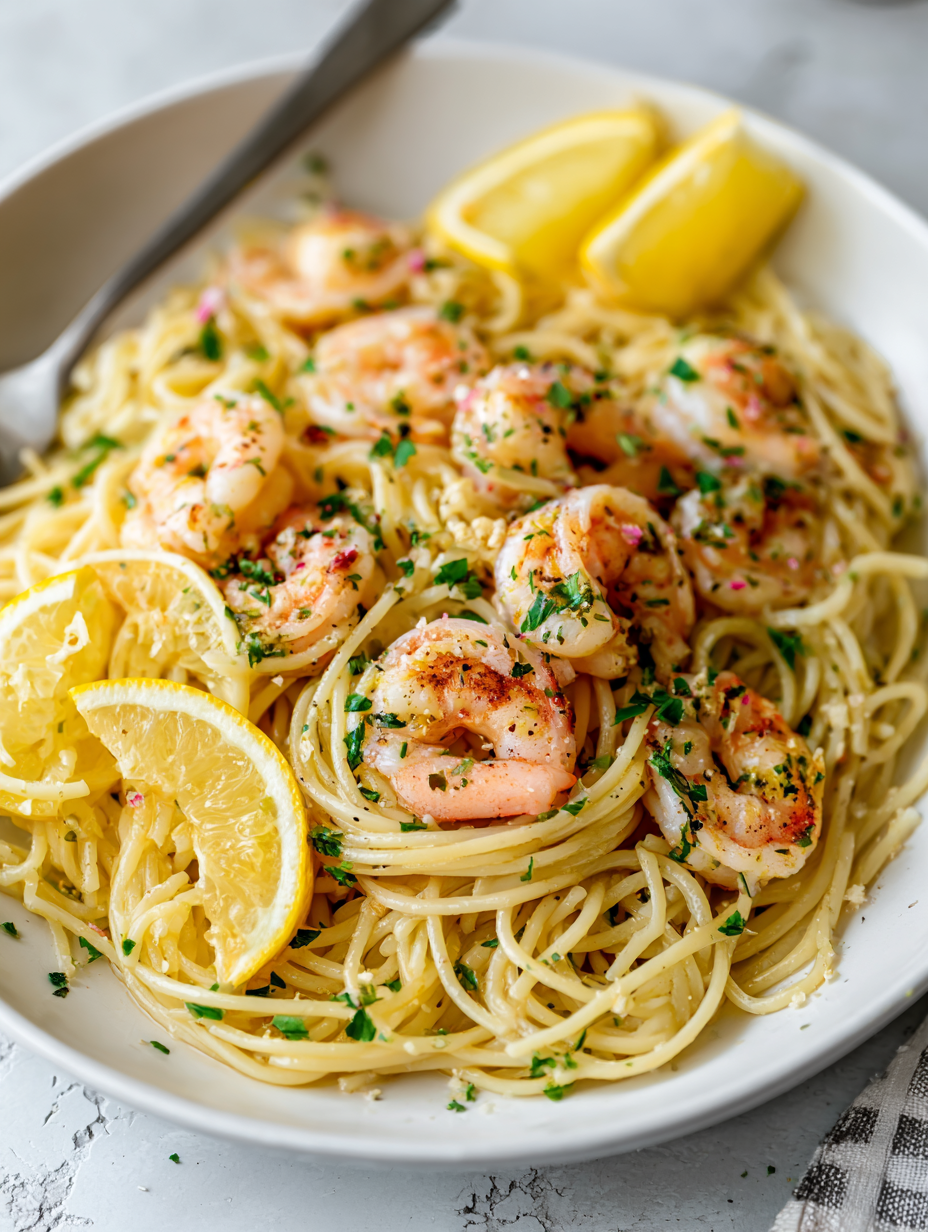
Category: Main Course

  • The Artistic Spin on Stuffed Peppers: Beyond the Basic Bake

    The Artistic Spin on Stuffed Peppers: Beyond the Basic Bake

    Stuffed peppers have always been a comforting staple, but today I want to explore a more creative angle. Imagine transforming these humble vegetables into a canvas of colors and flavors, inspired by global cuisines. It’s about turning a simple dish into a vibrant art piece that sparks joy at every glance and bite.

    The process involves selecting peppers in various hues—red, yellow, green—and filling them with a blend of unexpected ingredients. Think fragrant spices, crunchy nuts, and fresh herbs, all harmonizing in a perfect bite. This isn’t just a recipe; it’s a way to elevate your everyday dinner into something memorable and Instagram-worthy.

    Colorful Stuffed Peppers with Global Flavors

    This dish features vibrant bell peppers filled with a savory mixture of fragrant spices, crunchy nuts, and fresh herbs. The stuffed peppers are roasted until tender, with a browned, slightly bubbly exterior showing off their colorful skins and hearty filling. The result is a visually appealing, flavorful meal with a variety of textures and a satisfying bite.
    Prep Time 20 minutes
    Cook Time 40 minutes
    Total Time 1 hour
    Servings: 4
    Course: Main Course
    Cuisine: Global
    Calories: 320

    Ingredients
      

    • 4 piece bell peppers (red, yellow, green) stemmed and seeded
    • 1 cup cooked quinoa or rice cooled
    • 1/2 cup chopped nuts (such as walnuts or almonds)
    • 2 cloves garlic minced
    • 1 tablespoon olive oil
    • 2 teaspoons ground cumin or other spices
    • 1/4 cup chopped fresh herbs (parsley, cilantro, or mint)
    • to taste salt and pepper
    • 1 cup shredded cheese (optional) such as feta or cheddar

    Equipment

    • Baking dish
    • Chef’s knife
    • Cutting board
    • Mixing bowls
    • Sauté pan
    • Spoon

    Method
     

    1. Preheat your oven to 375°F (190°C). Arrange the colorful bell peppers on a baking dish, stem side up, and roast for about 15 minutes until they begin to soften and their skins slightly blister.
    2. While the peppers roast, heat olive oil in a sauté pan over medium heat. Add the minced garlic and ground cumin, cooking until fragrant—about 30 seconds—and then stir in the cooked quinoa, chopped nuts, and chopped herbs. Season with salt and pepper, and cook for another 2 minutes until heated through and well combined.
    3. Remove the peppers from the oven and carefully cut off the tops to create a opening. Gently scoop out the seeds and membranes, being careful not to puncture the walls, creating a hollow space for the filling.
    4. Fill each hollowed pepper with the quinoa mixture, pressing gently to pack the filling inside. If using, sprinkle shredded cheese on top of each stuffed pepper for added richness.
    5. Place the stuffed peppers back into the baking dish, standing upright. Bake for an additional 25 minutes until the peppers are tender and the filling is heated through, with the cheese (if added) melted and bubbly.
    6. Once baked, remove the peppers from the oven and let them cool slightly. Garnish with extra fresh herbs if desired, and serve warm, showcasing their vibrant colors and hearty filling.

    Notes

    Feel free to customize the filling with other vegetables or proteins for variation. Using a mixture of peppers adds visual interest and a variety of flavors.

    As the season shifts, this recipe offers a welcome opportunity to experiment in the kitchen while keeping things healthy and colorful. Perfect for a busy weeknight or a laid-back weekend gathering, these stuffed peppers bring both comfort and flair. They remind us that even the simplest ingredients can be transformed into something truly delightful.

    Enjoy the process of layering textures and flavors, and let the aroma of roasting peppers fill your home with warmth. Whether you’re cooking for loved ones or just for yourself, this dish is a small celebration of how vibrant, creative cooking can be. Sometimes, all it takes is a stuffed pepper to make a meal feel special.

  • Spooky Delight: The Ultimate Halloween Mummy Pizza

    Spooky Delight: The Ultimate Halloween Mummy Pizza

    Every October, I find myself craving a playful twist on classic comfort foods, and this Halloween Mummy Pizza hits the spot. It combines gooey cheese, crispy crust, and creepy bandages of pepperoni—perfect for a festive gathering. The aroma of baked dough mingling with herbs makes the whole house smell like a Halloween haunted house.

    What makes this recipe stand out is its quick assembly and immediate visual impact. Kids and adults alike are drawn to its spooky, whimsical appearance. Plus, it’s a fun way to get everyone involved in kitchen chaos, from rolling dough to decorating with cheese and pepperoni.

    Halloween Mummy Pizza

    This Halloween-themed pizza features a crispy crust topped with gooey melted cheese and decorated with strips of pepperoni that resemble bandages. The assembly involves spreading sauce, layering cheese, and creating mummy-like bandages before baking until golden and bubbly, resulting in a fun, spookily appealing dish with a crispy exterior and cheesy interior.
    Prep Time 15 minutes
    Cook Time 12 minutes
    Total Time 27 minutes
    Servings: 4
    Course: Main Course
    Cuisine: American
    Calories: 320

    Ingredients
      

    • 1 pack pizza dough store-bought or homemade
    • 1/2 cup pizza sauce
    • 1 1/2 cups shredded mozzarella cheese
    • 50 g pepperoni slices
    • 1 tsp olive oil optional for brushing crust

    Equipment

    • Pizza baking sheet or stone
    • Rolling pin
    • Baking paper or parchment
    • Knife

    Method
     

    1. Preheat your oven to 400°F (200°C) and line a baking sheet with parchment paper to prevent sticking.
    2. Roll out the pizza dough on a floured surface into a large circle or rectangle, about 1/4-inch thick. Transfer it carefully onto your prepared baking sheet.
    3. Spread a thin, even layer of pizza sauce over the dough, leaving a small border around the edges for the crust.
    4. Sprinkle the shredded mozzarella cheese generously over the sauce, covering the entire surface.
    5. Use your fingers or a knife to carefully cut the pepperoni slices into strips. Arrange these strips in a loose bandage pattern across the cheese to resemble bandages of a mummy, leaving some gaps for “eyes” if desired.
    6. If you like, lightly brush the crust edges with olive oil to give it a crisp and golden appearance when baked.
    7. Bake the pizza in the preheated oven for about 12 minutes, or until the crust is golden brown and the cheese is bubbly and slightly browned.
    8. Remove the pizza from the oven and let it cool slightly for a few minutes. Slice into pieces, revealing the gooey cheese and playful pepperoni bandages.
    9. Serve hot, enjoying the crispy crust and cheesy topping with fun mummy-like pepperoni decorations.

    This Halloween, this mummy pizza becomes a centerpiece that’s easy to make and even easier to enjoy. Its imperfect, fun appearance makes it approachable and memorable. Plus, it’s a conversation starter that makes the meal feel special and festive.

    When I bake this creepy treat, I remember the excitement of spooky nights and sharing smiles. No matter how chaotic the kitchen, the joy of creating something whimsical and delicious makes it all worthwhile. It’s more than just food; it’s a holiday tradition in the making.

  • White Chicken Chili: A Cozy Twist on Traditional Comfort

    White Chicken Chili: A Cozy Twist on Traditional Comfort

    Imagine a chilly evening where the aroma of creamy white chicken chili wafts through your kitchen. This dish isn’t just about warmth; it’s about bringing a savory, hearty experience to the table with a twist—using tender chicken and a blend of spices that evoke comfort and nostalgia.

    The fascination with this recipe lies in its simplicity and rich textures. The silky broth combined with the tender bites of chicken and the gentle heat of cumin and green chilies creates a symphony of flavors that feel both familiar and exciting. It’s perfect for those cozy nights when you want something substantial without heavy fuss.

    This white chili offers a unique comfort that’s both wholesome and elegantly effortless. Whether you’re aiming for a family dinner or an impressive potluck contribution, it’s a bowl that speaks of warmth, sharing, and culinary creativity.

    Creamy White Chicken Chili

    This white chicken chili is a hearty stew made with tender chunks of chicken simmered in a creamy broth infused with cumin and green chilies. The dish features a smooth, velvety texture with a comforting blend of spices and a slightly thickened consistency, topped with optional garnishes for added flavor.
    Prep Time 15 minutes
    Cook Time 30 minutes
    Total Time 45 minutes
    Servings: 6
    Course: Main Course
    Cuisine: American
    Calories: 350

    Ingredients
      

    • 1 lb boneless, skinless chicken breasts cut into bite-sized pieces
    • 1 medium yellow onion diced
    • 3 cloves garlic minced
    • 2 cups chicken broth preferably low-sodium
    • 1 can (4 oz) green chilies chopped, with liquid
    • 1 cup cooked white beans drained and rinsed
    • 1 cup heavy cream for creaminess
    • 1 tsp ground cumin
    • 1 tbsp olive oil
    • to taste salt and pepper

    Equipment

    • Large pot or Dutch oven
    • Wooden spoon or spatula

    Method
     

    1. Heat olive oil in a large pot over medium heat until shimmering. Add the diced onion and cook, stirring occasionally, until translucent and fragrant, about 5 minutes.
    2. Add the minced garlic to the pot and cook for another 30 seconds until fragrant, stirring continuously to prevent burning.
    3. Stir in the bite-sized chicken pieces and cook until they turn white and are no longer pink in the center, about 5-7 minutes.
    4. Pour in the chicken broth and add the chopped green chilies along with their liquid. Stir to combine and bring the mixture to a gentle simmer.
    5. Add the cooked white beans and sprinkle in the cumin, then stir everything together. Let the chili simmer uncovered for about 15 minutes, allowing the flavors to meld and the broth to slightly thicken.
    6. Reduce the heat to low and stir in the heavy cream, giving the chili a rich, velvety texture. Simmer for another 5 minutes, adjusting seasoning with salt and pepper as needed.
    7. Taste and adjust the seasoning if necessary, then remove from heat. The chili should be creamy, hearty, and fragrant with a smooth appearance.
    8. Spoon the hot white chicken chili into bowls and serve with your favorite toppings such as chopped cilantro, shredded cheese, or a squeeze of lime if desired.

    Notes

    For a thicker chili, simmer longer to reduce the broth; for a spicier kick, add more green chilies or cayenne pepper.
    This dish is more than just a meal; it’s an experience that brings people together through its inviting aroma and satisfying taste. It’s a recipe that allows for flexibility—add more spice, load it with toppings, or keep it pure and simple.

    As seasons transition and cozy evenings call for something hearty, white chicken chili stands out as an easy yet fulfilling choice. It’s a reminder that good food doesn’t have to be complicated—it just needs to be made with care, a pinch of love, and perhaps a dash of adventure.

  • Spooky Delicious: Halloween Monster Burgers to Thrill and Chill

    Spooky Delicious: Halloween Monster Burgers to Thrill and Chill

    As the nights grow longer and the air turns crisper, I find myself craving those playful twists on classic recipes that make Halloween special. This year, I decided to go beyond mere decorations and craft something edible and utterly fun: Halloween Monster Burgers. The kitchen fills with the smell of sizzling patties and melting cheese, each one transforming into a tiny monster ready to terrify and delight.

    What sets these burgers apart is their ability to bring out everyone’s inner child. Kids and grown-ups alike will giggle at the googly eyes and monstrous faces, making it perfect for a party or a cozy night in with spooky flicks. Plus, they’re surprisingly simple, letting you focus on the fun details rather than complicated steps.

    Halloween Monster Burgers

    Halloween Monster Burgers are assembled beef patties topped with cheese and decorated with googly eyes and facial features to resemble monsters. The burgers are cooked until charred and juicy, with melted cheese and playful toppings creating a fun, monster-like appearance. The final dish combines smoky, savory flavors with a visually whimsical presentation perfect for parties or festive gatherings.
    Prep Time 15 minutes
    Cook Time 20 minutes
    Total Time 35 minutes
    Servings: 4
    Course: Main Course
    Cuisine: American
    Calories: 500

    Ingredients
      

    • 1 pound ground beef 80/20 blend for juiciness
    • 4 slices cheddar cheese cut into monster shapes
    • 1 cup googly eyes plastic or edible
    • 1 small red bell pepper for facial features
    • 4 buns burger buns brushed with butter if desired
    • to taste salt and pepper for seasoning

    Equipment

    • Grill or stovetop skillet
    • Spatula
    • Knife
    • Cutting board
    • Baking sheet (optional for cheese melting)

    Method
     

    1. Preheat your grill or skillet over medium-high heat, letting it warm until hot and starting to sizzle slightly.
    2. Divide the ground beef into four equal portions, then gently shape each into a round patty about half an inch thick, avoiding overworking the meat for tender burgers.
    3. Season each patty generously with salt and pepper, pressing the seasonings into the surface for even flavor.
    4. Place the patties onto the hot grill or skillet, cooking for about 4-5 minutes per side, until they develop a nice sear and are cooked to your desired doneness.
    5. During the last minute of cooking, place a slice of cheddar cheese on top of each patty, allowing it to melt and evenly cover the surface.
    6. While the cheese melts, thinly slice the red bell pepper into small shapes or strips to form facial features like mouths or scars.
    7. Toast the burger buns briefly on the grill or in a toaster for about 1-2 minutes until golden and slightly crisp.
    8. Assemble each burger by placing the cooked patty with melted cheese onto the bottom bun, then decorate with googly eyes, red pepper slices, and any additional facial features to create a monster face.
    9. Cover with the top bun and gently press down to secure the decorations; repeat with remaining burgers.
    10. Serve the Halloween Monster Burgers immediately, allowing everyone to enjoy the visually fun and tasty treats.

    Notes

    Feel free to get creative with additional toppings or facial expressions to make each burger unique!

    These Halloween Monster Burgers turn an ordinary meal into a memorable event. They’re a playful way to celebrate the season and spark some culinary creativity. The best part? They’re as forgiving as they are fun, so don’t worry if a face or two gets a little jumbled. Just remember to enjoy the chaos and share lots of laughs along the way.

    As the spooky season winds down, these burgers leave behind more than just leftovers—they leave behind smiles and stories. Perfect for a casual gathering or a last-minute costume party, they add a dash of whimsy to any October evening. So, gather your ingredients and let the monster-making begin—this is one recipe that guarantees a good time.

    ,

  • Unconventional Twist: Spiced Turkey Chili With a Citrus Kick

    Unconventional Twist: Spiced Turkey Chili With a Citrus Kick

    Many turkey chili recipes stick to the basics, but I like to toss in a surprise element: a splash of fresh orange juice. It adds an unexpected brightness that cuts through the richness of the ground turkey and tomatoes, creating a vibrant flavor profile. This twist makes the chili feel lighter and more refreshing, perfect for those looking to elevate comfort food.

    Imagine simmering fragrant spices—cumin, smoked paprika, and a dash of cinnamon—mingling with tender turkey and beans. As the citrus infuses during the simmer, it creates a subtle tang that awakens your senses with every spoonful. This recipe is not just a meal; it’s an adventure for your taste buds, blending warmth and zest effortlessly.

    Turkey Chili with Orange Juice

    This turkey chili combines ground turkey and beans simmered with fragrant spices, then finished with a splash of fresh orange juice for brightness. The dish develops a thick, hearty texture with a vibrant, slightly tangy flavor profile and a rich, comforting appearance. It’s a quick, one-pot meal with a colorful and inviting look.
    Prep Time 10 minutes
    Cook Time 30 minutes
    Total Time 40 minutes
    Servings: 4
    Course: Main Course
    Cuisine: American
    Calories: 350

    Ingredients
      

    • 1 lb ground turkey preferably lean
    • 1 cup cooked beans black beans or kidney beans work well
    • 1 cup diced tomatoes canned or fresh
    • 1 tablespoon cumin ground
    • 1 teaspoon smoked paprika
    • 1/4 teaspoon cinnamon
    • 2 tablespoons vegetable oil
    • 1/2 cup fresh orange juice preferably freshly squeezed
    • to taste salt and pepper

    Equipment

    • Large pot or Dutch oven
    • Cutting board

    Method
     

    1. Heat the vegetable oil in a large pot over medium heat. Add the ground turkey and cook, breaking it apart with a spoon, until it is browned and cooked through, about 5-7 minutes. The meat will release its aroma and start to brown nicely.
    2. Add the diced tomatoes, cumin, smoked paprika, and cinnamon to the cooked turkey. Stir everything together well, allowing the spices to coat the meat evenly. Cook for another 2-3 minutes until fragrant and slightly thickened.
    3. Pour in the cooked beans and stir to combine. Let the mixture come to a gentle simmer, then reduce the heat to low. Cover the pot and let it simmer for about 15 minutes, stirring occasionally, until the flavors meld and the chili thickens slightly.
    4. Remove the lid and stir in the fresh orange juice. Increase the heat slightly to allow the chili to bubble gently. Cook uncovered for another 3-5 minutes, until the mixture is heated through and slightly reduced, giving it a vibrant aroma and bright flavor.
    5. Taste the chili and season with salt and pepper as desired. Stir well to distribute the seasonings evenly.
    6. Serve the turkey chili hot, with a hearty, thick appearance and a bright, flavorful finish. Enjoy it topped with your favorite garnishes if desired.

    Notes

    For added flavor, consider garnishing with chopped cilantro or a squeeze of lime before serving.

    This chili comes into its own during cozy evenings, but the fresh citrus touches also make it a standout for spring dinners. Its versatility means you can prepare it ahead and let the flavors deepen overnight. No matter the season, this dish reminds us that comfort food can surprise and delight at the same time.

    With each bowl, you’ll discover a new layer of flavor—something familiar yet completely fresh. It’s a reminder that small changes in our cooking can transform traditional classics into memorable meals. Keep this recipe in your back pocket for both busy weeknights and leisurely weekends alike.

  • The Secret Ingredient to a Comforting Chicken Noodle Soup

    The Secret Ingredient to a Comforting Chicken Noodle Soup

    Chicken noodle soup is a staple in many homes, but this version is packed with a surprising twist—a touch of freshly grated ginger that adds a warm, spicy aroma and a hint of zest. I discovered this while experimenting with traditional recipes, aiming to elevate the familiar into something unexpectedly delightful. Every spoonful offers a delicate balance of savory broth and bright, invigorating notes.

    This recipe’s charm lies in its ability to transform a simple dish into a moment of joy, especially during chilly evenings or when someone in the family needs a little extra care. The ginger infuses the broth with a fragrant heat that wakes up the senses, making the soup feel both soothing and revitalizing. It’s a small change that makes a big impact, creating a cozy bowl that truly feels special.

    Ginger Chicken Noodle Soup

    This chicken noodle soup features tender shredded chicken, al dente noodles, and a flavorful broth infused with freshly grated ginger, offering a warm and fragrant experience. The soup is simmered until the flavors meld and the ingredients are heated through, resulting in a comforting dish with a clear, inviting appearance. The ginger adds a spicy brightness that elevates the traditional soup into a more invigorating version.
    Prep Time 15 minutes
    Cook Time 30 minutes
    Total Time 45 minutes
    Servings: 4
    Course: Main Course
    Cuisine: Comfort Food
    Calories: 350

    Ingredients
      

    • 2 cups chicken broth preferably low-sodium
    • 1 lb boneless, skinless chicken breasts or thighs
    • 2 cups egg noodles or other pasta
    • 1 inch fresh ginger about 1-inch piece, grated
    • 2 cloves garlic minced
    • 1 tablespoon soy sauce optional for added flavor
    • 2 stalks celery chopped
    • 1 medium carrot sliced thinly
    • to taste Salt and pepper for seasoning

    Equipment

    • Large pot
    • Sharp knife
    • Cutting board
    • Ladle

    Method
     

    1. Place chicken breasts in a large pot and cover with water. Bring to a gentle boil and cook until the chicken is cooked through, about 15 minutes. Remove the chicken and set aside to cool slightly.
    2. Once cool enough to handle, shred the chicken into bite-sized pieces using two forks or your hands. Set aside.
    3. Meanwhile, in the same pot, pour in the chicken broth and bring it to a simmer over medium heat. Add the chopped celery, sliced carrot, and grated ginger. Let the vegetables cook until tender and fragrant, about 10 minutes.
    4. Stir in the minced garlic and soy sauce, and continue simmering for another 2 minutes to meld the flavors.
    5. While the broth simmers, cook the egg noodles separately in a pot of boiling water according to package instructions until al dente. Drain and set aside.
    6. Add the shredded chicken to the broth and stir well. Let it heat through for about 5 minutes. Taste and season with salt and pepper as needed.
    7. To serve, place a portion of cooked noodles into each bowl and ladle the hot broth with chicken and vegetables over the noodles. Stir gently to combine and enjoy immediately.

    Notes

    For an extra fresh flavor, garnish with chopped green onions or a squeeze of lime before serving.

    This ginger-infused chicken noodle soup is a testament to how a simple tweak can make comfort food unforgettable. It’s perfect for cozy nights or when you need something hearty yet light enough to keep you going. The vibrant flavors lift the spirits and warm the soul without overwhelming the senses.

    Cooking this dish reminds me of the joy in small changes and the impact of fresh ingredients. It’s a reminder to embrace simplicity and add a little spice to everyday routines. I hope this bowl brings you the same comfort and surprise, whenever you need it most.

  • Spooky, Cheesy Eyeball Pasta That Will Haunt Your Dinner

    Spooky, Cheesy Eyeball Pasta That Will Haunt Your Dinner

    Imagine a dish that transforms your kitchen into a Halloween haunted house with just a few simple ingredients. These creepy eyeball pasta and meatball ‘eyeballs’ are part art, part comfort food, and all fun. The sight of meaty orbs peeking out of a vibrant, spooky sauce makes every bite a delightful surprise.

    This recipe isn’t just about the scare factor; it’s about nostalgia and chaos in the best way. It’s perfect for a childhood throwback or a quick, playful meal to impress a crowd of little monsters. Plus, the messy, gooey textures and vivid colors are exactly what makes Halloween cooking so spirited.

    Halloween Eyeball Pasta and Meatball ‘Eyeballs’

    This dish features cooked pasta coated in a vibrant, spooky sauce, topped with meatballs that resemble creepy eyeballs. The meatballs are cooked until tender, then assembled with an eerie red sauce to create a playful, visually striking Halloween-themed meal. The final presentation combines gooey textures with vivid colors for a fun and spooky effect.
    Prep Time 20 minutes
    Cook Time 30 minutes
    Total Time 50 minutes
    Servings: 4
    Course: Main Course
    Cuisine: Halloween
    Calories: 520

    Ingredients
      

    • 12 oz spaghetti pasta uncooked
    • 1 1/2 cups meatball mixture prepared from ground meat, breadcrumbs, egg, seasonings
    • 2 cups tomato sauce preferably vibrant red or with red food coloring
    • 1 cup water
    • 1 tbsp olive oil
    • 1 tsp garlic powder
    • to taste salt and pepper
    • 12 small meatballs formed from mixture
    • 1 cup mozzarella cheese shredded, for eyeballs
    • 2 tbsp red food coloring optional for extra spooky color

    Equipment

    • Large pot
    • Skillet or frying pan
    • Mixing bowl
    • Baking sheet
    • Cooking spoon
    • Kitchen knife

    Method
     

    1. Cook the spaghetti in a large pot of boiling salted water until al dente according to package instructions. Drain and set aside.
      12 oz spaghetti pasta
    2. Heat olive oil in a skillet over medium heat. Add garlic powder, salt, and pepper, then pour in the tomato sauce and water. Stir until combined and simmer until slightly thickened, about 10 minutes.
      12 oz spaghetti pasta
    3. While the sauce simmers, form small meatballs from the prepared mixture, about the size of a walnut. Place them on a baking sheet lined with parchment.
      12 oz spaghetti pasta
    4. Bake the meatballs in a preheated oven at 400°F (200°C) until cooked through and browned, about 15 minutes. Remove from oven and let cool slightly.
      12 oz spaghetti pasta
    5. Slice each meatball in half horizontally to create a cross-section that resembles an eyeball. Place each half into a small mound of mozzarella cheese on a serving plate, pressing gently to adhere.
      12 oz spaghetti pasta
    6. Add a small dab of tomato sauce to the center of each mozzarella
      12 oz spaghetti pasta
    7. Serve the spooky eyeball pasta with the meatball eyeballs arranged on top, drizzled with extra sauce if desired. Enjoy while warm for a gooey, fun Halloween meal.

    Notes

    For added creepiness, add a few drops of red food coloring to the sauce or use black olives for extra eerie accents.
    As you plate up these eyeball pasta monsters, take a moment to enjoy the chaos of the kitchen. This dish is all about fun and creativity, a break from the usual routine. It’s a reminder that sometimes, the best recipes are the ones that make everyone smile and giggle.

    Whether you’re celebrating with kids or just craving some seasonal whimsy, these eyeballs will be a hit. They pair perfectly with a bubbling cauldron of green or blood-red sauce, adding that extra touch of Halloween magic to your table.

  • Spook-tacular Jack-o’-Lantern Stuffed Peppers: A Haunted Harvest

    Spook-tacular Jack-o’-Lantern Stuffed Peppers: A Haunted Harvest

    Imagine carving a classic Halloween pumpkin, but instead of a ghoulish face, it’s a vibrant bell pepper turned into a edible masterpiece. These Jack-o’-Lantern Stuffed Peppers combine festive fun with a hearty, healthy twist. The aromatic blend of seasoned ground meat and melted cheese oozes from the carved openings, just like a real jack-o’-lantern’s wicked grin.

    This recipe invites you to embrace chaos in the kitchen with a spooky, playful approach. It’s perfect for those who love holiday traditions but crave a nutritious, colorful dish that screams Halloween. Plus, the process of carving and stuffing transforms the ordinary into something delightfully eerie and engaging for all ages.

    Jack-o’-Lantern Stuffed Bell Peppers

    This dish features vibrant bell peppers carved into pumpkin shapes, hollowed out and filled with a savory mixture of ground meat, rice, and vegetables. After baking, the peppers have a tender texture with melted cheese on top, creating a festive and colorful presentation perfect for Halloween celebrations.
    Prep Time 20 minutes
    Cook Time 40 minutes
    Total Time 1 hour
    Servings: 4
    Course: Main Course
    Cuisine: American
    Calories: 350

    Ingredients
      

    • 4 large bell peppers preferably orange or yellow for a festive look
    • 1/2 pound ground meat beef, turkey, or chicken
    • 1 cup cooked rice white or brown rice
    • 1/2 cup diced onion preferably yellow or white
    • 1 clove garlic minced
    • 1/2 cup shredded cheese cheddar or mozzarella
    • 2 tablespoons olive oil for sautéing
    • to taste salt and pepper
    • 1 teaspoon paprika optional, for color and flavor

    Equipment

    • Chef’s knife
    • Baking dish
    • Spoon
    • Mixing bowl

    Method
     

    1. Preheat your oven to 375°F (190°C). Start by carefully carving pumpkin-like faces into each bell pepper using a sharp chef’s knife, creating a fun and Halloween-ready appearance. Remove the seeds and inner membranes to create a hollow interior.
    2. In a large skillet, heat olive oil over medium heat. Add diced onions and minced garlic, sautéing until they turn translucent and fragrant—about 3-4 minutes.
    3. Add ground meat to the skillet, breaking it apart with a spoon. Cook until browned and cooked through, about 7-8 minutes. Season with salt, pepper, and paprika for flavor. Stir in cooked rice and mix until evenly combined.
    4. Use a spoon to fill each carved pepper with the meat and rice mixture, pressing gently to pack the filling in tightly and leave a little space at the top for cheese.
    5. Place the filled peppers into a baking dish standing upright. Sprinkle shredded cheese over the top of each stuffed pepper evenly.
    6. Bake in the preheated oven for 30-40 minutes, until the peppers are tender and the cheese is melted and bubbly with some golden edges.
    7. Remove the dish from the oven and let it cool for a few minutes. Serve these festive jack-o’-lantern peppers hot, with their cheerful expressions and gooey cheese inside.

    Notes

    For extra spookiness, add small cheese slices or olives for eyes and a nose before baking.

    As the aroma of seasoned peppers and sizzling filling fills your space, you’ll feel the festive cheer grow stronger. These stuffed peppers are more than a dish—they’re a creative experience that celebrates the spooky season. Sharing them around the table turns dinner into a ghoulishly good celebration.

    With just a few simple ingredients, this recipe offers a fun, memorable way to enjoy Halloween with family and friends. The cheerful mashup of flavors and playful presentation makes it an instant hit. Now, all that’s left is to enjoy the spooky, savory feast you’ve crafted with love.

  • The Secret Ingredient That Turns Your Chili into a Cozy Masterpiece

    The Secret Ingredient That Turns Your Chili into a Cozy Masterpiece

    Everyone has their chili habits, but this recipe rediscover the magic of an unexpected ingredient: smoked paprika. It lends a warm, smoky aroma that sort of hugs your senses before you even take a sip. I stumbled upon this twist during a chilly weekend, and now I can’t imagine chili without it.

    Cooking chili is always about balancing comfort with a little chaos in the kitchen, and this recipe embraces both. It’s perfect for those lazy Sunday afternoons when you want something filling but also crave a burst of flavor that surprises even seasoned chili enthusiasts.

    Smoked Paprika Chili

    This chili recipe features a hearty combination of ground meat, beans, and tomatoes simmered with smoked paprika, which imparts a warm, smoky aroma. The dish develops a thick, flavorful sauce with tender ingredients, resulting in a comforting and visually rich stew.
    Prep Time 15 minutes
    Cook Time 45 minutes
    Total Time 1 hour
    Servings: 4
    Course: Main Course
    Cuisine: American
    Calories: 420

    Ingredients
      

    • 1 tablespoon olive oil
    • 1 pound ground beef or turkey
    • 1 medium yellow onion diced
    • 3 cloves garlic minced
    • 1 can diced tomatoes 14 oz
    • 1 can kidney beans drained and rinsed, 15 oz
    • 2 tablespoons smoked paprika
    • 1 teaspoon cumin
    • 0.5 teaspoon chili powder
    • to taste salt and pepper adjust to preference

    Equipment

    • Large pot or Dutch oven
    • Wooden spoon or spatula

    Method
     

    1. Heat the large pot over medium heat and add the olive oil, letting it warm until shimmering.
    2. Add the diced onion to the pot and sauté for about 5 minutes, stirring occasionally until it becomes translucent and fragrant.
    3. Pour in the ground meat and cook, breaking it apart with a spoon, until browned and cooked through, about 7-10 minutes. The meat should develop a nice crust where it contacts the pan.
    4. Add the minced garlic and cook for another 1 minute, stirring constantly until the garlic is fragrant and slightly golden.
    5. Sprinkle in the smoked paprika, cumin, chili powder, and a pinch of salt and pepper; stir well to coat the meat and onions in the spices, releasing their smoky aroma.
    6. Pour in the diced tomatoes with their juices and stir everything together, scraping any browned bits off the bottom of the pot for flavor.
    7. Bring the mixture to a simmer, then reduce the heat to low. Cover the pot partially and cook for 20-25 minutes, stirring occasionally, until the chili thickens and flavors meld.
    8. Add the drained and rinsed kidney beans to the chili and stir to combine. Continue simmering uncovered for another 10 minutes to heat through and develop richness.
    9. Taste and adjust seasoning with salt and pepper as desired, then remove from heat and let sit for a few minutes to settle.
    10. Spoon the chili into bowls and serve hot, optionally garnished with fresh herbs or a dollop of sour cream.

    Notes

    For extra smoky flavor, consider adding a pinch of smoked paprika at the end of cooking. You can also customize the heat level with more chili powder or hot sauce.
    As the pot simmers and the house fills with the rich smell of spices, I find myself feeling oddly nostalgic. This recipe isn’t just about food—it’s about creating moments of warmth during the cooler months.

    So, whenever you need a dish that comforts and invigorates, give this chili a try. The smoky undertones and hearty ingredients will remind you why good food is the best kind of therapy.

  • Bell Pepper Bliss: A Cozy Twist on Stuffed Peppers

    Bell Pepper Bliss: A Cozy Twist on Stuffed Peppers

    Imagine biting into a bell pepper filled with a symphony of seasoned grains, melting cheese, and herbs. This recipe transforms a simple vegetable into a comforting pocket of warmth and flavor, perfect for a chilly evening. The aroma of roasted peppers mingling with garlic and spices will instantly pull you into a cozy kitchen moment.

    What’s special about this stuffed pepper recipe? It’s adaptable—gluten-free, vegetarian, or with a protein boost. Plus, each pepper is like a little edible vessel, making serving and presentation feel playful and inviting. It’s a nourishing, straightforward dish you can prep ahead and customize to your heart’s content.

    Stuffed Bell Peppers

    This dish features bell peppers filled with a seasoned mixture of grains, cheese, and herbs, then baked until tender and bubbling. The peppers are roasted until their skins are slightly charred and the filling is heated through, creating a colorful and hearty presentation with a melty, textured interior.
    Prep Time 20 minutes
    Cook Time 40 minutes
    Total Time 1 hour
    Servings: 4
    Course: Main Course
    Cuisine: International
    Calories: 250

    Ingredients
      

    • 4 large bell peppers preferably red, yellow, or orange
    • 1 cup cooked grains (rice, quinoa, or bulgur) cooled
    • 1 cup shredded cheese cheddar, mozzarella, or your favorite melting cheese
    • 1/4 cup chopped fresh herbs parsley, cilantro, or basil
    • 2 cloves garlic minced
    • 2 tablespoons olive oil
    • to taste salt and pepper

    Equipment

    • Oven
    • Baking dish
    • Skillet or saucepan
    • Mixing bowl
    • Knife
    • Cutting board

    Method
     

    1. Preheat the oven to 400°F (200°C). Slice the tops off the bell peppers and remove the seeds and membranes. Place them upright in a baking dish.
    2. In a skillet, heat olive oil over medium heat. Add minced garlic and sauté until fragrant, about 30 seconds, releasing a warm aroma.
    3. Add cooked grains to the skillet with garlic, stirring to combine; cook for 2 minutes so the flavors meld and grains warm through.
    4. Remove the skillet from heat and stir in shredded cheese, chopped herbs, salt, and pepper until the cheese begins to melt and everything is evenly mixed.
    5. Spoon the filling mixture into each hollowed-out pepper, pressing gently to fill completely and mound slightly on top.
    6. Bake the peppers in the preheated oven for about 30-40 minutes, until the peppers are tender and slightly charred on the edges, and the filling is bubbling and golden.
    7. Remove from oven and let cool slightly before serving. The peppers will be soft with a charred skin and a warm, cheesy filling.

    In a world of quick bites, this dish offers a slower, savoring experience. The crisp-tender peppers and hearty stuffing create a delightful contrast with every bite. It’s an easy way to bring some joy and comfort to your dinner table, especially during busy, chilly nights.

    Revisiting the tradition of stuffed peppers feels like reconnecting with a childhood memory, but with a modern twist. Whether paired with a fresh salad or enjoyed solo, it’s a reminder that simple ingredients can deliver big, satisfying flavors. That first bite is always a little revelation, even on the busiest days.