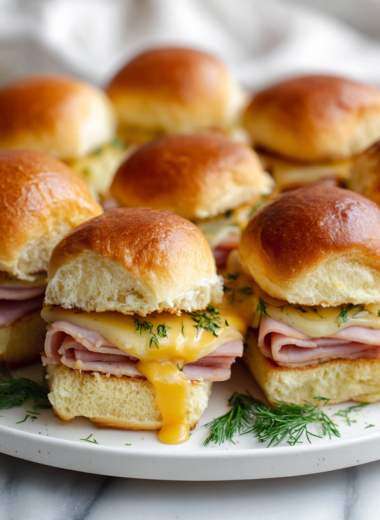
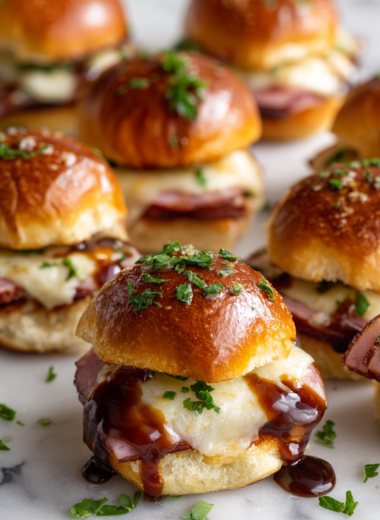
Blog

  • Chill Out with a Frozen Margarita Slushie: The Unexpected Allergy-Friendly Twist

    Chill Out with a Frozen Margarita Slushie: The Unexpected Allergy-Friendly Twist

    Imagine a summer afternoon where the only thing cooler than the breeze is a frosty beverage that hits all the right notes of citrus and tequila, but without the usual fuss. Frozen margarita slushies are a delightful way to beat the heat, especially when you want something refreshingly simple yet surprisingly adaptable. Today, I discovered how to make a version that’s friendly for those with nut allergies, transforming a classic into a safe and still vibrant treat.

    This recipe isn’t just about the freeze and the zest; it’s about reclaiming the joy of summer sips without worry. Using everyday pantry ingredients turned out to be the secret, creating a smooth, icy texture paired with a zingy punch of lime. It’s an invitation to celebrate spontaneous outdoor gatherings or a solo moment of cool relief after a long day.

    Nut-Free Frozen Margarita Slushie

    This frozen margarita slushie is prepared by blending citrus juice, tequila, and sweeteners with ice to create a smooth, icy beverage. The final texture is a vibrant, cold slush with a refreshing lime flavor, perfect for hot days.
    Prep Time 5 minutes
    Total Time 5 minutes
    Servings: 2
    Course: Main Course
    Cuisine: Mexican
    Calories: 150

    Ingredients
      

    • 1/2 cup fresh lime juice about 2 limes
    • 1 cup tequila blanco preferred
    • 2 tablespoons simple syrup adjust to taste
    • 3 cups ice cubes

    Equipment

    • Blender
    • Measuring cups and spoons
    • Citrus juicer

    Method
     

    1. Juice the limes until you have about half a cup of fresh lime juice, then set it aside.
    2. Add the lime juice, tequila, simple syrup, and ice cubes into the blender jar.
    3. Secure the lid on the blender and blend on high until the mixture becomes thick, slushy, and smooth, about 30-40 seconds.
    4. Stop the blender and check the texture; it should be soft, icy, and well combined. If needed, blend for a few more seconds.
    5. Pour the frozen margarita slushie into glasses, allowing the icy texture to mound attractively in each
    6. Garnish with lime wedges or a sprinkle of salt on the rim if desired, then serve immediately for a refreshing, chilled beverage.

    Notes

    Adjust the sweetness or tartness by adding more or less simple syrup or lime juice. For a creamier texture, consider adding a splash of coconut cream or alternative milk before blending.

    Crafting this frozen margarita slushie was a fun reminder that the simplest ingredients can yield the most satisfying results. It’s perfect for those sweltering days when you need a quick, reliable refreshment. Plus, the allergy-friendly tweak means everyone can join in the celebration without a second thought.

    As summer peaks and fresh fruit options become abundant, this slushie beckons as a versatile and approachable treat. No matter the occasion, it’s a cool little escape right in your own freezer. Cheers to easy, joyful sipping—no compromise needed.

  • Chill Out with an Unusual Milkshake Slushie Twist

    Chill Out with an Unusual Milkshake Slushie Twist

    Imagine turning a simple milkshake into a frosty, chaotic adventure that’s perfect for hot days or just a craving for something wildly different. The secret is in the way you freeze and blend—creating a texture that’s thick, slushy, and surprisingly fun to eat with a straw. This recipe is not just about flavor; it’s about the thrill of the icy crunch mixed with creamy sweetness.

    Most milkshakes stay smooth and predictable, but I love pushing boundaries with icy textures that make every sip feel like a cool splash of nostalgia and chaos dough. It’s a mind-shift from the usual—with playful swirls of fruit, chocolate, or even unexpected ingredients—transforming a routine treat into an adventure of its own. Perfect for sharing (or not sharing), this slushie is a messy, joyful riot in a glass.

    Frosty Chaotic Milkshake

    This frozen dessert transforms a traditional milkshake into a thick, icy slush with a playful, textured appearance. Key ingredients include milk, ice, and sweeteners, blended to create a crunchy, smooth, and visually chaotic final texture. It’s perfect for hot days or when craving a fun, messy treat with vibrant flavor mix-ins.
    Prep Time 10 minutes
    Total Time 10 minutes
    Servings: 2
    Course: Main Course
    Cuisine: none
    Calories: 150

    Ingredients
      

    • 2 cups milk preferably whole milk for creaminess
    • 3 cups ice cubes freshly frozen if possible
    • 3 tablespoons sugar syrup or honey adjust to taste
    • 1 teaspoon vanilla extract optional, for added flavor
    • 1 cup fruit or chocolate mix-ins berries, chocolate chips, or fruit pieces

    Equipment

    • Blender
    • Measuring cups and spoons

    Method
     

    1. Add the milk, ice cubes, sweetener, and vanilla extract into the blender.
    2. Pulse the blender several times to break down the ice slightly, creating a chunky, icy mixture that’s not yet fully smooth.
    3. Blend on high speed until the mixture becomes thick, slushy, and slightly frosty, sounding like crunching ice with a smooth internal texture.
    4. Pour in your chosen mix-ins, like berries or chocolate chips, and briefly pulse again to incorporate while maintaining some texture.
    5. Stop blending and check the texture—if it’s too thick, add a splash of milk and give it one quick blend to loosen it slightly.
    6. Transfer the icy, chaotic milkshake into glasses, using a spoon to help shape the uneven, textured surface if needed.
    7. Serve immediately with colorful straws or toppings to enjoy the full playful, crunchy, creamy experience.

    Notes

    For a more colorful appearance, swirl in fruit purees or food coloring before blending. Best served immediately for maximum icy crunch.

    In a world of refined, predictable cold beverages, this milkshake slushie throws a laugh into the mix. It’s about capturing the carefree spirit of summer, when spilling a little is part of the fun. Whether you’re cooling off after yard work or just embracing the chaos of a hot day, this recipe delivers on both tastes and giggles.

    Every sip brings a burst of cool, sweet relief, punctuated by crunch and surprise. It’s a reminder that the best treats often come from playful experimentation and a little bit of daring in the kitchen. So, toss in your favorite flavors and enjoy the frosty chaos—your new summer obsession awaits.

  • The Secret Ingredient That Elevates Your Roasted Butternut Squash Soup

    The Secret Ingredient That Elevates Your Roasted Butternut Squash Soup

    Imagine walking into a kitchen where the aroma of caramelized squash fills the air. That unexpected, almost nostalgic scent of roasted butternut squash can turn any dull lunch into a cozy experience. Today, I want to share a method that adds an unusual twist—using a splash of apple cider vinegar—to brighten each spoonful and awaken your taste buds.

    We often stick to simple herbs, but I’ve found that a hint of smoked paprika or a dash of nutmeg can transform this humble soup into something memorable. This approach has helped me turn a weekday dinner into a moment of culinary delight, even when the pantry feels a little empty. Let’s dive into making a roasted butternut squash soup that’s packed with depth, warmth, and just a hint of surprise.

    Roasted Butternut Squash Soup with Apple Cider Vinegar

    This roasted butternut squash soup features pureed, caramelized squash blended into a smooth, velvety texture. The soup is enhanced with a splash of apple cider vinegar and subtle spices, resulting in a warm, comforting dish with a slight tang. Its rich flavor and creamy consistency make it ideal for cozy meals.
    Prep Time 10 minutes
    Cook Time 40 minutes
    Total Time 50 minutes
    Servings: 4
    Course: Main Course
    Cuisine: Comfort Food
    Calories: 180

    Ingredients
      

    • 1 large butternut squash peeled, seeded, and cubed
    • 2 tablespoons olive oil for roasting
    • 1 medium onion diced
    • 3 cloves garlic minced
    • 4 cups vegetable broth
    • 1 tablespoon apple cider vinegar to brighten the flavors
    • 1/2 teaspoon smoked paprika optional, for depth
    • to taste salt and pepper

    Equipment

    • Oven
    • Blender

    Method
     

    1. Preheat the oven to 400°F (200°C). Spread the cubed butternut squash on a baking sheet, drizzle with olive oil, and toss to coat evenly. Roast until tender and caramelized around the edges, about 25-30 minutes.
    2. While the squash roasts, heat a tablespoon of olive oil in a large pot over medium heat. Add the diced onion and sauté until it becomes translucent and fragrant, about 5 minutes.
    3. Add the minced garlic to the pot and cook for another minute until it releases its aroma, stirring constantly to prevent burning.
    4. Once the roasted squash is done, transfer it to the pot with the onion and garlic. Pour in the vegetable broth and bring the mixture to a gentle simmer, allowing the flavors to meld for about 10 minutes.
    5. Use an immersion blender or carefully transfer the mixture to a blender, then blend until smooth and creamy. Return it to the pot if needed.
    6. Stir in the apple cider vinegar and smoked paprika, then season with salt and pepper to taste. Adjust the acidity and spice level according to your preference.
    7. Bring the soup back to a gentle simmer for a few minutes to allow the flavors to integrate, then remove from heat.
    8. Serve the soup hot, garnished with a drizzle of olive oil or your favorite herbs if desired. Enjoy the rich, velvety texture with a hint of tang and spice.

    Notes

    For a smoother texture, strain the soup through a sieve before reheating. Leftovers can be stored in an airtight container in the refrigerator for up to 3 days.

    This soup isn’t just a seasonal favorite; it’s a reminder of how simple ingredients can be manipulated into comforting dishes with care. Whether you’re warming up after a chilly walk or just craving something hearty, it delivers. Its flavors and textures echo the quiet joy of a slow Sunday afternoon, filled with the scent of roasted squash lingering in the air.

    As the seasons shift and crave more cozy meals, this recipe offers a reliable way to pair warmth and flavor effortlessly. I love how adaptable it is—adding a swirl of cream or a handful of toasted seeds can make it uniquely yours. Sometimes, the simplest recipes have the most unexpected stories behind them.

  • Peach Crumble: The Unexpected Secret to Summertime Bliss

    Peach Crumble: The Unexpected Secret to Summertime Bliss

    As summer reaches its peak, I find myself longing for a dessert that captures the season’s essence without fuss. Peach crumble is that quietly nostalgic treat that transforms ripe, juicy peaches into a warm, fragrant showdown of flavors and textures. The crunch of crumble, the sweetness of peaches, and a dash of cinnamon make every bite feel like a tender hug from grandmother’s kitchen.

    What makes this recipe even more special is the way it invites improvisation—use fresh peaches, or swap in those slightly overripe ones hiding in your fruit bowl. It’s perfect for spontaneous gatherings, beach picnics, or lazy afternoons on the porch. The aroma alone, with caramelized sugars and baked fruit, signals summer’s end while still enjoying its bounty.

    Peach Crumble

    Peach crumble combines ripe peaches with a buttery, oat-based topping to create a warm, tender dessert. The dish features soft, caramelized fruit underneath a crunchy, golden-brown crumble, assembled and baked until bubbling and fragrant.
    Prep Time 15 minutes
    Cook Time 40 minutes
    Total Time 55 minutes
    Servings: 4
    Course: Main Course
    Cuisine: American
    Calories: 250

    Ingredients
      

    • 4 cups ripe peaches, sliced peeled and pitted if desired
    • 1/2 cup sugar
    • 1 tablespoon lemon juice to enhance flavor and prevent browning
    • 1 cup all-purpose flour
    • 1 cup old-fashioned oats
    • 1/2 cup cold unsalted butter, diced
    • 1/2 cup brown sugar light or dark
    • pinch of salt

    Equipment

    • Mixing bowls
    • Baking dish
    • Pastry cutter or fork
    • Measuring cups and spoons
    • Oven

    Method
     

    1. Preheat your oven to 350°F (175°C) and lightly grease a baking dish.
    2. Combine sliced peaches, sugar, and lemon juice in a mixing bowl. Gently toss until the fruit is evenly coated and set aside to let the juices meld for about 10 minutes.
    3. In a separate bowl, whisk together the flour, oats, brown sugar, cinnamon, and salt.
    4. Add the diced cold butter to the dry mixture. Use a pastry cutter or fork to cut the butter into the mixture until it resembles coarse crumbs with some pea-sized bits.
    5. Spread the peeled and sugared peaches evenly into the prepared baking dish, creating a uniform layer.
    6. Sprinkle the crumb topping evenly over the peaches, covering the entire surface.
    7. Bake in the preheated oven for about 35 to 40 minutes, or until the topping is golden brown and bubbly along the edges.
    8. Remove from the oven and let cool slightly. The crumble should be fragrant with a crunchy topping and tender, caramelized peaches beneath.
    9. Serve warm, optionally with a scoop of vanilla ice cream or a dollop of whipped cream for added indulgence.

    Notes

    For a tart contrast, sprinkle a bit of ground ginger or nutmeg into the fruit mixture. Using ripe peaches ensures maximum sweetness and flavor.

    This peach crumble is more than just a dessert; it’s a storybook of summer memories coming alive in every forkful. Simple, approachable, and deeply satisfying, it’s a reminder that beauty can be found in the imperfect ripeness of fruit and the rustic charm of a well-loved recipe.

    As the season shifts and the days grow shorter, this crumble offers a comforting sign of sunshine and fresh fruit. A perfect ending to a warm evening or a reason to linger longer over family and friends. Just a scoop, a crackling top, and a burst of juicy sweetness—what more could you ask for?

  • Unearth the Halloween Mystery: Spooky Dirt Cake with Gummy Worms

    Unearth the Halloween Mystery: Spooky Dirt Cake with Gummy Worms

    Every Halloween, I hunt for treats that stir the playful chaos of the night. This year, I stumbled upon a recipe that transports you to a haunted garden—dirt cake with gummy worms. It’s a delightful mess, perfect for kids and nostalgic for adults who loved digging in the yard as kids.

    The first whiff of crushed Oreo and the sight of squirming gummy worms make this dessert an instant conversation starter. It’s not just a cake; it’s a story wrapped in chocolate and sugar, perfect for creating a little spooky fun at your table. Plus, it’s shockingly simple, yet wildly impressive when served.

    **WHY I LOVE THIS RECIPE?**

    • I cherish edible chaos; messy treats bring out the giggles and the nostalgia of childhood.
    • This cake captures the essence of Halloween—spooky, sweet, and just a little gross.
    • Crushing Oreos releases a rich chocolate aroma that invites curiosity and anticipation.
    • Gummy worms squirm their way into the centerpiece, causing delighted squeals and marveling eyes.

    **AVOID MY DISASTER (You’re Welcome)**

    • FORGOT to chill the whipped cream? The top became a watery mess—pop it back in the fridge for 10 minutes.
    • DUMPED too much milk into the pudding? It stays runny—add a bit more instant pudding powder to thicken.
    • OVER-TORCHED the chocolate crumbs? Burnt aroma ruins the look—smell for a gentle chocolate scent instead.
    • FORGOT the gummy worms? The cake lacks the signature squirm—keep a stash for that authentic effect.

    **QUICK FIXES THAT SAVE YOUR DAY**

    • When the pudding is too thin, splash in extra pudding mix and chill before serving.
    • Patch a runny whipped topping with a bit of cream cheese whipped with sugar.
    • Shield burned crumbs with a layer of fresh crushed Oreos for a quick correction.
    • When the gummy worms melt or break, simply replace them with fresh ones and hide the damage.
    • If the cake feels too dry, sprinkle a little milk over the top for moisture and shimmer.

    Dirt Cake with Gummy Worms

    This dessert features layers of crushed Oreo cookies mixed with butter to resemble dirt, topped with creamy pudding and whipped topping, and decorated with squirming gummy worms. The final appearance mimics a muddy garden bed, with a moist, crumbly texture and playful, edible
    Prep Time 20 minutes
    Cook Time 10 minutes
    Total Time 30 minutes
    Servings: 8
    Course: Main Course
    Cuisine: American
    Calories: 350

    Ingredients
      

    • 24 cookies Oreo cookies for the crust and topping
    • 1/2 cup unsalted butter melted
    • 3.5 oz instant chocolate pudding mix for the pudding layer
    • 2 cups cold milk for pudding
    • 1 cup heavy whipping cream for whipped topping
    • 2 tablespoons granulated sugar for whipped cream
    • 10 gummy worms gummy worms for decoration and atmosphere

    Equipment

    • Mixing bowls
    • Food processor or zip-top bag and rolling pin
    • 9×13 inch baking dish or similar
    • Whisk
    • Rubber spatula

    Method
     

    1. Place Oreo cookies in a food processor and pulse until finely crushed, resembling dirt. Alternatively, put them in a zip-top bag and crush with a rolling pin.
    2. Mix melted butter into the crushed Oreos until well combined. This mixture will form the base layer that resembles muddy earth.
    3. Press the Oreo mixture evenly into the bottom of a 9×13 inch dish to create a crust. Use the back of a spoon or your fingers to smooth it out.
    4. In a bowl, whisk together the instant chocolate pudding mix and cold milk until the pudding begins to thicken and is smooth. Let it sit for a few minutes to fully set.
    5. In a separate bowl, whip the heavy cream and sugar together with a whisk or mixer until soft peaks form and the mixture is fluffy.
    6. Fold the whipped cream gently into the thickened pudding until fully combined, creating a light and creamy layer.
    7. Spread the pudding and whipped topping mixture evenly over the Oreo crust, smoothing the top with a spatula.
    8. Decorate the top with gummy worms, tucking some into the dirt layer and letting a few crawl out for a fun, spooky effect.
    9. Refrigerate the cake for at least 2 hours to let the flavors meld and the layers set firmly.
    10. Before serving, optionally add more gummy worms on top for extra whimsy, and serve chilled for a fun, messy, and spooky dessert.

    Notes

    For an extra gross effect, add a few crushed cookies or edible dirt topping on the gummy worms. Keep refrigerated and serve within 24 hours for best texture.
    This Halloween dirt cake is more than just a fun treat; it’s a chance to bring friends and family together around a dessert that sparks both joy and chaos. Its nostalgic appeal and playful presentation fit perfectly into this year’s spooky palettes and love for simple yet amusing sweets. Let it become a tradition to dig into the dirt and uncover gummy worms hiding beneath the chocolate crumble each October.

  • Unexpected Twist: Reinventing Pumpkin Bread for the Curious Baker

    Unexpected Twist: Reinventing Pumpkin Bread for the Curious Baker

    Fall mornings call for something that awakens more than just the senses—it’s about capturing the essence of cozy chaos. This pumpkin bread isn’t just the usual cinnamon-sweet loaf. Imagine infusing it with a hint of fiery ginger and a swirl of caramel that surprises the palate at every bite.

    In my kitchen, I love to challenge the familiar—turning classic recipes into experiments of texture and flavor. The aroma of roasted pumpkin mingling with toasted spices creates a nostalgic scent that fills the house and sparks spontaneous smiles. Each slice promises a story of tradition mingled with a splash of adventure.

    WHY I LOVE THIS RECIPE?

    • The buttery crumb is perfectly moist, with a surprising crunchy topping that’s totally addictive.
    • The spice blend is personalized—more ginger, less cinnamon—tailored for my bold taste buds.
    • Using roasted pumpkin adds richness and deep flavor complexity I hunt down every fall.
    • It’s foolproof, forgiving, and makes the entire house smell like a bakery on a chilly day.

    AVOID MY DISASTER (You’re Welcome)

    • FORGOT to line the baking pan? Sticky mess. Always parchment, or risk a despair-filled spoon scrape.
    • DUMPED too much pumpkin puree? Dense, soggy loaf. Measure carefully and smooth out that batter.
    • OVER-TORCHED the edges? Burnt aroma and tough crust. Bake in the middle rack, watch it closely.
    • FAILED to mix spices well? Uneven taste, weird bites. Sift spice powders together first for even distribution.

    QUICK FIXES THAT SAVE YOUR DAY

    • When batter is too thick, splash in a tablespoon of buttermilk to loosen.
    • Patch a sinking center by carefully pressing in more chopped nuts or cranberries.
    • Shield over-baked edges with foil if they start to darken too quickly.
    • When loaf cracks on top, quickly reduce oven temp by 25°F and keep an eye.
    • Ever smell something burning? Open the oven immediately and check with a wooden skewer—don’t wait!

    Spiced Pumpkin Bread with Caramel and Ginger

    This pumpkin bread combines roasted pumpkin with warming spices, fiery ginger, and a caramel swirl, baked to a moist and tender crumb with a crunchy top. The loaf features a rich, velvety interior with a golden crust, showcasing a harmonious blend of sweet, spicy, and smoky flavors. Its layered textures include a soft, moist center and a slightly crisp exterior.
    Prep Time 15 minutes
    Cook Time 50 minutes
    Total Time 1 hour 5 minutes
    Servings: 8
    Course: Main Course
    Cuisine: American
    Calories: 320

    Ingredients
      

    • 1 1/2 cups all-purpose flour
    • 1 cup granulated sugar
    • 1/2 cup unsalted butter melted
    • 1 cup roasted pumpkin puree cooled
    • 3 large eggs
    • 1 1/2 teaspoons baking soda
    • 1/2 teaspoon salt
    • 1 teaspoon ground cinnamon
    • 1/2 teaspoon ground ginger
    • 1/2 cup brown sugar
    • 1/4 cup caramel sauce for swirl

    Equipment

    • Mixing bowls
    • Loaf pan
    • Whisk
    • Rubber spatula
    • Oven

    Method
     

    1. Preheat your oven to 350°F (175°C) and line a loaf pan with parchment paper for easy removal.
    2. In a large mixing bowl, whisk together the melted butter, granulated sugar, and brown sugar until smooth and creamy, with a slight sheen.
    3. Add the eggs one at a time, whisking well after each addition to incorporate fully and create a smooth batter.
    4. Gently fold in the roasted pumpkin puree, mixing until evenly distributed throughout the batter. The mixture should be well combined and slightly fluffy.
    5. Sift together the flour, baking soda, salt, cinnamon, and ginger in a separate bowl to ensure even spice distribution.
    6. Gradually add the dry ingredients to the wet mixture, folding gently with a spatula until just combined. Avoid overmixing to keep the bread moist and tender.
    7. Pour half of the batter into the prepared loaf pan, spreading it evenly with a spatula.
    8. Drizzle the caramel sauce over this layer, then add the remaining batter on top, smoothing out the surface.
    9. Use a toothpick or skewer to gently swirl the caramel into the batter for a marbled effect, creating streaks that will melt into the loaf as it bakes.
    10. Bake in the preheated oven for 50–55 minutes, or until a toothpick inserted into the center comes out clean with just a few moist crumbs.
    11. Remove the bread from the oven and let it cool in the pan for 10 minutes, then transfer it to a wire rack to cool completely before slicing.
    12. Slice into thick pieces to showcase the marbled caramel swirls and serve warm or at room temperature. Enjoy the moist crumb with a burst of spicy, caramelized flavor in every bite.
    This pumpkin bread isn’t just a treat for the palate; it’s a celebration of seasonal bounty. Sharing it feels effortless, yet each slice carries a hint of alchemy—perfect for crisp mornings or a cozy afternoon snack. The blend of textures and flavors makes it a steadfast keeper in my recipe box.

    As the seasons turn and pumpkins hit their peak, I find joy in turning this humble ingredient into a statement loaf. No matter what chaos surrounds the day, a warm slice reminds me of simple pleasures: good smells, familiar tastes, and the satisfaction of a recipe well loved.

  • Chill Out with the Watermelon Slushie: A Summer Surprise

    Chill Out with the Watermelon Slushie: A Summer Surprise

    Imagine peeling into a watermelon on a sweltering afternoon and finding it perfectly ripe, with the sweetness bursting in your mouth. Now, picture transforming that juicy goodness into a frosty, revitalizing slushie that feels like summer in a glass. This recipe is a playful twist, blending childhood nostalgia with a fresh, healthful vibe.

    Watermelon is a summer staple, but turning it into a refreshing frozen treat elevates the simple fruit into something special. It’s perfect for backyard gatherings or a quiet moment of cooling down after a walk. Plus, it’s so easy, you’ll want to make it every day.

    Watermelon Slushie

    This watermelon slushie is a frozen beverage made by blending ripe watermelon chunks with sweeteners and citrus juice until smooth. It has a vibrant, icy texture with a bright pink hue, perfect for hot days. The final drink is refreshing, juicy, and enjoyed with a straw or spoon.
    Prep Time 10 minutes
    Total Time 10 minutes
    Servings: 2
    Course: Main Course
    Cuisine: Summer
    Calories: 80

    Ingredients
      

    • 4 cups ripe watermelon chunks seedless or deseeded for smoother blending
    • 2 tablespoons honey or agave syrup adjust sweetness to taste
    • 1 tablespoon fresh lime juice adds a tangy brightness

    Equipment

    • Blender
    • Knife

    Method
     

    1. Place the watermelon chunks in the blender.
    2. Add honey or agave syrup to the blender to sweeten the mixture.
    3. Squeeze in the fresh lime juice for a hint of tang.
    4. Secure the lid on the blender and blend on high until the mixture is smooth and icy, about 30 seconds. You should see a vibrant pink slushie consistency.
    5. Pour the frozen slushie into glasses, using a spoon or straw.
    6. Serve immediately, garnished with a small wedge of lime or a mint sprig if desired.

    Notes

    For a thicker slushie, freeze the watermelon chunks prior to blending. Adjust sweetness by adding more or less honey, depending on the ripeness of your fruit.
    This watermelon slushie isn’t just a cool refreshment; it’s a little burst of sunshine that’s easier to make than you’d think. The vibrant pink hue and the smell of fresh watermelon make every sip refreshing and nostalgic. It reminds me of lazy summer mornings and spontaneous picnics.

    As the heat amps up, this slushie becomes an essential part of my cooling arsenal. Whether you’re looking for a quick snack or a beautiful party treat, it’s quick to whip up and the perfect way to beat the heat. Now, take that watermelon and enjoy a sip of pure summer.

  • Spooky Sweep: The Ultrachic Poison Apple Martini for Halloween

    Spooky Sweep: The Ultrachic Poison Apple Martini for Halloween

    As October leaves crunch underfoot, I find myself craving more than just pumpkin spice—something darkly elegant and a tad mischievous. The Poison Apple Martini is my new obsession; it’s like biting into a crisp apple, but with a wicked twist that makes every sip a playful danger.

    The secret? A clever blend of apple liqueur and a splash of sour apple schnapps, topped with a blood-red splash of grenadine. The shimmering green of the drink invites curious fingers, and the aroma of crisp apples mixed with a hint of cherry promises a spooky delight. Perfect for a hush-hush Halloween gathering or a solo night of haunting tunes and flickering candles.

    This recipe transforms a classic cocktail into a spellbinding potion everyone dreads to love. A little tart, a little sweet, with just the right amount of chilling flair—my new go-to for spooky season parties.

    Poison Apple Martini

    The Poison Apple Martini is a visually striking cocktail featuring a blend of apple liqueur, sour apple schnapps, and grenadine. It has a vibrant green hue with a bloody red garnish, offering a tart, sweet flavor with a sleek, smooth texture, perfect for spooky seasonal celebrations.
    Prep Time 5 minutes
    Total Time 5 minutes
    Servings: 1
    Course: Main Course
    Cuisine: mixed drinks
    Calories: 200

    Ingredients
      

    • 1.5 ounces apple liqueur such as Sour Apple Pucker
    • 0.5 ounces sour apple schnapps adds tartness and depth
    • 0.5 ounces grenadine for blood-red color and sweetness
    • Ice cubes ice cubes for chilling the cocktail

    Equipment

    • Cocktail shaker
    • Strainer
    • Martini glass

    Method
     

    1. Fill the cocktail shaker halfway with ice cubes, ensuring a generous chill.
    2. Add the apple liqueur, sour apple schnapps, and grenadine to the shaker.
    3. Secure the lid tightly and shake vigorously for about 15 seconds, until the mixture is well chilled and frothy.
    4. Remove the shaker lid and place a strainer over it, then pour the cocktail into a chilled martini glass.
    5. Gently pour a small splash of grenadine down the side of the glass, allowing it to settle at the bottom and create a blood-red layer.
    6. Garnish the rim with a thin slice of fresh apple or cherry, if desired, for an extra spooky touch.
    7. Serve immediately and enjoy the dark, vibrant beauty of your Poison Apple Martini.

    Notes

    For a more dramatic look, add a splash of edible glitter or dry ice for a smoky effect (use with caution).
    The Poison Apple Martini isn’t just a pretty face; it’s a conversation starter, especially when served in glow-in-the-dark glasses or with dry ice. It captures that autumnal magic with every pour, blending nostalgia with a daring twist that’s perfect for October.

    Crafting this drink is as much about the experience as drinking it. The clink of ice, the shimmer of grenadine, and the scent of ripe apples make every moment memorable. Embrace its charm, and let this be your signature spooky sip this season.

  • Wake Up to the Cozy Charm of Pumpkin Spice Overnight Oats

    Wake Up to the Cozy Charm of Pumpkin Spice Overnight Oats

    As the air turns crisper and pumpkin spice begins to scent the mornings, I find myself craving a breakfast that’s both comforting and prepared with minimal fuss. Enter Pumpkin Spice Overnight Oats—an unpretentious jar of goodness that transforms the mundane into something festive and satisfying. It’s like a warm hug in a bowl, ready to energize your day before the sun even rises.

    What sets this recipe apart is the unexpected depth of flavor you get from soaking oats in aromatic pumpkin puree, cinnamon, and a splash of maple syrup. The texture is velvety yet hearty, perfect for those mornings when time is tight but flavor is non-negotiable. Plus, it’s a smart way to indulge in seasonal spices without turning on the stove.

    Pumpkin Spice Overnight Oats

    Pumpkin Spice Overnight Oats is a no-cook breakfast dish where rolled oats are soaked overnight in a mixture of pumpkin puree, cinnamon, and sweetener, resulting in a creamy and hearty texture. The final product features a velvety consistency with flecks of spices and pumpkin, ready to enjoy straight from the fridge.
    Prep Time 5 minutes
    Total Time 5 minutes
    Servings: 2
    Course: Main Course
    Cuisine: American
    Calories: 250

    Ingredients
      

    • 1 cup rolled oats
    • 1/2 cup pumpkin puree canned or fresh
    • 1 cup milk of choice dairy or plant-based
    • 2 tablespoons maple syrup or honey
    • 1 teaspoon cinnamon ground
    • 1/4 teaspoon nutmeg optional

    Equipment

    • Measuring cups and spoons
    • Large mixing bowl
    • Jar or airtight container

    Method
     

    1. Measure out the rolled oats and transfer them into a large mixing bowl.
    2. Add pumpkin puree, milk, maple syrup, ground cinnamon, and nutmeg to the oats.
    3. Whisk everything together until you achieve a smooth, uniform mixture with the oats fully coated and spices evenly distributed.
    4. Spoon the mixture into a jar or airtight container, spreading it out evenly.
    5. Seal the container tightly and place in the refrigerator overnight or for at least 4 hours to let the oats soak up the flavors and become tender.
    6. The next morning, give the oats a gentle stir or fold to combine any separated liquids.
    7. Optional: top with fresh fruit, nuts, or a drizzle of additional maple syrup for added flavor and texture.
    8. Enjoy the creamy, spiced pumpkin oats straight from the jar for a wholesome, satisfying breakfast.

    Notes

    For added texture, include chopped pecans or a dollop of yogurt. Use dairy-free milk for vegan options.
    This recipe is a tribute to the cozy, sleepy mornings of fall, brought into the busy rhythm of everyday life. It makes me nostalgic for pumpkin patches and autumn walks, all while keeping things effortlessly delicious. As the seasons shift, this dish reminds me that simplicity can be a profound act of self-care.

  • Spooky, Cheesy Eyeball Pasta That Will Haunt Your Dinner

    Spooky, Cheesy Eyeball Pasta That Will Haunt Your Dinner

    Imagine a dish that transforms your kitchen into a Halloween haunted house with just a few simple ingredients. These creepy eyeball pasta and meatball ‘eyeballs’ are part art, part comfort food, and all fun. The sight of meaty orbs peeking out of a vibrant, spooky sauce makes every bite a delightful surprise.

    This recipe isn’t just about the scare factor; it’s about nostalgia and chaos in the best way. It’s perfect for a childhood throwback or a quick, playful meal to impress a crowd of little monsters. Plus, the messy, gooey textures and vivid colors are exactly what makes Halloween cooking so spirited.

    Halloween Eyeball Pasta and Meatball ‘Eyeballs’

    This dish features cooked pasta coated in a vibrant, spooky sauce, topped with meatballs that resemble creepy eyeballs. The meatballs are cooked until tender, then assembled with an eerie red sauce to create a playful, visually striking Halloween-themed meal. The final presentation combines gooey textures with vivid colors for a fun and spooky effect.
    Prep Time 20 minutes
    Cook Time 30 minutes
    Total Time 50 minutes
    Servings: 4
    Course: Main Course
    Cuisine: Halloween
    Calories: 520

    Ingredients
      

    • 12 oz spaghetti pasta uncooked
    • 1 1/2 cups meatball mixture prepared from ground meat, breadcrumbs, egg, seasonings
    • 2 cups tomato sauce preferably vibrant red or with red food coloring
    • 1 cup water
    • 1 tbsp olive oil
    • 1 tsp garlic powder
    • to taste salt and pepper
    • 12 small meatballs formed from mixture
    • 1 cup mozzarella cheese shredded, for eyeballs
    • 2 tbsp red food coloring optional for extra spooky color

    Equipment

    • Large pot
    • Skillet or frying pan
    • Mixing bowl
    • Baking sheet
    • Cooking spoon
    • Kitchen knife

    Method
     

    1. Cook the spaghetti in a large pot of boiling salted water until al dente according to package instructions. Drain and set aside.
      12 oz spaghetti pasta
    2. Heat olive oil in a skillet over medium heat. Add garlic powder, salt, and pepper, then pour in the tomato sauce and water. Stir until combined and simmer until slightly thickened, about 10 minutes.
      12 oz spaghetti pasta
    3. While the sauce simmers, form small meatballs from the prepared mixture, about the size of a walnut. Place them on a baking sheet lined with parchment.
      12 oz spaghetti pasta
    4. Bake the meatballs in a preheated oven at 400°F (200°C) until cooked through and browned, about 15 minutes. Remove from oven and let cool slightly.
      12 oz spaghetti pasta
    5. Slice each meatball in half horizontally to create a cross-section that resembles an eyeball. Place each half into a small mound of mozzarella cheese on a serving plate, pressing gently to adhere.
      12 oz spaghetti pasta
    6. Add a small dab of tomato sauce to the center of each mozzarella
      12 oz spaghetti pasta
    7. Serve the spooky eyeball pasta with the meatball eyeballs arranged on top, drizzled with extra sauce if desired. Enjoy while warm for a gooey, fun Halloween meal.

    Notes

    For added creepiness, add a few drops of red food coloring to the sauce or use black olives for extra eerie accents.
    As you plate up these eyeball pasta monsters, take a moment to enjoy the chaos of the kitchen. This dish is all about fun and creativity, a break from the usual routine. It’s a reminder that sometimes, the best recipes are the ones that make everyone smile and giggle.

    Whether you’re celebrating with kids or just craving some seasonal whimsy, these eyeballs will be a hit. They pair perfectly with a bubbling cauldron of green or blood-red sauce, adding that extra touch of Halloween magic to your table.