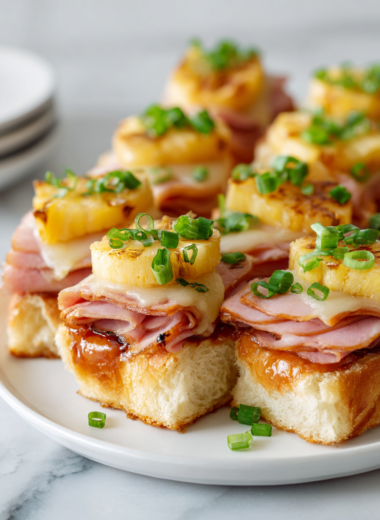
Blog

  • Chill Out with an Unusual Milkshake Slushie Twist

    Chill Out with an Unusual Milkshake Slushie Twist

    Imagine turning a simple milkshake into a frosty, chaotic adventure that’s perfect for hot days or just a craving for something wildly different. The secret is in the way you freeze and blend—creating a texture that’s thick, slushy, and surprisingly fun to eat with a straw. This recipe is not just about flavor; it’s about the thrill of the icy crunch mixed with creamy sweetness.

    Most milkshakes stay smooth and predictable, but I love pushing boundaries with icy textures that make every sip feel like a cool splash of nostalgia and chaos dough. It’s a mind-shift from the usual—with playful swirls of fruit, chocolate, or even unexpected ingredients—transforming a routine treat into an adventure of its own. Perfect for sharing (or not sharing), this slushie is a messy, joyful riot in a glass.

    Frosty Chaotic Milkshake

    This frozen dessert transforms a traditional milkshake into a thick, icy slush with a playful, textured appearance. Key ingredients include milk, ice, and sweeteners, blended to create a crunchy, smooth, and visually chaotic final texture. It’s perfect for hot days or when craving a fun, messy treat with vibrant flavor mix-ins.
    Prep Time 10 minutes
    Total Time 10 minutes
    Servings: 2
    Course: Main Course
    Cuisine: none
    Calories: 150

    Ingredients
      

    • 2 cups milk preferably whole milk for creaminess
    • 3 cups ice cubes freshly frozen if possible
    • 3 tablespoons sugar syrup or honey adjust to taste
    • 1 teaspoon vanilla extract optional, for added flavor
    • 1 cup fruit or chocolate mix-ins berries, chocolate chips, or fruit pieces

    Equipment

    • Blender
    • Measuring cups and spoons

    Method
     

    1. Add the milk, ice cubes, sweetener, and vanilla extract into the blender.
    2. Pulse the blender several times to break down the ice slightly, creating a chunky, icy mixture that’s not yet fully smooth.
    3. Blend on high speed until the mixture becomes thick, slushy, and slightly frosty, sounding like crunching ice with a smooth internal texture.
    4. Pour in your chosen mix-ins, like berries or chocolate chips, and briefly pulse again to incorporate while maintaining some texture.
    5. Stop blending and check the texture—if it’s too thick, add a splash of milk and give it one quick blend to loosen it slightly.
    6. Transfer the icy, chaotic milkshake into glasses, using a spoon to help shape the uneven, textured surface if needed.
    7. Serve immediately with colorful straws or toppings to enjoy the full playful, crunchy, creamy experience.

    Notes

    For a more colorful appearance, swirl in fruit purees or food coloring before blending. Best served immediately for maximum icy crunch.

    In a world of refined, predictable cold beverages, this milkshake slushie throws a laugh into the mix. It’s about capturing the carefree spirit of summer, when spilling a little is part of the fun. Whether you’re cooling off after yard work or just embracing the chaos of a hot day, this recipe delivers on both tastes and giggles.

    Every sip brings a burst of cool, sweet relief, punctuated by crunch and surprise. It’s a reminder that the best treats often come from playful experimentation and a little bit of daring in the kitchen. So, toss in your favorite flavors and enjoy the frosty chaos—your new summer obsession awaits.

  • The Secret Ingredient That Turns Your Chili into a Cozy Masterpiece

    The Secret Ingredient That Turns Your Chili into a Cozy Masterpiece

    Everyone has their chili habits, but this recipe rediscover the magic of an unexpected ingredient: smoked paprika. It lends a warm, smoky aroma that sort of hugs your senses before you even take a sip. I stumbled upon this twist during a chilly weekend, and now I can’t imagine chili without it.

    Cooking chili is always about balancing comfort with a little chaos in the kitchen, and this recipe embraces both. It’s perfect for those lazy Sunday afternoons when you want something filling but also crave a burst of flavor that surprises even seasoned chili enthusiasts.

    Smoked Paprika Chili

    This chili recipe features a hearty combination of ground meat, beans, and tomatoes simmered with smoked paprika, which imparts a warm, smoky aroma. The dish develops a thick, flavorful sauce with tender ingredients, resulting in a comforting and visually rich stew.
    Prep Time 15 minutes
    Cook Time 45 minutes
    Total Time 1 hour
    Servings: 4
    Course: Main Course
    Cuisine: American
    Calories: 420

    Ingredients
      

    • 1 tablespoon olive oil
    • 1 pound ground beef or turkey
    • 1 medium yellow onion diced
    • 3 cloves garlic minced
    • 1 can diced tomatoes 14 oz
    • 1 can kidney beans drained and rinsed, 15 oz
    • 2 tablespoons smoked paprika
    • 1 teaspoon cumin
    • 0.5 teaspoon chili powder
    • to taste salt and pepper adjust to preference

    Equipment

    • Large pot or Dutch oven
    • Wooden spoon or spatula

    Method
     

    1. Heat the large pot over medium heat and add the olive oil, letting it warm until shimmering.
    2. Add the diced onion to the pot and sauté for about 5 minutes, stirring occasionally until it becomes translucent and fragrant.
    3. Pour in the ground meat and cook, breaking it apart with a spoon, until browned and cooked through, about 7-10 minutes. The meat should develop a nice crust where it contacts the pan.
    4. Add the minced garlic and cook for another 1 minute, stirring constantly until the garlic is fragrant and slightly golden.
    5. Sprinkle in the smoked paprika, cumin, chili powder, and a pinch of salt and pepper; stir well to coat the meat and onions in the spices, releasing their smoky aroma.
    6. Pour in the diced tomatoes with their juices and stir everything together, scraping any browned bits off the bottom of the pot for flavor.
    7. Bring the mixture to a simmer, then reduce the heat to low. Cover the pot partially and cook for 20-25 minutes, stirring occasionally, until the chili thickens and flavors meld.
    8. Add the drained and rinsed kidney beans to the chili and stir to combine. Continue simmering uncovered for another 10 minutes to heat through and develop richness.
    9. Taste and adjust seasoning with salt and pepper as desired, then remove from heat and let sit for a few minutes to settle.
    10. Spoon the chili into bowls and serve hot, optionally garnished with fresh herbs or a dollop of sour cream.

    Notes

    For extra smoky flavor, consider adding a pinch of smoked paprika at the end of cooking. You can also customize the heat level with more chili powder or hot sauce.
    As the pot simmers and the house fills with the rich smell of spices, I find myself feeling oddly nostalgic. This recipe isn’t just about food—it’s about creating moments of warmth during the cooler months.

    So, whenever you need a dish that comforts and invigorates, give this chili a try. The smoky undertones and hearty ingredients will remind you why good food is the best kind of therapy.

  • Chill with a Twist: The Unconventional Oreo Slushie Experience

    Chill with a Twist: The Unconventional Oreo Slushie Experience

    This recipe is perfect for those unexpectedly hot days when only something icy and indulgent will do. It’s a whirlwind of textures and flavors that wakes up your taste buds and stirs up memories of sitting cross-legged with a cookie in hand. And the best part? It’s quick, forgiving, and endlessly customizable.

    Ice Cream Cookie Sandwiches

    This dessert features two cookies filled with a layer of creamy ice cream, creating a cool and indulgent treat. The cookies are baked until golden and crisp, then sandwiched around softened ice cream for a delightful combination of crunchy and creamy textures with a visually appealing final appearance.
    Prep Time 15 minutes
    Cook Time 12 minutes
    Total Time 27 minutes
    Servings: 8
    Course: Main Course
    Cuisine: Dessert
    Calories: 220

    Ingredients
      

    • 1 cup unsalted butter softened
    • 1 cup brown sugar
    • 1 egg large egg
    • 2 tsp vanilla extract
    • 2 cups all-purpose flour
    • 1/2 tsp baking soda
    • 1/4 tsp salt
    • 2 cups vanilla ice cream softened but still firm

    Equipment

    • Mixing bowls
    • Baking sheet
    • Parchment paper
    • Ice cream scoop
    • Cooling rack

    Method
     

    1. Preheat the oven to 350°F (175°C) and line a baking sheet with parchment paper to prevent sticking.
    2. Cream together the softened butter and brown sugar in a mixing bowl until the mixture is light and fluffy, and you can see the sugar dissolving.
    3. Beat in the egg and vanilla extract until fully incorporated, resulting in a smooth, cohesive batter.
    4. In a separate bowl, whisk together the flour, baking soda, and salt to evenly distribute the leavening agents.
    5. Gradually add the dry ingredients to the wet mixture, stirring gently until a thick dough forms.
    6. Using a cookie scoop or spoon, portion out the dough onto the prepared baking sheet, spacing the cookies about 2 inches apart.
    7. Bake the cookies for about 10-12 minutes, or until they turn golden around the edges but are still soft in the center.
    8. Remove the cookies from the oven and let them cool on the baking sheet for 5 minutes before transferring them to a wire rack to cool completely.
    9. Once cooled, take one cookie and spread a generous scoop of softened ice cream onto its flat side.
    10. Top with a second cookie, pressing gently to sandwich the ice cream evenly between the two cookies.
    11. Repeat this process with the remaining cookies and ice cream, then serve immediately or freeze for later enjoyment.

    Notes

    For easier handling, refrigerate the assembled sandwiches for about 10 minutes before serving. This helps the ice cream firm up slightly and prevents melting quickly.
    As the summer sun dips lower, this Oreo slushie becomes the unexpected hero of your cooling lineup. It’s an easy, fun way to bring friends together or enjoy solo as a satisfying treat after a long day. Keep the blender handy, because once you start, you’ll find yourself craving this frozen delight again and again.

  • Autumnal Spice & Cream: Roasted Butternut Squash & Carrot Soup

    Autumnal Spice & Cream: Roasted Butternut Squash & Carrot Soup

    As the leaves turn shades of amber and gold, I find myself craving the comforting embrace of warm soups. This roasted butternut squash and carrot soup offers a perfect blend of earthiness and sweetness, amplified by caramelized edges and smoky undertones. It’s a dish that invites slow, mindful eating amid the sounds of crackling leaves outside.

    Roasting transforms everyday vegetables into something truly special—a symphony of flavors that bloom in every spoonful. This recipe is my go-to when I want to celebrate the season or cozy up on chilly evenings. The rich, velvety texture and natural sweetness make it a versatile meal for any occasion, whether for family dinners or a small gathering with friends.

    Roasted Butternut Squash and Carrot Soup

    This roasted butternut squash and carrot soup is made by roasting the vegetables until caramelized and tender, then blending them into a smooth, velvety purée. The final dish has a rich, slightly sweet flavor with a creamy texture and a warm, inviting appearance.
    Prep Time 15 minutes
    Cook Time 40 minutes
    Total Time 55 minutes
    Servings: 4
    Course: Main Course
    Cuisine: Seasonal
    Calories: 150

    Ingredients
      

    • 1 lb butternut squash peeled and cubed
    • 2 large carrots peeled and sliced
    • 2 tablespoons olive oil for roasting
    • 1 small onion diced
    • 2 cloves garlic minced
    • 4 cups vegetable broth
    • to taste salt and pepper for seasoning

    Equipment

    • Baking sheet
    • Blender
    • Saucepan

    Method
     

    1. Preheat the oven to 400°F (200°C). Spread the cubed butternut squash and sliced carrots evenly on a baking sheet. Drizzle with olive oil, then toss to coat thoroughly. Roast until the vegetables are deeply browned and caramelized around the edges, about 25-30 minutes.
    2. While the vegetables roast, sauté the diced onion in a large saucepan over medium heat with a splash of olive oil. Cook until translucent and fragrant, about 5 minutes, stirring occasionally.
    3. Add the minced garlic to the onions and cook for another minute until fragrant. Be careful not to burn the garlic.
    4. Transfer the roasted vegetables into the saucepan with the sautéed onions and garlic. Pour in the vegetable broth and bring to a gentle simmer.
    5. Use an immersion blender or carefully transfer the mixture to a blender. Blend until completely smooth and velvety, with no chunks remaining.
    6. Return the blended soup to the saucepan if needed. Warm over low heat, seasoning with salt and pepper to taste. Stir gently to combine.
    7. Once heated through, ladle the soup into bowls, and serve hot. Optionally, garnish with fresh herbs or a swirl of cream.

    Notes

    Roasting the vegetables enhances their natural sweetness and depth of flavor. Adjust seasoning to your preference for salt and pepper.

    Whenever I make this soup, I feel a sense of accomplishment. It’s simple but feels indulgent, especially with a swirl of cream or a sprinkle of toasted seeds on top. The warm aroma alone signals comfort and autumn’s arrival, which is exactly what I need right now.

    This recipe reminds me of childhood falls and long conversations over mugs of hot soup. It’s a dish that grounds me, offering both nourishment and nostalgia. As the season shifts, I’ll be turning to this comforting bowl, knowing it’s a taste of seasonal magic in every bite.

  • Lazy Saturday? Turn It Into a Cozy Lasagna Soup Adventure

    Lazy Saturday? Turn It Into a Cozy Lasagna Soup Adventure

    Imagine coming home after a long week and craving something hearty without the marathon effort of layered lasagna. Lasagna soup offers that perfect intersection of comfort and simplicity, melding all the luscious flavors in one bowl. The scent alone—rich tomato, melting cheese, and fragrant Italian herbs—can turn a dull afternoon into a celebration.

    This recipe is my secret weapon for busy days when heartwarming food feels out of reach. It’s like a hug in a bowl, where pasta and cheese meet a vibrant, savory broth that mimics every bite of classic lasagna. Plus, it’s surprisingly fast to put together considering how indulgent it tastes.

    Lasagna Soup

    Lasagna soup combines the flavors of classic lasagna in a single bowl, featuring a rich tomato-based broth, tender pasta, and melted cheese. The dish is prepared by simmering savory broth with herbs and adding pasta until al dente, topped with cheese for a comforting, hearty texture.
    Prep Time 10 minutes
    Cook Time 30 minutes
    Total Time 40 minutes
    Servings: 4
    Course: Main Course
    Cuisine: Italian
    Calories: 320

    Ingredients
      

    • 1 tablespoon olive oil for sautéing
    • 1 medium onion finely chopped
    • 3 cloves garlic minced
    • 28 ounces canned crushed tomatoes use high-quality for best flavor
    • 4 cups chicken broth or vegetable broth
    • 1 teaspoon dried basil optional, add more for extra flavor
    • 0.5 teaspoon dried oregano optional
    • 8 ounces small pasta shells or elbow macaroni uncooked
    • 1 cup mozzarella cheese shredded
    • 0.5 cup parmesan cheese grated
    • Salt and pepper to taste

    Equipment

    • Large pot
    • Wooden spoon

    Method
     

    1. Heat a large pot over medium heat and add olive oil. Once shimmering, add the chopped onion and cook until translucent and fragrant, about 5 minutes.
    2. Add the minced garlic to the pot and cook for about 1 minute, stirring constantly until fragrant, avoiding burning.
    3. Stir in the crushed tomatoes, chicken broth, dried basil, and oregano. Bring the mixture to a gentle simmer, allowing the flavors to meld for 10 minutes.
    4. Once the broth is flavorful, add the uncooked pasta and cook until al dente, following pasta package instructions, about 8-10 minutes.
    5. Stir in the shredded mozzarella and grated parmesan cheese until melted and creamy, about 2 minutes. Taste and season with salt and pepper as needed.
    6. Serve the hot lasagna soup garnished with additional parmesan or fresh herbs if desired.

    There’s something about a bubbling bowl of lasagna soup that feels both nostalgic and excitingly new. It’s perfect for cozy weekends or when friends crash unexpectedly, promising a warm, filling meal in minutes. The best part? It’s a dish that makes everyone feel cared for without hours in the kitchen.

    As the seasons shift, this recipe reminds me that comfort food doesn’t need to be complicated. Sometimes, the simplest ingredients, simmered just right, create the most memorable moments. Keep this recipe on hand—you’ll find it’s a true crowd-pleaser and a weekly staple.

  • Peach Crumble: The Unexpected Secret to Summertime Bliss

    Peach Crumble: The Unexpected Secret to Summertime Bliss

    As summer reaches its peak, I find myself longing for a dessert that captures the season’s essence without fuss. Peach crumble is that quietly nostalgic treat that transforms ripe, juicy peaches into a warm, fragrant showdown of flavors and textures. The crunch of crumble, the sweetness of peaches, and a dash of cinnamon make every bite feel like a tender hug from grandmother’s kitchen.

    What makes this recipe even more special is the way it invites improvisation—use fresh peaches, or swap in those slightly overripe ones hiding in your fruit bowl. It’s perfect for spontaneous gatherings, beach picnics, or lazy afternoons on the porch. The aroma alone, with caramelized sugars and baked fruit, signals summer’s end while still enjoying its bounty.

    Peach Crumble

    Peach crumble combines ripe peaches with a buttery, oat-based topping to create a warm, tender dessert. The dish features soft, caramelized fruit underneath a crunchy, golden-brown crumble, assembled and baked until bubbling and fragrant.
    Prep Time 15 minutes
    Cook Time 40 minutes
    Total Time 55 minutes
    Servings: 4
    Course: Main Course
    Cuisine: American
    Calories: 250

    Ingredients
      

    • 4 cups ripe peaches, sliced peeled and pitted if desired
    • 1/2 cup sugar
    • 1 tablespoon lemon juice to enhance flavor and prevent browning
    • 1 cup all-purpose flour
    • 1 cup old-fashioned oats
    • 1/2 cup cold unsalted butter, diced
    • 1/2 cup brown sugar light or dark
    • pinch of salt

    Equipment

    • Mixing bowls
    • Baking dish
    • Pastry cutter or fork
    • Measuring cups and spoons
    • Oven

    Method
     

    1. Preheat your oven to 350°F (175°C) and lightly grease a baking dish.
    2. Combine sliced peaches, sugar, and lemon juice in a mixing bowl. Gently toss until the fruit is evenly coated and set aside to let the juices meld for about 10 minutes.
    3. In a separate bowl, whisk together the flour, oats, brown sugar, cinnamon, and salt.
    4. Add the diced cold butter to the dry mixture. Use a pastry cutter or fork to cut the butter into the mixture until it resembles coarse crumbs with some pea-sized bits.
    5. Spread the peeled and sugared peaches evenly into the prepared baking dish, creating a uniform layer.
    6. Sprinkle the crumb topping evenly over the peaches, covering the entire surface.
    7. Bake in the preheated oven for about 35 to 40 minutes, or until the topping is golden brown and bubbly along the edges.
    8. Remove from the oven and let cool slightly. The crumble should be fragrant with a crunchy topping and tender, caramelized peaches beneath.
    9. Serve warm, optionally with a scoop of vanilla ice cream or a dollop of whipped cream for added indulgence.

    Notes

    For a tart contrast, sprinkle a bit of ground ginger or nutmeg into the fruit mixture. Using ripe peaches ensures maximum sweetness and flavor.

    This peach crumble is more than just a dessert; it’s a storybook of summer memories coming alive in every forkful. Simple, approachable, and deeply satisfying, it’s a reminder that beauty can be found in the imperfect ripeness of fruit and the rustic charm of a well-loved recipe.

    As the season shifts and the days grow shorter, this crumble offers a comforting sign of sunshine and fresh fruit. A perfect ending to a warm evening or a reason to linger longer over family and friends. Just a scoop, a crackling top, and a burst of juicy sweetness—what more could you ask for?

  • Wake Up to the Cozy Charm of Pumpkin Spice Overnight Oats

    Wake Up to the Cozy Charm of Pumpkin Spice Overnight Oats

    As the air turns crisper and pumpkin spice begins to scent the mornings, I find myself craving a breakfast that’s both comforting and prepared with minimal fuss. Enter Pumpkin Spice Overnight Oats—an unpretentious jar of goodness that transforms the mundane into something festive and satisfying. It’s like a warm hug in a bowl, ready to energize your day before the sun even rises.

    What sets this recipe apart is the unexpected depth of flavor you get from soaking oats in aromatic pumpkin puree, cinnamon, and a splash of maple syrup. The texture is velvety yet hearty, perfect for those mornings when time is tight but flavor is non-negotiable. Plus, it’s a smart way to indulge in seasonal spices without turning on the stove.

    Pumpkin Spice Overnight Oats

    Pumpkin Spice Overnight Oats is a no-cook breakfast dish where rolled oats are soaked overnight in a mixture of pumpkin puree, cinnamon, and sweetener, resulting in a creamy and hearty texture. The final product features a velvety consistency with flecks of spices and pumpkin, ready to enjoy straight from the fridge.
    Prep Time 5 minutes
    Total Time 5 minutes
    Servings: 2
    Course: Main Course
    Cuisine: American
    Calories: 250

    Ingredients
      

    • 1 cup rolled oats
    • 1/2 cup pumpkin puree canned or fresh
    • 1 cup milk of choice dairy or plant-based
    • 2 tablespoons maple syrup or honey
    • 1 teaspoon cinnamon ground
    • 1/4 teaspoon nutmeg optional

    Equipment

    • Measuring cups and spoons
    • Large mixing bowl
    • Jar or airtight container

    Method
     

    1. Measure out the rolled oats and transfer them into a large mixing bowl.
    2. Add pumpkin puree, milk, maple syrup, ground cinnamon, and nutmeg to the oats.
    3. Whisk everything together until you achieve a smooth, uniform mixture with the oats fully coated and spices evenly distributed.
    4. Spoon the mixture into a jar or airtight container, spreading it out evenly.
    5. Seal the container tightly and place in the refrigerator overnight or for at least 4 hours to let the oats soak up the flavors and become tender.
    6. The next morning, give the oats a gentle stir or fold to combine any separated liquids.
    7. Optional: top with fresh fruit, nuts, or a drizzle of additional maple syrup for added flavor and texture.
    8. Enjoy the creamy, spiced pumpkin oats straight from the jar for a wholesome, satisfying breakfast.

    Notes

    For added texture, include chopped pecans or a dollop of yogurt. Use dairy-free milk for vegan options.
    This recipe is a tribute to the cozy, sleepy mornings of fall, brought into the busy rhythm of everyday life. It makes me nostalgic for pumpkin patches and autumn walks, all while keeping things effortlessly delicious. As the seasons shift, this dish reminds me that simplicity can be a profound act of self-care.

  • The Secret to an Unforgettably Refreshing Champagne Slushie

    The Secret to an Unforgettably Refreshing Champagne Slushie

    When summer heat hits, I turn to an unlikely hero: the champagne slushie. It’s my go-to escape, a bubbling, icy miracle that transforms a simple drink into a celebration in every sip. There’s something about the fizz and cold that instantly lifts my mood, makes everything feel a little more festive.

    This recipe isn’t just about mixing drinks; it’s about recreating a memory. A forgotten picnic, an impromptu toast, or a spontaneous dance in the kitchen—all frozen alive in a glass. And trust me, the unexpected chill paired with sparkling bubbles is a sensation you don’t want to miss.

    ## WHY I LOVE THIS RECIPE?
    – It’s a playful twist on a classic, perfect for summer gatherings.
    – The icy texture makes every sip unexpectedly cooling and delightful.
    – It’s surprisingly easy, with a quick blend that screams instant gratification.
    – The bubbles add a lively, sparkling surprise that’s hard to resist.
    – I love how it makes every moment feel a little more special, even at home.

    Champagne Slushie

    A champagne slushie is a refreshing frozen beverage made by blending champagne with ice and sweeteners to create a bubbly, icy drink. The mixture results in a fizzy, slushy texture that’s cold, sparkling, and visually appealing, perfect for summer gatherings or celebratory moments.
    Prep Time 5 minutes
    Total Time 5 minutes
    Servings: 2
    Course: Main Course
    Cuisine: International
    Calories: 150

    Ingredients
      

    • 1 bottle champagne chilled
    • 2 cups ice cubes
    • 2 tablespoons simple syrup adjust to taste

    Equipment

    • Blender
    • Measuring cups and spoons

    Method
     

    1. Pour the chilled champagne into the blender jar.
    2. Add the ice cubes to the blender, distributing evenly over the liquid.
    3. Drizzle in the simple syrup for sweetness, adjusting based on your preference.
    4. Pulse the blender a few times to start crushing the ice and mixing the ingredients gently.
    5. Blend on high until the mixture is smooth, icy, and slightly slushy, about 30-45 seconds.
    6. Turn off the blender and check the texture—the drink should be bubbly, cold, and fluffy.
    7. Scoop the champagne slushie into chilled glasses and garnish with a twist of lemon or a small sprig of mint if desired.
    As the ice melts into a mist of bubbly sweetness, I find myself craving another sip. This champagne slushie isn’t just a treat—it’s a small, sparkling escape from everyday life.

    Whether it’s a lazy afternoon or a spontaneous celebration, this recipe keeps my spirits high and my glasses frosty. The fact that it’s so simple makes it a perfect go-to, no matter the occasion. Cheers to cool, sparkling bliss whenever you need it.

  • Spook-tacular Witch Finger Cookies That Will Bewitch Your Halloween

    Spook-tacular Witch Finger Cookies That Will Bewitch Your Halloween

    Halloween is my favorite time to get a little creative in the kitchen, and these Witch Finger Cookies are my secret weapon for a creepy, fun treat. The moment I shape the dough into tiny, gnarled fingers, I feel a mischievous thrill—it’s like casting a sweet spell on everyone who sees them. Plus, the scent of melting butter and almond extract fills the kitchen with a hauntingly good aroma.

    What makes these cookies stand out is their perfect combo of crunch and chew, with that creepy little almond nail on top. They’re surprisingly easy to make, even at the last minute, and they turn a simple baking session into a hilarious zombie-haunt. Kids and adults alike love the unsettling look and delicious taste, making them the highlight of any Halloween party.

    Witch Finger Cookies

    Witch Finger Cookies are shaped into small, bony-looking fingers and baked until crisp, featuring a delicate almond nail on each. The dough is made with buttery, almond-flavored ingredients, which give them a crunchy exterior with a slight chew. They have a spooky, gnarled appearance perfect for Halloween celebrations.
    Prep Time 20 minutes
    Cook Time 15 minutes
    Total Time 35 minutes
    Servings: 24
    Course: Main Course
    Cuisine: Halloween
    Calories: 120

    Ingredients
      

    • 1 cup unsalted butter softened
    • 1 cup granulated sugar
    • 1 large egg
    • 1/2 teaspoon almond extract
    • 2 1/2 cups all-purpose flour
    • 1/2 teaspoon baking powder
    • 1/4 teaspoon salt
    • small quantity almond slice for the nail

    Equipment

    • Mixing bowls
    • Baking sheet
    • Parchment paper
    • Small knife or toothpick

    Method
     

    1. Cream together the softened butter and sugar in a mixing bowl until the mixture is light and fluffy, with a pale color and a slightly velvety texture.
    2. Beat in the egg and almond extract until fully incorporated, giving the mixture a fragrant aroma and a smooth consistency.
    3. In a separate bowl, whisk together the flour, baking powder, and salt to evenly distribute the dry ingredients.
    4. Gradually add the dry mixture to the wet ingredients, mixing gently until a cohesive dough forms that’s soft but manageable.
    5. Preheat your oven to 350°F (175°C) and line a baking sheet with parchment paper.
    6. Divide the dough into small portions and roll each into a thin, finger-length shape, tapering the ends slightly to resemble fingers.
    7. Place the shaped fingers on the prepared baking sheet, spacing them slightly apart.
    8. Use a small knife or toothpick to create knuckle marks along each finger, giving them a gnarled, creepy appearance.
    9. Press an almond slice onto the top of each finger to create a spooky nail, embedding it slightly into the dough.
    10. Bake the cookies for about 15 minutes, until they are lightly golden around the edges and feel firm to the touch.
    11. Remove the cookies from the oven and allow them to cool completely on a wire rack, which helps them set and crisp up.
    12. Once cooled, enjoy these spooky, crunchy witch finger cookies that are perfect for Halloween treats.

    Adorning my haunted dessert table wouldn’t be complete without these ghoulish little fingers. Each bite offers a crisp snap, followed by a buttery, almondy sweetness that’s impossible to resist. They’re not just treats—they’re tiny pieces of spooky art that bring my Halloween décor to life.

    This recipe is a reminder that sometimes, the simplest ingredients can create the most theatrically spooky results. As the shadows stretch and the night grows cold, these cookies carve out a special, slightly chaotic, but wholly fun spot in my holiday tradition.

  • Chilled Vodka Slushies with a Twist of Lemon and Basil

    Chilled Vodka Slushies with a Twist of Lemon and Basil

    As summer heat hits its peak, I find myself craving something icy and unexpectedly sophisticated. Vodka slushies are my go-to refreshment, but I love giving them a twist that surprises the palate. Imagine bright lemon, fresh basil, and a hint of mint swirling in a glass of icy vodka — irresistible and utterly simple to prepare.

    Adding herbal notes to a frozen cocktail isn’t just about flavor; it’s about creating a sensory experience. The chill of the slushie combined with the aroma of fresh herbs makes each sip feel like a mini escape. This recipe proves that even the most casual drink can feel a little special.

    Herbal Vodka Slushie

    This vodka slushie combines bright lemon juice with fresh basil and mint, blended with ice to create a icy, smooth texture. The herbal aromas and tangy citrus flavor make for a refreshingly sophisticated frozen cocktail. The final appearance is a frosty, vibrant drink with small ice crystals and visible herb leaves stirred in.
    Prep Time 10 minutes
    Total Time 10 minutes
    Servings: 2
    Course: Main Course
    Cuisine: fusion
    Calories: 210

    Ingredients
      

    • 1 cup fresh lemon juice about 2-3 lemons
    • 8 fresh basil leaves fresh basil
    • 8 fresh mint leaves fresh mint
    • 1 cup vodka
    • 2 cups ice cubes

    Equipment

    • Measuring cups and spoons
    • Blender
    • Citrus juicer or reamer
    • Herb knife or scissors

    Method
     

    1. Juice the lemons using a citrus reamer or juicer until you have about one cup of fresh lemon juice. Set aside.
    2. Roughly chop the basil and mint leaves to help release their aromatic oils, then set aside.
    3. Add the lemon juice, vodka, and the chopped herbs into your blender jar.
    4. Pulse a few times to slightly crush the herbs and combine the liquid ingredients evenly.
    5. Add the ice cubes to the blender and secure the lid firmly.
    6. Blend on high speed until the mixture is smooth, frosty, and with a slushy texture, about 30-60 seconds.
    7. Open the lid and check the consistency; it should be thick, icy, and well combined with visible herb flecks.
    8. Pour the slushie into chilled glasses and garnish with a small sprig of basil or mint if desired.

    Notes

    For an extra refreshing twist, rim glasses with sugar or salt before pouring. Adjust the sweetness by adding a touch of simple syrup if desired.

    This recipe is perfect for those lazy weekends or spontaneous gatherings when a cold, flavorful drink hits the spot. The simplicity and freshness make it an instant crowd-pleaser and a great way to impress without fuss. Plus, it’s endlessly customizable—swap basil for mint, or lemon for lime.

    Enjoy the crisp, invigorating burst of this vodka slushie whenever you need a moment of cool relief. It’s a reminder that the best drinks are often the simplest, with just a few fresh ingredients and a good chill. Cheers to making your summer moments cooler and more memorable.