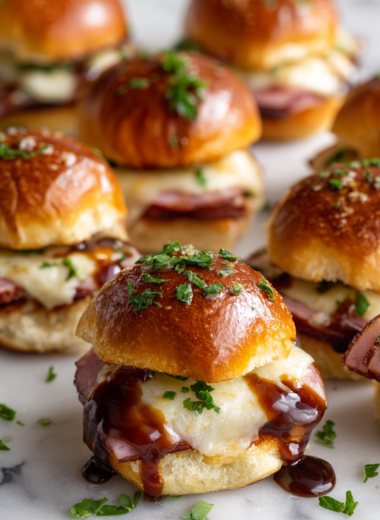
Category: Main Course

  • Vegan Stuffed Peppers Recipe

    When I first started making stuffed peppers, I was obsessed with getting the filling just right — not too dry, not too mushy, with a good balance of textures. I’d often overcook the peppers or drown the filling in too much sauce. Now, I keep it simple, focusing on the natural sweetness of the peppers and the smoky, nutty flavor of the filling.

    These peppers are a reminder that good food doesn’t need fancy ingredients or complicated techniques. It’s about respecting the ingredients, tasting as you go, and adjusting with a gentle hand. They’re perfect for a cozy weeknight dinner or when you want a little nourishment that feels like a warm hug.

    A cook’s notes approach: honest, specific, unpolished but clear.

    Why I keep coming back to this recipe

    • I love how versatile this dish is; I can swap ingredients based on what’s in the fridge.
    • There’s a satisfying moment when the peppers come out of the oven, bubbling and smoky.
    • I used to struggle with getting the peppers tender without overcooking the filling.
    • Baking the peppers whole makes them sweet and smoky, a real treat.
    • This recipe always reminds me of family dinner times, simple and warm.

    The story behind my favorite vegan stuffed peppers

    • One evening, I had a bunch of leftover grains and a few peppers that needed using up. I threw everything together, and the smell alone made my house feel cozy. That’s when I realized how forgiving and adaptable stuffed peppers are, especially when you don’t want to fuss too much.
    • It’s become a go-to meal for me because it’s easy to customize, nourishing, and always satisfying. Plus, the act of stuffing feels a bit playful — like giving each pepper its own little package of flavor.
    • Over time, I’ve tweaked the spices and added different herbs, but the core idea is the same: simple ingredients, honest cooking, and a dish that feels like a hug.

    A little history and fun facts about stuffed peppers

    • Native to Mediterranean and Middle Eastern cuisines, stuffed peppers have many regional variations.
    • Vegan versions often replace cheese or ground meat with grains, legumes, or nuts.
    • The peppers’ sweetness intensifies as they bake, making them more flavorful and tender.
    • In some traditions, stuffed peppers symbolize abundance and hospitality.
    • Using heirloom or colorful peppers adds visual appeal and depth of flavor.

    Ingredient quirks and tips

    • Bell peppers: I love the sweet, smoky flavor of red peppers, but yellow or orange work well too. They can be softer, so handle gently.
    • Brown rice: It’s my go-to for chewy texture. Swap for quinoa if you want a nuttier bite, but reduce cooking time.
    • Lentils: I prefer green or brown for sturdiness. Red lentils cook faster but can turn mushy—add last.
    • Tomatoes: Use canned or fresh diced for acidity and moisture. Fresh tomatoes add brightness, canned add depth.
    • Herbs & spices: I keep it simple with cumin, paprika, and parsley. Feel free to toss in cilantro or basil for fresh flavor.

    Spotlight on peppers and herbs

    Fresh herbs (parsley, cilantro) : I love the bright, grassy scent they add at the end. Chop finely to release their full flavor.:

    • Peppers: They soften beautifully in the oven, developing a sweet, smoky aroma. Handle with care so they don’t split.
    • The skin might blister, adding a bit of char for flavor. A quick broil can intensify this.

    Lemon juice: It brightens everything and cuts through the richness. Zest first for extra punch.:

    • Herbs: They’re delicate and lose potency if cooked too long. Add at the last minute for maximum impact.
    • Fresh herbs can wilt if exposed to high heat too early, so sprinkle just before serving.

    Substitution ideas to customize your stuffed peppers

    • Dairy-Free: Use vegan cheese or omit cheese altogether for a lighter, plant-based dish.
    • Grain-Free: Substitute cauliflower rice for grains to make it lower carb.
    • Gluten-Free: Ensure spices and any added sauces are gluten-free.
    • Extra Protein: Add chopped nuts or seeds for crunch and extra nutrition.
    • Spice Level: Adjust chili powder or cayenne for heat, or skip for milder flavor.

    Equipment & Tools

    • Baking dish: To hold and bake the stuffed peppers
    • Sharp knife: To cut and prepare peppers
    • Saucepan: To cook rice and lentils
    • Skillet: To sauté vegetables
    • Spoon or spatula: To stuff peppers and stir filling

    Step-by-step guide to perfect vegan stuffed peppers

    1. Preheat your oven to 190°C (375°F).
    2. Slice off the tops of the peppers and carefully remove seeds. Keep the tops for later.
    3. Cook the rice and lentils together in a pot with 1.5 cups water, simmer for 20 minutes until tender.
    4. Meanwhile, chop onions, garlic, and your choice of veggies. Sauté in a pan with olive oil until fragrant and soft, about 5-7 minutes.
    5. Add cooked grains, diced tomatoes, spices, and herbs to the sautéed veggies. Stir well, cook another 5 minutes.
    6. Stuff the peppers with the filling, pressing down gently. Place them upright in a baking dish.
    7. Top each with a little extra tomato or vegan cheese if you like. Cover loosely with foil.
    8. Bake for 30 minutes, until peppers are tender and slightly blistered. Check at 25 minutes to prevent over-browning.
    9. Remove from oven, let rest for 5 minutes. Garnish with fresh herbs and a squeeze of lemon.
    10. Serve warm, with a side salad or crusty bread.

    Let the peppers rest 5 minutes out of the oven. Garnish with herbs and lemon before serving.

    How to Know It’s Done

    • Peppers should be tender and slightly blistered.
    • Filling should be hot and slightly browned on top.
    • Peppers should hold their shape without collapsing.

    Vegan Stuffed Peppers

    These vegan stuffed peppers are baked until tender, with a flavorful filling of rice, lentils, tomatoes, and herbs. The peppers develop a sweet, smoky aroma and a slightly blistered skin, creating a cozy, satisfying dish that balances textures between soft, chewy, and slightly crispy.
    Prep Time 15 minutes
    Cook Time 40 minutes
    Total Time 55 minutes
    Servings: 4
    Course: Main Course
    Cuisine: Mediterranean
    Calories: 250

    Ingredients
      

    • 4 large bell peppers preferably red for sweetness and smokiness
    • 1.5 cups brown rice uncooked
    • 1 cup green lentils uncooked
    • 1 can diced tomatoes or fresh diced tomatoes
    • 1 medium onion finely chopped
    • 3 cloves garlic minced
    • 2 tablespoons olive oil
    • 1 teaspoon cumin ground
    • 1 teaspoon paprika smoked if possible
    • Fresh parsley chopped, for garnish
    • Lemon lemon juice for brightness
    • Salt to taste
    • Black pepper to taste

    Equipment

    • Baking dish
    • Sharp knife
    • Saucepan
    • Skillet
    • Spoon or Spatula

    Method
     

    1. Preheat your oven to 190°C (375°F). Carefully slice off the tops of the peppers and remove seeds and membranes, keeping the tops to use as lids later.
    2. In a saucepan, combine the rice and lentils with 3 cups of water. Bring to a boil, then reduce heat, cover, and simmer for about 20 minutes until tender and water is absorbed. Fluff with a fork and set aside.
    3. While the grains cook, heat olive oil in a skillet over medium heat. Add chopped onion and minced garlic, sautéing until fragrant and translucent, about 5-7 minutes. The kitchen should fill with a warm aroma as they soften.
    4. Add the cooked grains, diced tomatoes, cumin, paprika, salt, and pepper to the skillet. Stir everything together and cook for another 5 minutes, allowing the flavors to meld and the mixture to slightly thicken.
    5. Fill each hollowed-out pepper with the savory mixture, pressing down gently to pack in the filling. Place the peppers upright in a baking dish and top each with their reserved tops for a charming presentation.
    6. If desired, sprinkle a little more diced tomato or vegan cheese on top of each pepper. Cover the dish loosely with foil to keep everything moist.
    7. Bake the peppers for 30 minutes, until the skin blisters slightly and peppers are tender when pierced with a knife. Check at 25 minutes to avoid over-browning.
    8. Remove from the oven and let rest for 5 minutes. Meanwhile, chop fresh parsley for garnish and squeeze a little lemon juice over the peppers for brightness.
    9. Serve the peppers warm, garnished with parsley and a squeeze of lemon, alongside your favorite salad or crusty bread for a cozy, nourishing meal.

    Tips & tricks for perfect stuffed peppers

    • PRE-COOK grains: Save time and ensure even cooking by preparing grains ahead.
    • SEAR the peppers briefly in a hot pan for smoky flavor before baking.
    • BAKE uncovered for a crispy top, covered for tender peppers and moist filling.
    • USE fresh herbs at the end to brighten flavors and add color.
    • TASTE as you go: Adjust spices and acidity before stuffing for the best flavor balance.

    Common mistakes and how to fix them

    • FORGOT to remove seeds? Rinse the peppers under cold water, then pat dry before stuffing.
    • DUMPED too much filling? Use a smaller spoon or pack lightly to avoid overflowing.
    • OVER-TORCHED the tops? Cover with foil early next time, or lower oven temp.
    • SALT overshoot? Taste the filling before stuffing, then adjust seasoning accordingly.

    Quick fixes for common stuffed pepper issues

    • When peppers are too firm, cover with foil and bake 5 more minutes.
    • If filling is too dry, stir in a splash of vegetable broth or tomato sauce.
    • Splash a little vinegar or lemon juice if flavors are flat.
    • Patch over over-browned tops with a sprinkle of vegan cheese or herbs.
    • Shield peppers with foil if tops brown too quickly during baking.

    Make-ahead and storage tips for leftover magic

    • Prepare the filling and stuff the peppers a day ahead. Keep refrigerated for up to 24 hours.
    • You can also bake them in advance, then reheat in the oven at 180°C (350°F) for 15-20 minutes.
    • The flavors deepen overnight, making leftovers even tastier.
    • Reheat until piping hot and bubbling, checking that peppers are tender and filling is heated through.

    10 Practical Q&As: Vegan Stuffed Peppers

    1. Can I use other grains instead of rice?

    Use a mix of brown rice and lentils for a hearty, chewy texture that holds up well during baking.

    2. How do I prep the peppers?

    Chop the tops off and remove seeds carefully; set aside the tops for a cute, edible lid.

    3. How do I know when the filling is ready?

    Cook the filling just until the veggies soften; overcooking makes it mushy.

    4. What’s the perfect bake time?

    Bake at 190°C (375°F) for about 30 minutes until peppers are tender and slightly blistered.

    5. Why rest the stuffed peppers?

    Let the peppers rest 5 minutes after baking so juices settle; then serve warm.

    6. Can I add herbs earlier in cooking?

    Use fresh herbs at the end for bright flavor and color.

    7. How do I prevent burning?

    If peppers brown too fast, cover loosely with foil to protect them.

    8. Can I skip the lemon?

    Add a squeeze of lemon on top before serving for a fresh zing.

    9. What’s the best way to cut peppers?

    Use a sharp knife to cut peppers; they should be easy to slice without crushing.

    10. How long do leftovers last?

    Store leftovers in an airtight container for up to 3 days in the fridge.

    Making these vegan stuffed peppers is a small act of kindness — a way to nourish your body and soul with simple, honest flavors. They’re forgiving, adaptable, and just satisfying enough to keep you coming back for more.

    In a busy world, these peppers offer a moment of calm and comfort. They’re easy to assemble, forgiving if you tweak ingredients, and always welcome at the table. Plus, they smell incredible while baking, filling the kitchen with a smoky, spiced aroma that’s hard to beat.

  • Sweet Potato Carrot Soup Recipe

    This soup is what I turn to when I want something honest and nourishing, especially on chilly days. There’s a certain sweetness that comes from caramelizing the carrots and sweet potatoes, which makes the whole kitchen smell like a cozy hug.

    I love how simple ingredients can come together into something unexpectedly rich and vibrant. It’s a kind of meal that feels like a small act of kindness, especially when served with a crusty piece of bread. No fuss, just pure, honest comfort.

    Honest cook’s notes on transforming humble ingredients into a soulful, comforting bowl.

    Why this Soup Means a Lot to Me

    • I love how the aroma of caramelizing carrots makes the kitchen feel warmer.
    • There’s a nostalgic feeling when I make this, reminding me of family dinners.
    • It’s satisfying to turn simple ingredients into a vibrant, hearty bowl.
    • Making this soup always makes me feel like I’ve hit a culinary sweet spot.
    • I appreciate how forgiving and flexible the recipe is—adjust seasoning to taste.

    My Personal Connection to this Soup

    • I first came across this recipe during a busy week when I needed something quick and nourishing. The natural sweetness from the carrots and sweet potatoes struck me, making the soup feel almost dessert-like, but still savory.
    • It’s one of those recipes I tweak endlessly—sometimes adding ginger, other times a dash of coconut milk. It’s a canvas for whatever I have on hand, which makes it feel personal.
    • I love how the process is straightforward but yields something so soulful. It’s a reminder that good cooking can be simple and honest.

    Origins and Quirks of this Humble Soup

    • Sweet potato and carrot soup is a classic comfort food across many cultures, often associated with fall and winter.
    • Sweet potatoes are native to Central and South America, cherished for their sweet, starchy flavor.
    • Carrots have been cultivated for over a thousand years, originally purple or white before orange became popular.
    • Adding lemon or vinegar at the end brightens the earthy sweetness, balancing the richness.
    • This soup is a great way to use up root vegetables, turning pantry staples into a cozy meal.

    Ingredient Insights and Tweak Tips

    • Sweet Potatoes: I love their creamy, dense texture. Swap with squash if you want a lighter feel.
    • Carrots: Their natural sweetness is key. Use parsnips for a slightly earthier flavor.
    • Vegetable Broth: I prefer homemade, but store-bought works. Look for low-sodium versions.
    • Lemon Juice: Brightens the dish. A splash of vinegar can do the same if lemons are unavailable.
    • Olive Oil: Adds richness and helps vegetables caramelize. Butter can be a richer alternative.

    Spotlight on Sweet Potatoes and Carrots

    Sweet Potatoes:

    • Sweet potatoes have a dense, moist flesh that becomes creamy when cooked.
    • They contain natural sugars that caramelize beautifully during sautéing.

    Carrots:

    • Carrots bring a bright, earthy sweetness and vibrant color.
    • They soften and become tender, releasing a sweet aroma during cooking.

    Substitutions for Different Diets and Tastes

    • Dairy-Free: Use coconut milk instead of cream for a rich, tropical flavor.
    • Vegan: Skip butter, use oil, and ensure broth is vegetable-based.
    • Low-Sodium: Choose no-salt-added broth and adjust seasoning accordingly.
    • Spicy Kick: Add a pinch of cayenne or chili flakes to spice it up.
    • Extra Creaminess: Stir in a dollop of coconut yogurt or cashew cream.

    Equipment & Tools

    • Large heavy-bottomed pot: Even heat distribution for sautéing and simmering
    • Sharp chef’s knife: Efficient peeling and chopping
    • Immersion blender or regular blender: Pureeing the soup smoothly
    • Measuring cups and spoons: Accurate seasoning and broth measurement

    Step-by-Step Guide to Perfect Sweet Potato Carrot Soup

    1. Peel the sweet potatoes and carrots. Chop into 2-3 cm chunks.
    2. Heat a large pot over medium. Add a tablespoon of oil, then the vegetables.
    3. Sauté for 10 minutes, stirring often, until they start to soften and smell sweet.
    4. Pour in 750 ml (3 cups) of vegetable broth. Bring to a boil.
    5. Reduce heat, cover, and simmer for 20-25 minutes, until veggies are very tender.
    6. Use an immersion blender to puree the soup until smooth, or transfer to a blender.
    7. Return to heat, add salt, pepper, and a splash of lemon juice. Adjust seasoning.
    8. Serve hot, garnished with herbs or a swirl of cream.
    9. Rest for 5 minutes off heat before serving to let flavors meld.

    Let the soup rest for 5 minutes off heat. Then, taste and adjust seasoning. Serve in warm bowls, garnished as desired.

    How to Know It’s Done

    • Vegetables are soft and breaking apart easily.
    • Soup has a vibrant, slightly thick consistency.
    • A gentle simmer with no boiling over or scorching at the bottom.

    Sweet Potato Carrot Soup

    This comforting soup combines caramelized carrots and sweet potatoes, cooked until tender and blended into a smooth, vibrant purée. The process involves sautéing, simmering, and blending to achieve a rich, velvety texture with a naturally sweet flavor and a warm, inviting appearance. It’s perfect for chilly days when you crave something nourishing and soul-warming.
    Prep Time 10 minutes
    Cook Time 35 minutes
    Total Time 45 minutes
    Servings: 4
    Course: Main Course
    Cuisine: Comfort Food
    Calories: 150

    Ingredients
      

    • 2 large sweet potatoes peeled and chopped
    • 3 large carrots peeled and chopped
    • 1 tablespoon olive oil for sautéing
    • 750 ml vegetable broth low-sodium preferred
    • to taste salt adjust after blending
    • to taste pepper freshly ground, optional
    • 1 tablespoon lemon juice brightens the flavor

    Equipment

    • Large heavy-bottomed pot
    • Sharp chef’s knife
    • Immersion blender or regular blender
    • Measuring cups and spoons

    Method
     

    1. Peel the sweet potatoes and carrots, then chop them into roughly 2-3 cm chunks. The pieces should be uniform for even cooking.
    2. Heat a large heavy-bottomed pot over medium heat, then add a tablespoon of olive oil. Once shimmering, add the chopped vegetables and sauté for about 10 minutes, stirring occasionally, until they start to soften and smell sweet, with some edges beginning to caramelize.
    3. Pour in the vegetable broth, then bring the mixture to a gentle boil. Reduce the heat to low, cover the pot, and let it simmer for 20-25 minutes, or until the vegetables are very tender and easily break apart when pierced with a fork.
    4. Use an immersion blender directly in the pot, or carefully transfer the soup to a blender in batches, and blend until smooth and velvety. The mixture should be bright orange and creamy, with no chunks remaining.
    5. Return the pureed soup to the pot (if using a blender). Stir in a tablespoon of lemon juice, then season with salt and pepper to taste. Reheat gently over low heat if needed, until steaming hot.
    6. Serve the soup hot, garnished with fresh herbs or a swirl of cream if desired. Enjoy the warm, comforting aroma and silky texture with a crusty piece of bread on the side.

    Notes

    For an extra layer of flavor, add a pinch of ginger or a dash of coconut milk during blending.

    Cooking Tips & Tricks to Elevate Your Soup

    • Use a heavy-bottomed pot—prevents scorching and promotes even cooking.
    • Sauté vegetables until they smell sweet and caramelized—adds depth.
    • Purée in batches if needed—avoid splatters and ensure smoothness.
    • Season in layers—salt at the end enhances sweetness.
    • Add lemon or vinegar at the very end—brightens flavors.

    Common Mistakes and How to Fix Them

    • FORGOT to taste before serving? Add a splash of lemon juice or vinegar to brighten.
    • DUMPED in too much broth? Simmer longer to thicken, or blend in some cooked potato for creaminess.
    • OVER-TORCHED the vegetables? Quickly add a splash of water to cool and prevent bitterness.
    • MISSED the seasoning step? Always taste and adjust salt and acid at the end.

    Quick Kitchen Fixes for Troublesome Moments

    • When too thick, splash in hot broth and stir—rescue with ease.
    • If the soup is bland, add a pinch of sugar or a squeeze of lemon.
    • Patch over a burned bottom with a spoonful of water and stir—prevents bitterness.
    • Shield with a lid if it’s bubbling over during simmering.
    • When the soup separates, blend again to restore smoothness.

    Make-Ahead and Storage Tips for Comfort in a Bowl

    • Peel and chop the vegetables a day ahead. Keep in an airtight container in the fridge for up to 24 hours.
    • The soup can be made a day in advance and stored in the fridge for up to 3 days.
    • Reheat gently on the stove over low heat, stirring often. Add a splash of broth if it thickens too much.
    • Frozen soup keeps well for up to 3 months. Thaw overnight in the fridge before reheating.

    10 Practical Q&As for Sweet Potato Carrot Soup

    1. How do I prep the sweet potatoes and carrots?

    Use a sharp chef’s knife to peel and chop. It makes the process faster and safer.

    2. What size should the vegetables be chopped?

    Cut into uniform chunks so they cook evenly. About 2-3 cm (1 inch) pieces work well.

    3. How do I know when the veggies are tender?

    Cook until they’re soft and break apart easily, about 20-25 minutes.

    4. Can I use a regular blender? And how smooth should it be?

    Blend until smooth in a blender or with an immersion blender for a velvety texture.

    5. When should I season the soup?

    Taste and adjust salt and pepper before serving for the best flavor.

    6. How do I make the soup pop with flavor?

    Add a splash of lemon juice or vinegar at the end for brightness.

    7. What’s a nice finishing touch?

    Serve hot, garnished with a swirl of cream or a sprinkle of herbs.

    8. How do I reheat without losing flavor or texture?

    Reheat gently on the stove, stirring often to prevent sticking.

    9. How should I store and reheat leftovers?

    Leftovers keep in the fridge for 3-4 days; freeze for up to 3 months.

    10. How do I adjust the soup’s consistency later?

    For a thinner soup, add more broth during reheating; for a thicker one, simmer longer.

    Sometimes, I forget how powerful a bowl of soup can be. It’s humble but honest, filling yet light enough to not weigh you down. It’s a reminder that good food doesn’t have to be complicated to be satisfying.

    This soup has seen me through busy weekends and quiet evenings alike. It’s a staple that I make when I need a little bit of warmth, both from the inside out and in the act of cooking itself.

  • Easy Vegan Potato Soup Recipe

    Sometimes, I think about how a humble potato can be turned into something comforting, almost like a hug in a bowl. This soup is my go-to when I want something quick, filling, and honest—no fuss, just good ingredients simmered until they melt into each other.

    There’s a kind of quiet satisfaction in mashing those soft potatoes and hearing the gentle crackle of onions frying. It’s a reminder that good food doesn’t have to be complicated—just honest, with a little patience and a lot of flavor.

    The unpolished, honest cook’s notes on making a simple vegan potato soup that feels like a warm chat at the stove.

    Why this simple soup matters to me

    • I love how this soup turns out every time, it’s like an old friend.
    • There’s a quiet pride in making something so humble taste so rich.
    • It’s perfect for those nights when I want something warm but don’t want to cook complicated.
    • The smell of onions and garlic simmering always makes the house feel cozy.
    • I’m always surprised how quickly this comes together—like a warm hug in under 30 minutes.

    A personal story of turning tradition into my own

    • Growing up, potato soup was a Sunday staple, always made with butter and cream. When I turned vegan, I missed that richness—so I found ways to recreate it with everyday ingredients.
    • This recipe is a blend of nostalgia and adaptation, proving that comfort food can be simple, honest, and plant-based.
    • It’s become my go-to for busy nights, when I want something hearty and satisfying without a fuss.

    A little history and fun facts about potato soup

    • Potato soup dates back centuries, with variations across cultures—from Irish colcannon to French vichyssoise.
    • This vegan version is a modern twist, relying on simple plant-based ingredients.
    • Potatoes are the world’s fourth most consumed food, known for their versatility and comfort.
    • Adding a splash of plant milk mimics the creamy texture of traditional dairy-based soups.

    Key ingredients and how they behave in the soup

    • Potatoes: I prefer starchy Russets for creaminess; waxy types hold shape but less thickening power.
    • Onions: They add sweetness and depth—don’t rush the caramelization, slow and steady unlocks flavor.
    • Garlic: A little goes a long way—roast or sauté to mellow its sharpness.
    • Vegetable broth: Use homemade or store-bought—look for low-sodium options to control salt.
    • Plant-based milk: I like almond or oat for subtle sweetness—skip if you want a lighter broth.
    • Salt and pepper: Essential for balancing—add gradually and taste as you go.

    Spotlight on Potatoes and Onion

    Potatoes:

    • They soften and release starch, turning the soup velvety—choose firm, unblemished potatoes.
    • Onions: They form the flavor base—sauté until golden for natural sweetness and depth.

    Onions:

    • Their aroma deepens as they cook—avoid rushing, let them caramelize slowly.
    • They add a subtle sweetness and a savory backbone to the soup.

    Practical swaps for different dietary needs or flavor twists

    • Dairy-Free: Use coconut cream or cashew cream for richness—adds a subtle nutty sweetness.
    • Gluten-Free: Ensure broth is GF, no flour or thickeners needed.
    • Extra Protein: Toss in some cooked lentils or chickpeas for heartiness.
    • Add Heat: Stir in red pepper flakes or hot sauce for a spicy kick.
    • Herb Variations: Fresh thyme or rosemary can elevate the flavor—use sparingly.

    Equipment & Tools

    • Large heavy-bottomed pot: Even heat distribution for simmering
    • Immersion blender or potato masher: Puree or mash the soup smoothly
    • Cutting board and knife: Prepare vegetables
    • Measuring cups and spoons: Accurate ingredient measurement

    Making the perfect vegan potato soup step-by-step

    1. Peel and chop 4 large potatoes into 2-cm cubes.
    2. Dice 1 onion and 2 cloves of garlic.
    3. In a large pot, heat 2 tbsp olive oil over medium.
    4. Sauté onion and garlic until fragrant, about 3-4 minutes, until translucent.
    5. Add potatoes, cover with 4 cups vegetable broth, bring to a boil.
    6. Reduce heat, simmer for 15-20 minutes, until potatoes are very soft.
    7. Use a potato masher or immersion blender to mash or blend the soup to your preferred texture.
    8. Stir in 1 cup plant-based milk for creaminess, season with salt and pepper.
    9. Let rest for 5 minutes, then taste and adjust seasoning.
    10. Serve hot, with a sprinkle of chopped herbs or a drizzle of olive oil.

    Let the soup sit for 5 minutes to allow flavors to meld. Garnish with herbs or a splash of good olive oil before serving.

    How to Know It’s Done

    • Potatoes should be fork-tender after 15-20 minutes.
    • Soup should be smooth and creamy after blending.
    • Taste and adjust salt and pepper before serving.

    Vegan Potato Soup

    This vegan potato soup combines simple ingredients like potatoes, onions, and garlic, simmered until tender and blended into a creamy, comforting texture. It’s quick to prepare, with the potatoes becoming velvety and the onions adding natural sweetness. The final dish is warm, smooth, and perfect for cozy nights.
    Prep Time 10 minutes
    Cook Time 25 minutes
    Total Time 35 minutes
    Servings: 4
    Course: Main Course
    Cuisine: Vegan
    Calories: 180

    Ingredients
      

    • 4 large potatoes Russet preferred for creaminess
    • 1 onion diced
    • 2 cloves garlic minced
    • 4 cups vegetable broth low-sodium preferred
    • 1 cup plant-based milk almond or oat for added creaminess
    • to taste salt and pepper for seasoning

    Equipment

    • Large heavy-bottomed pot
    • Immersion blender or potato masher
    • Cutting board and knife
    • Measuring cups and spoons

    Method
     

    1. Peel and chop the potatoes into 2-cm cubes, making sure they’re uniform so they cook evenly.
    2. Dice the onion and mince the garlic, setting them aside for sautéing.
    3. Heat the large pot over medium heat and add a splash of oil, then sauté the onion until it starts to soften and become translucent, about 3-4 minutes. The aroma should deepen and the edges might turn a little golden.
    4. Add the minced garlic to the pot and cook for another minute, until fragrant. You’ll notice a rich aroma filling the kitchen.
    5. Stir in the chopped potatoes, coating them with the onion and garlic mixture. Let them cook for a minute to absorb the flavors.
    6. Pour in the vegetable broth, ensuring the potatoes are submerged. Increase the heat to bring the mixture to a gentle boil, with bubbles rising steadily.
    7. Once bubbling, reduce the heat to low and cover the pot. Let it simmer for about 15-20 minutes, or until the potatoes are fork-tender and easily mashable.
    8. Remove the pot from heat. Use an immersion blender to blend the soup until smooth and creamy, or mash the potatoes directly with a potato masher for a chunkier texture. You’ll notice the soup thickening and turning velvety.
    9. Stir in the plant-based milk to add extra creaminess. Season with salt and pepper to taste, tasting and adjusting until perfectly balanced.
    10. Let the soup sit for a few minutes to meld the flavors and cool slightly before serving. It should be warm, smooth, and inviting with a gentle aroma of garlic and onion.
    11. Serve hot, garnished with chopped herbs or a drizzle of olive oil if desired. Enjoy the comforting, velvety texture of your homemade vegan potato soup.

    Helpful tips to perfect your vegan potato soup

    • FLAVOR: Sauté onions and garlic slowly over medium heat until golden for deeper sweetness.
    • EASY THICKEN: Mash some potatoes before blending for a naturally thicker soup.
    • BALANCE TASTE: Add a splash of lemon juice at the end to brighten the flavor.
    • CREAMY TEXTURE: Stir in a bit of plant-based milk just before serving.
    • AVOID STICKINESS: Use a heavy-bottomed pot to prevent potatoes from sticking.

    Common mistakes and how to fix them

    • FORGOT to peel potatoes? Use smaller chunks to cook evenly, or mash skins in for texture.
    • DUMPED too much broth? Reduce heat and simmer longer to thicken, or stir in a spoonful of cornstarch.
    • OVER-TORCHED garlic? Rinse slightly, then start over; garlic burns quickly and turns bitter.
    • SALT too much? Dilute with more broth or a squeeze of lemon to brighten flavors.

    Fast fixes for common soup issues

    • When too thick, splash in hot broth and stir until loosened.
    • If bland, add a pinch of salt and a squeeze of lemon.
    • Splash a little vinegar if the soup tastes dull.
    • Patch overburned garlic with fresh sautéed garlic and onions.
    • Shield from overcooking by removing from heat early, then blending.

    Preparing and storing your soup in advance

    • Peel and chop potatoes ahead, store in water in the fridge for up to 24 hours.
    • The soup can be made 1-2 days in advance, stored in an airtight container in the fridge.
    • Reheat gently on the stove, stirring often until steaming—add a splash of broth if needed.
    • Flavor intensifies over time, so taste before serving and adjust seasonings.

    10 Practical Q&As about Easy Vegan Potato Soup

    1. Can I use different potatoes?

    Use starchy potatoes like Russets for a creamier texture, mash a few before blending.

    2. Can I make this gluten-free?

    Yes, but waxy potatoes like Yukon Gold will make it less thick and more soup-like.

    3. What if it’s too thick?

    Absolutely, it’s naturally gluten-free unless you add flour or thickening agents.

    4. How do I prevent it from sticking to the pot?

    Add a splash of vegetable broth or water while reheating to loosen it up.

    5. Can I add other vegetables?

    Stir regularly and use a heavy-bottomed pot to distribute heat evenly.

    6. Is this soup suitable for batch cooking?

    Yes, carrots or celery work well, just sauté them with the onions.

    7. How do I reheat it?

    Definitely, it stores well in the fridge for 3-4 days, or freeze for up to a month.

    8. Can I make it spicier?

    Gently warm on the stove, stirring often, until hot and steaming.

    9. How do I get a smooth texture?

    Add chili flakes or a dash of hot sauce when blending for a kick.

    Cooking this soup feels like a small act of kindness—something I make when I need to slow down and nourish myself. It’s not fancy, but it’s honest and warm, perfect for those days when you want something simple yet satisfying.

    Sometimes, I leave it chunky, other times I blend it smooth. Either way, it’s a reminder that the best comfort comes from knowing exactly what’s in your bowl.

  • Vegan Lentil Soup Recipe

    This recipe is about more than just making a pot of soup. It’s about capturing that slow, quiet moment of chopping and simmering, feeling the warmth spread from the bubbling pot into your hands and nose. I love how the smell of garlic and cumin can fill a kitchen, stirring up memories of cozy gatherings or quiet evenings alone.

    Lentil soup is one of those humble dishes that, if done right, feels like a warm hug in a bowl. It’s endlessly adaptable, forgiving even when you’re rushing or tired. And there’s a kind of satisfaction in turning simple ingredients into something nourishing and deeply satisfying.

    Focusing on the sensory journey of each bite, from the earthy aroma of lentils to the silky texture of the broth, this recipe explores the soulful simplicity of vegan lentil soup as a comfort food that connects us to home and heritage.

    Why This Simple Soup Means So Much to Me

    • I love how the aroma of cumin and garlic fills my kitchen.
    • It’s a relief to know I can make a filling meal from pantry staples.
    • There’s a nostalgic feeling in cooking this soup that reminds me of family Sunday dinners.
    • I take pride in making this dish completely plant-based and wholesome.

    My Inspiration Behind This Lentil Soup

    • Growing up, lentil soup was a weekly staple in my family’s kitchen. I learned early on that it’s about patience—lettils need time to soften and develop flavor. Now, I find comfort in its slow simmer, knowing each ingredient has a moment to shine.
    • It’s a humble dish, but one that’s adaptable to whatever’s in the fridge. I often toss in a handful of greens or a splash of coconut milk for richness, making it my own. It’s a reminder that simple ingredients, treated with care, can turn into something truly satisfying.
    • This recipe is a nod to those cozy, family-filled Sundays. It’s about nourishing not just the body but the soul, in the simplest, most honest way.

    The Rich History and Fun Facts of Lentil Soup

    • Lentils have been a staple in Middle Eastern and Mediterranean diets for thousands of years.
    • This dish is a modern twist on traditional hearty pulses, adapted for vegan and plant-based eating.
    • The name ‘lentil’ comes from Latin ‘lens,’ referring to the shape of the legume.
    • In some cultures, lentil soup is believed to bring good luck and prosperity when eaten on New Year’s Day.

    Ingredient Notes and Tweak Tips

    • Lentils: I prefer green or brown—they hold shape but soften nicely. Rinse well to remove dust.
    • Onions: They create a sweet base when sautéed. If you’re out, a dash of onion powder works.
    • Carrots: Add sweetness and texture. Use parsnips or sweet potatoes as a swap for a different flavor.
    • Garlic: It’s the aromatherapy of the dish. Use fresh for the best punch; garlic powder can substitute but loses aroma.
    • Cumin: Its earthy, smoky scent is key. Try smoked paprika for a similar depth if you’re out.
    • Tomatoes: They add acidity and brightness. Canned diced work, or fresh in season.
    • Vegetable broth: The backbone of flavor. Water can be a substitute, but you’ll need more seasoning.

    Spotlight on Lentils and Garlic

    Lentils:

    • They soften beautifully, releasing a nutty aroma. Keep an eye to prevent over-mushing.
    • They tend to get mushy if overcooked—timing is everything.
    • They absorb flavors and can be a bit gritty if not rinsed properly.

    Garlic:

    • It’s the fragrant heart of this soup. It transforms from raw sharpness to sweet, mellow goodness when sautéed.
    • During cooking, it should turn golden, releasing a warm, inviting smell.
    • Avoid burning garlic—the bitter taste will ruin your soup.

    Smart Substitutions for Common Ingredients

    • Broth: Water or mushroom stock can step in, though flavor will diminish slightly.
    • Spices: Swap cumin for coriander or turmeric for different warm notes.
    • Vegetables: Swap carrots for sweet potatoes or parsnips for a different sweetness.
    • Herbs: Fresh cilantro or basil can replace parsley for varied freshness.
    • Acid: Lemon juice or vinegar can replace or complement the lemon squeeze at the end.

    Equipment & Tools

    • Large soup pot: To cook the soup evenly
    • Cutting board and knives: Chopping vegetables and herbs
    • Wooden spoon or spatula: Stirring ingredients without damaging non-stick surfaces
    • Immersion blender (optional): Pureeing for creaminess or texture adjustments
    • Measuring spoons and cups: Accurate ingredient measurement

    How to Make Vegan Lentil Soup: A Step-by-Step Guide

    1. Heat a large pot over medium heat, add a splash of oil, and sauté chopped onions and carrots until translucent, about 5 minutes.
    2. Add minced garlic, cumin, and smoked paprika. Cook for another minute until fragrant.
    3. Pour in lentils, vegetable broth, and a can of diced tomatoes (with juices). Bring to a boil.
    4. Reduce heat, cover, and simmer for 25-30 minutes. Check for tenderness—lentils should be soft but not mushy.
    5. Uncover, taste and adjust salt and pepper. If it’s too thick, stir in a bit more broth; if too thin, simmer uncovered for 5-10 more minutes.
    6. For a creamier texture, mash some lentils with the back of a spoon or use an immersion blender briefly.
    7. Finish with a squeeze of lemon and chopped herbs. Serve hot, with crusty bread if you like.

    Let the soup sit for 5 minutes before serving. Garnish with fresh herbs, a drizzle of olive oil, or lemon slices. Serve in warm bowls, paired with crusty bread.

    How to Know It’s Done

    • Lentils should be tender but hold their shape.
    • The broth should be slightly thickened and fragrant.
    • No raw garlic or spices should be detectable; they should be integrated into the aroma.

    Vegan Lentil Soup

    This hearty vegan lentil soup is made by sautéing onions, carrots, garlic, and spices before simmering with lentils and tomatoes until tender. The result is a warm, silky broth with earthy flavors and a thick, comforting texture, perfect for cozy evenings. It’s a nourishing dish that showcases simple ingredients transformed through slow simmering into a satisfying meal.
    Prep Time 10 minutes
    Cook Time 30 minutes
    Total Time 40 minutes
    Servings: 4
    Course: Main Course
    Cuisine: Mediterranean, Middle Eastern
    Calories: 250

    Ingredients
      

    • 1 cup green or brown lentils rinsed
    • 1 large onion chopped
    • 2 carrots carrots diced
    • 3 cloves garlic minced
    • 1 teaspoon ground cumin
    • 1/2 teaspoon smoked paprika
    • 1 can (14 oz) diced tomatoes with juices
    • 4 cups vegetable broth
    • 2 tablespoons olive oil
    • to taste salt and pepper
    • 1 lemon lemon for squeezing
    • a handful fresh parsley chopped, for garnish

    Equipment

    • Large soup pot
    • Cutting board and knives
    • Wooden spoon or spatula
    • Measuring spoons and cups

    Method
     

    1. Heat the olive oil in a large soup pot over medium heat. Add the chopped onion and diced carrots, sautéing until they become tender and fragrant, about 5 minutes, with the vegetables softening and the onions turning translucent.
    2. Add the minced garlic, ground cumin, and smoked paprika to the pot. Cook for about 1 minute, stirring constantly, until the spices release their aroma and the garlic turns golden.
    3. Pour in the rinsed lentils, canned diced tomatoes with their juices, and vegetable broth. Stir everything together, bringing the mixture to a gentle boil over high heat.
    4. Reduce the heat to low, cover the pot, and let the soup simmer gently for 25 to 30 minutes. During this time, the lentils will soften, and the broth will thicken slightly, filling your kitchen with a warm, earthy aroma.
    5. Uncover the pot and check the lentils—they should be tender. Taste the broth and season with salt and pepper as needed, stirring well to incorporate the flavors.
    6. Squeeze fresh lemon juice into the soup to brighten the flavors. Stir in chopped parsley for a fresh, herbal finish. If you prefer a creamier texture, mash a few lentils with the back of a spoon or briefly blend with an immersion blender.
    7. Serve the hot lentil soup in bowls, garnished with extra parsley if desired, alongside crusty bread for a comforting meal. Enjoy the rich aroma and hearty texture that make this dish a true soul-satisfier.

    Cooking Tips & Tricks for Perfect Lentil Soup

    • Sauté vegetables until sweet and fragrant—this builds flavor.
    • Use hot broth to deglaze the pan—captures all those tasty bits.
    • Keep an eye on the lentils—they cook quickly and turn mushy if overdone.
    • Add acid at the end—lemon or vinegar brightens the entire dish.
    • For extra richness, stir in a splash of coconut milk or olive oil just before serving.

    Common Mistakes and How to Fix Them

    • FORGOT TO RINSE LENTILS? Rinse again and simmer longer to avoid grit.
    • DUMPED TOO MUCH SALT? Add a peeled potato to absorb excess salt, then discard.
    • OVER-TORCHED SPICES? Rinse briefly with cold water, then start fresh with new spices.
    • NO time to simmer? Use a pressure cooker to cut cooking time in half.

    Quick Fixes for Common Lentil Soup Woes

    • When too thick, splash in hot water or broth and stir.
    • Splash a dash of vinegar if the soup tastes dull.
    • Patch bland flavor with more garlic or spices.
    • Shield from overcooking by lowering heat immediately.
    • Add a squeeze of lemon for instant brightness.

    Prepping and Storing Your Lentil Soup

    • Chop vegetables a day ahead; store in airtight containers in the fridge for up to 24 hours.
    • Cooked lentil soup keeps well in the fridge for 3-4 days. Reheat gently, stirring often.
    • The flavors deepen overnight, making it even tastier the next day.
    • Freeze in portions for up to 3 months. Thaw overnight in the fridge and reheat until steaming, watching for bubbling edges.

    10 Practical Q&As about Vegan Lentil Soup

    1. Can I use other types of lentils?

    Use green or brown lentils—they hold their shape well and cook faster. Rinse thoroughly to remove dust and small stones.

    2. What if I don’t have onion or garlic?

    Absolutely. Red lentils cook faster and become creamier, perfect if you prefer a softer texture.

    3. How do I fix a too-thin soup?

    Add a teaspoon of onion powder or garlic powder for a similar flavor boost.

    4. My soup is too salty, what now?

    Simmer uncovered for a few more minutes to thicken, or mash some lentils with the back of a spoon.

    5. Can I make this ahead?

    Add a splash of water or a squeeze of lemon to balance the saltiness.

    6. How do I reheat without losing flavor?

    Yes, it tastes better the next day after flavors meld. Store in the fridge for up to 4 days.

    7. What’s a good garnish?

    Gently warm on the stove over low heat, stirring occasionally. Add a little water if it thickens too much.

    8. Is this soup freezer-friendly?

    Chopped fresh herbs like parsley, a drizzle of olive oil, or a squeeze of lemon brighten it up.

    9. Can I make it spicy?

    Yes, freeze in airtight containers for up to 3 months. Thaw overnight in the fridge before reheating.

    10. What if I want it thicker or thinner?

    Add a pinch of red pepper flakes or a dash of hot sauce during cooking for some heat.

    When you finally ladle out that steaming bowl, it’s as if the whole day quiets down. Each spoonful has a depth from the slow simmering, a balance of earthiness and spice that feels grounding.

    This soup isn’t just nourishment; it’s a chance to slow down, to appreciate the small rituals of cooking. Plus, it’s budget-friendly, easy to tweak, and always a little different depending on what’s in your pantry.

  • Roasted Pumpkin Ravioli: A Cozy Fall Treasure with a Rustic Twist

    Roasted Pumpkin Ravioli: A Cozy Fall Treasure with a Rustic Twist

    I’ve always loved the idea of turning seasonal ingredients into handheld comfort. This roasted pumpkin ravioli feels like a warm hug from the kitchen, especially when the air turns crisp outside. It’s a dish that makes you slow down and appreciate the simple joys of good ingredients. Plus, roasting the pumpkin adds a smoky sweetness that’s hard to beat.

    Why This Dish Gets Repeated in My Kitchen

    The balance of smoky roasted pumpkin and tender pasta is addictive. It’s forgiving to tweak—more spices, different herbs, or even a splash of cream. Plus, the process of roasting and shaping feels honest and grounding, making every bite worth the effort. It’s my go-to for chilly nights or when I need a little culinary comfort.

    Breaking Down the Ingredients: What Makes This Dish Shine

    • Pumpkin: Sweet, earthy, and oozy when roasted, it’s the soul of these ravioli. Swap with butternut squash if you prefer a milder flavor.
    • Pasta dough: Simple flour, eggs, and a pinch of salt—easy but needs patience. Use semolina for a firmer bite or gluten-free blend if needed.
    • Nutmeg: A whisper of warm spice that enhances the pumpkin’s sweetness. Skip if you’re not a fan of warm spices.
    • Sage butter: Fragrant, crispy-sage topped butter adds a smoky, salty finish. Fresh sage is best, but thyme is an okay substitute.
    • Olive oil: For blending into the filling and finishing touches. Use good quality for the best flavor.
    • Salt and pepper: Essential, simple seasoning to balance sweetness. Adjust generously—don’t be shy.
    • Lemon zest (optional): Brightens up the filling with a zingy note. Skip if you prefer a more mellow taste.

    Tools of the Trade for Perfect Ravioli

    • Baking sheet: For roasting the pumpkin evenly.
    • Food processor or potato masher: To mash the cooked pumpkin smoothly.
    • Pasta machine or rolling pin: To roll out the dough thinly.
    • Pastry cutter or knife: To cut out ravioli shapes.
    • Large pot: For boiling the ravioli.

    Crafting the Perfect Roasted Pumpkin Ravioli: A Step-by-Step Guide

    Step 1: Preheat your oven to 200°C (390°F).

    Step 2: Cut the pumpkin in half, scoop out seeds, and roast cut-side down on a baking sheet lined with parchment for about 40 minutes.

    Step 3: Once tender and caramelized, scoop out the flesh and mash it smoothly.

    Step 4: Mix the mashed pumpkin with a pinch of nutmeg, salt, and a splash of olive oil to enhance its natural sweetness.

    Cooking Checkpoints and Tips for Best Results

    • The pumpkin flesh should be deeply caramelized and easily mashable.
    • Pasta dough should be smooth and elastic—if it’s sticky, dust with a little more flour.
    • Seal the ravioli edges well; no gaps or leaks, or filling will escape during boiling.

    Common Mistakes and How to Fix Them

    • Filling leaks out during boiling.? If ravioli edges split, press edges together firmly and pinch to seal.
    • Dough feels sticky or tears easily.? Dough too sticky? Knead in a little more flour until workable.
    • Pumpkin becomes mushy or burnt.? Overcooked pumpkin? Reduce roasting time next batch.
    • Filling lacks depth.? Too bland filling? Add a pinch more salt or a dash of lemon zest.

    Roasted Pumpkin Ravioli with Sage Butter

    These roasted pumpkin ravioli showcase tender pasta filled with sweet, smoky pumpkin flesh, crafted through roasting and shaping by hand. The final dish features delicate, golden ravioli coated in fragrant sage butter, creating a comforting and visually appealing meal. Perfect for crisp evenings, the dish combines rich flavors and a tender, satisfying texture.
    Prep Time 20 minutes
    Cook Time 50 minutes
    Total Time 1 hour 10 minutes
    Servings: 4
    Course: Main Course
    Cuisine: Italian
    Calories: 350

    Ingredients
      

    • 1 medium pumpkin halved and seeded
    • 2 cups all-purpose flour plus extra for dusting
    • 2 eggs large eggs
    • 1/2 tsp salt
    • 1/4 tsp nutmeg ground
    • 2 tbsp olive oil for mixing the filling
    • 3 tbsp unsalted butter for sage butter
    • 1 lemon zest optional, for brightness
    • to taste salt and pepper for seasoning

    Equipment

    • Baking sheet
    • Food processor or potato masher
    • Pasta machine or rolling pin
    • Pastry cutter or knife
    • Large pot

    Method
     

    1. Preheat your oven to 200°C (390°F). Place the pumpkin cut-side down on a parchment-lined baking sheet and roast for about 40 minutes, until deeply caramelized and soft.
    2. Once roasted and cool enough to handle, scoop out the tender flesh and mash it until smooth using a food processor or potato masher.
    3. In a small bowl, mix the mashed pumpkin with a pinch of nutmeg, a splash of olive oil, and season with salt and pepper to taste. Add lemon zest if using, for a bright contrast.
    4. On a floured surface, combine the flour, eggs, and salt to form a smooth, elastic pasta dough. Knead for about 8 minutes, then cover and let rest for 20 minutes.
    5. Divide the rested dough into smaller portions and roll each out thinly using a pasta machine or rolling pin, aiming for an even sheet about 1/16 inch thick.
    6. Cut the pasta sheets into rectangles approximately 3×3 inches. Place teaspoon-sized dollops of pumpkin filling along one edge of each rectangle, leaving space around the filling.
    7. Fold the pasta over the filling, pressing out air and sealing the edges tightly to prevent leaks. Use a fork or your fingers to pinch the edges for a secure seal.
    8. Bring a large pot of salted water to a gentle boil. Carefully drop the ravioli in, cooking for about 3-4 minutes until they float to the surface and are tender.
    9. While the ravioli cook, melt the butter in a skillet over medium heat and add the sage leaves. Sauté until crispy and fragrant, about 2 minutes.
    10. Drain the cooked ravioli carefully and add them to the sage butter, tossing gently to coat thoroughly.
    11. Serve the ravioli hot, drizzled with the fragrant sage butter and garnished with additional sage leaves if desired. Enjoy each tender, smoky bite!

    Notes

    Ensure the edges are well sealed to prevent filling from escaping during boiling. Adjust seasoning to taste, and feel free to add a splash of cream or sprinkle of Parmesan for extra richness.
    This ravioli isn’t just about pumpkin; it’s about the cozy chaos of fall in every bite. The roasted flesh offers a smoky depth that balances beautifully with a simple sage butter sauce. Feel free to tweak the seasoning—maybe a dash of cinnamon or a sprinkle of toasted seeds—to make it your own. Dive in with a spoon, and let the flavors surprise you.

  • Roasted Pumpkin Ravioli: A Cozy Fall Treasure with a Rustic Twist

    Roasted Pumpkin Ravioli: A Cozy Fall Treasure with a Rustic Twist

    I’ve always loved the idea of turning seasonal ingredients into handheld comfort. This roasted pumpkin ravioli feels like a warm hug from the kitchen, especially when the air turns crisp outside. It’s a dish that makes you slow down and appreciate the simple joys of good ingredients. Plus, roasting the pumpkin adds a smoky sweetness that’s hard to beat.

    Why This Dish Gets Repeated in My Kitchen

    The balance of smoky roasted pumpkin and tender pasta is addictive. It’s forgiving to tweak—more spices, different herbs, or even a splash of cream. Plus, the process of roasting and shaping feels honest and grounding, making every bite worth the effort. It’s my go-to for chilly nights or when I need a little culinary comfort.

    Breaking Down the Ingredients: What Makes This Dish Shine

    • Pumpkin: Sweet, earthy, and oozy when roasted, it’s the soul of these ravioli. Swap with butternut squash if you prefer a milder flavor.
    • Pasta dough: Simple flour, eggs, and a pinch of salt—easy but needs patience. Use semolina for a firmer bite or gluten-free blend if needed.
    • Nutmeg: A whisper of warm spice that enhances the pumpkin’s sweetness. Skip if you’re not a fan of warm spices.
    • Sage butter: Fragrant, crispy-sage topped butter adds a smoky, salty finish. Fresh sage is best, but thyme is an okay substitute.
    • Olive oil: For blending into the filling and finishing touches. Use good quality for the best flavor.
    • Salt and pepper: Essential, simple seasoning to balance sweetness. Adjust generously—don’t be shy.
    • Lemon zest (optional): Brightens up the filling with a zingy note. Skip if you prefer a more mellow taste.

    Tools of the Trade for Perfect Ravioli

    • Baking sheet: For roasting the pumpkin evenly.
    • Food processor or potato masher: To mash the cooked pumpkin smoothly.
    • Pasta machine or rolling pin: To roll out the dough thinly.
    • Pastry cutter or knife: To cut out ravioli shapes.
    • Large pot: For boiling the ravioli.

    Crafting the Perfect Roasted Pumpkin Ravioli: A Step-by-Step Guide

    Step 1: Preheat your oven to 200°C (390°F).

    Step 2: Cut the pumpkin in half, scoop out seeds, and roast cut-side down on a baking sheet lined with parchment for about 40 minutes.

    Step 3: Once tender and caramelized, scoop out the flesh and mash it smoothly.

    Step 4: Mix the mashed pumpkin with a pinch of nutmeg, salt, and a splash of olive oil to enhance its natural sweetness.

    Cooking Checkpoints and Tips for Best Results

    • The pumpkin flesh should be deeply caramelized and easily mashable.
    • Pasta dough should be smooth and elastic—if it’s sticky, dust with a little more flour.
    • Seal the ravioli edges well; no gaps or leaks, or filling will escape during boiling.

    Common Mistakes and How to Fix Them

    • Filling leaks out during boiling.? If ravioli edges split, press edges together firmly and pinch to seal.
    • Dough feels sticky or tears easily.? Dough too sticky? Knead in a little more flour until workable.
    • Pumpkin becomes mushy or burnt.? Overcooked pumpkin? Reduce roasting time next batch.
    • Filling lacks depth.? Too bland filling? Add a pinch more salt or a dash of lemon zest.

    Roasted Pumpkin Ravioli with Sage Butter

    This roasted pumpkin ravioli features tender pasta pockets filled with caramelized, smoky pumpkin flesh. The dish showcases a balance of sweet, earthy flavors with crispy sage butter, resulting in a comforting, melt-in-your-mouth texture. The process involves roasting, shaping, and boiling the ravioli, culminating in a fragrant, golden finish.
    Prep Time 30 minutes
    Cook Time 50 minutes
    Total Time 1 hour 20 minutes
    Servings: 4
    Course: Main Course
    Cuisine: Italian
    Calories: 420

    Ingredients
      

    • 1 medium pumpkin cut in half
    • 2 tbsp olive oil for roasting and filling
    • 1/4 tsp nutmeg ground
    • 1 tsp salt adjust to taste
    • 1 tsp pepper freshly ground
    • 2 cups all-purpose flour for pasta dough
    • 2 large eggs beaten
    • 1/2 tsp salt for dough
    • 4 tablespoons unsalted butter for sage butter
    • 8 sage leaves fresh sage chopped
    • 1 lemon zest optional, for brightness

    Equipment

    • Baking sheet
    • Food processor or potato masher
    • Pasta machine or rolling pin
    • Pastry cutter or knife
    • Large pot

    Method
     

    1. Preheat your oven to 200°C (390°F). Place the pumpkin halves cut-side down on a parchment-lined baking sheet and roast for about 40 minutes until deeply caramelized and tender.
    2. Once roasted, scoop out the flesh and mash it smoothly using a food processor or potato masher. Mix in a pinch of ground nutmeg, salt, and a tablespoon of olive oil to enhance its natural sweetness and flavor.
    3. In a large bowl, combine the flour, beaten eggs, and a pinch of salt to form a dough. Knead until the dough is smooth and elastic, about 8 minutes. Wrap in plastic and let rest for 30 minutes.
    4. Divide the rested dough into manageable portions and roll out thinly using a pasta machine or rolling pin, aiming for a nearly translucent sheet. Dust with a little flour if it sticks.
    5. Spoon small mounds of pumpkin filling onto one sheet of dough, spacing them evenly. Cover with another sheet of dough and press around each mound to seal, using a pastry cutter or knife to cut out individual ravioli shapes.
    6. Bring a large pot of salted water to a boil. Carefully drop in the ravioli and cook for 3-4 minutes until they float to the surface and are tender.
    7. Meanwhile, melt the butter in a skillet over medium heat. Add the chopped sage leaves and cook until crispy and fragrant, about 2 minutes.
    8. Drain the cooked ravioli gently and transfer to the skillet with sage butter. Toss carefully to coat each piece with the fragrant butter.
    9. Finish by adding lemon zest if desired, and serve immediately, garnished with a few crispy sage leaves for extra flair.

    Notes

    Ensure the ravioli edges are well sealed to prevent filling from escaping during boiling. Feel free to tweak the spice levels or add a splash of cream for extra richness.
    This ravioli isn’t just about pumpkin; it’s about the cozy chaos of fall in every bite. The roasted flesh offers a smoky depth that balances beautifully with a simple sage butter sauce. Feel free to tweak the seasoning—maybe a dash of cinnamon or a sprinkle of toasted seeds—to make it your own. Dive in with a spoon, and let the flavors surprise you.

  • Roasted Pumpkin Ravioli: A Cozy Fall Treasure with a Rustic Twist

    Roasted Pumpkin Ravioli: A Cozy Fall Treasure with a Rustic Twist

    I’ve always loved the idea of turning seasonal ingredients into handheld comfort. This roasted pumpkin ravioli feels like a warm hug from the kitchen, especially when the air turns crisp outside. It’s a dish that makes you slow down and appreciate the simple joys of good ingredients. Plus, roasting the pumpkin adds a smoky sweetness that’s hard to beat.

    Why This Dish Gets Repeated in My Kitchen

    The balance of smoky roasted pumpkin and tender pasta is addictive. It’s forgiving to tweak—more spices, different herbs, or even a splash of cream. Plus, the process of roasting and shaping feels honest and grounding, making every bite worth the effort. It’s my go-to for chilly nights or when I need a little culinary comfort.

    Breaking Down the Ingredients: What Makes This Dish Shine

    • Pumpkin: Sweet, earthy, and oozy when roasted, it’s the soul of these ravioli. Swap with butternut squash if you prefer a milder flavor.
    • Pasta dough: Simple flour, eggs, and a pinch of salt—easy but needs patience. Use semolina for a firmer bite or gluten-free blend if needed.
    • Nutmeg: A whisper of warm spice that enhances the pumpkin’s sweetness. Skip if you’re not a fan of warm spices.
    • Sage butter: Fragrant, crispy-sage topped butter adds a smoky, salty finish. Fresh sage is best, but thyme is an okay substitute.
    • Olive oil: For blending into the filling and finishing touches. Use good quality for the best flavor.
    • Salt and pepper: Essential, simple seasoning to balance sweetness. Adjust generously—don’t be shy.
    • Lemon zest (optional): Brightens up the filling with a zingy note. Skip if you prefer a more mellow taste.

    Tools of the Trade for Perfect Ravioli

    • Baking sheet: For roasting the pumpkin evenly.
    • Food processor or potato masher: To mash the cooked pumpkin smoothly.
    • Pasta machine or rolling pin: To roll out the dough thinly.
    • Pastry cutter or knife: To cut out ravioli shapes.
    • Large pot: For boiling the ravioli.

    Crafting the Perfect Roasted Pumpkin Ravioli: A Step-by-Step Guide

    Step 1: Preheat your oven to 200°C (390°F).

    Step 2: Cut the pumpkin in half, scoop out seeds, and roast cut-side down on a baking sheet lined with parchment for about 40 minutes.

    Step 3: Once tender and caramelized, scoop out the flesh and mash it smoothly.

    Step 4: Mix the mashed pumpkin with a pinch of nutmeg, salt, and a splash of olive oil to enhance its natural sweetness.

    Cooking Checkpoints and Tips for Best Results

    • The pumpkin flesh should be deeply caramelized and easily mashable.
    • Pasta dough should be smooth and elastic—if it’s sticky, dust with a little more flour.
    • Seal the ravioli edges well; no gaps or leaks, or filling will escape during boiling.

    Common Mistakes and How to Fix Them

    • Filling leaks out during boiling.? If ravioli edges split, press edges together firmly and pinch to seal.
    • Dough feels sticky or tears easily.? Dough too sticky? Knead in a little more flour until workable.
    • Pumpkin becomes mushy or burnt.? Overcooked pumpkin? Reduce roasting time next batch.
    • Filling lacks depth.? Too bland filling? Add a pinch more salt or a dash of lemon zest.

    Roasted Pumpkin Ravioli with Sage Butter

    This roasted pumpkin ravioli features tender pasta pillows filled with sweet, caramelized pumpkin flesh, enhanced by warm spices and topped with fragrant sage butter. The process involves roasting pumpkin until deeply caramelized, then shaping and boiling the ravioli until tender, finished with a crispy sage butter sauce for a comforting, visually appealing dish.
    Prep Time 30 minutes
    Cook Time 50 minutes
    Total Time 1 hour 20 minutes
    Servings: 4
    Course: Main Course
    Cuisine: Italian
    Calories: 420

    Ingredients
      

    • 1 medium pumpkin hollowed and seeded
    • 2 ½ cups all-purpose flour plus more for dusting
    • 2 large eggs
    • ¼ teaspoon nutmeg ground
    • 2 tablespoons olive oil divided
    • 1 fresh sage for butter
    • 3 tablespoons unsalted butter for sage butter
    • ½ teaspoon salt
    • freshly ground black pepper
    • 1 teaspoon lemon zest optional, for brightness

    Equipment

    • Baking sheet
    • Food processor or potato masher
    • Rolling pin or pasta machine
    • Pastry cutter or knife
    • Large pot

    Method
     

    1. Preheat your oven to 200°C (390°F). Slice the pumpkin in half, scoop out the seeds, and place cut-side down on a parchment-lined baking sheet. Roast for about 40 minutes until the flesh is deeply caramelized and tender, filling the kitchen with a sweet, roasted aroma.
    2. Once cool enough to handle, scoop out the soft pumpkin flesh and transfer it to a food processor or mash with a potato masher until smooth and creamy, ensuring no lumps remain. Mix in a pinch of nutmeg, a pinch of salt, lemon zest if using, and a tablespoon of olive oil to enhance its natural sweetness and flavor.
    3. In a large bowl, mound the flour and create a well in the center. Crack the eggs into the well, then slowly incorporate the flour into the eggs, kneading gently until a smooth, elastic dough forms. Cover with a damp cloth and let rest for 20 minutes to relax the gluten.
    4. Divide the rested dough into 4 portions. Using a rolling pin or pasta machine, roll each portion out on a floured surface until very thin, about 1/16 inch. Keep the dough dusted with flour to prevent sticking.
    5. Place small spoonfuls of the pumpkin filling about 1 inch apart over half of the pasta sheet. Fold the other half over the filling and press gently around each mound to seal, ensuring no air pockets remain. Cut out individual ravioli with a pastry cutter or knife, sealing edges firmly.
    6. Bring a large pot of salted water to a gentle boil. Carefully drop the ravioli into the water, cooking for about 3-4 minutes until they float to the surface and are tender. Use a slotted spoon to remove and set aside.
    7. Meanwhile, melt the butter in a skillet over medium heat. Add the fresh sage leaves and cook until crispy and fragrant, about 1-2 minutes, then remove from heat. Drizzle half of the sage butter over the cooked ravioli.
    8. Gently toss the drained ravioli in the sage butter, ensuring each piece is coated with the fragrant sauce. Serve immediately, topped with a drizzle of remaining sage butter, cracked black pepper, and extra lemon zest if desired.

    Notes

    For best results, ensure the pasta is rolled very thin and seal ravioli edges well to prevent filling leaks. Feel free to add a splash of cream or sprinkle grated cheese for extra richness. This dish is perfect for fall evenings and makes a cozy, impressive meal.
    This ravioli isn’t just about pumpkin; it’s about the cozy chaos of fall in every bite. The roasted flesh offers a smoky depth that balances beautifully with a simple sage butter sauce. Feel free to tweak the seasoning—maybe a dash of cinnamon or a sprinkle of toasted seeds—to make it your own. Dive in with a spoon, and let the flavors surprise you.

  • Blood-Red Beet Gnocchi: A Rustic, Vibrant Twist on a Classic

    Blood-Red Beet Gnocchi: A Rustic, Vibrant Twist on a Classic

    Gnocchi made with beets feels like a splash of color in the kitchen, a way to elevate a simple dish with natural beauty. The process of roasting and pureeing the beets adds a smoky, earthy sweetness that pairs beautifully with the soft, pillowy gnocchi. It’s a dish that demands patience but rewards with an irresistible, vivid plate.

    Why I keep returning to this recipe

    The vivid color, the earthy sweetness, and the comforting chew make every batch feel like a small celebration. It’s imperfect, often messy, but always satisfying. Plus, it’s a reminder that humble ingredients can create something truly memorable.

    Breaking down the beet and beyond

    • Beets: Deeply earthy, sweet, and vibrant—key for that stunning color and flavor.
    • Egg: Helps bind the dough, adds richness. Substitute with a flax egg for vegan.
    • Ricotta: Creamy and mild, it keeps gnocchi tender. Yogurt works in a pinch.
    • Parmesan: Salty and nutty, enhances flavor. Pecorino can replace for a sharper bite.
    • Flour: Provides structure, but too much makes gnocchi dense. Use just enough to bring it together.
    • Olive oil: Optional for a light drizzle or sauce base. Smells bright and fresh.

    Tools of the trade for vibrant gnocchi preparation

    • Oven: Roasts the beets evenly for deep flavor.
    • Blender or Food Processor: Purees the beets into a smooth, vivid paste.
    • Large Pot: Boils the gnocchi until tender.
    • Slotted Spoon: Removes gnocchi from boiling water gently.
    • Mixing Bowls and Dough Scraper: Helps combine ingredients and handle dough.

    Step-by-step for perfect bloody beet gnocchi

    Step 1: Preheat your oven to 200°C (390°F). Wrap the whole beets in foil and roast for about 50 minutes, or until tender when pierced with a fork.

    Step 2: Peel the beets once cool enough to handle. Puree them in a blender until smooth, the color should be a deep, rich crimson.

    Step 3: In a large bowl, combine the beet puree with 1 egg, 1 cup of ricotta, and 1/2 cup grated Parmesan. Mix well.

    Step 4: Add 2 cups of all-purpose flour gradually, kneading gently until a soft dough forms. If the dough feels sticky, sprinkle in a little more flour.

    Step 5: Divide the dough into four portions. Roll each into a long rope about 1 inch thick. Cut into 1-inch pieces.

    Step 6: Bring a large pot of salted water to a boil. Drop the gnocchi in and cook until they float to the surface, about 2-3 minutes.

    Step 7: Remove with a slotted spoon. They should be firm but tender with a slight bounce.

    Step 8: Optional: Toss with browned butter and sage, or your favorite sauce.

    Step 9: Serve hot, with a sprinkle of extra Parmesan and a drizzle of olive oil.

    Cooking checkpoints that save your gnocchi

    • Beet puree should be smooth and vibrant, not watery or lumpy.
    • Gnocchi dough should hold together without sticking excessively to your hands.
    • Gnocchi float when done, but they should also be tender when you bite into one.
    • Sauce should cling lightly without drowning the gnocchi or making them soggy.

    Common pitfalls and how to fix them

    • Dough feels overly wet or sticky.? Add a bit more flour if dough is too sticky.
    • Gnocchi sink or stay dense.? Cook gnocchi slightly longer if they don’t float.
    • Overcooking leads to a gluey texture.? Reduce heat immediately if gnocchi turn mushy.
    • Gnocchi stick together after cooking.? Toss gnocchi in sauce quickly to prevent sticking.

    Beet Gnocchi

    Beet gnocchi are vibrant, tender dumplings made with roasted beets blended into a smooth puree, combined with ricotta and Parmesan to create a soft, pillowy texture. The dough is gently shaped into small pieces and boiled until they float, resulting in colorful, delicate bites. Served with your favorite sauce, they offer a beautiful and earthy addition to any meal.
    Prep Time 15 minutes
    Cook Time 10 minutes
    Total Time 25 minutes
    Servings: 4
    Course: Main Course
    Cuisine: Italian
    Calories: 250

    Ingredients
      

    • 4 large beets whole, scrubbed
    • 1 cup ricotta cheese or yogurt as a substitute
    • 1/2 cup Parmesan cheese freshly grated
    • 1 large egg or flax egg for vegan
    • 2 cups all-purpose flour plus extra if needed
    • 2 tablespoons olive oil optional, for serving

    Equipment

    • Oven
    • Blender or Food Processor
    • Large pot
    • Slotted spoon
    • Mixing bowls
    • Dough Scraper

    Method
     

    1. Preheat your oven to 200°C (390°F). Wrap each beet in foil and roast for about 50 minutes until tender when pierced with a fork.
    2. Once cooled slightly, peel the beets using your hands or a paper towel to remove the skin, revealing the deep red flesh.
    3. Puree the peeled beets in a blender or food processor until smooth and vibrant in color, ensuring there are no lumps.
    4. In a large mixing bowl, combine the beet puree with the egg, ricotta, and grated Parmesan. Mix gently until well incorporated.
    5. Gradually add the flour to the mixture, folding and kneading gently until a soft dough forms. If it feels sticky, sprinkle in a little more flour.
    6. Divide the dough into four equal portions. Roll each portion into a long rope approximately 1 inch in diameter on a lightly floured surface.
    7. Cut each rope into 1-inch pieces, creating the gnocchi shape, and place them on a floured tray to prevent sticking.
    8. Bring a large pot of salted water to a boil. Drop the gnocchi in batches, cooking until they float to the surface, about 2-3 minutes.
    9. Use a slotted spoon to remove the cooked gnocchi, and transfer them to a serving dish. They should be tender with a slight bounce when pressed.
    10. Optional: Toss the warm gnocchi with a drizzle of olive oil or your preferred sauce, and garnish with extra Parmesan if desired.
    11. Serve immediately, enjoying the vibrant color and earthy sweetness of these beautiful beet gnocchi.

    Notes

    Ensure the beet puree is smooth and not watery. Handle the dough gently to keep gnocchi light and tender. Adjust flour as needed for perfect consistency.
    This dish is a riot of color and flavor, a reminder that even humble ingredients like beets can shine. Gnocchi like this make me feel connected to the earth and the seasons, a simple pleasure that’s full of surprises. Enjoy customizing with your favorite herbs, nuts, or a splash of vinegar for brightness. It’s a messy, joyful process, but the result is worth every bit of effort.

  • Jack O’ Lantern Burgers: A Playful Twist for Fall Gatherings

    Jack O’ Lantern Burgers: A Playful Twist for Fall Gatherings

    Jack O’ Lantern Burgers are more than just a Halloween joke; they’re a celebration of autumn’s bounty and playful spirit. I love how a simple burger can be turned into a visual treat that sparks conversations and giggles. It’s a chance to get creative with textures and colors, turning everyday ingredients into something memorable.

    Why I keep coming back to this recipe

    The playful spirit and burst of flavors make every fall gathering special. It’s a simple way to surprise friends and family, sparking joy and nostalgia at the same time. Plus, it’s forgiving—perfect for casual cooks who want to impress without fuss.

    Breaking down the ingredients

    • Ground beef: Juicy, flavorful, and ideal for quick searing. Opt for 80/20 for tenderness.
    • Carrots: Sweet and crunchy, these mimic pumpkin ridges. Use heirloom or standard carrots.
    • Burger buns: Soft but sturdy, toasted lightly for contrast. Brioche or potato buns work well.
    • Cheese slices: Mild cheddar or American melt nicely, adding gooeyness.
    • Lemon or smoked paprika: Lemon brightens the flavors, paprika adds smoky depth.
    • Ketchup or spicy mustard: A tangy finish that balances the savory richness.
    • Vegetable toppings (lettuce, tomato): Fresh and crisp, to contrast the cooked components.

    Tools & equipment you’ll need

    • Grill or skillet: To cook the burger patties evenly with a good sear.
    • Sharp knife: For slicing vegetables and shaping the pumpkin-like toppings.
    • Toaster or oven: To lightly toast the buns for extra crunch.
    • Spatula: To flip the burgers safely and evenly.
    • Meat thermometer: To check that the patties reach safe internal temperature.

    Step-by-step to craft the perfect Jack O’ Lantern Burgers

    Step 1: Start by preparing your veggie toppings. Slice bright orange carrots into thin rounds to mimic pumpkin ridges.

    Step 2: Heat a grill or skillet to medium-high (about 190°C/375°F).

    Step 3: Form your burger patties—don’t overwork the meat, keep it tender.

    Step 4: Cook the patties for 4-5 minutes per side, until nicely browned and slightly charred.

    Step 5: While they cook, toast burger buns lightly, about 1-2 minutes, until golden.

    Step 6: Assemble your burgers: place the patty on the bun, add cheese, then stack with your pumpkin-inspired toppings.

    Step 7: Use a squeeze of lemon or a dash of smoky paprika for extra punch.

    Step 8: Finish with a playful squirt of ketchup or a smear of spicy mustard.

    Cooking checkpoints & tips for best results

    • Meat should be cooked to an internal temperature of 71°C/160°F for safety.
    • Patty edges should be crisp and caramelized, with a juicy center.
    • Buns should be toasted lightly, not burnt, for a perfect crunch and warmth.

    Common mistakes & how to fix them

    • Not enough oil, causing sticking and tearing.? If the burger sticks to the pan, add a little oil or butter to the surface.
    • Cheese not melting fast enough.? If the cheese isn’t melting, cover the pan briefly or increase heat slightly.
    • Overtoasted buns.? If buns burn before toasting, lower the heat or toast for less time.
    • Thick, undercooked center.? If the patties are too thick, gently press down to flatten slightly.

    Jack O’ Lantern Burgers

    Jack O’ Lantern Burgers transform classic beef patties into playful, pumpkin-inspired treats perfect for autumn gatherings. Juicy burgers topped with melty cheese and vibrant carrot ridges are assembled on toasted buns to create a fun and flavorful dish with a festive appearance. The final result is a crunchy, cheesy burger with colorful toppings that sparks joy and conversation.
    Prep Time 15 minutes
    Cook Time 10 minutes
    Total Time 25 minutes
    Servings: 4
    Course: Main Course
    Cuisine: American
    Calories: 450

    Ingredients
      

    • 1 lb ground beef 80/20 for tenderness
    • 4 burger buns brioche or potato buns recommended
    • 4 slice cheese slices cheddar or American
    • 2 large carrots orange, for pumpkin ridges
    • to taste lemon or smoked paprika for flavor enhancement
    • to taste ketchup or spicy mustard for finishing touch
    • as needed vegetable toppings (lettuce, tomato) optional, for added freshness

    Equipment

    • Grill or skillet
    • Sharp knife
    • Toaster or oven
    • Spatula
    • Meat thermometer

    Method
     

    1. Slice the carrots into thin rounds, then cut some into smaller ridges to mimic pumpkin textures; set aside.
    2. Preheat your grill or skillet to a medium-high heat until it’s hot and slightly smoky.
    3. Gently divide the ground beef into four equal portions and shape each into a patty, being careful not to overwork the meat for tenderness.
    4. Place the patties on the hot grill or skillet, cooking for about 4-5 minutes per side until they develop a deep brown sear and reach an internal temperature of 71°C/160°F.
    5. While the patties cook, lightly toast the burger buns in a toaster or oven until golden, about 1-2 minutes.
    6. Place a slice of cheese on each hot burger patty, allowing it to melt slightly as you prepare to assemble.
    7. Arrange the carrot slices and ridges on each toasted bun to resemble pumpkin features, creating a fun, festive look.
    8. Set the cooked patties with melted cheese onto the prepared bun bottoms, atop the carrot decorations.
    9. Squeeze a dash of lemon or sprinkle smoked paprika over the toppings to add brightness and smoky depth.
    10. Finish by adding fresh vegetable toppings like lettuce and tomato if desired, then cap with the top bun.
    11. Serve immediately with a dollop of ketchup or spicy mustard for a flavorful finishing touch.

    Notes

    Ensure the carrots are sliced thin enough to mimic pumpkin ridges and can be easily shaped for decoration. Keep a close eye on the buns while toasting to prevent burning. Use a meat thermometer for perfect doneness of the patties.
    This recipe turns ordinary burgers into a festive spectacle. It’s a fun, imperfect process—don’t worry if your pumpkin slices aren’t perfect or the cheese melts a little unevenly. The joy is in the chaos, the smell of sizzling meat, and the look on everyone’s face when they see your spooky, tasty creation. Keep it casual, and let the fall vibes do the rest.

  • Spooky Stuffed Peppers: A Halloween-Inspired Snack with a Twist

    Spooky Stuffed Peppers: A Halloween-Inspired Snack with a Twist

    Halloween is creeping closer, and I find myself craving something playful yet satisfying. These spooky stuffed peppers hit that sweet spot — a little eerie, a little cozy, all about bold flavors and fun presentation. They’re perfect for a casual gathering or a solo dinner when you want something festive.

    Why I Keep Coming Back to This Recipe

    It’s endlessly customizable and always a conversation starter, especially around Halloween. The combination of smoky, cheesy, and slightly spicy flavors keeps me intrigued. Plus, the playful presentation makes it feel like a treat for both kids and adults. I love how simple ingredients turn into something unexpectedly fun and satisfying.

    Breaking Down the Key Ingredients

    • Bell Peppers:: Sweet, crunchy, and vibrant, they form the spooky vessel. Swap for zucchini boats if peppers aren’t your thing.
    • Ground Meat or Plant Mince:: Adds savory richness and substance. Use lentils or tofu for a vegetarian twist.
    • Cooked Rice:: Gives bulk and helps everything stick together. Cauliflower rice works if you want less carbs.
    • Cheese:: Melty, gooey, with a smoky edge if you choose smoked varieties. Cheddar or mozzarella are classics.
    • Smoked Paprika:: Adds a deep smoky flavor that screams fall. Substitute with chipotle powder for extra heat.
    • Onion & Garlic:: Fundamental aromatics that build flavor. Shallots can be a milder alternative.

    Tools & Equipment for Spooky Stuffed Peppers

    • Oven: Bakes the peppers evenly and crisps up the cheese.
    • Skillet: Sautés the aromatics and cooks the filling.
    • Knife: Preps the peppers and ingredients.
    • Spoon: Fills the peppers neatly.
    • Baking dish: Holds the peppers during baking.

    How to Make Spooky Stuffed Peppers: Step-by-Step

    Step 1: Preheat your oven to 200°C (390°F).

    Step 2: Slice the tops off 4 large bell peppers, scoop out seeds and membranes.

    Step 3: In a skillet, heat a splash of oil over medium heat. Sauté 1 chopped onion until translucent, about 5 minutes.

    Step 4: Add 200g ground beef or plant-based mince, cook until browned, about 7 minutes.

    Step 5: Stir in 1 cup cooked rice, ½ cup shredded cheese, and a dash of smoked paprika. Mix well.

    Step 6: Stuff the peppers generously with the filling, pressing down slightly.

    Step 7: Place peppers in a baking dish, cover with foil.

    Step 8: Bake for 25-30 minutes, until peppers are tender and filling is bubbling.

    Step 9: Remove foil, sprinkle extra cheese on top, bake uncovered for 5 more minutes.

    Step 10: Let rest 5 minutes before serving. Garnish with chopped parsley or jalapeños.

    Cooking Checkpoints & Tips for Perfect Spooky Stuffed Peppers

    • Peppers should be tender but not mushy after baking.
    • Filling should be hot and bubbling when you take them out.
    • Cheese on top should be golden and crispy, not burnt.

    Common Mistakes & How to Fix Them

    • Peppers tear when slicing.? USE A sharper knife for easier cutting.
    • Cheese over-browns too quickly.? Cover with foil to prevent burning.
    • Filling is undercooked or dry.? Lower oven temperature slightly.
    • Onions stay raw and harsh.? Sauté onions longer if they smell raw.

    Spooky Stuffed Peppers

    These vibrant bell peppers are filled with a savory mixture of ground meat, rice, cheese, and smoky spices, then baked until tender and bubbling. The final dish features a crispy cheese topping and a colorful, playful presentation perfect for Halloween gatherings or festive dinners. The process involves stuffing the peppers and baking to achieve a cheesy, slightly crispy exterior with a flavorful, tender interior.
    Prep Time 15 minutes
    Cook Time 35 minutes
    Total Time 50 minutes
    Servings: 4
    Course: Main Course
    Cuisine: American
    Calories: 350

    Ingredients
      

    • 4 large bell peppers preferably colorful for visual flair
    • 1 whole onion chopped
    • 200 g ground meat beef, chicken, or plant-based
    • 1 cup cooked rice white, brown, or cauliflower rice for low carb
    • 0.5 cup shredded cheese cheddar or mozzarella, plus extra for topping
    • 1 tsp smoked paprika for smoky flavor
    • 2 cloves garlic minced
    • 1 tbsp oil for sautéing

    Equipment

    • Oven
    • Skillet
    • Knife
    • Spoon
    • Baking dish

    Method
     

    1. Preheat your oven to 200°C (390°F). Slice the tops off each bell pepper and carefully scoop out the seeds and membranes, creating a hollow cavity for the filling.
    2. Heat a splash of oil in a skillet over medium heat. Add the chopped onion and sauté for about 5 minutes until it becomes translucent and fragrant.
    3. Add the ground meat to the skillet. Cook, breaking it apart with a spoon, until browned and cooked through, about 7 minutes.
    4. Stir in the minced garlic and smoked paprika, cooking for another minute until fragrant. Then, fold in the cooked rice and half of the shredded cheese, mixing well to combine.
    5. Use a spoon to generously stuff each hollowed-out pepper with the filling, pressing down slightly to pack it in.
    6. Arrange the stuffed peppers upright in a baking dish. Cover the dish with foil to trap heat and moisture.
    7. Bake the peppers for 25 to 30 minutes until they are tender and the filling is bubbling and hot.
    8. Remove the foil, sprinkle the remaining cheese over the tops of the peppers, and bake uncovered for an additional 5 minutes until the cheese is golden and crispy.
    9. Take the peppers out of the oven and let them rest for a few minutes. Garnish with chopped parsley or jalapeños for extra flair and heat.

    Notes

    For an extra spooky touch, cut out small shapes like bats or ghosts from cheese and place them on top during the final baking step. Feel free to customize the filling with your favorite ingredients or spice levels.
    These peppers are a fun way to elevate your usual snack game, especially if you’re into playful, slightly eerie food. They look impressive but are straightforward to prep, with a cozy, smoky aroma filling the kitchen. Feel free to swap ingredients to suit your taste or what’s in the fridge. Enjoy making these with a little bit of chaos and a lot of flavor.